什麼是css3的flexbox
flexbox的意思為“彈性盒子”,是CSS3引入的新的佈局模式,是一種可伸縮的靈活的web頁面佈局方式;Flexbox佈局模式能夠擴展和收縮flex容器內的元素,以最大限度地填滿可用空間。
本教學操作環境:windows7系統、CSS3&&HTML5版、Dell G3電腦。
Flexbox是Flexible box 的簡稱(靈活的盒子容器),是CSS3引入的新的佈局模式,一種可伸縮的靈活的web頁面佈局方式。它決定了元素如何在頁面上排列,使它們能在不同的螢幕尺寸和裝置下可預測地展現出來。
Flexbox具有強大的功能,可以輕鬆實現很多複雜佈局,在它出現之前,我們經常使用的佈局方式是浮動或固定寬度 百分比來進行佈局,程式碼量較大且難以理解。
flex佈局之所以被稱為 Flexbox ,是因為它能夠擴展和收縮 flex 容器內的元素,以最大限度地填充可用空間。與先前佈局方式(如table 佈局和浮動元素內嵌塊元素)相比,Flexbox 是一個更強大的方式:
- ##在不同方向排列元素
- #重新排列元素的顯示順序
- 更改元素的對齊方式
- 動態地將元素裝入容器
display: flex;
nbsp;html>


    <meta>
    <meta>
    <meta>
    <title>Document</title>

<style>
    *{
        margin: 0;
        padding: 0;
    }
    .flex-container{
        background-color: #131111;
        display: flex; /*让这个div变成弹性盒子*/
    }
    .flex-container .flex-item{
        padding: 20px;
        background-color: #b1ff84;
    }
    .flex-container .flex-item:first-child{
        background-color: #f5e25f;
    }
    .flex-container .flex-item:last-child{
        background-color: #0B5A79;
    }
</style>

    <div>
        <div>1</div>
        <div>2</div>
    </div>
 ##相當於兩個div自動向左浮動,預設情況下,所有的直接子元素都被認為是flex 項,並從左到右依序排列在一行中。如果 flex 項的寬度總和大於容器,那麼 flex 項將按比例縮小,直到它們適應 flex 容器寬度。
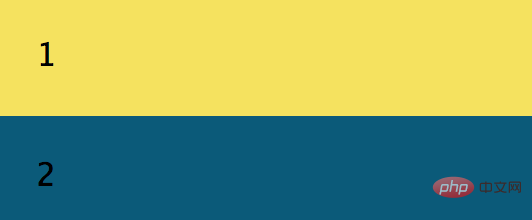
也可以將這個兩個子div排成一列,在.flex-container新增:flex-direction: column;
運行效果:
<!DOCTYPE html>
<html>
<head>
    <meta charset="UTF-8">
    <meta name="viewport" content="width=device-width, initial-scale=1.0">
    <meta http-equiv="X-UA-Compatible" content="ie=edge">
    <title>Document</title>
</head>
<style>
    *{
        margin: 0;
        padding: 0;
    }
    .flex-container{
        background-color: #131111;
        display: flex;  /*让这个div变成弹性盒子*/
        justify-content: flex-end;
    }
    .flex-container .flex-item{
        padding: 20px;
        background-color: #b1ff84;
    }
    .flex-container .flex-item:first-child{
        background-color: #f5e25f;
    }
    .flex-container .flex-item:last-child{
        background-color: #0B5A79;
    }
</style>
<body>
    <div>
        <div>1</div>
        <div>2</div>
    </div>
</body>
</html>

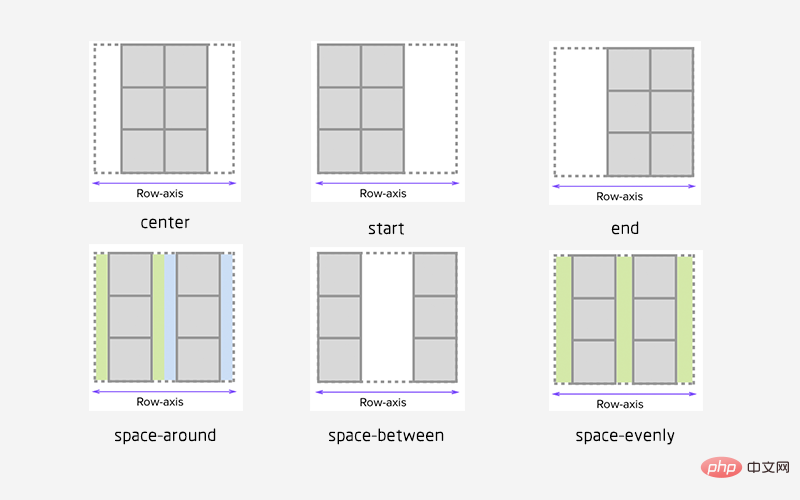
space-evenly: flex 容器起始邊緣和第一個flex 項之間的間距和每個相鄰flex 項之間的間距是相等。 (愚人碼頭註:這個屬性以前很少看到,原因是以前瀏覽器不支持,chrome 也是60 版本之後才支持。延伸一下,align-content: space-evenly 也是這個邏輯 )
space-between : 任何兩個相鄰flex 項之間的間距是相同的,但不一定等於第一個/最後一個flex 項與flex容器邊緣之間的間距;起始邊緣和第一個項目之間的間距和末端邊緣和最後一個項目之間的間距是相等的。 space-around : flex 容器中的每個 flex 項的每一邊間距都是相等的。請注意,這意味著兩個相鄰flex 項之間的空間將是第一個/最後一個flex 項與其最近邊緣之間的空間的兩倍
<!DOCTYPE html>
<html>
<head>
    <meta charset="UTF-8">
    <meta name="viewport" content="width=device-width, initial-scale=1.0">
    <meta http-equiv="X-UA-Compatible" content="ie=edge">
    <title>Document</title>
</head>
<style>
    *{
        margin: 0;
        padding: 0;
    }
    .flex-container{
        background-color: #131111;
        display: flex;  /*让这个div变成弹性盒子*/
        justify-content: center;
        align-items: center;
    }
    .flex-container .flex-item{
        padding: 20px;
        background-color: #b1ff84;
    }
    .flex-container .flex-item:first-child{
        background-color: #f5e25f;
    }
    .flex-container .flex-item:last-child{
        background-color: #0B5A79;
    }
    .flex-bottom{
        /* 让这个div向上 */
        align-self: flex-start;
    }
</style>
<body>
    <div>
        <!-- 多加个class属性,方便指定 -->
        <div class="flex-item flex-bottom">1</div>
        <div>2 <br />2 <br/></div>
        <div>3 <br />3<br />3</div>
    </div>
</body>
</html>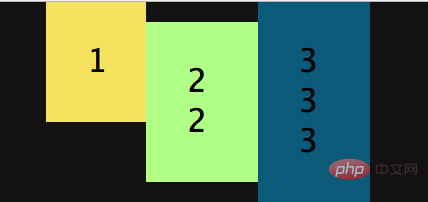
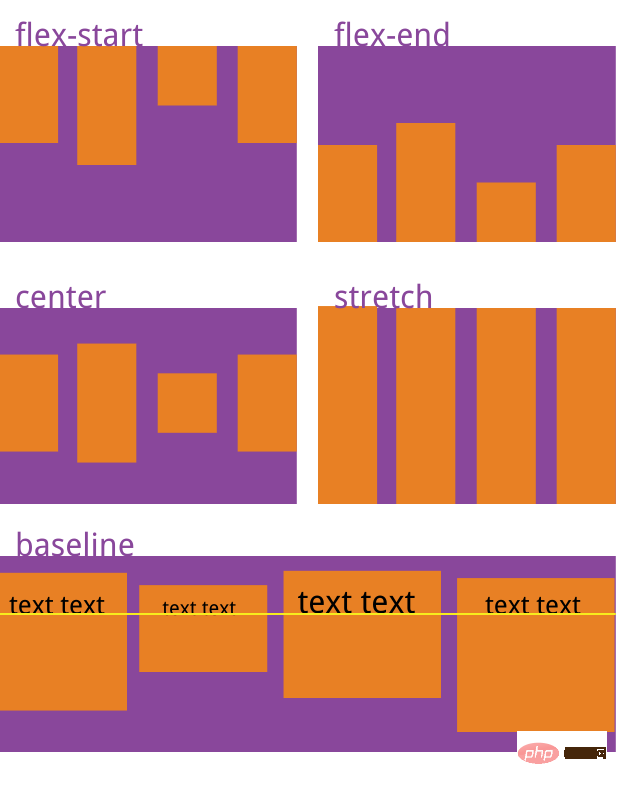
flex-start | flex-end | center | baseline | stretch;
下圖就是對應的效果:
    .flex-container{
        background-color: #131111;
        display: flex;
        flex-wrap: wrap;
}默认情况下, flex 项不允许多行/列排列(nowrap),如果 flex 容器尺寸对于所有 flex 项来说不够大,那么flex 项将被调整大小以适应单行或列排列。
通过添加 flex-wrap: wrap ,可以将溢出容器的 flex 项将被排列到另一行/列中,它也有三个取值:
nowrap(默认):不换行.

wrap:换行,第一行在上方

wrap-reverse:换行,第一行在下方

插入一段代码,看下效果:
<!DOCTYPE html>
<html>
<head>
    <meta charset="UTF-8">
    <meta name="viewport" content="width=device-width, initial-scale=1.0">
    <meta http-equiv="X-UA-Compatible" content="ie=edge">
    <title>Document</title>
</head>
<style>
    *{
        margin: 0;
        padding: 0;
    }
    .flex-container{
        background-color: #131111;
        display: flex;
        flex-wrap: wrap;
        justify-content: space-evenly;/**/
        align-content: space-evenly;
    }
    .flex-container .flex-item{
        padding: 20px;
        background-color: #b1ff84;
    }
    .flex-container .flex-item:first-child{
        background-color: #f5e25f;
    }
    .flex-container .flex-item:last-child{
        background-color: #0B5A79;
    }
    .flex-bottom{
        /* 让这个div向下 */
        align-self: stretch;
    }
</style>
<body>
    <div>
        <!-- 多加个class属性,方便指定 -->
        <div>1</div>
        <div>2</div>
        <div>3</div>
        <div>4</div>
        <div>5</div>
        <div>6</div>
        <div>7</div>
        <div>8</div>
        <div>9</div>
        <div>10</div>
    </div>
</body>
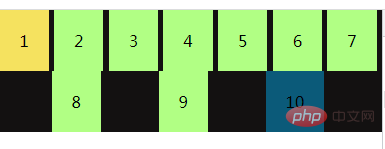
</html>运行效果:
当长度不够长时,自动换行:

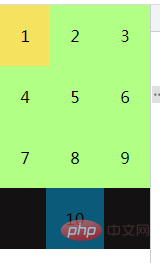
当长度再短时:

拉伸 flex 项
flex-grow 只有在 flex 容器中有剩余空间时才会生效。flex 项的 flex-grow 属性指定该 flex 项相对于其他 flex 项将拉伸多少,以填充 flex 容器。默认值为1。当设置为 0 时,该 flex 项将不会被拉伸去填补剩余空间。在这个例子中,两个项的比例是 1:2,意思是在被拉伸时,第一个 flex 项将占用 1/3,而第二个 flex 项将占据余下的空间,flex-grow控制的是flex项的拉伸比例,而不是占据 flex 容器的空间比例。
<!DOCTYPE html>
<html>
<head>
    <meta charset="UTF-8">
    <meta name="viewport" content="width=device-width, initial-scale=1.0">
    <meta http-equiv="X-UA-Compatible" content="ie=edge">
    <title>Document</title>
</head>
<style>
    *{
        margin: 0;
        padding: 0;
    }
    .flex-container{
        background-color: #131111;
        display: flex;
    }
    .flex-item1{flex-grow: 0;}
    .flex-item2{flex-grow: 1;}
    .flex-item3{flex-grow: 2;}
    .flex-container{
        width:400px;
        padding:10px;
        background-color: #F0f0f0;
      }
      .flex-container .flex-item{
        padding:20px 0;
        text-align: center;
        width:90px;
        background-color: #B1FF84;
      }
      .flex-container .flex-item:first-child{
        background-color: #F5DE25;
      }
      .flex-container .flex-item:last-child{
        background-color: #90D9F7;
      }

</style>
<body>
        <div>
                <div class="flex-item flex-item1">1</div>
                <div class="flex-item flex-item2">2</div>
                <div class="flex-item flex-item3">3</div>
              </div>
</body>
</html>我将三个div全部设为width:90px;
运行效果:


将flex-container的width变为600时:


可以看出2 3 以不同的比例在填充剩余的空间,grow-shrink则是相反的,默认为1,即如果空间不足,该项目将缩小。
以上是什麼是css3的flexbox的詳細內容。更多資訊請關注PHP中文網其他相關文章!

熱AI工具

Undresser.AI Undress
人工智慧驅動的應用程序,用於創建逼真的裸體照片

AI Clothes Remover
用於從照片中去除衣服的線上人工智慧工具。

Undress AI Tool
免費脫衣圖片

Clothoff.io
AI脫衣器

Video Face Swap
使用我們完全免費的人工智慧換臉工具,輕鬆在任何影片中換臉!

熱門文章

熱工具

記事本++7.3.1
好用且免費的程式碼編輯器

SublimeText3漢化版
中文版,非常好用

禪工作室 13.0.1
強大的PHP整合開發環境

Dreamweaver CS6
視覺化網頁開發工具

SublimeText3 Mac版
神級程式碼編輯軟體(SublimeText3)
 純CSS3怎麼實現波浪效果? (程式碼範例)
Jun 28, 2022 pm 01:39 PM
純CSS3怎麼實現波浪效果?這篇文章就來跟大家介紹一下使用 SVG 和 CSS 動畫來製作波浪效果的方法,希望對大家有幫助!
 css怎麼隱藏元素但不佔空間
Jun 01, 2022 pm 07:15 PM
兩種方法:1、利用display屬性,只要為元素加上「display:none;」樣式即可。 2.利用position和top屬性設定元素絕對定位來隱藏元素,只需為元素加上「position:absolute;top:-9999px;」樣式。
 css3怎麼實現花邊邊框
Sep 16, 2022 pm 07:11 PM
在css中,可以利用border-image屬性來實作花邊邊框。 border-image屬性可以使用圖片來建立邊框,即給邊框加上背景圖片,只需要將背景圖片指定為花邊樣式即可;語法「border-image: url(圖片路徑) 向內偏移值圖像邊界寬度outset 是否重複;」。
 原來利用純CSS也能實現文字輪播與圖片輪播!
Jun 10, 2022 pm 01:00 PM
怎麼製作文字輪播與圖片輪播?大家第一想到的是利用js,其實利用純CSS也能實現文字輪播與圖片輪播,下面來看看實作方法,希望對大家有幫助!
 css3怎麼設定動畫旋轉速度
Apr 28, 2022 pm 04:32 PM
在css3中,可以利用「animation-timing-function」屬性來設定動畫旋轉速度,該屬性用於指定動畫將如何完成一個週期,設定動畫的速度曲線,語法為「元素{animation-timing-function:速度屬性值;}」。
 CSS 佈局屬性最佳化技巧:position sticky 和 flexbox
Oct 20, 2023 pm 03:15 PM
CSS版面配置屬性最佳化技巧:positionsticky和flexbox在網頁開發中,版面是一個非常重要的面向。良好的佈局結構可以提高使用者體驗,使頁面更加美觀和易於導航。而CSS佈局屬性則是達成此目標的關鍵。在本文中,我將介紹兩種常用的CSS佈局屬性最佳化技巧:positionsticky和flexbox,並提供特定的程式碼範例。一、positions
 H5中position屬性的靈活運用技巧
Dec 27, 2023 pm 01:05 PM
H5中如何靈活運用position屬性在H5開發中,常會涉及到元素的定位和佈局問題。這時候,CSS的position屬性就會發揮作用。 position屬性可以控制元素在頁面中的定位方式,包括相對定位(relative)、絕對定位(absolute)、固定定位(fixed)和黏附定位(sticky)。本文將詳細介紹在H5開發中如何靈活運用position屬性


