淺析vue中的生命週期鉤子mounted
本篇文章带大家了解一下vue中的生命周期钩子,介绍一下vue中的mounted钩子,希望对大家有所帮助!

注:阅读本文需要对vue的patch流程有较清晰的理解,如果不清楚patch流程,建议先了解清楚这个流程再阅读本文,否则可能会感觉云里雾里。【相关推荐:vuejs视频教程】
聊之前我们先看一个场景
<div id="app">
    <aC />
    <bC />
</div>如上所示,App.vue文件里面有两个子组件,互为兄弟关系
组件里面自各有created和mounted两个生命周期钩子,a表示组件名 C是created的缩写
// a组件
created() {
    console.log('aC')
  },
mounted() {
  debugger
  console.log('aM')
},

// b组件
created() {
    console.log('bC')
  },
mounted() {
  debugger
  console.log('bM')
},请问打印顺序是什么?各位读者可以先脑补一下,后面看看对不对。
如果对vue patch流程比较熟悉的读者,可能会认为顺序是aC→aM→bC→BM,也就是a组件先创建,再挂载,然后到b组件重复以上流程。因为从patch的方法里面可以知道,组件created后,再走到insert进父容器的过程,是一个同步的流程,只有这个流程走完后,才会遍历到b组件,走b组件的渲染流程。
实际上浏览器打印出来的顺序是aC→bC→aM→bM,也就是两个created先执行,才到mounted执行,和上面的分析相悖。这里先说原因,子组件从created到insert进父容器的过程还是同步的,但是insert进父容器后,也可以理解为子组件mounted,并没有马上调用mounted生命周期钩子。下面从源码角度分析一下:
先大概回顾一下子组件渲染流程,patch函数调用createElm创建真实element,createElm里面通过createComponent判断当前vnode是否组件vnode,是则进入组件渲染流程
function createComponent (vnode, insertedVnodeQueue, parentElm, refElm) {
    var i = vnode.data;
    if (isDef(i)) {
      var isReactivated = isDef(vnode.componentInstance) && i.keepAlive;
      if (isDef(i = i.hook) && isDef(i = i.init)) {
        i(vnode, false /* hydrating */);
      }
      if (isDef(vnode.componentInstance)) {
        initComponent(vnode, insertedVnodeQueue);
				// 最终组件创建完后会走到这里 把组件对应的el插入到父节点
        insert(parentElm, vnode.elm, refElm);
        if (isTrue(isReactivated)) {
          reactivateComponent(vnode, insertedVnodeQueue, parentElm, refElm);
        }
        return true
      }
    }
}createComponent里面就把组件对应的el插入到父节点,最后会返回到patch调用栈,调用
invokeInsertHook(vnode, insertedVnodeQueue, isInitialPatch);
因为子组件有vnode.parent所以会走一个分支,但是我们也看看第二个分支调用的insert是什么
function invokeInsertHook (vnode, queue, initial) {
    // delay insert hooks for component root nodes, invoke them after the
    // element is really inserted
    if (isTrue(initial) && isDef(vnode.parent)) {
      vnode.parent.data.pendingInsert = queue;
    } else {
      for (var i = 0; i < queue.length; ++i) {
        queue[i].data.hook.insert(queue[i]);
      }
    }
}这个insert是挂在vnode.data.hook上,在组件创建过程中,createComponent方法里面有一个调用
installComponentHooks,在这里把insert钩子注入了。这个方法实际定义在componentVNodeHooks对象里面,可以看到这个insert里面调用了callHook(componentInstance, 'mounted'),这里实际上就是调用子组件的mounted生命周期。
insert: function insert (vnode) {
    var context = vnode.context;
    var componentInstance = vnode.componentInstance;
    if (!componentInstance._isMounted) {
      componentInstance._isMounted = true;
      callHook(componentInstance, 'mounted');
    }
    if (vnode.data.keepAlive) {
      if (context._isMounted) {
        // vue-router#1212
        // During updates, a kept-alive component's child components may
        // change, so directly walking the tree here may call activated hooks
        // on incorrect children. Instead we push them into a queue which will
        // be processed after the whole patch process ended.
        queueActivatedComponent(componentInstance);
      } else {
        activateChildComponent(componentInstance, true /* direct */);
      }
    }
},再来看看这个方法,子组件走第一个分支,仅仅执行了一行代码vnode.parent.data.pendingInsert = queue , 这个queue实际是在patch 开始时候,定义的insertedVnodeQueue。这里的逻辑就是把当前的insertedVnodeQueue,挂在parent的vnode data的pendingInsert上。
function invokeInsertHook (vnode, queue, initial) {
    // delay insert hooks for component root nodes, invoke them after the
    // element is really inserted
    if (isTrue(initial) && isDef(vnode.parent)) {
      vnode.parent.data.pendingInsert = queue;
    } else {
      for (var i = 0; i < queue.length; ++i) {
        queue[i].data.hook.insert(queue[i]);
      }
    }
  }

// 在patch 开始时候 定义了insertedVnodeQueue为一个空数组
var insertedVnodeQueue = [];源码里面再搜索insertedVnodeQueue ,可以看到有这样一段逻辑,initComponent还是在createComponent里面调用的
function initComponent (vnode, insertedVnodeQueue) {
    if (isDef(vnode.data.pendingInsert)) {
      insertedVnodeQueue.push.apply(insertedVnodeQueue, vnode.data.pendingInsert);
      vnode.data.pendingInsert = null;
    }
    vnode.elm = vnode.componentInstance.$el;
    if (isPatchable(vnode)) {
			// ⚠️注意这个方法
      invokeCreateHooks(vnode, insertedVnodeQueue);
      setScope(vnode);
    } else {
      // empty component root.
      // skip all element-related modules except for ref (#3455)
      registerRef(vnode);
      // make sure to invoke the insert hook
      insertedVnodeQueue.push(vnode);
    }
}insertedVnodeQueue.push.apply(insertedVnodeQueue, vnode.data.pendingInsert) 重点看这一行代码,把 vnode.data.pendingInsert这个数组每一项push到当前vnode的insertedVnodeQueue中,注意这里是通过apply的方式,所以是把 vnode.data.pendingInsert这个数组每一项都push,而不是push pendingInsert这个列表进去。也就是说在这里,组件把他的子组件的insertedVnodeQueue里面的item收集了,因为渲染是一个深度递归的过程,所有最后根组件的insertedVnodeQueue能拿到所有子组件的insertedVnodeQueue里面的每一项。
从invokeInsertHook的queue[i].data.hook.insert(queue[i]) 这一行可以看出,insertedVnodeQueue里面的item应该是vnode。源码中搜索insertedVnodeQueue.push ,可以发现是invokeCreateHooks这个方法把当前vnode push了进去。
function invokeCreateHooks (vnode, insertedVnodeQueue) {
    for (var i$1 = 0; i$1 < cbs.create.length; ++i$1) {
      cbs.create[i$1](emptyNode, vnode);
    }
    i = vnode.data.hook; // Reuse variable
    if (isDef(i)) {
      if (isDef(i.create)) { i.create(emptyNode, vnode); }
	     // 把当前vnode push 到了insertedVnodeQueue
      if (isDef(i.insert)) { insertedVnodeQueue.push(vnode); }
    }
}对于组件vnode来说,这个方法还是在initComponent中调用的。
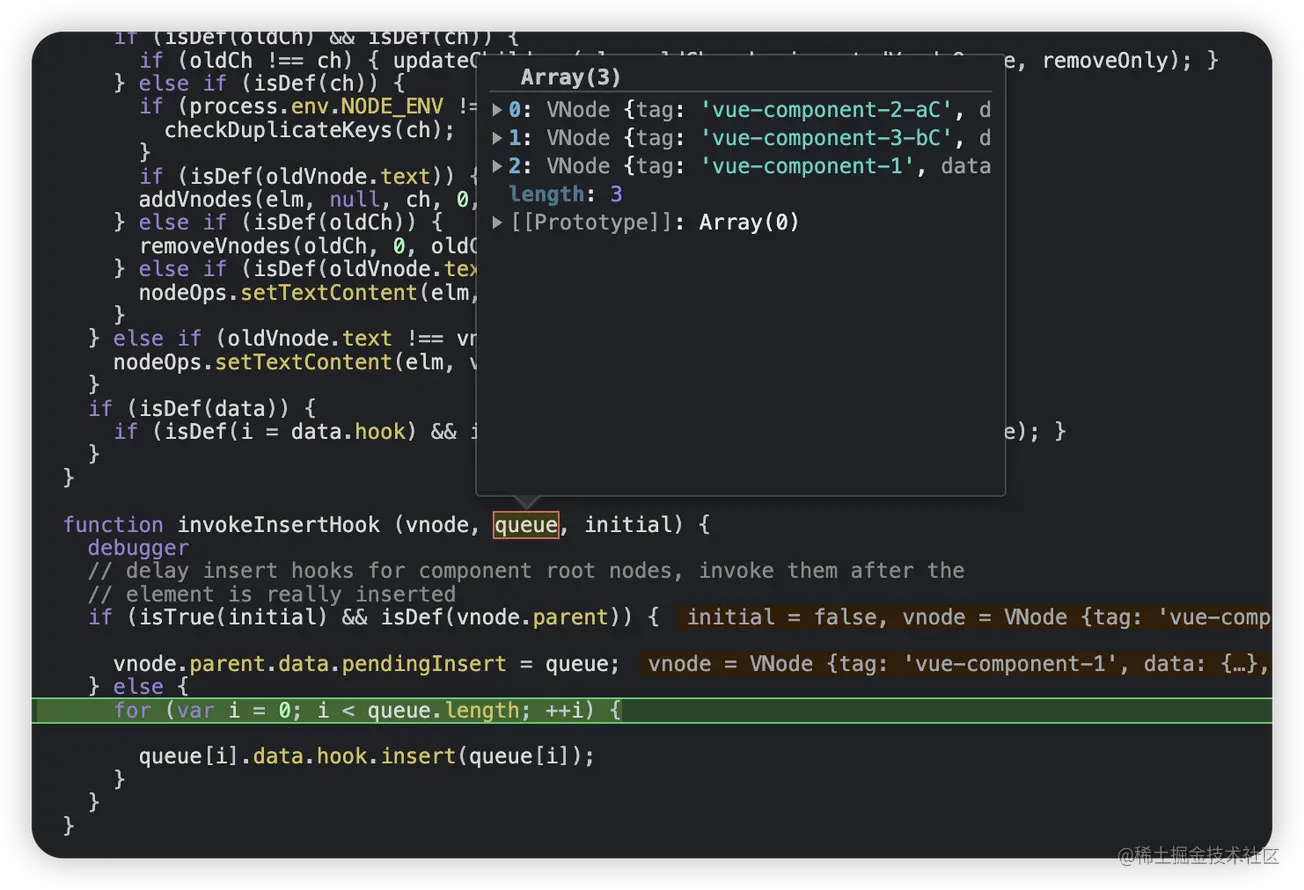
到这里就很清晰,子组件insert进父节点后,并不会马上调用mounted钩子,而是把组件对应到vnode插入到父vnode的insertedVnodeQueue中,层层递归,最终根组件拿到所有子组件的vnode,再依次循环遍历,调用vnode的insert钩子,从而调用了mounted钩子。这里是先进先出的,第一个被push进去的第一个被拿出来调用,所以最深的那个子组件的mounted先执行。最后附上一张源码调试的图,可以清晰的看到根组件的insertedVnodeQueue是什么内容。

至於為什麼vue要這樣設計,是因為掛載是先子後父的,子元件插入到了父節點,但是父節點還沒有真正插入到頁面中,如果這時候立刻呼叫子元件的mounted,對框架使用者來說可能會造成困惑,因為子元件呼叫mounted的時候並沒有真正渲染到頁面中,而且此時也肯定也無法透過document.querySelector的方式操作dom。
以上是淺析vue中的生命週期鉤子mounted的詳細內容。更多資訊請關注PHP中文網其他相關文章!

熱AI工具

Undresser.AI Undress
人工智慧驅動的應用程序,用於創建逼真的裸體照片

AI Clothes Remover
用於從照片中去除衣服的線上人工智慧工具。

Undress AI Tool
免費脫衣圖片

Clothoff.io
AI脫衣器

Video Face Swap
使用我們完全免費的人工智慧換臉工具,輕鬆在任何影片中換臉!

熱門文章

熱工具

記事本++7.3.1
好用且免費的程式碼編輯器

SublimeText3漢化版
中文版,非常好用

禪工作室 13.0.1
強大的PHP整合開發環境

Dreamweaver CS6
視覺化網頁開發工具

SublimeText3 Mac版
神級程式碼編輯軟體(SublimeText3)
 vue中怎麼用bootstrap
Apr 07, 2025 pm 11:33 PM
在 Vue.js 中使用 Bootstrap 分為五個步驟:安裝 Bootstrap。在 main.js 中導入 Bootstrap。直接在模板中使用 Bootstrap 組件。可選:自定義樣式。可選:使用插件。
 vue怎麼給按鈕添加函數
Apr 08, 2025 am 08:51 AM
可以通過以下步驟為 Vue 按鈕添加函數:將 HTML 模板中的按鈕綁定到一個方法。在 Vue 實例中定義該方法並編寫函數邏輯。
 vue中的watch怎麼用
Apr 07, 2025 pm 11:36 PM
Vue.js 中的 watch 選項允許開發者監聽特定數據的變化。當數據發生變化時,watch 會觸發一個回調函數,用於執行更新視圖或其他任務。其配置選項包括 immediate,用於指定是否立即執行回調,以及 deep,用於指定是否遞歸監聽對像或數組的更改。
 vue多頁面開發是啥意思
Apr 07, 2025 pm 11:57 PM
Vue 多頁面開發是一種使用 Vue.js 框架構建應用程序的方法,其中應用程序被劃分為獨立的頁面:代碼維護性:將應用程序拆分為多個頁面可以使代碼更易於管理和維護。模塊化:每個頁面都可以作為獨立的模塊,便於重用和替換。路由簡單:頁面之間的導航可以通過簡單的路由配置來管理。 SEO 優化:每個頁面都有自己的 URL,這有助於搜索引擎優化。
 vue返回上一頁的方法
Apr 07, 2025 pm 11:30 PM
Vue.js 返回上一頁有四種方法:$router.go(-1)$router.back()使用 <router-link to="/"> 組件window.history.back(),方法選擇取決於場景。
 vue.js怎麼引用js文件
Apr 07, 2025 pm 11:27 PM
在 Vue.js 中引用 JS 文件的方法有三種:直接使用 <script> 標籤指定路徑;利用 mounted() 生命週期鉤子動態導入;通過 Vuex 狀態管理庫進行導入。
 vue遍歷怎麼用
Apr 07, 2025 pm 11:48 PM
Vue.js 遍歷數組和對像有三種常見方法:v-for 指令用於遍歷每個元素並渲染模板;v-bind 指令可與 v-for 一起使用,為每個元素動態設置屬性值;.map 方法可將數組元素轉換為新數組。
 vue的div怎麼跳轉
Apr 08, 2025 am 09:18 AM
Vue 中 div 元素跳轉的方法有兩種:使用 Vue Router,添加 router-link 組件。添加 @click 事件監聽器,調用 this.$router.push() 方法跳轉。


