如何用 Vue 3 開發 Figma 外掛?以下這篇文章跟大家介紹一下Figma插件原理,記錄下使用Vue 3開發Fimga插件的過程,並附有開箱即用的程式碼,希望對大家有幫助!

Figma 是當下流行的設計工具,越來越多的設計團隊開始從Sketch 轉向Figma。 Figma 最大的特點是使用Web技術開發,實現了完全的跨平台。 Figma 外掛程式也是使用 Web 技術開發,只要會 html 、 js 、 css 就能動手寫一個 Figma 外掛。
Figma 外掛原理
在介紹Fimga 外掛之前,我們先來了解一下Fimga 的技術架構。
Figma 整體是用 React 開發的,核心的畫布區是一塊 canvas ,使用WebGL來渲染。而畫布引擎部分使用的是WebAssembly,這就是 Figma 能夠如此流暢的原因。桌面端的Figma App 使用了 Electron——一個使用Web技術開發桌面應用程式的框架。 Electron 類似一個瀏覽器,內部運作的其實還是一個Web應用程式。
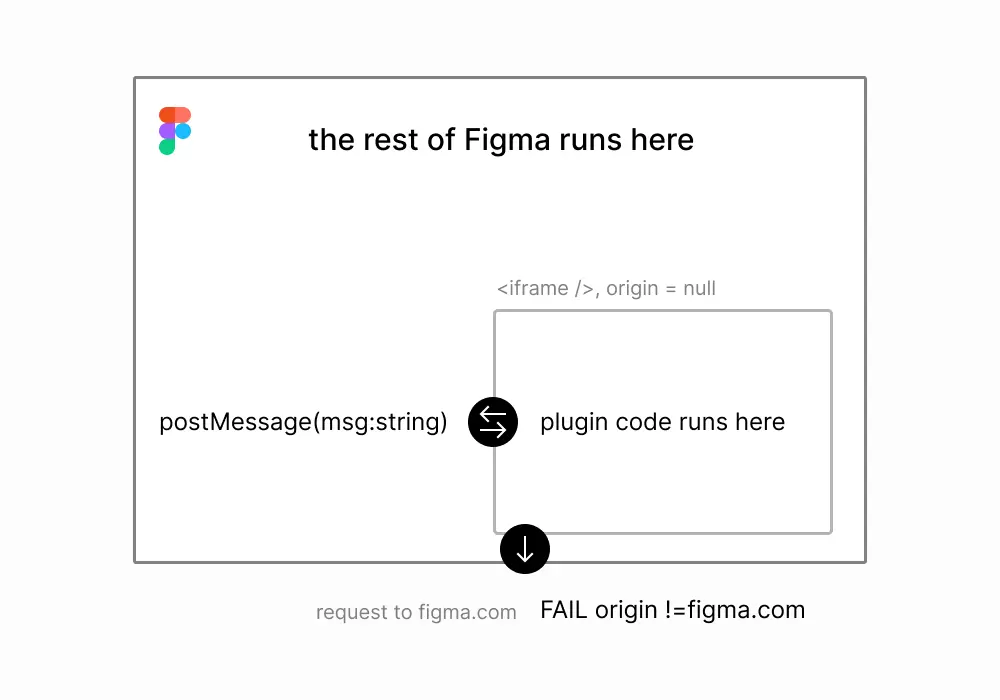
在在Web端開發一套安全、可靠的插件系統, iframe 無疑是最直接的方案。 iframe 是標準的W3C規範,在瀏覽器上已經經過多年應用,它的特點是:
安全,天然沙箱隔離環境,iframe內頁面無法操作主框架;
可靠,相容性非常好,且經過了多年市場的檢驗;
但是它也有明顯的缺點:與主框架通訊只能透過postMessage(STRING) 的方式,通訊效率非常低。如果要在插件裡操作一個畫布元素,首先要將元素的節點資訊從主框架拷貝到iframe 中,然後在 iframe 中操作完再更新節點資訊給主框架。這涉及大量通信,而且對於複雜的設計稿節點資訊是非常巨大的,可能超過通信的限制。
為了保證操作畫布的能力,必須回到主執行緒。外掛程式在主執行緒運行的問題主要在於安全性上,於是Figma的開發人員在主執行緒實作了一個 js 沙箱環境,使用了Realm API。沙箱中只能執行純粹的 js 程式碼和Figma提供的API,無法存取瀏覽器API(例如網路、儲存等),這就保證了安全性。

有興趣的同學推薦閱讀官方團隊寫的《How to build a plugin system on the web and also sleep well at night》,詳細介紹了Figma 插件方案的選擇過程,讀取來獲益良多。
經過綜合考慮,Figma 將插件分成兩個部分:插件UI運行在 iframe 中,操作畫布的程式碼運行在主執行緒的隔離沙箱中。 UI執行緒和主執行緒透過 postMessage 通訊。
外掛程式設定檔manifest.json 中分別配置main 欄位指向載入到主執行緒的js 文件, ui 字段配置載入到iframe 中的html 檔案。開啟外掛程式時,主執行緒呼叫 figma.showUI() 方法載入 iframe 。
寫一個最簡單的 Figma 外掛
為了了解外掛程式的運作過程,我們先寫一個最簡單的 Figma 外掛。功能很簡單:可以加減正方形色塊。
首先要下載並安裝好 Figma 桌面端。
新建一個程式碼工程,在根目錄中新建manifest.json 文件,內容如下:
{
  "name": "simple-demo",
  "api": "1.0.0",
  "main": "main.js",
  "ui": "index.html",
  "editorType": [
    "figjam",
    "figma"
  ]
}根目錄新建index.html ,
<!DOCTYPE html>
<html>
<head>
<meta charset="UTF-8">
<meta http-equiv="X-UA-Compatible" content="IE=edge">
<meta name="viewport" content="width=device-width, initial-scale=1.0">
<title>Demo</title>
<style>
h1 {
text-align: center;
}
p {
color: red;
}
.buttons {
margin-top: 20px;
text-align: center;
}
.buttons button {
width: 40px;
}
#block-num {
font-size: 20px;
}
</style>
</head>
<body>
<h1>Figma 插件 Demo</h1>
<p>当前色块数量:<span id="block-num">0</span></p>
<div>
<button id="btn-add" onclick="addBlock()">+</button>
<button id="btn-sub" onclick="subBlock()">-</button>
</div>
<script>
console.log('ui code runs!');
var blockNumEle = document.getElementById('block-num');
function addBlock() {
console.log('add');
var num = +blockNumEle.innerText;
num += 1;
blockNumEle.innerText = num;
}
function subBlock() {
console.log('substract');
var num = +blockNumEle.innerText;
if (num === 0) return;
num -= 1;
blockNumEle.innerText = num;
}
</script>
</body>
</html>根目錄新建main.js ,內容如下:
console.log('from code 2');
figma.showUI(__html__, {
  width: 400,
  height: 400,
});Figma桌面APP,畫布任意地方右鍵開啟選單,Plugins -> Development -> Import plugin from manifest... ,選擇前面建立的manifest.json#文件路徑,即可成功導入插件。
接著透過右鍵, Plugins -> Development -> simple-demo (外掛名稱),就可以開啟外掛程式。

測試點擊按鈕,功能正常。只不過頁面上還未出現色塊(別急)。
透過 Plugins -> Development -> Open console 可以開啟偵錯控制台。可以看到我們列印的日誌。
前面講了,畫布程式碼是運行在主執行緒的,為了執行效率,外掛程式要操作畫布內容也只能在主執行緒執行,即在main.js 中。 main.js 中暴露了頂級物件 figma ,封裝了用來操作畫布的一系列API,具體可以去看官網文檔。我們用 figma.createRectangle() 來建立一個矩形。主執行緒需要透過 figma.ui.onmessage 監聽來自UI執行緒的事件,從而做出回應。修改後的main.js 程式碼如下:
console.log('figma plugin code runs!')

figma.showUI(__html__, {
  width: 400,
  height: 400,
});

const nodes = [];

figma.ui.onmessage = (msg) => {=
  if (msg.type === "add-block") {
    const rect = figma.createRectangle();
    rect.x = nodes.length * 150;
    rect.fills = [{ type: "SOLID", color: { r: 1, g: 0.5, b: 0 } }];
    figma.currentPage.appendChild(rect);
    nodes.push(rect);
  } else if (msg.type === "sub-block") {
    const rect = nodes.pop();
    if (rect) {
      rect.remove();
    }
  }
  figma.viewport.scrollAndZoomIntoView(nodes);
};同時要修改 index.html 中的部分程式碼,透過parent.postMessage 給主執行緒發送事件:
function addBlock() {
  console.log('add');
  var num = +blockNumEle.innerText;
  num += 1;
  blockNumEle.innerText = num;
  parent.postMessage({ pluginMessage: { type: 'add-block' } }, '*')
}

function subBlock() {
  console.log('substract');
  var num = +blockNumEle.innerText;
  if (num === 0) return;
  num -= 1;
  blockNumEle.innerText = num;
  parent.postMessage({ pluginMessage: { type: 'sub-block' } }, '*')
}重新啟動插件,再試驗一下,發現已經可以成功加減色塊了。

使用Vue 3 開發Figma 外掛程式
透過前面的例子,我們已經清楚Figma 外掛程式的運行原理。但是用這種「原生」的 js 、 html 來寫程式碼非常低效的。我們完全可以用最新的Web技術來編寫程式碼,只要打包產物包含一個運行在主框架的js 檔案和一個給iframe 運行的html 文件即可。我決定嘗試使用 Vue 3 來開發外掛程式。 (學習影片分享:vuejs教學)
關於Vue 3 就不多做介紹了,懂的都懂,不懂的看到這裡可以先去學習一下再來。這裡的重點不在於用什麼框架(改成用vue 2、react流程也差不多),而在於建構工具。
Vite 是Vue的作者開發的新一代建置工具,也是 Vue 3推薦的建置工具。
我們先建立一個 Vue TypeScript 的範本項目。
npm init vite@latest figma-plugin-vue3 --template vue-ts
cd figma-plugin-vue3
npm install
npm run dev
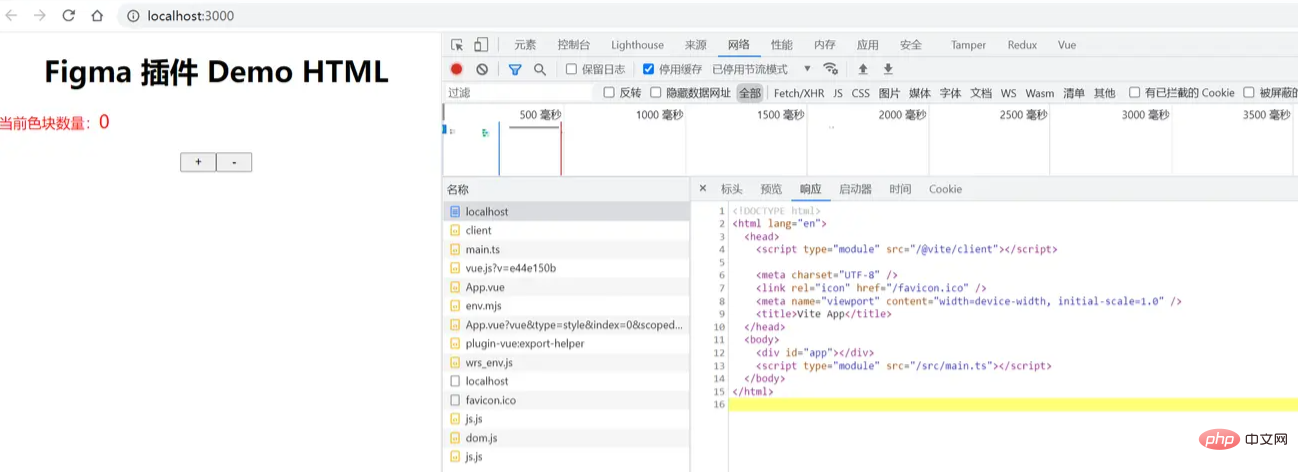
然後透過瀏覽器開啟 http://localhost:3000 就能看到頁面。
我們把前面的外掛程式demo移植到 Vue 3 中。 src/App.vue 程式碼修改如下:
<script setup>
import { ref } from 'vue';
const num = ref(0);
console.log('ui code runs!');
function addBlock() {
console.log('add');
num.value += 1;
parent.postMessage({ pluginMessage: { type: 'add-block' } }, '*')
}
function subBlock() {
console.log('substract');
if (num .value=== 0) return;
num.value -= 1;
parent.postMessage({ pluginMessage: { type: 'sub-block' } }, '*')
}
</script>
<template>
<h1>Figma 插件 Demo</h1>
<p>当前色块数量:<span id="block-num">{{ num }}</span></p>
<div>
<button id="btn-add" @click="addBlock">+</button>
<button id="btn-sub" @click="subBlock">-</button>
</div>
</template>
<style scoped>
h1 {
text-align: center;
}
p {
color: red;
}
.buttons {
margin-top: 20px;
text-align: center;
}
.buttons button {
width: 40px;
}
#block-num {
font-size: 20px;
}
</style>我們在 src/worker 目錄存放在主執行緒沙箱中運行的js程式碼。新建 src/worker/code.ts ,內容如下:
console.log('figma plugin code runs!')

figma.showUI(__html__, {
  width: 400,
  height: 400,
});

const nodes: RectangleNode[] = [];

figma.ui.onmessage = (msg) => {

  if (msg.type === "add-block") {
    const rect = figma.createRectangle();
    rect.x = nodes.length * 150;
    rect.fills = [{ type: "SOLID", color: { r: 1, g: 0.5, b: 0 } }];
    figma.currentPage.appendChild(rect);
    nodes.push(rect);
  } else if (msg.type === "sub-block") {
    const rect = nodes.pop();
    if (rect) {
      rect.remove();
    }
  }

  figma.viewport.scrollAndZoomIntoView(nodes);

};上述程式碼中缺少 figma 的 ts 類型聲明,所以我們需要安裝一下。
npm i -D @figma/plugin-typings
#修改tsconfig.json ,加上typeRoots ,這樣ts代碼就不會報錯了。同時也要加上 "skipLibCheck": true ,解決型別宣告衝突問題。
{
  "compilerOptions": {
    // ...
"skipLibCheck": true,
    "typeRoots": [
      "./node_modules/@types",
      "./node_modules/@figma"
    ]
  },
}Figma 外掛所需的建置產物有:
manifest.json 檔案作為外掛程式設定
index.html 作為UI程式碼
code.js作為主執行緒js程式碼
public 目錄中的檔案都會負責到建構產物dist 目錄下。
{
  "name": "figma-plugin-vue3",
  "api": "1.0.0",
  "main": "code.js",
  "ui": "index.html",
  "editorType": [
    "figjam",
    "figma"
  ]
}默认情况下 vite 会用 index.html 作为构建入口,里面用到的资源会被打包构建。我们还需要一个入口,用来构建主线程 js 代码。
执行 npm i -D @types/node ,安装 Node.js 的类型声明,以便在 ts 中使用 Node.js API。 vite.config.ts 的 build.rollupOptions 中增加 input 。默认情况下输出产物会带上文件 hash ,所以也要修改 output 配置:
import { defineConfig } from 'vite'
import vue from '@vitejs/plugin-vue'
import { resolve } from 'path';

// https://vitejs.dev/config/
export default defineConfig({
  plugins: [vue()],
  build: {
    sourcemap: 'inline',
    rollupOptions: {
      input:{
            main: resolve(__dirname, 'index.html'),
            code: resolve(__dirname, 'src/worker/code.ts'),
          },
      output: {
        entryFileNames: '[name].js',
      },
    },
  },
})执行 npm run build , dist 目录会有构建产物。然后我们按照前面的步骤,将 dist 目录添加为 Figma 插件。 Plugins -> Development -> Import plugin from manifest... ,选择 dist/manifest.json 文件路径。
启动插件......怎么插件里一片空白?好在 Figma 里面有 devtools 调试工具,我们打开瞧一瞧。

可以看到,我们的 index.html 已经成功加载,但是 js 代码没加载所以页面空白。js、css 等资源是通过相对路径引用的,而我们的 iframe 中的 src 是一个 base64 格式内容,在寻找 js 资源的时候因为没有域名,所以找不到资源。
解决办法也很简单,我们给资源加上域名,然后本地起一个静态资源服务器就行了。修改 vite.config.ts ,加上 base: 'http://127.0.0.1:3000'
import { defineConfig } from 'vite'
import vue from '@vitejs/plugin-vue'
import { resolve } from 'path';

// https://vitejs.dev/config/
export default defineConfig({
  plugins: [vue()],
  base: 'http://127.0.0.1:3000',
  build: {
    sourcemap: 'inline',
    rollupOptions: {
      input: {
        main: resolve(__dirname, 'index.html'),
        code: resolve(__dirname, 'src/worker/code.ts'),
      },
      output: {
        entryFileNames: '[name].js',
      },
    },
  },
  preview: {
    port: 3000,
  },
})重新构建代码 npm run build 。然后启动静态资源服务器 npm run preview 。通过浏览器访问 http://localhost:3000/ 可以看到内容。
然后重新打开 Figma 插件看看。果然,插件已经正常了!

Figma 加载插件只需要
index.html和code.js,其他资源都可以通过网络加载。这意味着我们可以将 js、css 资源放在服务端,实现插件的热更?不知道发布插件的时候会不会有限制,这个我还没试过。
我们已经能成功通过 Vue 3 来构建 Figma 插件了,但是我不想每次修改代码都要构建一遍,我们需要能够自动构建代码的开发模式。
vite 自动的 dev 模式是启动了一个服务,没有构建产物(而且没有类似webpack里面的 writeToDisk 配置),所以无法使用。
vite 的 build 命令有watch模式,可以监听文件改动然后自动执行 build 。我们只需要修改 package.json , scripts 里新增 "watch": "vite build --watch" 。
npm run watch

# 同时要在另一个终端里启动静态文件服务
npm run preview
这种方式虽然修改代码后会自动编译,但是每次还是要关闭插件并重新打开才能看到更新。这样写UI还是太低效了,能不能在插件里实现 HMR (模块热重载)功能呢?
vite dev 的问题在于没有构建产物。 code.js 是运行在 Fimga 主线程沙箱中的,这部分是无法热重载的,所以可以利用 vite build --watch 实现来编译。需要热重载的是 index.html 以及相应的 js 、css 资源。
先来看一下 npm run dev 模式下的 html 资源有什么内容:

理论上来说,我们只需要把这个 html 手动写入到 dist 目录就行,热重载的时候 html 文件不需要修改。直接写入的话会遇到资源是相对路径的问题,所以要么把资源路径都加上域名( http://localhost:3000 ),或者使用 <base>标签。
对比上面的 html 代码和根目录的 index.html 文件,发现只是增加了一个 <script type="module" src="/@vite/client"></script> 。所以我们可以自己解析 index.html ,然后插入相应这个标签,以及一个 <base> 标签。解析 HTML 我们用 jsdom 。
const JSDOM = require('jsdom');
const fs = require('fs');

// 生成 html 文件
function genIndexHtml(sourceHTMLPath, targetHTMLPath) {
  const htmlContent = fs.readFileSync(sourceHTMLPath, 'utf-8');
  const dom = new JSDOM(htmlContent);
  const { document } = dom.window;

  const script = document.createElement('script');
  script.setAttribute('type', 'module');
  script.setAttribute('src', '/@vite/client');
  dom.window.document.head.insertBefore(script, document.head.firstChild);

  const base = document.createElement('base');
  base.setAttribute('href', 'http://127.0.0.1:3000/');
  dom.window.document.head.insertBefore(base, document.head.firstChild);

  const result = dom.serialize();
  fs.writeFileSync(targetHTMLPath, result);
}同时 vite 提供了 JavaScript API,所以我们可以代码组织起来,写一个 js 脚本来启动开发模式。新建文件 scripts/dev.js ,完整内容如下:
const { JSDOM } = require('jsdom');
const fs = require('fs');
const path = require('path');
const vite = require('vite');

const rootDir = path.resolve(__dirname, '../');

function dev() {
  const htmlPath = path.resolve(rootDir, 'index.html');
  const targetHTMLPath = path.resolve(rootDir, 'dist/index.html');
  genIndexHtml(htmlPath, targetHTMLPath);

  buildMainCode();

  startDevServer();
}

// 生成 html 文件
function genIndexHtml(sourceHTMLPath, targetHTMLPath) {
  const htmlContent = fs.readFileSync(sourceHTMLPath, 'utf-8');
  const dom = new JSDOM(htmlContent);
  const {
    document
  } = dom.window;

  const script = document.createElement('script');
  script.setAttribute('type', 'module');
  script.setAttribute('src', '/@vite/client');
  dom.window.document.head.insertBefore(script, document.head.firstChild);

  const base = document.createElement('base');
  base.setAttribute('href', 'http://127.0.0.1:3000/');
  dom.window.document.head.insertBefore(base, document.head.firstChild);

  const result = dom.serialize();
  fs.writeFileSync(targetHTMLPath, result);
}

// 构建 code.js 入口
async function buildMainCode() {
  const config = vite.defineConfig({
    configFile: false, // 关闭默认使用的配置文件
    build: {
      emptyOutDir: false, // 不要清空 dist 目录
      lib: { // 使用库模式构建
        entry: path.resolve(rootDir, 'src/worker/code.ts'),
        name: 'code',
        formats: ['es'],
        fileName: (format) => `code.js`,
      },
      sourcemap: 'inline',
      watch: {},
    },
  });
  return vite.build(config);
}

// 开启 devServer
async function startDevServer() {
  const config = vite.defineConfig({
    configFile: path.resolve(rootDir, 'vite.config.ts'),
    root: rootDir,
    server: {
      hmr: {
        host: '127.0.0.1', // 必须加上这个,否则 HMR 会报错
      },
      port: 3000,
    },
    build: {
      emptyOutDir: false, // 不要清空 dist 目录
      watch: {}, // 使用 watch 模式
    }
  });
  const server = await vite.createServer(config);
  await server.listen()

  server.printUrls()
}

dev();执行 node scripts/dev.js ,然后在 Figma 中重启插件。试试修改一下 Vue 代码,发现插件内容自动更新了!
最后在 package.json 中新建一个修改一下dev的内容为 "dev": "node scripts/dev.js" 就可以了。
前面通过自己生产 index.html 的方式有很大的弊端:万一后续 vite 更新后修改了默认 html 的内容,那我们的脚本也要跟着修改。有没有更健壮的方式呢?我想到可以通过请求 devServer 来获取 html 内容,然后写入本地。话不多说,修改后代码如下:
const { JSDOM } = require('jsdom');
const fs = require('fs');
const path = require('path');
const vite = require('vite');
const axios = require('axios');

const rootDir = path.resolve(__dirname, '../');

async function dev() {
  // const htmlPath = path.resolve(rootDir, 'index.html');
  const targetHTMLPath = path.resolve(rootDir, 'dist/index.html');

  await buildMainCode();

  await startDevServer();

  // 必须放到 startDevServer 后面执行
  await genIndexHtml(targetHTMLPath);
}

// 生成 html 文件
async function genIndexHtml(/* sourceHTMLPath,*/ targetHTMLPath) {
  const htmlContent = await getHTMLfromDevServer();
  const dom = new JSDOM(htmlContent);

  // ...

  const result = dom.serialize();
  fs.writeFileSync(targetHTMLPath, result);
}

// ...

// 通过请求 devServer 获取HTML
async function getHTMLfromDevServer () {
  const rsp = await axios.get('http://localhost:3000/index.html');
  return rsp.data;
}

dev();Figma 基于Web平台的特性使之能成为真正跨平台的设计工具,只要有浏览器就能使用。同时也使得开发插件变得非常简单,非专业人士经过简单的学习也可以上手开发一个插件。而Web社区有数量庞大的开发者,相信 Figma 的插件市场也会越来越繁荣。
本文通过一个例子,详细讲述了使用 Vue 3 开发 Figma 插件的过程,并且完美解决了开发模式下热重载的问题。我将模板代码提交到了 Git 仓库中,需要的同学可以直接下载使用:figma-plugin-vue3。
开发 Figma 插件还会遇到一些其他问题,例如如何进行网络请求、本地存储等,有空再继续分享我的实践心得。
本文转载自:https://juejin.cn/post/7084639146915921956
作者:大料园
(学习视频分享:web前端开发)
以上是記錄一個使用Vue 3開發Fimga插件的過程的詳細內容。更多資訊請關注PHP中文網其他相關文章!


