

總結分享幾個 VueUse 最佳組合,快來收藏使用吧!

VueUse 是 Anthony Fu 的一個開源項目,它為 Vue 開發人員提供了大量適用於 Vue 2 和 Vue 3 的基本 Composition API 實用程式函數。這篇文章就來跟大家分享幾個我常用的幾個 VueUse 最佳組合,希望對大家有幫助!

(學習影片分享:vue影片教學)
Vueuse擁有大量出色的組合。但是量太大,要把它們全部看完可能會讓人抓不到重點。以下來介紹一些有用到的組合,它們如下:
onClickOutside
useFocusTrap
- ## useHead
- useStorage
- useVModel
##useDark
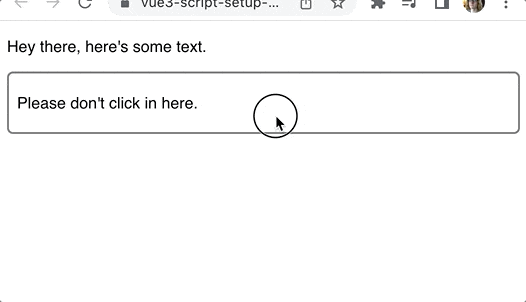
1、 onClickOutside#偵測點擊非常簡單。但是,當點擊發生在一個元素之外時,如何檢測?那就有點棘手了。但使用VueUse中的 onClickOutside 元件就很容易能做到這一點。程式碼如下:
<script setup>
import { ref } from 'vue'
import { onClickOutside } from '@vueuse/core'

const container = ref(null)
onClickOutside(container, () => alert('Good. Better to click outside.'))
</script>

<template>
  <div>
    <p>Hey there, here's some text.</p>
    <div class="container" ref="container">
      <p>Please don't click in here.</p>
    </div>
  </div>
</template>為想要追蹤的container 元素建立一個
:<div class="code" style="position:relative; padding:0px; margin:0px;"><pre class="brush:php;toolbar:false">const container = ref(null);</pre><div class="contentsignin">登入後複製</div></div>然後我們用元素上的ref 屬性把它變成一個模板ref。
<div class="container" ref="container">
  <p>Please don't click in here.</p>
</div>
有了容器的ref 之後,我們把它和一個處理程序一起傳遞給
組合。 <div class="code" style="position:relative; padding:0px; margin:0px;"><pre class="brush:php;toolbar:false">onClickOutside(
container,
() => alert('Good. Better to click outside.')
)</pre><div class="contentsignin">登入後複製</div></div>這種可組合對於管理視窗或下拉式選單很有用。當使用者點擊下拉式選單以外的地方時,你可以關閉它。
模態框也通常會表現出這種行為。範例網址:https://stackblitz.com/edit/vue3-script-setup-with-vite-18scsl?file=src/App.vue
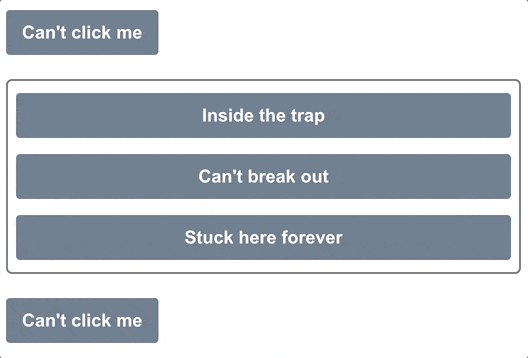
# 2、useFocusTrap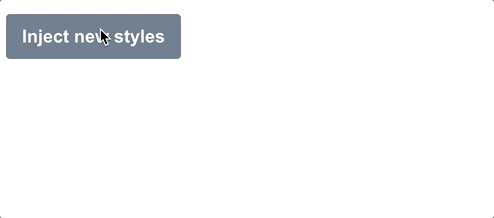
為了擁有可訪問的應用程序,正確地管理焦點非常重要。
沒有什麼比不小心在模態後面加上tab,並且無法將焦點回到模態更糟糕的了。這就是焦點陷阱的作用。
將鍵盤焦點鎖定在一個特定的DOM元素上,不是在整個頁面中循環,而是在瀏覽器本身中循環,鍵盤焦點只在該DOM元素中循環。 下面是一個使用VueUse的
的範例:<div class="code" style="position:relative; padding:0px; margin:0px;"><pre class="brush:php;toolbar:false"><script setup>
import { ref } from 'vue'
import { useFocusTrap } from '@vueuse/integrations/useFocusTrap'
const container = ref(null)
useFocusTrap(container, { immediate: true })
</script>
<template>
<div>
<button tab-index="-1">Can't click me</button>
<div class="container" ref="container">
  <button tab-index="-1">Inside the trap</button>
  <button tab-index="-1">Can't break out</button>
  <button tab-index="-1">Stuck here forever</button>
</div>
<button tab-index="-1">Can't click me</button>
</div>
</template></pre><div class="contentsignin">登入後複製</div></div>將
設定為
true#都,焦點將會被放置在container
元素中。然後,就不可能在該容器之外的地方做標籤。
到達第三個按鈕後,再點選
tab鍵將回到第一個按鈕。 就像onClickOutside一樣,我們先為
const container = ref(null)
<div class="container" ref="container"> <button tab-index="-1">Inside the trap</button> <button tab-index="-1">Can't break out</button> <button tab-index="-1">Stuck here forever</button> </div>
useFocusTrap(container, { immediate: true });import { createApp } from 'vue'
import { createHead } from '@vueuse/head'
import App from './App.vue'
const app = createApp(App)
const head = createHead()
app.use(head)
app.mount('#app')<script setup>
import { ref } from 'vue'
import { useHead } from '@vueuse/head'
const styles = ref('')
useHead({
  // Inject a style tag into the head
  style: [{ children: styles }],
})
const injectStyles = () => {
  styles.value = 'button { background: red }'
}
</script>
<template>
<div>
<button @click="injectStyles">Inject new styles</button>
</div>
</template>const styles = ref('');useHead({
// Inject a style tag into the head
style: [{ children: styles }],
})const injectStyles = () => {
styles.value = 'button { background: red }'
}<script setup>
import { useStorage } from '@vueuse/core'
const input = useStorage('unique-key', 'Hello, world!')
</script>
<template>
<div>
<input v-model="input" />
</div>
</template>第一次加载时, input 显示 'Hello, world!',但最后,它会显示你最后在 input 中输入的内容,因为它被保存在localstorage中。
除了 localstorage,我们也可以指定 sessionstorage:
const input = useStorage('unique-key', 'Hello, world!', sessionStorage)当然,也可以自己实现存储系统,只要它实现了StorageLike接口。
export interface StorageLike {
  getItem(key: string): string | null
  setItem(key: string, value: string): void
  removeItem(key: string): void
}5、useVModel
v-model指令是很好的语法糖,使双向数据绑定更容易。
但useVModel更进一步,摆脱了一堆没有人真正想写的模板代码。
<script setup>
import { useVModel } from '@vueuse/core'

const props = defineProps({
  count: Number,
})
const emit = defineEmits(['update:count'])

const count = useVModel(props, 'count', emit)
</script>

<template>
  <div>
    <button @click="count = count - 1">-</button>
    <button @click="count = 0">Reset to 0</button>
    <button @click="count = count + 1">+</button>
  </div>
</template>在这个例子中,我们首先定义了要附加到v-model上的 props:
const props = defineProps({
  count: Number,
})然后我们发出一个事件,使用v-model的命名惯例update:<propName>:
const emit = defineEmits(['update:count'])
现在,我们可以使用useVModel组合来将 prop和事件绑定到一个ref。
const count = useVModel(props, 'count', emit)
每当 prop 发生变化时,这个 count 就会改变。但只要它从这个组件中被改变,它就会发出update:count事件,通过v-model指令触发更新。
我们可以像这样使用这个 Input 组件。
<script setup>
import { ref } from 'vue'
import Input from './components/Input.vue'

const count = ref(50)
</script>

<template>
  <div>
    <Input v-model:count="count" />
    {{ count }}
  </div>
</template>这里的count ref是通过v-model绑定与 Input组件内部的count ref同步的。
事例地址:https://stackblitz.com/edit/vue3-script-setup-with-vite-ut5ap8?file=src%2FApp.vue
6、useImage

随着时间的推移,web应用中的图像变得越来越漂亮。我们已经有了带有srcset的响应式图像,渐进式加载库,以及只有在图像滚动到视口时才会加载的库。
但你知道吗,我们也可以访问图像本身的加载和错误状态?
我以前主要通过监听每个HTML元素发出的onload和onerror事件来做到这一点,但VueUse给我们提供了一个更简单的方法,那就是useImage组合。
<script setup>
import { useImage } from '@vueuse/core'

// Change this to a non-existent URL to see the error state
const url = 'https://source.unsplash.com/random/400x300'
const { isLoading, error } = useImage(
  {
    src: url,
  },
  {
    // Just to show the loading effect more clearly
    delay: 2000,
  }
)
</script>

<template>
  <div>
    <div v-if="isLoading" class="loading gradient"></div>
    <div v-else-if="error">Couldn't load the image :(</div>
    <img v-else :src="url" />
  </div>
</template>第一步,通过useImage 设置图片的src:
const { isLoading, error } = useImage({ src: url })获取它返回的isLoading和error引用,以便跟踪状态。这个组合在内部使用useAsyncState,因此它返回的值与该组合的值相同。
安排好后,useImage 就会加载我们的图像并将事件处理程序附加到它上面。
我们所要做的就是在我们的模板中使用相同的URL来使用该图片。由于浏览器会重复使用任何缓存的图片,它将重复使用由useImage加载的图片。
<template>
  <div>
    <div v-if="isLoading" class="loading gradient"></div>
    <div v-else-if="error">Couldn't load the image :(</div>
    <img v-else :src="url" />
  </div>
</template>
在这里,我们设置了一个基本的加载和错误状态处理程序。当图片正在加载时,我们显示一个带有动画渐变的占位符。如果有错误,我们显示一个错误信息。否则我们可以渲染图像。
UseImage 还有其他一些很棒的特性!如果想让它成为响应式图像,那么它支持srcset和sizes属性,这些属性在幕后传递给img元素。
如果你想把所有内容都放在模板中,还有一个无渲染组件。它的工作原理与组合的相同:
<template>
    <UseImage src="https://source.unsplash.com/random/401x301">
    <template #loading>
            <div class="loading gradient"></div>
        </template>
    <template #error>
            Oops!
        </template>
  </UseImage>
</template>
事例:https://stackblitz.com/edit/vue3-script-setup-with-vite-d1jsec?file=src%2FApp.vue
7、暗黑模式 useDark
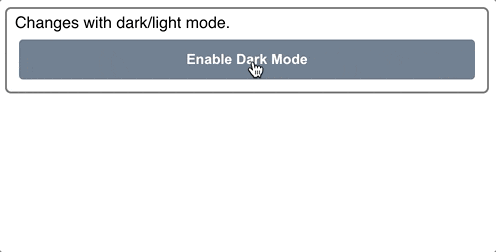
最近,每个网站和应用程序似乎都有暗黑模式。最难的部分是造型的改变。但是一旦你有了这些,来回切换就很简单了。
如果你使用的是Tailwind,你只需要在html元素中添加dark类,就可以在整个页面中启用。
<html class="dark"><!-- ... --></html>
然而,在黑暗模式和光明模式之间切换时,有几件事需要考虑。首先,我们要考虑到用户的系统设置。第二,我们要记住他们是否已经推翻了这个选择。
VueUse的useDark组合性为我们把所有这些东西都包起来。默认情况下,它查看系统设置,但任何变化都会被持久化到localStorage,所以设置会被记住。
<script setup>
import { useDark, useToggle } from '@vueuse/core'

const isDark = useDark()
const toggleDark = useToggle(isDark)
</script>

<template>
  <div class="container">
    Changes with dark/light mode.

    <button @click="toggleDark()">
            Enable {{ isDark ? 'Light' : 'Dark' }} Mode
        </button>
  </div>
</template>黑暗模式的样式:
.dark .container {
  background: slategrey;
  color: white;
  border-color: black;
}

.dark button {
  background: lightgrey;
  color: black;
}

.dark body {
  background: darkgrey;
}如果你没有使用Tailwind,你可以通过传入一个选项对象来完全定制黑暗模式的应用方式。下面是默认的Tailwind:
const isDark = useDark({
  selector: 'html',
  attribute: 'class',
  valueDark: 'dark',
  valueLight: '',
})也可以提供一个onChanged处理程序,这样你就可以编写任何你需要的Javascript。这两种方法使你可以使它与你已有的任何造型系统一起工作。
總結
Vueuse 擁有一個巨大的函式庫,其中包含出色的組合,而我們在這裡只涵蓋了其中的一小部分。我強烈建議你花些時間去探索這些文檔,看看所有可用的東西。這是一個非常好的資源,它將使你免於大量的模板程式碼和不斷地重新發明車輪。
以上是總結分享幾個 VueUse 最佳組合,快來收藏使用吧!的詳細內容。更多資訊請關注PHP中文網其他相關文章!

熱AI工具

Undresser.AI Undress
人工智慧驅動的應用程序,用於創建逼真的裸體照片

AI Clothes Remover
用於從照片中去除衣服的線上人工智慧工具。

Undress AI Tool
免費脫衣圖片

Clothoff.io
AI脫衣器

Video Face Swap
使用我們完全免費的人工智慧換臉工具,輕鬆在任何影片中換臉!

熱門文章
熱工具

記事本++7.3.1
好用且免費的程式碼編輯器

SublimeText3漢化版
中文版,非常好用

禪工作室 13.0.1
強大的PHP整合開發環境

Dreamweaver CS6
視覺化網頁開發工具

SublimeText3 Mac版
神級程式碼編輯軟體(SublimeText3)


 vue.js vs.反應:特定於項目的考慮因素
Apr 09, 2025 am 12:01 AM
vue.js vs.反應:特定於項目的考慮因素
Apr 09, 2025 am 12:01 AM
Vue.js適合中小型項目和快速迭代,React適用於大型複雜應用。 1)Vue.js易於上手,適用於團隊經驗不足或項目規模較小的情況。 2)React的生態系統更豐富,適合有高性能需求和復雜功能需求的項目。
 vue怎麼給按鈕添加函數
Apr 08, 2025 am 08:51 AM
vue怎麼給按鈕添加函數
Apr 08, 2025 am 08:51 AM
可以通過以下步驟為 Vue 按鈕添加函數:將 HTML 模板中的按鈕綁定到一個方法。在 Vue 實例中定義該方法並編寫函數邏輯。
 vue多頁面開發是啥意思
Apr 07, 2025 pm 11:57 PM
vue多頁面開發是啥意思
Apr 07, 2025 pm 11:57 PM
Vue 多頁面開發是一種使用 Vue.js 框架構建應用程序的方法,其中應用程序被劃分為獨立的頁面:代碼維護性:將應用程序拆分為多個頁面可以使代碼更易於管理和維護。模塊化:每個頁面都可以作為獨立的模塊,便於重用和替換。路由簡單:頁面之間的導航可以通過簡單的路由配置來管理。 SEO 優化:每個頁面都有自己的 URL,這有助於搜索引擎優化。
 vue遍歷怎麼用
Apr 07, 2025 pm 11:48 PM
vue遍歷怎麼用
Apr 07, 2025 pm 11:48 PM
Vue.js 遍歷數組和對像有三種常見方法:v-for 指令用於遍歷每個元素並渲染模板;v-bind 指令可與 v-for 一起使用,為每個元素動態設置屬性值;.map 方法可將數組元素轉換為新數組。
 vue的div怎麼跳轉
Apr 08, 2025 am 09:18 AM
vue的div怎麼跳轉
Apr 08, 2025 am 09:18 AM
Vue 中 div 元素跳轉的方法有兩種:使用 Vue Router,添加 router-link 組件。添加 @click 事件監聽器,調用 this.$router.push() 方法跳轉。
 vue怎麼a標籤跳轉
Apr 08, 2025 am 09:24 AM
vue怎麼a標籤跳轉
Apr 08, 2025 am 09:24 AM
實現 Vue 中 a 標籤跳轉的方法包括:HTML 模板中使用 a 標籤指定 href 屬性。使用 Vue 路由的 router-link 組件。使用 JavaScript 的 this.$router.push() 方法。可通過 query 參數傳遞參數,並在 router 選項中配置路由以進行動態跳轉。
 vue組件傳值是什麼意思
Apr 07, 2025 pm 11:51 PM
vue組件傳值是什麼意思
Apr 07, 2025 pm 11:51 PM
Vue 組件傳值是一種在組件之間傳遞數據和信息的機制。它可以通過屬性 (props) 或事件 (events) 實現:屬性 (props):聲明要在組件中接收的數據,在父組件中傳遞數據。事件 (events):使用 $emit 方法觸發事件,並使用 v-on 指令在父組件中監聽。
 React與Vue:Netflix使用哪個框架?
Apr 14, 2025 am 12:19 AM
React與Vue:Netflix使用哪個框架?
Apr 14, 2025 am 12:19 AM
NetflixusesAcustomFrameworkcalled“ Gibbon” BuiltonReact,notReactorVuedIrectly.1)TeamSperience:selectBasedonFamiliarity.2)ProjectComplexity:vueforsimplerprojects:reactforforforproproject,reactforforforcompleplexones.3)cocatizationneedneeds:reactoffipicatizationneedneedneedneedneedneeds:reactoffersizationneedneedneedneedneeds:reactoffersizatization needefersmoreflexibleise.4)
