實例詳解之操作單一dom元素新增動畫
這篇文章為大家帶來了關於javascript的相關知識,其中主要介紹了操作dom元素添加動畫效果的相關問題,下面一起來看一下,希望對大家有幫助。

【相關推薦:javascript影片教學、web前端】
##DOM動畫效果- 讓一個元素從左到右進行運動
-
<div id="box"></div>
登入後複製var box = document.getElementById("box"); var t = null; t = setInterval(function(){ })登入後複製
t = setInterval(function(){終止條件})
    // 元素的属性值 === 目标点
    if(dom.attr === target){
        clearInterval(t);
}- 起始點
一個動作的起始點其實就是目前元素的位置,我們透過API取得目前元素的位置,讓這個位置作為運動的起始。
- 目標
- 速度
- 讓元素透過計時器在很短的間隔內進行CSS屬性值的改變
- 這樣連續的運動在使用者看來就是動畫效果
封裝的主要作用是讓元素可以在短時間間隔內不斷改變屬性實現動畫效果
單屬性運動框架:
<button id="btn">开始运动</button>
<div id="box"></div>
<div id="line"></div>
<script>
    var  box = document.getElementById("box");
    var  btn = document.getElementById("btn");
    var  target = 500;
    // 速度可以根据 起始点和目标点进行判断,从而决定正负;
    var speed  = 17;
    // - 方向;
    btn.onclick = function(){
        // 1. 获取元素初始位置;
        var _left = box.offsetLeft;
        speed  = target - _left >= 0 ? speed : -speed ;
        var interval = setInterval( function(){
            // 4. 判定运动的终止条件;
            if(Math.abs(target - _left) <= Math.abs(speed) ){
                // 因为终止时有可能没有到达目标点,因此我们把元素赋值到目标点位置;
                box.style.left = target + "px";
                clearInterval( interval );
            }else{
                // 2. 元素根据初始位置进行改变;
                _left += speed;
                // 3. DOM操作,根据已有数据让元素属性发生改变;
                box.style.left = _left + "px";
            }
        } , 30)
    }
</script>- 勻速運動封裝
<script>// - 提取属性名作为参数; btn.onclick = function(){
    animate( "left", 500 )}function animate( attr , target , speed = 10 ){
    // 1. 获取元素初始样式
    var _style = getComputedStyle( box );
    // 2. 根据属性要求取出当前的属性的属性值;
    var _css_style = parseInt(_style[attr]);
    speed  = target - _css_style >= 0 ? speed : -speed ;
    var interval = setInterval( function(){
        // 4. 判定运动的终止条件;
        if(Math.abs(target - _css_style) <= Math.abs(speed) ){
            // 因为终止时有可能没有到达目标点,因此我们把元素赋值到目标点位置;
            box.style[attr] = target + "px";
            clearInterval( interval );
        }else{
            // 2. 元素根据初始位置进行改变;
            _css_style += speed;
            // 3. DOM操作,根据已有数据让元素属性发生改变;
            box.style[attr] = _css_style + "px";
        }
} , 30)}</script>- 相容透明度
<script>function animate( dom , attr , target , speed = 10 ){
    // 1. 获取元素初始样式
    var _style = getComputedStyle( dom );
    // 2. 根据属性要求取出当前的属性的属性值;
    if( attr === "opacity"){
        var _css_style = parseInt(_style[attr] * 100 );
        target *= 100;
    }else{
        var _css_style = parseInt(_style[attr]);
    }
    speed  = target - _css_style >= 0 ? speed : -speed ;
    var interval = setInterval( function(){
        // 4. 判定运动的终止条件;
        if(Math.abs(target - _css_style) <= Math.abs(speed) ){
            // 因为终止时有可能没有到达目标点,因此我们把元素赋值到目标点位置;
            if( attr === "opacity"){
                dom.style[attr] = target / 100;
            }else{
                dom.style[attr] = target + "px";
            }
            clearInterval( interval );
        }else{
            // 2. 元素根据初始位置进行改变;
            _css_style += speed;
            // 3. DOM操作,根据已有数据让元素属性发生改变;
            if( attr === "opacity"){
                dom.style[attr] = _css_style / 100 ;
            }else{
                dom.style[attr] = _css_style + "px";
            }
        }
} , 30)}</script>- 緩衝運動
- 緩衝運動是一種運動方式
- 這種運動方式是速度在運動過程中會有改變的運動
- 距離越小速度越小
<button id="btn">开始运动</button>
<div id="box"></div>
<script>
var  box = document.getElementById("box");
var  btn = document.getElementById("btn");
btn.onclick = function(){
    animate( box , "left" , 500 )
}
function animate( dom , attr , target , transition = "buffer", speed = 10 ){
    var _style = getComputedStyle( dom );
    if( attr === "opacity"){
        var _css_style = parseInt(_style[attr] * 100 );
        target *= 100;
    }else{
        var _css_style = parseInt(_style[attr]);
    }

    if( transition === "liner"){
        speed  = target - _css_style >= 0 ? speed : -speed ;
    }

    var interval = setInterval( function(){
        if( transition === "buffer"){
            // 计算速度;
            speed = (target - _css_style) / 10;
            //速度不取整在小数部分会做很多无意义的计算;
            speed = speed > 0 ? Math.ceil(speed) :Math.floor( speed )
        }

        if(Math.abs(target - _css_style) <= Math.abs(speed) ){
            // 因为终止时有可能没有到达目标点,因此我们把元素赋值到目标点位置;
            if( attr === "opacity"){
                dom.style[attr] = target / 100;
            }else{
                dom.style[attr] = target + "px";
            }
                clearInterval( interval );
        }else{
            // 2. 元素根据初始位置进行改变;
            _css_style += speed;
            // 3. DOM操作,根据已有数据让元素属性发生改变;
            if( attr === "opacity"){
                dom.style[attr] = _css_style / 100 ;
            }else{
                dom.style[attr] = _css_style + "px";
            }
        }
    } , 30)
}
</script>
//只需要改变里面transition的值就可以调整运动模式
//buffer为缓冲运动
//liner为匀速运动- 多屬性運動框架
- 我們在多次呼叫animate的時候會開啟多個計時器
- 因為定時器之中的資料都一樣,我們看不出在效果上的差異
- 但是多次開啟定時器會極其嚴重的消耗計算機性能
- 開啟當前定時器之前關閉上一個定時器
<script>// 在一个定时器之中,用for循环同时执行多次dom样式操作; // 1. 需要优化的部分:参数,要把样式部分的参数优化成一个对象; function animate( dom , attrs , transition = "buffer", speed = 10 ){
    var _style = getComputedStyle( dom );
    // 获取元素当前的属性 :
    for(var attr in attrs ){
        // attr ? 要过渡的css属性名;
        // attrs[attr] ? 要过渡的当前属性;
        attrs[attr] = {
            target : attrs[attr],
            // 元素当前的属性放入到这个对象之中;
            now  : parseInt(_style[attr])
        }
    }
    // 因为直接关闭interval是没有作用的,此时的inteval是一个局部变量,每次animate被调用的时候都会直接重置;
    // 我们应该吧定时器的id放在当前正在执行过渡效果的dom对象上;
    clearInterval(dom.interval);
    dom.interval = setInterval( function(){
        for(var attr in attrs){
        // 取出 attrs 之中的目标点和当前值;
            speed = (attrs[attr].target -  attrs[attr].now) / 10 ;
            // 根据速度正负,进行速度取整;
            speed = speed > 0 ? Math.ceil( speed ) : Math.floor( speed );
            // 判定终止条件;
            if( attrs[attr].target ===  attrs[attr].now){
                // 删除已经到达目标点的属性;
                delete attrs[attr]
                // 判定attrs里面已经没有属性了;
                for(var a in attrs){
                    return false;
                }
                clearInterval(dom.interval);
            }else{
                attrs[attr].now += speed;
                dom.style[ attr ] = attrs[attr].now + "px";
            }
        }
    } , 30)}// 优化参数之后,key值是等待运动的css属性,value值是元素的目标; btn.onclick = function(){
    animate( box , { width : 500 , height : 400 } )}</script>
 <style>
            *{
                  margin: 0;
                  padding: 0;
            }
            .container{
                  width: 1130px;
                  height: 286px;
                  margin: 0 auto;
                  position: relative;
                  overflow: hidden;
            }
            .wrapper{
                  width: 6780px;
                  position: absolute;
                  left: 0;
            }
            .slide{
                  float: left;
            }

            .slide , .slide img{
                  width: 1130px;
                  height: 286px;
            }
            .button-prev{
                  left: 0;
                  background-position: 30px center;
                  background-image: url(https://static.zcool.cn/git_z/z/widget/slider/images/svg/left_arrow.svg?v=2);
                  top: 0;
                  width: 13px;
                  height: 100%;
                  padding: 0 80px;
                  border-radius: 2px;
                  position: absolute;
                  background-repeat: no-repeat;
            }
            .button-prev:hover{
                  background-image: url(https://static.zcool.cn/git_z/z/widget/slider/images/svg/left_arrowhover.svg?v=2);
            }
            .button-next{
                  right: 0;
                  background-position: 91px center;
                  background-image: url(https://static.zcool.cn/git_z/z/widget/slider/images/svg/right_arrow.svg?v=2);
                  top: 0;
                  width: 13px;
                  height: 100%;
                  padding: 0 80px;
                  border-radius: 2px;
                  position: absolute;
                  background-repeat: no-repeat;
            }
            .button-next:hover{
                  background-image: url(https://static.zcool.cn/git_z/z/widget/slider/images/svg/right_arrowhover.svg?v=2);
            }
            .pagination{
                  position: absolute;
                  bottom: 10%;
                  width: 100%;
                  height: 10px;
                  left: 30px;
            }
            .pagination span{
                  display: inline-block;
                  width: 10px;
                  height: 10px;
                  margin-left: 10px;
                  border-radius: 50%;
                  background-color: cornflowerblue;
                  border: 2px solid transparent;
                  background-clip: content-box;
            }
            .pagination span.active{
                  border: 2px solid skyblue;
                  box-shadow: 0 0 5px skyblue;
                  background-color: #fff;
            }
      </style>
登入後複製
<!-- 类名请使用和我一样的类名 -->
<div class="container">
    <div class="wrapper">
          <!-- 第0张图片 -->
          <div class="slide">
                <img src="https://img.zcool.cn/ad_manager/location/f35d611484931101c43350bbdbd5.jpg" alt="">
          </div>
          <div class="slide">
                <img src="https://img.zcool.cn/ad_manager/location/3dcb6113a3471101c433505bbd72.jpg" alt="">
          </div>
          <div class="slide">
                <img src="https://img.zcool.cn/ad_manager/location/65f36113a3341101c4335014b174.jpg" alt="">
          </div>
          <div class="slide">
                <img src="https://img.zcool.cn/ad_manager/location/7f97611481181101c43350225b33.jpg" alt="">
          </div>
          <div class="slide">
                <img src="https://img.zcool.cn/ad_manager/location/afcf6114801e1101c433507f9e28.jpg" alt="">
          </div>
          <!-- 最后一张图片 -->
          <!-- 把第0张图片放在整个图片结构的最后 -->
          <div class="slide">
                <img src="https://img.zcool.cn/ad_manager/location/f35d611484931101c43350bbdbd5.jpg" alt="">
          </div>
    </div>
    <div class="button-next"></div>
    <div class="button-prev"></div>
    <div class="pagination">
          <span class="active"></span>
          <span></span>
          <span></span>
          <span></span>
          <span></span>
    </div>
</div>

<script src="./utils.js"></script>
<script>
    // 轮播图的核心就是左右切换按钮,实现显示元素下标的改变;
    var index = 0 ;
    var prev = 0;

    var next_btn = document.querySelector(".button-next");
    var prev_btn = document.querySelector(".button-prev");
    var slides   = document.querySelectorAll(".slide");
    var wrapper  = document.querySelector(".wrapper");
    // 自动播放的阻止功能是在鼠标移入container容器之中就触发的;
    var container   = document.querySelector(".container");

    var bullets = document.querySelectorAll(".pagination span");

    // 绑定事件
    // - 轮播图改变下标功能必须设置边界;
    function bindEvent(){
          next_btn.onclick = function(){
                add();
                bannerAnimate();
          }
          prev_btn.onclick = function(){
                reduce()
                bannerAnimate();
          }
          container.onmouseover = function(){
                stop();
          }
          container.onmouseout = function(){
                autoPlay();
          }

          bullets.forEach( function( ele , i ){

                ele.onmouseover = function(){
                      prev = index;
                      // 防止穿帮逻辑;
                      // - 如果在假的第0张图片上(在最后一张图片上)
                      // - 我们先让真假图片呼喊然后在进行元素的动画效果;
                      if( index === 5 ){
                            wrapper.style.left = 0;
                      }
                      index = i;
                      bannerAnimate();
                }
          })
    }
    // 下标增加;
    function add(){

          prev = index;

          if( index === slides.length - 1 ){
                // 这个逻辑会在最后一张图片进行切换时进入;
                // 我们让wrapper直接位移到开头,改变元素位置的同时让用户无法感知;
                wrapper.style.left = 0;
                // 我们需要从第0个图片切换到第一个图片;
                // -因为我们最后一张图片的显示和开头图片的显示是一样的
                index = 1;
          }else{
                index ++;
          }
    }
    // 下标减少;
    function reduce(){
          prev = index;

          if( index === 0 ){
                wrapper.style.left = -(slides.length - 1) * 1130 + "px";
                index = slides.length - 2;
          }else{
                index --;
          }
    }
    // 根据我们的算法去实现动画效果;
    function bannerAnimate(){
          animate( wrapper , { left : - index * 1130 });

          // 给对应的分页器按钮添加active;

          // 先去清空所有的类名;

          bullets.forEach( function( ele ){
                ele.classList.remove("active")
          })

          // 下标需要进行特殊处理,在显示最后一张图片的时候,给第0个按钮添加active;

          bullets[ index === 5 ? 0 : index ].classList.add("active");
    }
    bindEvent();

    var interval = null;
    function autoPlay(){
          // 间隔3s,让js点击一下下一页按钮;
          interval = setInterval( function(){
                // 虚拟点击 :
                next_btn.dispatchEvent( new Event("click"));
          } , 3000 )
    }

    function stop(){
          clearInterval( interval )
    }

    autoPlay();

</script>
登入後複製
<style>
*{
margin: 0;
padding: 0;
}
.container{
width: 1130px;
height: 286px;
margin: 0 auto;
position: relative;
overflow: hidden;
}
.wrapper{
width: 6780px;
position: absolute;
left: 0;
}
.slide{
float: left;
}
.slide , .slide img{
width: 1130px;
height: 286px;
}
.button-prev{
left: 0;
background-position: 30px center;
background-image: url(https://static.zcool.cn/git_z/z/widget/slider/images/svg/left_arrow.svg?v=2);
top: 0;
width: 13px;
height: 100%;
padding: 0 80px;
border-radius: 2px;
position: absolute;
background-repeat: no-repeat;
}
.button-prev:hover{
background-image: url(https://static.zcool.cn/git_z/z/widget/slider/images/svg/left_arrowhover.svg?v=2);
}
.button-next{
right: 0;
background-position: 91px center;
background-image: url(https://static.zcool.cn/git_z/z/widget/slider/images/svg/right_arrow.svg?v=2);
top: 0;
width: 13px;
height: 100%;
padding: 0 80px;
border-radius: 2px;
position: absolute;
background-repeat: no-repeat;
}
.button-next:hover{
background-image: url(https://static.zcool.cn/git_z/z/widget/slider/images/svg/right_arrowhover.svg?v=2);
}
.pagination{
position: absolute;
bottom: 10%;
width: 100%;
height: 10px;
left: 30px;
}
.pagination span{
display: inline-block;
width: 10px;
height: 10px;
margin-left: 10px;
border-radius: 50%;
background-color: cornflowerblue;
border: 2px solid transparent;
background-clip: content-box;
}
.pagination span.active{
border: 2px solid skyblue;
box-shadow: 0 0 5px skyblue;
background-color: #fff;
}
</style><!-- 类名请使用和我一样的类名 -->
<div class="container">
<div class="wrapper">
<!-- 第0张图片 -->
<div class="slide">
<img src="https://img.zcool.cn/ad_manager/location/f35d611484931101c43350bbdbd5.jpg" alt="">
</div>
<div class="slide">
<img src="https://img.zcool.cn/ad_manager/location/3dcb6113a3471101c433505bbd72.jpg" alt="">
</div>
<div class="slide">
<img src="https://img.zcool.cn/ad_manager/location/65f36113a3341101c4335014b174.jpg" alt="">
</div>
<div class="slide">
<img src="https://img.zcool.cn/ad_manager/location/7f97611481181101c43350225b33.jpg" alt="">
</div>
<div class="slide">
<img src="https://img.zcool.cn/ad_manager/location/afcf6114801e1101c433507f9e28.jpg" alt="">
</div>
<!-- 最后一张图片 -->
<!-- 把第0张图片放在整个图片结构的最后 -->
<div class="slide">
<img src="https://img.zcool.cn/ad_manager/location/f35d611484931101c43350bbdbd5.jpg" alt="">
</div>
</div>
<div class="button-next"></div>
<div class="button-prev"></div>
<div class="pagination">
<span class="active"></span>
<span></span>
<span></span>
<span></span>
<span></span>
</div>
</div>
<script src="./utils.js"></script>
<script>
// 轮播图的核心就是左右切换按钮,实现显示元素下标的改变;
var index = 0 ;
var prev = 0;
var next_btn = document.querySelector(".button-next");
var prev_btn = document.querySelector(".button-prev");
var slides = document.querySelectorAll(".slide");
var wrapper = document.querySelector(".wrapper");
// 自动播放的阻止功能是在鼠标移入container容器之中就触发的;
var container = document.querySelector(".container");
var bullets = document.querySelectorAll(".pagination span");
// 绑定事件
// - 轮播图改变下标功能必须设置边界;
function bindEvent(){
next_btn.onclick = function(){
add();
bannerAnimate();
}
prev_btn.onclick = function(){
reduce()
bannerAnimate();
}
container.onmouseover = function(){
stop();
}
container.onmouseout = function(){
autoPlay();
}
bullets.forEach( function( ele , i ){
ele.onmouseover = function(){
prev = index;
// 防止穿帮逻辑;
// - 如果在假的第0张图片上(在最后一张图片上)
// - 我们先让真假图片呼喊然后在进行元素的动画效果;
if( index === 5 ){
wrapper.style.left = 0;
}
index = i;
bannerAnimate();
}
})
}
// 下标增加;
function add(){
prev = index;
if( index === slides.length - 1 ){
// 这个逻辑会在最后一张图片进行切换时进入;
// 我们让wrapper直接位移到开头,改变元素位置的同时让用户无法感知;
wrapper.style.left = 0;
// 我们需要从第0个图片切换到第一个图片;
// -因为我们最后一张图片的显示和开头图片的显示是一样的
index = 1;
}else{
index ++;
}
}
// 下标减少;
function reduce(){
prev = index;
if( index === 0 ){
wrapper.style.left = -(slides.length - 1) * 1130 + "px";
index = slides.length - 2;
}else{
index --;
}
}
// 根据我们的算法去实现动画效果;
function bannerAnimate(){
animate( wrapper , { left : - index * 1130 });
// 给对应的分页器按钮添加active;
// 先去清空所有的类名;
bullets.forEach( function( ele ){
ele.classList.remove("active")
})
// 下标需要进行特殊处理,在显示最后一张图片的时候,给第0个按钮添加active;
bullets[ index === 5 ? 0 : index ].classList.add("active");
}
bindEvent();
var interval = null;
function autoPlay(){
// 间隔3s,让js点击一下下一页按钮;
interval = setInterval( function(){
// 虚拟点击 :
next_btn.dispatchEvent( new Event("click"));
} , 3000 )
}
function stop(){
clearInterval( interval )
}
autoPlay();
</script>##範例如下
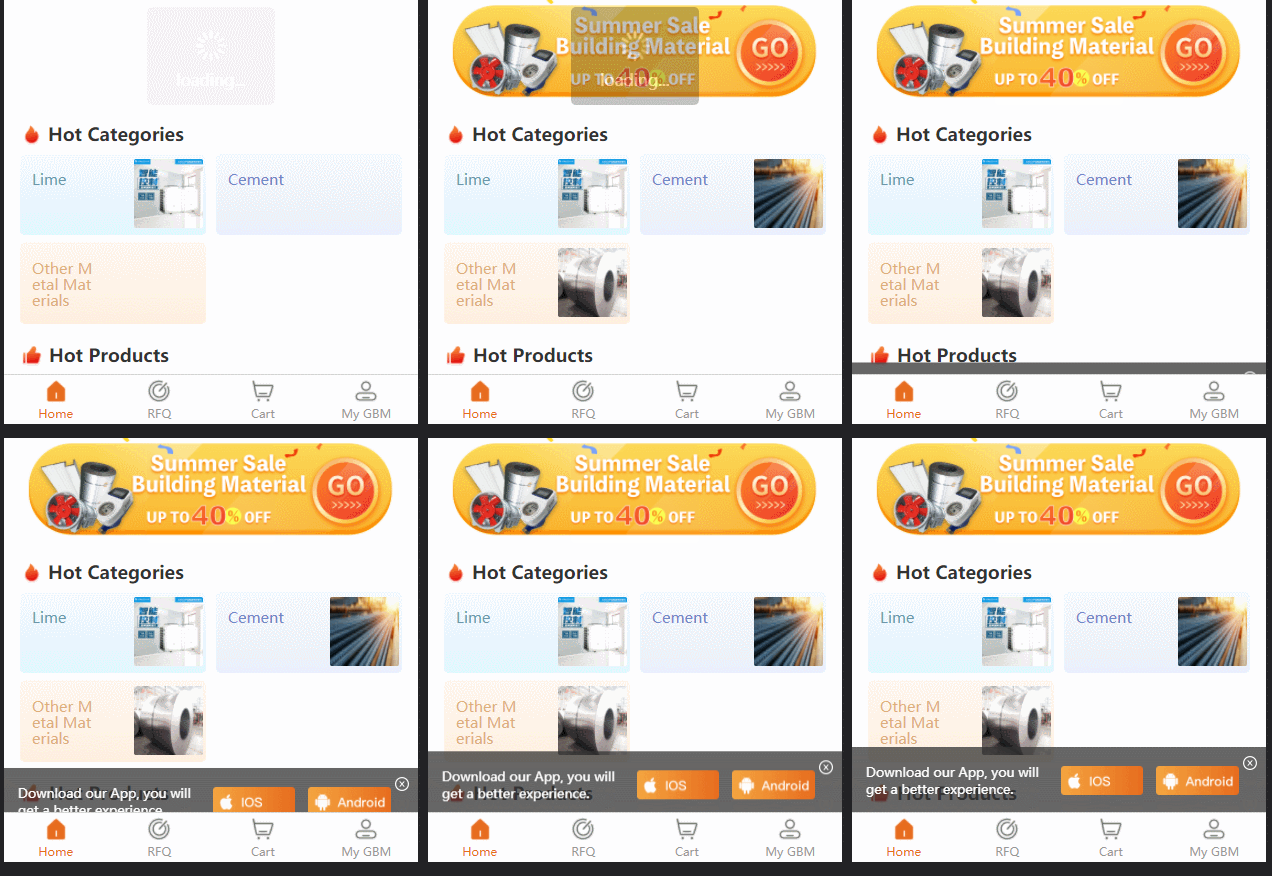
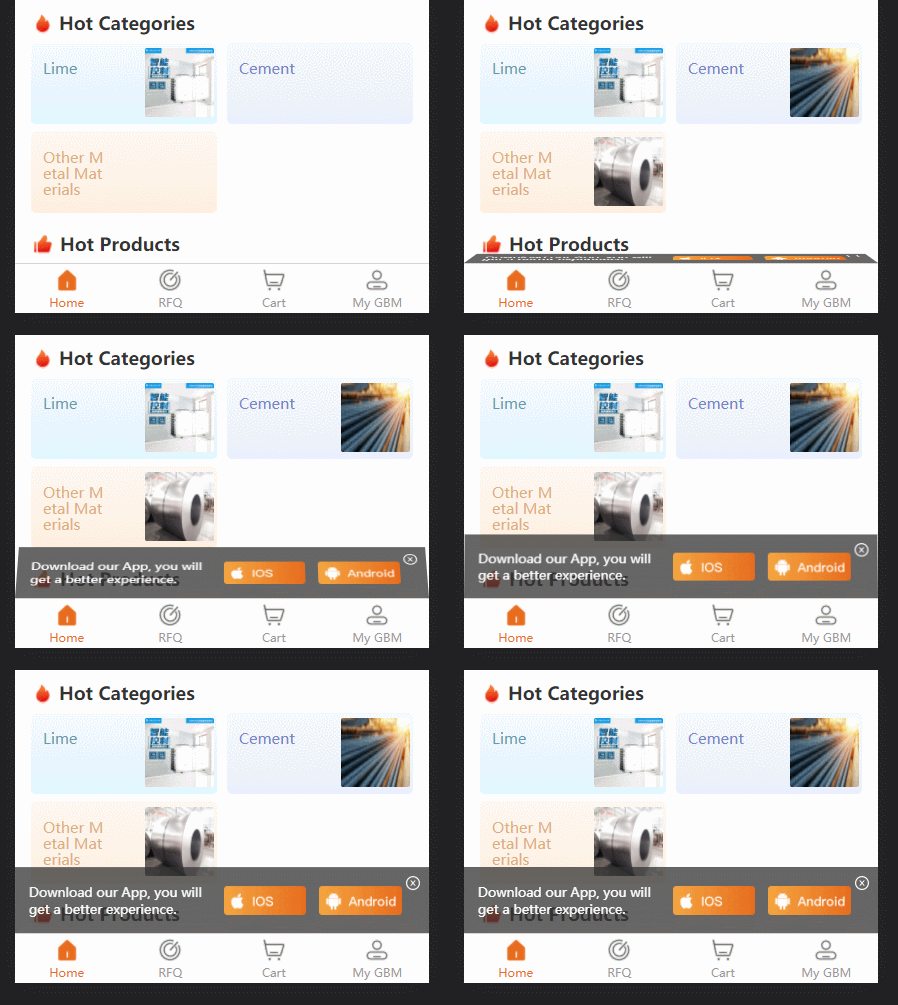
項目背景:uniapp h5應用,為了提示使用者下載,這裡有個提示下載的dom, 本來想來想在每個tabbar 中新增(一共加入四個);但想嘗試換種玩法如下: 效果如下:
 直接上程式碼:
function showDownloadTisp() {
  console.log('--------------------------->showDownloadTisp')
  // #ifdef H5
  const parent = document.querySelector('.uni-tabbar')
  console.log('parent:', parent)
  const tips = document.createElement('p')
  tips.id = 'downloadTisp'


  tips.setAttribute('style',
    'background: rgba(51,51,51,0.75);'
  )

  tips.setAttribute('style',
    `background: rgba(51,51,51,0.75); position: fixed;width: 100%;height: ${uni.upx2px(120)}px; bottom:${uni.upx2px(-140)}px;  display: flex;flex-direction: row;justify-content: space-between;align-items:center;transition:0.5s;`
  )

  const desParent = document.createElement('p')
  const des = document.createTextNode('Download our App, you will get a better experience.')
  desParent.appendChild(des)
  desParent.setAttribute('style',
    `padding: 0;color: #FFFFFF;font-size:${uni.upx2px(24)}px;margin-left: ${uni.upx2px(27)}px;padding-right: ${uni.upx2px(25)}px;`
  )

  const iosImage = document.createElement('img')
  iosImage.src = '../static/guide/download ios.png'
  iosImage.setAttribute('style',
    `width: ${uni.upx2px(154)}px;height: ${uni.upx2px(54)}px;margin-right: ${uni.upx2px(25)}px;`)

  const anroidImage = document.createElement('img')
  anroidImage.src = '../static/guide/download android.png'
  anroidImage.setAttribute('style',
    `width: ${uni.upx2px(154)}px;height: ${uni.upx2px(54)}px;margin-right: ${uni.upx2px(50)}px;`)

  const closedImage = document.createElement('img')
  closedImage.src = '../static/guide/download closd.png'
  closedImage.setAttribute('style',
    `width: ${uni.upx2px(30)}px;height: ${uni.upx2px(30)}px;position: absolute;right:${uni.upx2px(15)}px;top: ${uni.upx2px(15)}px;padding: ${uni.upx2px(5)};`
  )

  tips.appendChild(desParent)
  tips.appendChild(iosImage)
  tips.appendChild(anroidImage)
  tips.appendChild(closedImage)


  iosImage.onclick = () => {
    //console.log("iosImage.onclick")
    window.location.href = 'https://apps.apple.com/cn/app/gbm001/id1574324240'
    // window.open('https://www.baidu.com/')
  }

  anroidImage.onclick = () => {
    //console.log("anroidImage.onclick")
    window.location.href = 'https://play.google.com/store/apps/details?id=com.vandream.gbmpro'
    // window.open('https://www.sina.com.cn/')
  }

  closedImage.onclick = () => {
    console.log("closedImage.onclick")
    tips.remove()
  }


  parent.parentNode.appendChild(tips)
  //parent.appendChild(tips)


  setTimeout(() => {
    tips.style.transform = `translateY(${uni.upx2px(-140) - 50}px);`
    //console.log(" tips.style.transform done")
  }, 2500)

  // #endif
}關於js 設定變換動畫;這邊改成了3D 的形式
##
function showDownloadTisp() {
  // #ifdef H5
  const parent = document.querySelector('.uni-tabbar')
  // console.log('parent:', parent)
  const tips = document.createElement('p')
  tips.id = 'downloadTisp'

  // tips.setAttribute('style',
  //   'background: rgba(51,51,51,0.75);'
  // )

  // tips.setAttribute('style',
  //   `background: rgba(51,51,51,0.75); position: fixed;width: 100%;height: ${uni.upx2px(120)}px; bottom:${uni.upx2px(-140)}px;  display: flex;flex-direction: row;justify-content: space-between;align-items:center;transition:0.5s;`
  // )
  tips.setAttribute('style',
    `background: rgba(51,51,51,0.75); position: fixed;width: 100%;height: ${uni.upx2px(120)}px; bottom:50px;  display: flex;flex-direction: row;justify-content: space-between;align-items:center;transition:0.5s; transform-origin:center bottom; transform:perspective(900px) rotateX(90deg);`
  )

  const desParent = document.createElement('p')
  const des = document.createTextNode('Download our App, you will get a better experience.')
  desParent.appendChild(des)
  desParent.setAttribute('style',
    `padding: 0;color: #FFFFFF;font-size:${uni.upx2px(24)}px;margin-left: ${uni.upx2px(27)}px;padding-right: ${uni.upx2px(10)}px;`
  )

  const iosImage = document.createElement('img')
  // iosImage.src = '../static/guide/download ios.png'
  iosImage.src = 'https://img.vandream.com/54/0330f6211506cc.png'
  iosImage.setAttribute('style',
    `width: ${uni.upx2px(154)}px;height: ${uni.upx2px(54)}px;margin-right: ${uni.upx2px(25)}px;`)

  const anroidImage = document.createElement('img')
  // anroidImage.src = '../static/guide/download android.png'
  anroidImage.src = 'https://img.vandream.com/53/0330f45097465d.png'
  anroidImage.setAttribute('style',
    `width: ${uni.upx2px(154)}px;height: ${uni.upx2px(54)}px;margin-right: ${uni.upx2px(50)}px;`)

  const closedImage = document.createElement('img')
  // closedImage.src = '../static/guide/download closd.png'
  closedImage.src = 'https://img.vandream.com/52/0330f523d7709d.png'
  closedImage.setAttribute('style',
    `width: ${uni.upx2px(30)}px;height: ${uni.upx2px(30)}px;position: absolute;right:${uni.upx2px(15)}px;top: ${uni.upx2px(15)}px;padding: ${uni.upx2px(5)};`
  )

  tips.appendChild(desParent)
  tips.appendChild(iosImage)
  tips.appendChild(anroidImage)
  tips.appendChild(closedImage)

  iosImage.onclick = () => {
    console.log('iosImage.onclick')
    window.location.href = 'https://apps.apple.com/cn/app/gbm001/id1574324240'
    // window.open('https://www.baidu.com/')
  }

  anroidImage.onclick = () => {
    console.log('anroidImage.onclick')
    window.location.href = 'https://play.google.com/store/apps/details?id=com.vandream.gbmpro'
    // window.open('https://www.sina.com.cn/')
  }

  closedImage.onclick = () => {
    console.log('closedImage.onclick')
    tips.remove()
  }

  parent.parentNode.appendChild(tips)
  // parent.appendChild(tips)

  setTimeout(() => {
    // tips.style.transform = `translateY(${uni.upx2px(-140) - 50}px);`
    tips.style.transform = 'rotateX(0deg)'
    // console.log(" tips.style.transform done"):rotateX(90deg);
  }, 2500)

  // #endif
}【相關推薦: javascript影片教學
web前端】
以上是實例詳解之操作單一dom元素新增動畫的詳細內容。更多資訊請關注PHP中文網其他相關文章!

熱AI工具

Undresser.AI Undress
人工智慧驅動的應用程序,用於創建逼真的裸體照片

AI Clothes Remover
用於從照片中去除衣服的線上人工智慧工具。

Undress AI Tool
免費脫衣圖片

Clothoff.io
AI脫衣器

Video Face Swap
使用我們完全免費的人工智慧換臉工具,輕鬆在任何影片中換臉!

熱門文章

熱工具

記事本++7.3.1
好用且免費的程式碼編輯器

SublimeText3漢化版
中文版,非常好用

禪工作室 13.0.1
強大的PHP整合開發環境

Dreamweaver CS6
視覺化網頁開發工具

SublimeText3 Mac版
神級程式碼編輯軟體(SublimeText3)
 如何使用WebSocket和JavaScript實現線上語音辨識系統
Dec 17, 2023 pm 02:54 PM
如何使用WebSocket和JavaScript實現線上語音辨識系統引言:隨著科技的不斷發展,語音辨識技術已成為了人工智慧領域的重要組成部分。而基於WebSocket和JavaScript實現的線上語音辨識系統,具備了低延遲、即時性和跨平台的特點,成為了廣泛應用的解決方案。本文將介紹如何使用WebSocket和JavaScript來實現線上語音辨識系
 WebSocket與JavaScript:實現即時監控系統的關鍵技術
Dec 17, 2023 pm 05:30 PM
WebSocket與JavaScript:實現即時監控系統的關鍵技術引言:隨著互聯網技術的快速發展,即時監控系統在各個領域中得到了廣泛的應用。而實現即時監控的關鍵技術之一就是WebSocket與JavaScript的結合使用。本文將介紹WebSocket與JavaScript在即時監控系統中的應用,並給出程式碼範例,詳細解釋其實作原理。一、WebSocket技
 如何利用JavaScript和WebSocket實現即時線上點餐系統
Dec 17, 2023 pm 12:09 PM
如何利用JavaScript和WebSocket實現即時線上點餐系統介紹:隨著網路的普及和技術的進步,越來越多的餐廳開始提供線上點餐服務。為了實現即時線上點餐系統,我們可以利用JavaScript和WebSocket技術。 WebSocket是一種基於TCP協定的全雙工通訊協議,可實現客戶端與伺服器的即時雙向通訊。在即時線上點餐系統中,當使用者選擇菜餚並下訂單
 如何使用WebSocket和JavaScript實現線上預約系統
Dec 17, 2023 am 09:39 AM
如何使用WebSocket和JavaScript實現線上預約系統在當今數位化的時代,越來越多的業務和服務都需要提供線上預約功能。而實現一個高效、即時的線上預約系統是至關重要的。本文將介紹如何使用WebSocket和JavaScript來實作一個線上預約系統,並提供具體的程式碼範例。一、什麼是WebSocketWebSocket是一種在單一TCP連線上進行全雙工
 JavaScript與WebSocket:打造高效率的即時天氣預報系統
Dec 17, 2023 pm 05:13 PM
JavaScript和WebSocket:打造高效的即時天氣預報系統引言:如今,天氣預報的準確性對於日常生活以及決策制定具有重要意義。隨著技術的發展,我們可以透過即時獲取天氣數據來提供更準確可靠的天氣預報。在本文中,我們將學習如何使用JavaScript和WebSocket技術,來建立一個高效的即時天氣預報系統。本文將透過具體的程式碼範例來展示實現的過程。 We
 簡易JavaScript教學:取得HTTP狀態碼的方法
Jan 05, 2024 pm 06:08 PM
JavaScript教學:如何取得HTTP狀態碼,需要具體程式碼範例前言:在Web開發中,經常會涉及到與伺服器進行資料互動的場景。在與伺服器進行通訊時,我們經常需要取得傳回的HTTP狀態碼來判斷操作是否成功,並根據不同的狀態碼來進行對應的處理。本篇文章將教你如何使用JavaScript來取得HTTP狀態碼,並提供一些實用的程式碼範例。使用XMLHttpRequest
 javascript如何使用insertBefore
Nov 24, 2023 am 11:56 AM
用法:在JavaScript中,insertBefore()方法用於在DOM樹中插入一個新的節點。這個方法需要兩個參數:要插入的新節點和參考節點(即新節點將要插入的位置的節點)。
 JavaScript與WebSocket:打造高效率的即時影像處理系統
Dec 17, 2023 am 08:41 AM
JavaScript是一種廣泛應用於Web開發的程式語言,而WebSocket則是一種用於即時通訊的網路協定。結合二者的強大功能,我們可以打造一個高效率的即時影像處理系統。本文將介紹如何利用JavaScript和WebSocket來實作這個系統,並提供具體的程式碼範例。首先,我們需要明確指出即時影像處理系統的需求和目標。假設我們有一個攝影機設備,可以擷取即時的影像數


