Vue實例的生命週期詳解之從創建到銷毀全過程
這篇文章為大家帶來了關於vue的相關知識,其中主要介紹了關於vue實例的生命週期從創建到銷毀的全過程,生命週期是每個Vue實例在被創作時都要經過一系列的初始化過程,下面一起來看看,希望對大家有幫助。

【相關推薦:javascript影片教學、vue.js教學】
Vue的生命週期一直以來都是重中之重,雖然在實際開發中經常用到的就幾個,但是你對生命週期的掌握程度決定著你寫的程序好不好,並且這一塊也一直是面試Vue部分的重要考點。
初識new Vue
關於new Vue 大家應該都知道,new關鍵字在js就是實例化一個物件。那麼 new Vue 都做了啥?
其實,new Vue就是創建了一個Vue實例,Vue實例上是一個類別,new Vue實際上是執行了Vue類別的建構子
建立Vue實例:
let vm = new Vue({
   el: "#app",
   data: {
       name: 'beiyu'
   },
}那麼關於這個實例,從它初始化到銷毀,都經歷了什麼?下面一起來看看:
Vue實例從創建到銷毀
實例從創建到銷毀的過程我們稱為生命週期
生命週期的基本概念:
每個Vue實例在被建立時都要經過一系列的初始化過程。
例如:需要設定資料監聽、編譯範本、將實例掛載到DOM並在資料變更時更新DOM等。同時在這個過程中也會執行一些叫做生命週期鉤子的函數,這給了使用者在不同階段加入自己程式碼的機會。
1.創建之前—beforeCreate()
Vue實例物件建立之前
el屬性和data屬性均為空,常用於初始化非響應式變量
beforeCreate() {
    console.group("---创建前beforeCreate---")
    console.log('%c%s', 'color: red', 'el:' + this.$el)
    console.log('%c%s', 'color: red', 'data:' + this.$data)
},2.建立之後—created()
Vue實例物件建立之後
data屬性存在,el屬性為空,ref屬性內容為空數組,常用於進行axios請求,頁面的初始化等。但這裡不要請求過多,否則會出現長時間的白屏現象。
created() {
    console.group("---创建之后created---")
    console.log('%c%s', 'color: red', 'el:' + this.$el)
    console.log('%c%s', 'color: red', 'data:' + this.$data, this.$data.name)
},3.實例物件和文件掛載之前—beforeMount()
Vue實例物件和文件掛載之前,會去找對應的template
beforeMount() {
    // 这个时候$el属性是绑定之前的值
    console.group("---挂载之前beforeMount---")
    console.log('%c%s', 'color: red', 'el:' + this.$el, this.$el.innerHTML)
    console.log('%c%s', 'color: red', 'data:' + this.$data, this.$data.name)
},4.實例物件與文件掛載之後—mounted()
Vue實例物件與文件節點掛載之後
el屬性存在,ref屬性可以存取
mounted() {
    console.group("---挂载之后mounted---")
    console.log('%c%s', 'color: red', 'el:' + this.$el, this.$el.innerHTML)
    console.log('%c%s', 'color: red', 'data:' + this.$data, this.$data.name)
},5.檢視更新前—beforeUpdate()
View檢視更新之前
響應式資料更新時呼叫
beforeUpdate() {
    console.group("---更新之前beforeUpdate---")
    console.log('%c%s', 'color: red', 'el:' + this.$el, this.$el.innerHTML)
},# 6.視圖更新後—updated()
View視圖更新之後
DOM更新完畢,不要在這裡操作數據,可能陷入死循環
updated() {
    console.group("---更新之后updated---")
    console.log('%c%s', 'color: red', 'el:' + this.$el, this.$el.innerHTML)
},7 .實例銷毀之前—beforeDestroy()
Vue實例物件銷毀之前|此時el和data全都還在,一般會在這一步驟進行銷毀定時器、解綁定全域事件、銷毀插件對象等操作。
beforeDestroy() {
    console.group("---销毁之前beforeDestroy---")
console.log('%c%s', 'color: red', 'el:' + this.$el, this.$el.innerHTML)},8.實例銷毀之後—destroyed()
Vue實例物件銷毀之後|
destroyed() {
    console.group("---销毁之后destroyed---")
console.log('%c%s', 'color: red', 'el:' + this.$el, this.$el.innerHTML)},總結
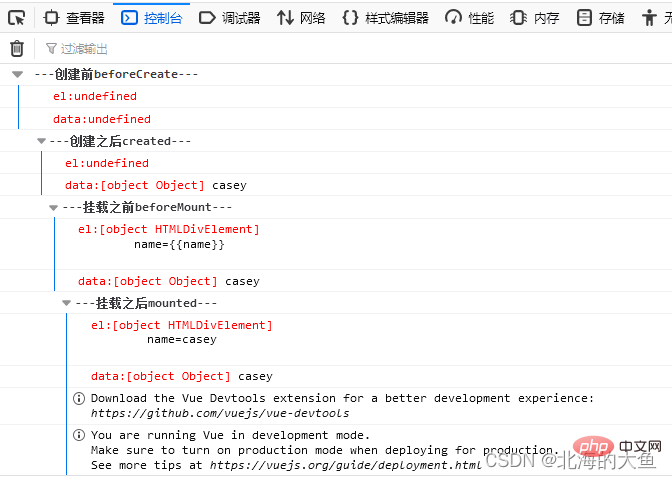
#vue2生命週期就是以上8個過程,在頁面中我們來看一看,上面的打印結果:
從頁面打開到完成一共經過四個生命週期,因為這裡頁面沒有其他操作,所以剩下的四個生命週期沒有對應的顯示出來

【相關推薦:javascript影片教學、vue.js教學】
以上是Vue實例的生命週期詳解之從創建到銷毀全過程的詳細內容。更多資訊請關注PHP中文網其他相關文章!

熱AI工具

Undresser.AI Undress
人工智慧驅動的應用程序,用於創建逼真的裸體照片

AI Clothes Remover
用於從照片中去除衣服的線上人工智慧工具。

Undress AI Tool
免費脫衣圖片

Clothoff.io
AI脫衣器

Video Face Swap
使用我們完全免費的人工智慧換臉工具,輕鬆在任何影片中換臉!

熱門文章

熱工具

記事本++7.3.1
好用且免費的程式碼編輯器

SublimeText3漢化版
中文版,非常好用

禪工作室 13.0.1
強大的PHP整合開發環境

Dreamweaver CS6
視覺化網頁開發工具

SublimeText3 Mac版
神級程式碼編輯軟體(SublimeText3)
 vue中怎麼用bootstrap
Apr 07, 2025 pm 11:33 PM
在 Vue.js 中使用 Bootstrap 分為五個步驟:安裝 Bootstrap。在 main.js 中導入 Bootstrap。直接在模板中使用 Bootstrap 組件。可選:自定義樣式。可選:使用插件。
 vue怎麼給按鈕添加函數
Apr 08, 2025 am 08:51 AM
可以通過以下步驟為 Vue 按鈕添加函數:將 HTML 模板中的按鈕綁定到一個方法。在 Vue 實例中定義該方法並編寫函數邏輯。
 vue中的watch怎麼用
Apr 07, 2025 pm 11:36 PM
Vue.js 中的 watch 選項允許開發者監聽特定數據的變化。當數據發生變化時,watch 會觸發一個回調函數,用於執行更新視圖或其他任務。其配置選項包括 immediate,用於指定是否立即執行回調,以及 deep,用於指定是否遞歸監聽對像或數組的更改。
 vue多頁面開發是啥意思
Apr 07, 2025 pm 11:57 PM
Vue 多頁面開發是一種使用 Vue.js 框架構建應用程序的方法,其中應用程序被劃分為獨立的頁面:代碼維護性:將應用程序拆分為多個頁面可以使代碼更易於管理和維護。模塊化:每個頁面都可以作為獨立的模塊,便於重用和替換。路由簡單:頁面之間的導航可以通過簡單的路由配置來管理。 SEO 優化:每個頁面都有自己的 URL,這有助於搜索引擎優化。
 vue返回上一頁的方法
Apr 07, 2025 pm 11:30 PM
Vue.js 返回上一頁有四種方法:$router.go(-1)$router.back()使用 <router-link to="/"> 組件window.history.back(),方法選擇取決於場景。
 vue.js怎麼引用js文件
Apr 07, 2025 pm 11:27 PM
在 Vue.js 中引用 JS 文件的方法有三種:直接使用 <script> 標籤指定路徑;利用 mounted() 生命週期鉤子動態導入;通過 Vuex 狀態管理庫進行導入。
 vue遍歷怎麼用
Apr 07, 2025 pm 11:48 PM
Vue.js 遍歷數組和對像有三種常見方法:v-for 指令用於遍歷每個元素並渲染模板;v-bind 指令可與 v-for 一起使用,為每個元素動態設置屬性值;.map 方法可將數組元素轉換為新數組。
 vue的div怎麼跳轉
Apr 08, 2025 am 09:18 AM
Vue 中 div 元素跳轉的方法有兩種:使用 Vue Router,添加 router-link 組件。添加 @click 事件監聽器,調用 this.$router.push() 方法跳轉。


