

vue引入Element-plus的全域引入與局部引入(附程式碼)

這篇文章為大家帶來了關於vue的相關知識,其中主要介紹了關於vue3集成Element-plus使用全局引入以及局部引入方法的相關問題,下面一起來看一下,希望對大家有幫助。
【相關推薦:javascript影片教學、vue.js教學】
首先下載element- plus
npm install element-plus
1、第一種方式,使用全局引入
引入element-plus的方式是全局引入,代表的含義是所有的元件和外掛程式都會被自動註冊,
優點:上手快
缺點:會增加大包的體積
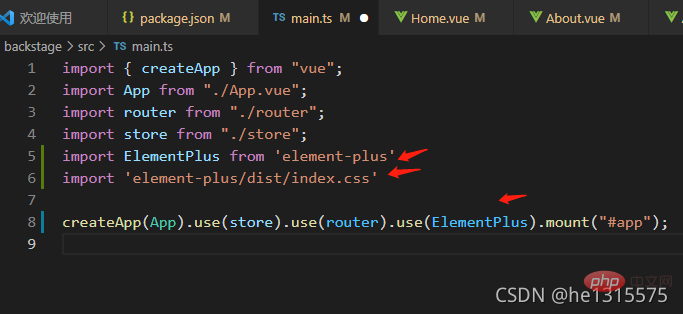
在main.ts檔中
import { createApp } from 'vue'
// 全局引入
import ElementPlus from 'element-plus'
import 'element-plus/dist/index.css'
import App from './App.vue'
import router from './router'
import store from './store'
const app = createApp(App)
app.use(router)
app.use(store)
app.use(ElementPlus)
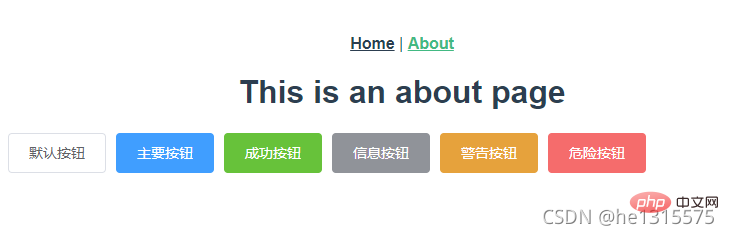
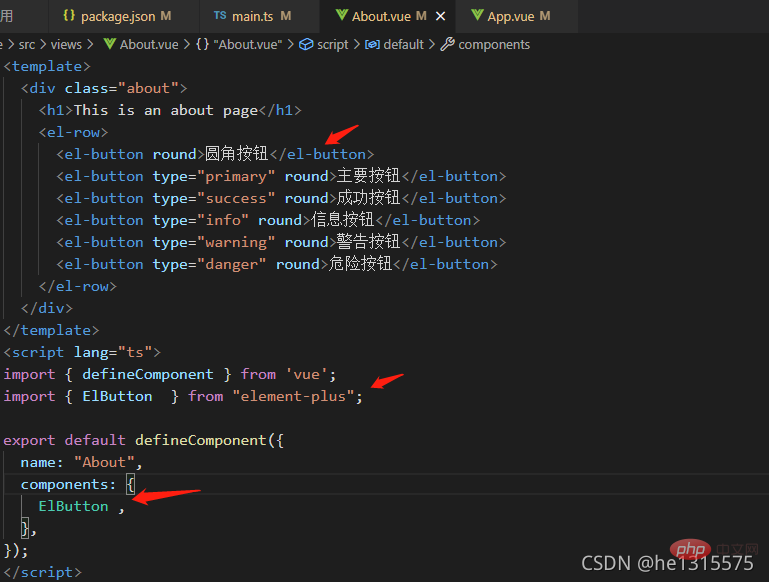
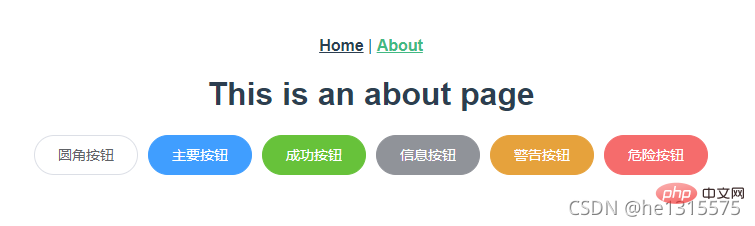
app.mount('#app')2、第二種方式,使用局部引入
局部引入也就是在開發中用到某個元件對某個元件進行引入,
<template>
<div>
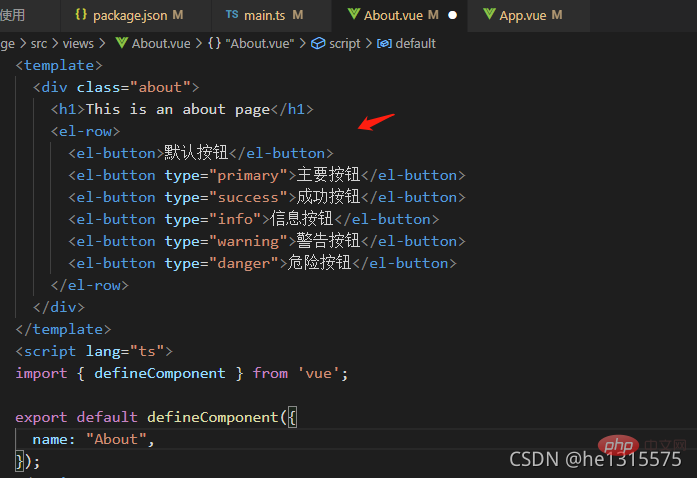
<el-button>Default</el-button>
<el-button type="primary">Primary</el-button>
<el-button type="success">Success</el-button>
<el-button type="info">Info</el-button>
<el-button type="warning">Warning</el-button>
<el-button type="danger">Danger</el-button>
<el-button>中文</el-button>
</div>
</template>
<script>
import { defineComponent } from 'vue'
// 局部引入
import { ElButton } from 'element-plus'
import 'element-plus/theme-chalk/el-button.css'
import 'element-plus/theme-chalk/base.css'
export default defineComponent({
components: { ElButton },
setup() {
return {}
}
})
</script>
<style></style>但是這樣我們在開發時每次使用都要手動在元件中引入對應的css樣式,使用起來會比較麻煩
3、按需自動引入element-plus 推薦
需要安裝unplugin-vue-components 和 unplugin-##unplugin- auto-import這兩款外掛程式
npm install -D unplugin-vue-components unplugin-auto-import
安裝完成之後在vue.config.js檔案中設定
// vue.config.js
const AutoImport = require('unplugin-auto-import/webpack')
const Components = require('unplugin-vue-components/webpack')
const { ElementPlusResolver } = require('unplugin-vue-components/resolvers')
module.exports = {
  outputDir: './build',
  // 和webpapck属性完全一致,最后会进行合并
  configureWebpack: {
    resolve: {
      alias: {
        components: '@/components'
      }
    },
    //配置webpack自动按需引入element-plus,
      plugins: [
        AutoImport({
          resolvers: [ElementPlusResolver()]
        }),
        Components({
          resolvers: [ElementPlusResolver()]
        })
      ]
  }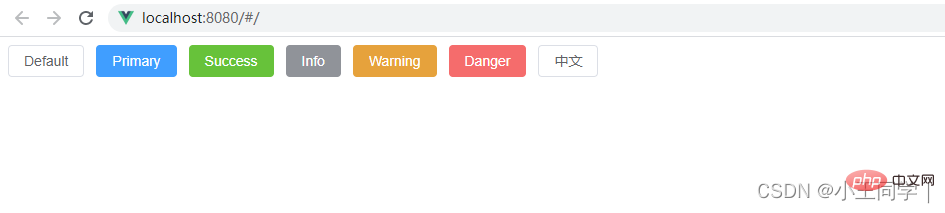
}按需自動引入設定完後,在元件中可直接使用,不需要引用和註冊這裡已經實現了按需自動移入Element-plus元件元件中直接使用:
<template>
<div>
<el-button>Default</el-button>
<el-button type="primary">Primary</el-button>
<el-button type="success">Success</el-button>
<el-button type="info">Info</el-button>
<el-button type="warning">Warning</el-button>
<el-button type="danger">Danger</el-button>
<el-button>中文</el-button>
</div>
</template>
<script>
import { defineComponent } from 'vue'
export default defineComponent({
setup() {
return {}
}
})
</script>
<style></style>效果:
擴充:
方式一,全域參考(所有的元件全部整合)
#優點:整合比較簡單
缺點:元件與樣式全部會打包,體積大
用法:npm install element-plus --save
在main.ts中,引用js與css檔案
以About.vue頁面為例,直接在頁面中使用相關元件就行,元件已預設全域註冊,不需要在頁面中重新註冊
方式二:局部引用(隨選引用)
優點:套件會小一點
缺點:引用比較麻煩一點
用法一:以About .vue頁面為例,在頁面中引用js文件,局部註冊元件,樣式依然是全域引用,官方推薦
【相關推薦:javascript影片教學、vue.js教學】
以上是vue引入Element-plus的全域引入與局部引入(附程式碼)的詳細內容。更多資訊請關注PHP中文網其他相關文章!

熱AI工具

Undresser.AI Undress
人工智慧驅動的應用程序,用於創建逼真的裸體照片

AI Clothes Remover
用於從照片中去除衣服的線上人工智慧工具。

Undress AI Tool
免費脫衣圖片

Clothoff.io
AI脫衣器

Video Face Swap
使用我們完全免費的人工智慧換臉工具,輕鬆在任何影片中換臉!

熱門文章
熱工具

記事本++7.3.1
好用且免費的程式碼編輯器

SublimeText3漢化版
中文版,非常好用

禪工作室 13.0.1
強大的PHP整合開發環境

Dreamweaver CS6
視覺化網頁開發工具

SublimeText3 Mac版
神級程式碼編輯軟體(SublimeText3)


 vue中怎麼用bootstrap
Apr 07, 2025 pm 11:33 PM
vue中怎麼用bootstrap
Apr 07, 2025 pm 11:33 PM
在 Vue.js 中使用 Bootstrap 分為五個步驟:安裝 Bootstrap。在 main.js 中導入 Bootstrap。直接在模板中使用 Bootstrap 組件。可選:自定義樣式。可選:使用插件。
 vue怎麼給按鈕添加函數
Apr 08, 2025 am 08:51 AM
vue怎麼給按鈕添加函數
Apr 08, 2025 am 08:51 AM
可以通過以下步驟為 Vue 按鈕添加函數:將 HTML 模板中的按鈕綁定到一個方法。在 Vue 實例中定義該方法並編寫函數邏輯。
 vue中的watch怎麼用
Apr 07, 2025 pm 11:36 PM
vue中的watch怎麼用
Apr 07, 2025 pm 11:36 PM
Vue.js 中的 watch 選項允許開發者監聽特定數據的變化。當數據發生變化時,watch 會觸發一個回調函數,用於執行更新視圖或其他任務。其配置選項包括 immediate,用於指定是否立即執行回調,以及 deep,用於指定是否遞歸監聽對像或數組的更改。
 vue多頁面開發是啥意思
Apr 07, 2025 pm 11:57 PM
vue多頁面開發是啥意思
Apr 07, 2025 pm 11:57 PM
Vue 多頁面開發是一種使用 Vue.js 框架構建應用程序的方法,其中應用程序被劃分為獨立的頁面:代碼維護性:將應用程序拆分為多個頁面可以使代碼更易於管理和維護。模塊化:每個頁面都可以作為獨立的模塊,便於重用和替換。路由簡單:頁面之間的導航可以通過簡單的路由配置來管理。 SEO 優化:每個頁面都有自己的 URL,這有助於搜索引擎優化。
 vue返回上一頁的方法
Apr 07, 2025 pm 11:30 PM
vue返回上一頁的方法
Apr 07, 2025 pm 11:30 PM
Vue.js 返回上一頁有四種方法:$router.go(-1)$router.back()使用 <router-link to="/"> 組件window.history.back(),方法選擇取決於場景。
 vue.js怎麼引用js文件
Apr 07, 2025 pm 11:27 PM
vue.js怎麼引用js文件
Apr 07, 2025 pm 11:27 PM
在 Vue.js 中引用 JS 文件的方法有三種:直接使用 <script> 標籤指定路徑;利用 mounted() 生命週期鉤子動態導入;通過 Vuex 狀態管理庫進行導入。
 vue遍歷怎麼用
Apr 07, 2025 pm 11:48 PM
vue遍歷怎麼用
Apr 07, 2025 pm 11:48 PM
Vue.js 遍歷數組和對像有三種常見方法:v-for 指令用於遍歷每個元素並渲染模板;v-bind 指令可與 v-for 一起使用,為每個元素動態設置屬性值;.map 方法可將數組元素轉換為新數組。
 vue的div怎麼跳轉
Apr 08, 2025 am 09:18 AM
vue的div怎麼跳轉
Apr 08, 2025 am 09:18 AM
Vue 中 div 元素跳轉的方法有兩種:使用 Vue Router,添加 router-link 組件。添加 @click 事件監聽器,調用 this.$router.push() 方法跳轉。
