一起分析MySQL中replace into與replace差異
這篇文章為大家帶來了關於mysql的相關知識,其中主要介紹了MySQL中replace into與replace區別詳解,文中透過範例程式碼介紹的非常詳細,對大家的學習或工作有一定的參考學習價值,希望對大家有幫助。

推薦學習:mysql影片教學
本篇為拋磚引玉篇,之前沒關注過replace into 與replace 的差別。經過多個場景測試,居然沒找到在插入資料的時候兩者有什麼本質的差別?若了解詳情的夥伴們,請告知留言告知一二,不勝感激! ! !
0.故事的背景
【表格結構】
CREATE TABLE `xtp_algo_white_list` (
  `strategy_type` int DEFAULT NULL,
  `user_name` varchar(64) COLLATE utf8_bin DEFAULT NULL,
  `status` int DEFAULT NULL,
  `destroy_at` datetime DEFAULT NULL,
  `created_at` datetime DEFAULT CURRENT_TIMESTAMP,
  `updated_at` datetime DEFAULT CURRENT_TIMESTAMP,
  UNIQUE KEY `xtp_algo_white_list_UN` (`strategy_type`,`user_name`)
) ENGINE=InnoDB DEFAULT CHARSET=utf8 COLLATE=utf8_bin


# `strategy_type`,`user_name` 这两个是联合唯一索引,多关注后续需要用到!!!

【需求:】
- 根據表格裡面,209133002266帳戶的數據,重新插入一個使用者20220302001, 使得新產生的資料中strategy_type & status & destroy_at 欄位與209133002266使用者的一致。
- 使用update 一則更新也行,但是比較慢。
- 使用replace into 效果會高很多,但深入研究發現也有一些坑的地方
1.replace into 的使用方法
replace into xtp_algo_white_list (`strategy_type`, `user_name`, `status`, `destroy_at`)
select strategy_type ,20220302001, status, destroy_at from xtp_algo_white_list xawl where xawl.user_name = 209133002266;

# replace into 后面跟表格+需要插入的所有字段名(自动递增字段不用写)
# select 后面选择的字段,如果根据查询结果取值,则写字段名;如果是写死的,则直接写具体值即可
# 可以理解为,第一部分是插入表格的结构,第二部分是你查询的数据结果
2.有唯一索引時—replace into & 與replace 效果
step1: 第一次執行sql狀況
replace into xtp_algo_white_list (`strategy_type`, `user_name`, `status`, `destroy_at`)
select strategy_type ,20220302001, status, destroy_at from xtp_algo_white_list xawl where xawl.user_name = 209133002266;


# 此时执行的是replace

replace xtp_algo_white_list (`strategy_type`, `user_name`, `status`, `destroy_at`)
select strategy_type ,20220302001, status, destroy_at from xtp_algo_white_list xawl where xawl.user_name = 209133002266;


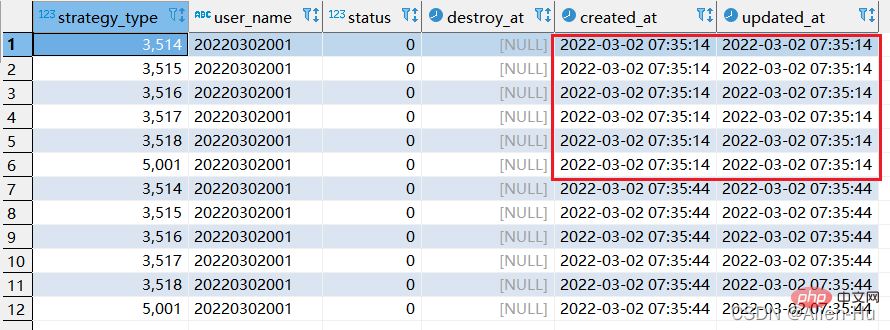
- #最終檢視到的情況與第二次執行的sql一樣。 當新資料已經存在的時候,replace into 與replace是一樣的後續刪除所有20220302001,執行1次,2次sql,發現replace into 與replace 效果都是一樣的
CREATE TABLE `xtp_algo_white_list` (
  `strategy_type` int DEFAULT NULL,
  `user_name` varchar(64) COLLATE utf8_bin DEFAULT NULL,
  `status` int DEFAULT NULL,
  `destroy_at` datetime DEFAULT NULL,
  `created_at` datetime DEFAULT CURRENT_TIMESTAMP,
  `updated_at` datetime DEFAULT CURRENT_TIMESTAMP
) ENGINE=InnoDB DEFAULT CHARSET=utf8 COLLATE=utf8_bin
replace xtp_algo_white_list (`strategy_type`, `user_name`, `status`, `destroy_at`)
select strategy_type ,20220302001, status, destroy_at from xtp_algo_white_list xawl where xawl.user_name = 209133002266;


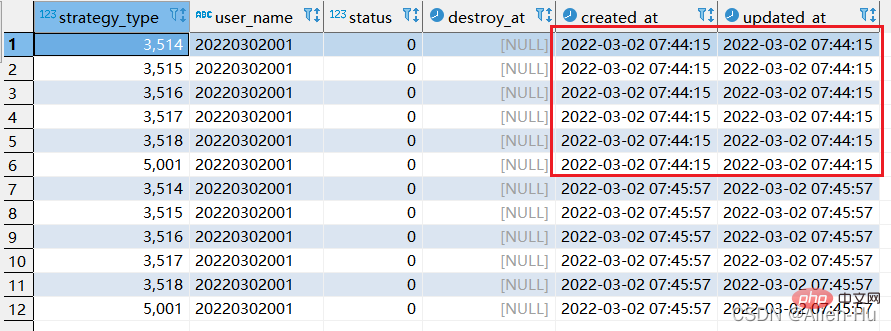
- #第二次執行replace 對應sql ,因為沒有唯一索引限制,結果原始資料居然沒變動。又重新產生了新的6條資料。 如果後續也執行如上的sql,則資料也會繼續增加
replace into xtp_algo_white_list (`strategy_type`, `user_name`, `status`, `destroy_at`)
select strategy_type ,20220302001, status, destroy_at from xtp_algo_white_list xawl where xawl.user_name = 209133002266;


step2:再次执行replace into 对应sql:


最终发现,没有唯一索引的时候,replace into 与replace 居然一摸一样的效果,都是继续增加数据。
通过以上分析,没看出replace into 与replace 具体有啥区别????有谁知道呢?
4.replace的用法
- 单独replace的作用是替换字段中某数值的显示效果。可以数值中的部分替换、也可以全部替换。
- 如下表格,将user_name的字段,20220302改为"A_20220303"显示,并且新字段叫做new_name显示

select *, replace(user_name,20220302,'A_20220303') as "new_name" from xtp_algo_white_list where user_name = 20220302001;

推荐学习:mysql视频教程
以上是一起分析MySQL中replace into與replace差異的詳細內容。更多資訊請關注PHP中文網其他相關文章!

熱AI工具

Undresser.AI Undress
人工智慧驅動的應用程序,用於創建逼真的裸體照片

AI Clothes Remover
用於從照片中去除衣服的線上人工智慧工具。

Undress AI Tool
免費脫衣圖片

Clothoff.io
AI脫衣器

AI Hentai Generator
免費產生 AI 無盡。

熱門文章

熱工具

記事本++7.3.1
好用且免費的程式碼編輯器

SublimeText3漢化版
中文版,非常好用

禪工作室 13.0.1
強大的PHP整合開發環境

Dreamweaver CS6
視覺化網頁開發工具

SublimeText3 Mac版
神級程式碼編輯軟體(SublimeText3)

熱門話題
 MySQL:初學者的數據管理易用性
Apr 09, 2025 am 12:07 AM
MySQL適合初學者使用,因為它安裝簡單、功能強大且易於管理數據。 1.安裝和配置簡單,適用於多種操作系統。 2.支持基本操作如創建數據庫和表、插入、查詢、更新和刪除數據。 3.提供高級功能如JOIN操作和子查詢。 4.可以通過索引、查詢優化和分錶分區來提升性能。 5.支持備份、恢復和安全措施,確保數據的安全和一致性。
 忘記數據庫密碼,能在Navicat中找回嗎?
Apr 08, 2025 pm 09:51 PM
Navicat本身不存儲數據庫密碼,只能找回加密後的密碼。解決辦法:1. 檢查密碼管理器;2. 檢查Navicat的“記住密碼”功能;3. 重置數據庫密碼;4. 聯繫數據庫管理員。
 navicat premium怎麼創建
Apr 09, 2025 am 07:09 AM
使用 Navicat Premium 創建數據庫:連接到數據庫服務器並輸入連接參數。右鍵單擊服務器並選擇“創建數據庫”。輸入新數據庫的名稱和指定字符集和排序規則。連接到新數據庫並在“對象瀏覽器”中創建表。右鍵單擊表並選擇“插入數據”來插入數據。
 Navicat for MariaDB如何查看數據庫密碼?
Apr 08, 2025 pm 09:18 PM
Navicat for MariaDB 無法直接查看數據庫密碼,因為密碼以加密形式存儲。為確保數據庫安全,有三個方法可重置密碼:通過 Navicat 重置密碼,設置複雜密碼。查看配置文件(不推薦,風險高)。使用系統命令行工具(不推薦,需要對命令行工具精通)。
 mysql:簡單的概念,用於輕鬆學習
Apr 10, 2025 am 09:29 AM
MySQL是一個開源的關係型數據庫管理系統。 1)創建數據庫和表:使用CREATEDATABASE和CREATETABLE命令。 2)基本操作:INSERT、UPDATE、DELETE和SELECT。 3)高級操作:JOIN、子查詢和事務處理。 4)調試技巧:檢查語法、數據類型和權限。 5)優化建議:使用索引、避免SELECT*和使用事務。
 navicat如何執行sql
Apr 08, 2025 pm 11:42 PM
在 Navicat 中執行 SQL 的步驟:連接到數據庫。創建 SQL 編輯器窗口。編寫 SQL 查詢或腳本。單擊“運行”按鈕執行查詢或腳本。查看結果(如果執行查詢的話)。
 navicat怎麼新建連接mysql
Apr 09, 2025 am 07:21 AM
可在 Navicat 中通過以下步驟新建 MySQL 連接:打開應用程序並選擇“新建連接”(Ctrl N)。選擇“MySQL”作為連接類型。輸入主機名/IP 地址、端口、用戶名和密碼。 (可選)配置高級選項。保存連接並輸入連接名稱。
 Navicat 無法連接 MySQL/MariaDB/PostgreSQL 等數據庫的解決方法
Apr 08, 2025 pm 11:00 PM
Navicat 無法連接數據庫的常見原因及其解決方法:1. 檢查服務器運行狀態;2. 核對連接信息;3. 調整防火牆設置;4. 配置遠程訪問;5. 排除網絡問題;6. 檢查權限;7. 保障版本兼容性;8. 排除其他可能性。


