

帶你使用Vue搞定無法解決的'動態掛載”


在一些特殊場景下,使用元件的時機無法確定,或者無法在Vue的template中確定要我們要使用的元件,這時就需要動態的掛載元件,或使用執行時間編譯動態建立元件並掛載。
今天我們將帶大家從實際專案出發,看看在實際解決客戶問題時,如何將元件進行動態掛載,並為大家展示一個完整的解決動態掛載問題的完整過程。

無法解決的「動態掛載」
#我們的電子表格控制項SpreadJS在運行時,存在這樣一個功能:當使用者雙擊儲存格會顯示一個輸入框用於編輯儲存格的內容,使用者可以根據需求按照自訂儲存格類型的規格自訂輸入框的形式,整合任何Form表單輸入類型。
這個輸入框的創建銷毀都是透過繼承單元格類型對應方法實現的,因此這裡就存在一個問題——這個動態的創建方式並不能簡單在VUE template中配置,然後直接使用。 【相關推薦:vuejs影片教學】

#而就在前不久,客戶問然詢問我:你家控制項的自訂儲存格是否支援Vue元件比如ElementUI的AutoComplete?
由於前面提到的這個問題:

沉思許久,我認真給客戶回复:“組件運行生命週期不一致,用不了”,但又話鋒一轉,表示可以使用通用元件解決這個問題。
問題呢,是順利解決了。
但是這個無奈的"用不了",卻也成為我這幾天午夜夢回跨不去的坎。

#後來,某天看Vue文件時,我想到App是運行時掛載到#app上的。 ,從理論上來說,其他元件也應該能動態掛載到需要的Dom上,這樣創建時機的問題不就解決了嘛!
正式開啟動態掛載
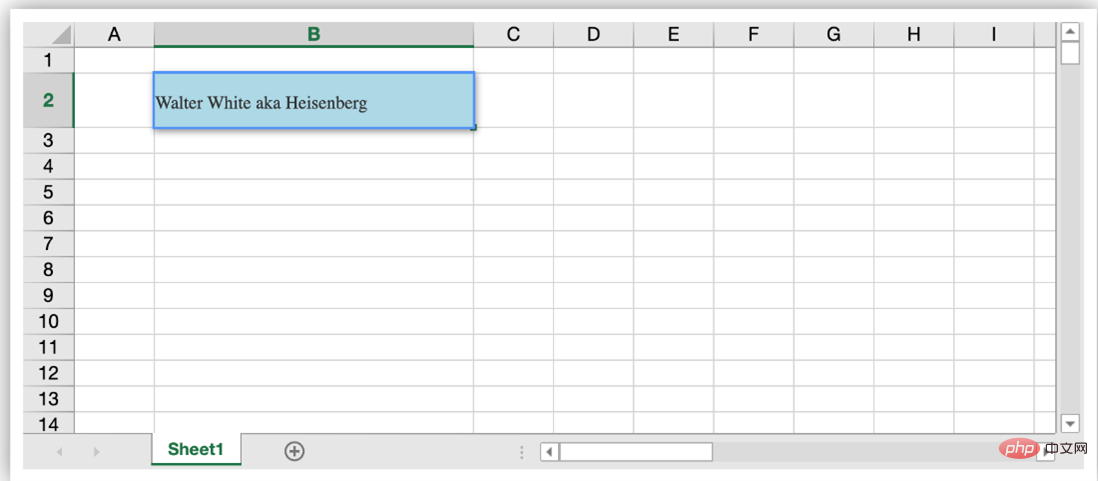
讓我們繼續查看文檔,全域APIVue.extend( options )是透過extend建立的。 Vue實例可以使用$mount方法直接掛載到DOM元素上-這正是我們所需要的。
<div id="mount-point"></div>

// 创建构造器
var Profile = Vue.extend({
  template: '<p>{{firstName}} {{lastName}} aka {{alias}}</p>',
  data: function () {
    return {
      firstName: 'Walter',
      lastName: 'White',
      alias: 'Heisenberg'
    }
  }
})
// 创建 Profile 实例,并挂载到一个元素上。
new Profile().$mount('#mount-point')依照SpreadJS自訂單元格範例建立AutoCompleteCellType,並設定到儲存格中:
function AutoComplateCellType() {
}
AutoComplateCellType.prototype = new GC.Spread.Sheets.CellTypes.Base();
AutoComplateCellType.prototype.createEditorElement = function (context, cellWrapperElement) {
//   cellWrapperElement.setAttribute("gcUIElement", "gcEditingInput");
  cellWrapperElement.style.overflow = 'visible'
  let editorContext = document.createElement("div")
  editorContext.setAttribute("gcUIElement", "gcEditingInput");
  let editor = document.createElement("div");
  // 自定义单元格中editorContext作为容器,需要在创建一个child用于挂载,不能直接挂载到editorContext上
  editorContext.appendChild(editor);
  return editorContext;
}
AutoComplateCellType.prototype.activateEditor = function (editorContext, cellStyle, cellRect, context) {
    let width = cellRect.width > 180 ? cellRect.width : 180;
    if (editorContext) {
      // 创建构造器
      var Profile = Vue.extend({
        template: '<p>{{firstName}} {{lastName}} aka {{alias}}</p>',
        data: function () {
          return {
            firstName: 'Walter',
            lastName: 'White',
            alias: 'Heisenberg'
          }
        }
      })
      // 创建 Profile 实例,并挂载到一个元素上。
      new Profile().$mount(editorContext.firstChild);
    }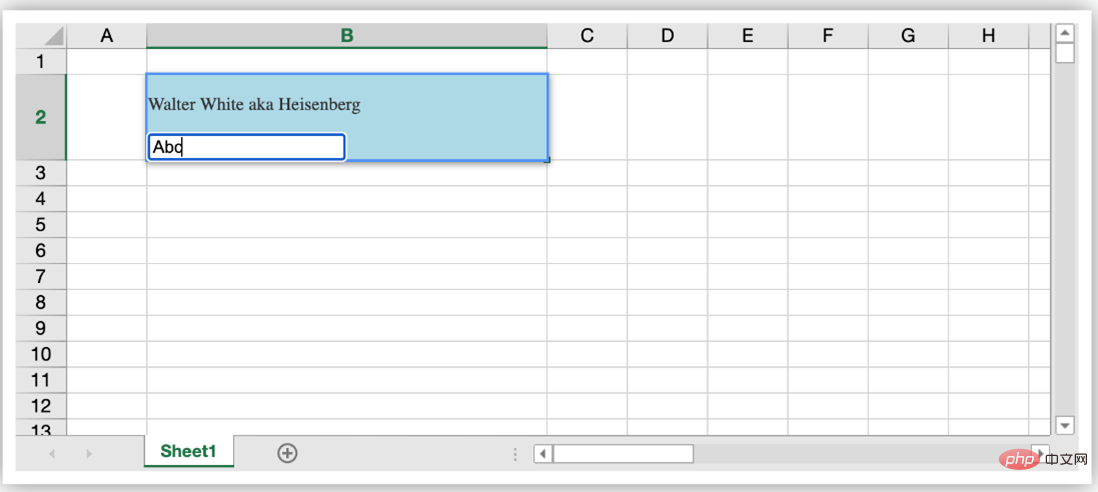
};運行,雙擊進入編輯狀態,結果卻發現報錯了
[Vue warn]: You are using the runtime-only build of Vue where the template compiler is not available. Either pre-compile the templates into render functions, or use the compiler-included templates into render functions, or use the compiler-included build.
根據報錯提示,此時候我們有兩種解決方法:
- 開啟runtimeCompiler,在vue.config.js中加入runtimeCompiler: true的配置,允許執行時間編譯,這樣可以動態產生template,滿足動態元件的需求
- 提前編譯模板僅動態掛載,autocomplete的元件是確定的,我們可以使用這個方法
- 新AutoComplete.vue元件用於動態掛載,這樣可以掛載編譯好的元件。
<template>
  <div>
    <p>{{ firstName }} {{ lastName }} aka {{ alias }}</p>
  </div>
</template>
<script>
export default {
  data: function () {
    return {
      firstName: "Walter",
      lastName: "White",
      alias: "Heisenberg",
    };
  },
};
</script>


import AutoComplate from './AutoComplate.vue'


AutoComplateCellType.prototype.activateEditor = function (editorContext, cellStyle, cellRect, context) {
    let width = cellRect.width > 180 ? cellRect.width : 180;
    if (editorContext) {
      // 创建构造器
      var Profile = Vue.extend(AutoComplate);
      // 创建 Profile 实例,并挂载到一个元素上。
      new Profile().$mount(editorContext.firstChild);
    }
};雙擊進入編輯狀態,看到元件中的內容
 #下一步,對於自訂儲存格還需要設定和取得元件中的編輯內容,這時透過為元件新增props,同時在掛載時建立的VueComponent實例上直接取得到所有props內容,對應操作即可實現資料擷取設定。
更新AutoComplate.vue,新增props,增加input用於編輯
<template>
  <div>
    <p>{{ firstName }} {{ lastName }} aka {{ alias }}</p>
    <input type="text" v-model="value">
  </div>
</template>
<script>
export default {
  props:["value"],
  data: function () {
    return {
      firstName: "Walter",
      lastName: "White",
      alias: "Heisenberg",
    };
  },
};
</script>透過this.vm儲存VueComponent實例,在getEditorValue 和setEditorValue 方法中取得和給VUE元件設定Value。編輯結束,透過呼叫$destroy()方法銷毀動態建立的元件。
AutoComplateCellType.prototype.activateEditor = function (editorContext, cellStyle, cellRect, context) {
    let width = cellRect.width > 180 ? cellRect.width : 180;
    if (editorContext) {
      // 创建构造器
      var Profile = Vue.extend(MyInput);
      // 创建 Profile 实例,并挂载到一个元素上。
      this.vm = new Profile().$mount(editorContext.firstChild);
    }
};

AutoComplateCellType.prototype.getEditorValue = function (editorContext) {
    // 设置组件默认值
    if (this.vm) {
        return this.vm.value;
    }
};
AutoComplateCellType.prototype.setEditorValue = function (editorContext, value) {
    // 获取组件编辑后的值
    if (editorContext) {
      this.vm.value = value;
    }
};
AutoComplateCellType.prototype.deactivateEditor = function (editorContext, context) {
    // 销毁组件
    this.vm.$destroy();
    this.vm = undefined;
}; 整個流程跑通了,下來只需要在AutoComplate.vue中,將input替換成ElementUI 的el- autocomplete並實作對應方法就好了。
讓我們看看效果吧。
其實動態掛載並不是什麼複雜操作,理解了Vue範例,透過vm來操作實例,靈活的運用動態掛載或執行時編譯的元件就不是什麼難事了。
其實一切的解決方案就在Vue教程入門教程中,但是腳手架的使用和各種工具的使用讓我們忘記了Vue的初心,反而把簡單問題複雜化了。

今天的分享到這裡就結束啦,後續還會為大家帶來更多嚴肅有趣的內容~
更多程式相關知識,請造訪:程式設計入門! !
以上是帶你使用Vue搞定無法解決的'動態掛載”的詳細內容。更多資訊請關注PHP中文網其他相關文章!

熱AI工具

Undresser.AI Undress
人工智慧驅動的應用程序,用於創建逼真的裸體照片

AI Clothes Remover
用於從照片中去除衣服的線上人工智慧工具。

Undress AI Tool
免費脫衣圖片

Clothoff.io
AI脫衣器

AI Hentai Generator
免費產生 AI 無盡。

熱門文章
熱工具

記事本++7.3.1
好用且免費的程式碼編輯器

SublimeText3漢化版
中文版,非常好用

禪工作室 13.0.1
強大的PHP整合開發環境

Dreamweaver CS6
視覺化網頁開發工具

SublimeText3 Mac版
神級程式碼編輯軟體(SublimeText3)
熱門話題


 vue怎麼給按鈕添加函數
Apr 08, 2025 am 08:51 AM
vue怎麼給按鈕添加函數
Apr 08, 2025 am 08:51 AM
可以通過以下步驟為 Vue 按鈕添加函數:將 HTML 模板中的按鈕綁定到一個方法。在 Vue 實例中定義該方法並編寫函數邏輯。
 vue.js怎麼引用js文件
Apr 07, 2025 pm 11:27 PM
vue.js怎麼引用js文件
Apr 07, 2025 pm 11:27 PM
在 Vue.js 中引用 JS 文件的方法有三種:直接使用 <script> 標籤指定路徑;利用 mounted() 生命週期鉤子動態導入;通過 Vuex 狀態管理庫進行導入。
 vue中怎麼用bootstrap
Apr 07, 2025 pm 11:33 PM
vue中怎麼用bootstrap
Apr 07, 2025 pm 11:33 PM
在 Vue.js 中使用 Bootstrap 分為五個步驟:安裝 Bootstrap。在 main.js 中導入 Bootstrap。直接在模板中使用 Bootstrap 組件。可選:自定義樣式。可選:使用插件。
 vue中的watch怎麼用
Apr 07, 2025 pm 11:36 PM
vue中的watch怎麼用
Apr 07, 2025 pm 11:36 PM
Vue.js 中的 watch 選項允許開發者監聽特定數據的變化。當數據發生變化時,watch 會觸發一個回調函數,用於執行更新視圖或其他任務。其配置選項包括 immediate,用於指定是否立即執行回調,以及 deep,用於指定是否遞歸監聽對像或數組的更改。
 vue返回上一頁的方法
Apr 07, 2025 pm 11:30 PM
vue返回上一頁的方法
Apr 07, 2025 pm 11:30 PM
Vue.js 返回上一頁有四種方法:$router.go(-1)$router.back()使用 <router-link to="/"> 組件window.history.back(),方法選擇取決於場景。
 Vue 實現跑馬燈/文字滾動效果
Apr 07, 2025 pm 10:51 PM
Vue 實現跑馬燈/文字滾動效果
Apr 07, 2025 pm 10:51 PM
在 Vue 中實現跑馬燈/文字滾動效果,可以使用 CSS 動畫或第三方庫。本文介紹了使用 CSS 動畫的方法:創建滾動文本,用 <div> 包裹文本。定義 CSS 動畫,設置 overflow: hidden、width 和 animation。定義關鍵幀,設置動畫開始和結束時的 transform: translateX()。調整動畫屬性,如持續時間、滾動速度和方向。
 怎樣查詢vue的版本
Apr 07, 2025 pm 11:24 PM
怎樣查詢vue的版本
Apr 07, 2025 pm 11:24 PM
可以通過以下方法查詢 Vue 版本:使用 Vue Devtools 在瀏覽器的控制台中查看“Vue”選項卡。使用 npm 運行“npm list -g vue”命令。在 package.json 文件的“dependencies”對像中查找 Vue 項。對於 Vue CLI 項目,運行“vue --version”命令。檢查 HTML 文件中引用 Vue 文件的 <script> 標籤中的版本信息。
 vue遍歷怎麼用
Apr 07, 2025 pm 11:48 PM
vue遍歷怎麼用
Apr 07, 2025 pm 11:48 PM
Vue.js 遍歷數組和對像有三種常見方法:v-for 指令用於遍歷每個元素並渲染模板;v-bind 指令可與 v-for 一起使用,為每個元素動態設置屬性值;.map 方法可將數組元素轉換為新數組。
