本篇文章帶大家深入地講解Vite中的依賴掃描的實現細節,最終的掃描結果是一個包含多個模組的名字的對象,不涉及預先構建的過程、預構建產物如何是使用的。

當我們第一次執行Vite 的時候,Vite 會執行依賴預先建置,目的是為了相容 CommonJS 和UMD,以及提升性能。 【相關推薦:vuejs影片教學】
要對依賴進行預先構建,首先要搞清楚這兩個問題:
預先構建的內容是什麼? / 哪些模組需要預先建置?
如何找到需要預先建置的模組?
這兩個問題,其實就是依賴掃描的內容以及實作方式。
本文會深入講解依賴掃描的實作細節,最終的掃描結果是一個包含多個模組的名字的物件,不涉及預先建構的過程、預先建構產物如何是使用的。如果對該部分內容有興趣,可以關注我,等待後續文章。
一個專案中,存在非常多的模組,並不是所有模組都會預先建置。 只有 bare import(裸依賴)會執行依賴預建
什麼是 bare import ?
直接看下面這個範例
// vue 是 bare import
import xxx from "vue"
import xxx from "vue/xxx"

// 以下不是裸依赖
import xxx from "./foo.ts"
import xxx from "/foo.ts"
可以簡單的分割一下:
其實Vite 也是這麼判斷的。
下面是一個常見的Vue 專案的模組依賴樹

#依賴掃描的結果如下:
[ "vue", "axios" ]
為什麼只對bare import 進行預先建置?
Node.js 定義了bare import 的尋址機制 —— 在當前目錄下的node_modules 下尋找,找不到則往上一級目錄的node_modules,直到目錄為根路徑,不能再往上走。
bare import 一般是npm 安裝的模組,是第三方的模組,不是我們自己寫的程式碼,一般情況下是不會被修改的,因此對這部分的模組提前執行構建,有利於提升性能。
相反,如果對開發者寫的程式碼執行預構建,將專案打包成chunk 文件,當開發者修改程式碼時,就需要重新執行構建,再打包成chunk 文件,這個過程反而會影響效能。
monorepo 下的模組也會被預先建置嗎?
不會。因為 monorepo 的情況下,部分模組雖然是 bare import,但這些模組也是開發者自己寫的,不是第三方模組,因此 Vite 沒有對該部分的模組執行預先建置。
實際上,Vite 會判斷模組的實際路徑,是否在node_modules 中:
實作想法
我們再來看看這棵模組依賴樹:

要掃描出所有的bare import,就需要遍歷整個依賴樹,這就牽涉到了樹的深度遍歷
#當我們在討論樹的遍歷時,一般會關注這兩點:

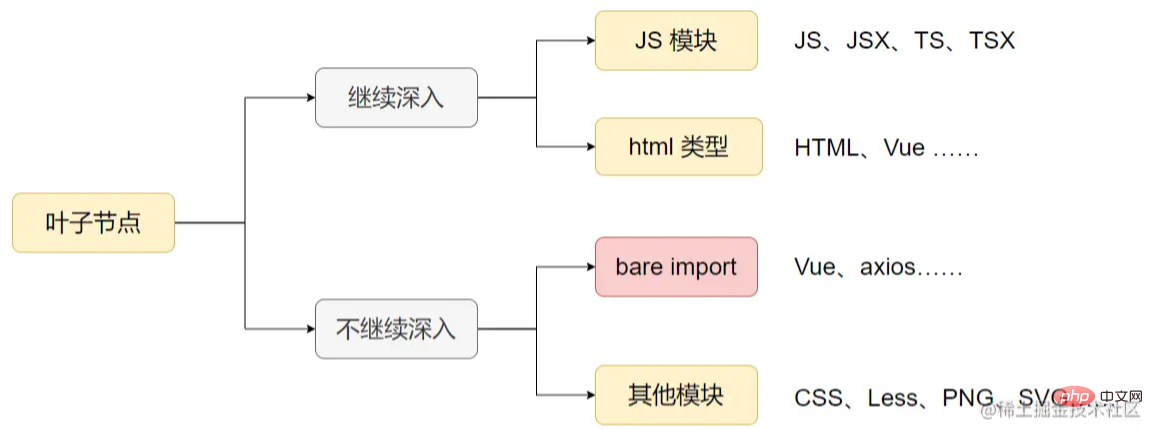
目前葉子節點不需要繼續深入遍歷的情況:
當所有的葉子節點遍歷完成後,記錄的bare import 對象,就是依賴掃描的結果。
依賴掃描的實作思維其實非常容易理解,但實際的處理就不簡單了。
我們來看看葉子節點的處理:
可以透過模組 id 判斷,模組 id 不為路徑的模組,就是 bare import。遇到這些模組則記錄依賴,不再深入遍歷。
可以透過模組的字尾名判斷,例如遇到*.css 的模組,無需任何處理,不再深入遍歷。
要取得JS 程式碼中所依賴的子模組,就需要將程式碼轉成AST,取得其中import 語句引入的模組,或者正規符合所有import 的模組,然後繼續深入遍歷這些模組
這類模組比較複雜,例如HTML 或Vue,裡面有一部分是JS,需要把這部分JS 程式碼提取出來,然後按JS 模組進行分析處理,繼續深入遍歷這些模組。這裡只需要關心 JS 部分,其他部分不會引入模組。

具體實作
#我們已經知道了依賴掃描的實作思路,思路其實不複雜,複雜的是處理過程,尤其是HTML、Vue 等模組的處理。
Vite 這裡用了一個比較巧妙的辦法 —— 用 esbuild 工具打包
為什麼可以用 esbuild 打包代替深度遍歷的過程?
本質上打包過程也是個深度遍歷模組的過程,其替代的方式如下:
| 深度遍歷 | esbuild 打包 |
|---|---|
| 葉子節點的處理 | esbuild 可以對每個模組(葉子節點)進行解析與載入 可以透過外掛程式對這兩個過程進行擴充,加入一些特殊的邏輯 例如將html 在載入過程中轉換為js |
| #不深入處理模組 | esbuild 可以在解析過程,指定當前解析的模組為external 則esbuild 不再深入解析並載入該模組。 |
| 深入遍歷模組 | 正常解析模組(什麼都不做,esbuild 預設行為),傳回模組的檔案真實路徑 |
這塊暫時看不懂沒有關係,後面會有例子

#各類別模組的處理
| 範例 | 處理 | |
|---|---|---|
| #bare import | vue |
在解析過程中,將裸依賴儲存到deps 物件中,設定為external |
| 其他JS 無關的模組 | less檔 |
在解析過程中,設定為external |
| JS 模組 | ./mian.ts |
正常解析與載入即可,esbuild 本身能處理JS |
| html 類型模組 |
index.html、app.vue
|
在載入過程中,將這些模組載入成JS |
最后 dep 对象中收集到的依赖就是依赖扫描的结果,而这次 esbuild 的打包产物,其实是没有任何作用的,在依赖扫描过程中,我们只关心每个模块的处理过程,不关心构建产物
用 Rollup 处理可以吗?
其实也可以,打包工具基本上都会有解析和加载的流程,也能对模块进行 external
但是 esbuild 性能更好
这类文件有 html、vue 等。之前我们提到了要将它们转换成 JS,那么到底要如何转换呢?

由于依赖扫描过程,只关注引入的 JS 模块,因此可以直接丢弃掉其他不需要的内容,直接取其中 JS
html 类型文件(包括 vue)的转换,有两种情况:
import 语句,引入外部 script什么是虚拟模块?
是模块的内容并非直接从磁盘中读取,而是编译时生成。
举个例子,src/main.ts 是磁盘中实际存在的文件,而 virtual-module:D:/project/index.html?id=0 在磁盘中是不存在的,需要借助打包工具(如 esbuild),在编译过程生成。
为什么需要虚拟模块?
因为一个 html 类型文件中,允许有多个 script 标签,多个内联的 script 标签,其内容无法处理成一个 JS 文件 (因为可能会有命名冲突等原因)
既然无法将多个内联 script,就只能将它们分散成多个虚拟模块,然后分别引入了。
依赖扫描的入口
下面是扫描依赖的入口函数(为了便于理解,有删减和修改):
import { build } from 'esbuild'
export async function scanImports(config: ResolvedConfig): Promise
  missing: Record<string>
}> {

  // 将项目中所有的 html 文件作为入口,会排除 node_modules
  let entries: string[] = await globEntries('**/*.html', config)

  // 扫描到的依赖,会放到该对象
  const deps: Record<string> = {}
  // 缺少的依赖,用于错误提示
  const missing: Record<string> = {}

  // esbuild 扫描插件,这个是重点!!!
  const plugin = esbuildScanPlugin(config, container, deps, missing, entries)

  // 获取用户配置的 esbuild 自定义配置,没有配置就是空的
  const { plugins = [], ...esbuildOptions } =
    config.optimizeDeps?.esbuildOptions ?? {}

  await Promise.all(
    // 入口可能不止一个,分别用 esbuid 打包
    entries.map((entry) =>
      // esbuild 打包
      build({
        absWorkingDir: process.cwd(),
        write: false,
        entryPoints: [entry],
        bundle: true,
        format: 'esm',
        // 使用插件
        plugins: [...plugins, plugin],
        ...esbuildOptions
      })
    )
  )

  return {
    deps,
    missing
  }
}</string></string></string>主要流程如下:
将项目内所有的 html 作为入口文件(排除 node_modules)。
将每个入口文件,用 esbuild 进行打包
这里的核心其实是 esbuildScanPlugin 插件的实现,它定义了各类模块(叶子节点)的处理方式。
function esbuildScanPlugin(config, container, deps, missing, entries){}dep 、missing对象被当做入参传入,在函数中,这两个对象的内容会在打包(插件运行)过程中被修改
esbuild 插件
很多同学可能不知道 esbuild 插件是如何编写的,这里简单介绍一下:
每个模块都会经过解析(resolve)和加载(load)的过程:
vue,会解析到实际 node_modules 中的 vue 的入口 js 文件
插件可以定制化解析和加载的过程,下面是一些插件示例代码:
const plugin = {
    name: 'xxx',
    setup(build) {

        // 定制解析过程,所有的 http/https 的模块,都会被 external
        build.onResolve({ filter: /^(https?:)?\/\// }, ({ path }) => ({
            path,
            external: true
        }))

        // 定制解析过程,给所有 less 文件 namespace: less 标记
        build.onResolve({ filter: /.*\.less/ }, args => ({
            path: args.path,
            namespace: 'less',
        }))

        // 定义加载过程:只处理 namespace 为 less 的模块
        build.onLoad({ filter: /.*/, namespace: 'less' }, () => {
            const raw = fs.readFileSync(path, 'utf-8')
            const content = // 省略 less 处理,将 less 处理成 css
            return {
                contents,
                loader: 'css'
        	}
        })
    }
}onResolve、onLoad 定义解析和加载过程onResolve 的第一个参数为过滤条件,第二个参数为回调函数,解析时调用,返回值可以给模块做标记,如 external、namespace(用于过滤),还需要返回模块的路径
onResolve 会被依次调用,直到回调函数返回有效的值,后面的不再调用。如果都没有有效返回,则使用默认的解析方式onLoad 的第一个参数为过滤条件,第二个参数为回调函数,加载时调用,可以读取文件的内容,然后进行处理,最后返回加载的内容。onLoad 会被依次调用,直到回调函数返回有效的值,后面的不再调用。如果都没有有效返回,则使用默认的加载方式。扫描插件的实现
function esbuildScanPlugin(
  config: ResolvedConfig,
  container: PluginContainer,
  depImports: Record<string>,
  missing: Record<string>,
  entries: string[]
): Plugin</string></string>
部分参数解析:
config:Vite 的解析好的用户配置
container:这里只会用到 container.resolveId 的方法,这个方法能将模块路径转成真实路径。
例如 vue 转成 xxx/node_modules/dist/vue.esm-bundler.js。
depImports:用于存储扫描到的依赖对象,插件执行过程中会被修改
missing:用于存储缺少的依赖的对象,插件执行过程中会被修改
entries:存储所有入口文件的数组
esbuild 默认能将模块路径转成真实路径,为什么还要用
container.resolveId?
因为 Vite/Rollup 的插件,也能扩展解析的流程,例如 alias 的能力,我们常常会在项目中用 @ 的别名代表项目的 src 路径。
因此不能用 esbuild 原生的解析流程进行解析。
container(插件容器)用于兼容 Rollup 插件生态,用于保证 dev 和 production 模式下,Vite 能有一致的表现。感兴趣的可查看《Vite 是如何兼容 Rollup 插件生态的》
这里 container.resolveId 会被再次包装一成 resolve 函数(多了缓存能力)
const seen = new Map<string>()
const resolve = async (
    id: string,
    importer?: string,
    options?: ResolveIdOptions
) => {
    const key = id + (importer && path.dirname(importer))

    // 如果有缓存,就直接使用缓存
    if (seen.has(key)) {
        return seen.get(key)
    }
    // 将模块路径转成真实路径
    const resolved = await container.resolveId(
        id,
        importer && normalizePath(importer),
        {
            ...options,
            scan: true
        }
    )
    // 缓存解析过的路径,之后可以直接获取
    const res = resolved?.id
    seen.set(key, res)
    return res
}</string>那么接下来就是插件的实现了,先回顾一下之前写的各类模块的处理:
| 例子 | 处理 | |
|---|---|---|
| bare import | vue |
在解析过程中,将裸依赖保存到 deps 对象中,设置为 external |
| 其他 JS 无关的模块 | less文件 |
在解析过程中,设置为 external |
| JS 模块 | ./mian.ts |
正常解析和加载即可,esbuild 本身能处理 JS |
| html 类型模块 |
index.html、app.vue
|
在加载过程中,将这些模块加载成 JS |
esbuild 本身就能处理 JS 语法,因此 JS 是不需要任何处理的,esbuild 能够分析出 JS 文件中的依赖,并进一步深入处理这些依赖。
// external urls
build.onResolve({ filter: /^(https?:)?\/\// }, ({ path }) => ({
    path,
    external: true
}))

// external css 等文件
build.onResolve(
    {
        filter: /\.(css|less|sass|scss|styl|stylus|pcss|postcss|json|wasm)$/
    },
    ({ path }) => ({
        path,
        external: true
    }
)

// 省略其他 JS 无关的模块这部分处理非常简单,直接匹配,然后 external 就行了
build.onResolve(
  {
    // 第一个字符串为字母或 @,且第二个字符串不是 : 冒号。如 vite、@vite/plugin-vue
    // 目的是:避免匹配 window 路径,如 D:/xxx
    filter: /^[\w@][^:]/
  },
  async ({ path: id, importer, pluginData }) => {
    // depImports 为
    if (depImports[id]) {
      return externalUnlessEntry({ path: id })
    }
    // 将模块路径转换成真实路径,实际上调用 container.resolveId
    const resolved = await resolve(id, importer, {
      custom: {
        depScan: { loader: pluginData?.htmlType?.loader }
      }
    })

    // 如果解析到路径,证明找得到依赖
    // 如果解析不到路径,则证明找不到依赖,要记录下来后面报错
    if (resolved) {
      if (shouldExternalizeDep(resolved, id)) {
        return externalUnlessEntry({ path: id })
      }
      // 如果模块在 node_modules 中,则记录 bare import
      if (resolved.includes('node_modules')) {
        // 记录 bare import
        depImports[id] = resolved

        return {
        	path,
        	external: true
   		}
      }
      // isScannable 判断该文件是否可以扫描,可扫描的文件有 JS、html、vue 等
      // 因为有可能裸依赖的入口是 css 等非 JS 模块的文件
      else if (isScannable(resolved)) {
        // 真实路径不在 node_modules 中,则证明是 monorepo,实际上代码还是在用户的目录中
        // 是用户自己写的代码,不应该 external
        return {
          path: path.resolve(resolved)
        }
      } else {
        // 其他模块不可扫描,直接忽略,external
        return {
            path,
            external: true
        }
      }
    } else {
      // 解析不到依赖,则记录缺少的依赖
      missing[id] = normalizePath(importer)
    }
  }
)如: index.html、app.vue
const htmlTypesRE = /\.(html|vue|svelte|astro)$/

// html types: 提取 script 标签
build.onResolve({ filter: htmlTypesRE }, async ({ path, importer }) => {
    // 将模块路径,转成文件的真实路径
    const resolved = await resolve(path, importer)
    if (!resolved) return

    // 不处理 node_modules 内的
    if (resolved.includes('node_modules'){
        return
   }

    return {
        path: resolved,
        // 标记 namespace 为 html
        namespace: 'html'
    }
})解析过程很简单,只是用于过滤掉一些不需要的模块,并且标记 namespace 为 html
真正的处理在加载阶段:

// 正则,匹配例子: <script></script>
const scriptModuleRE = /(<script>]*type\s*=\s*(?:"module"|'module')[^>]*>)(.*?)<\/script>/gims
// 正则,匹配例子: <script></script>
export const scriptRE = /(<script>]*>|>))(.*?)<\/script>/gims
build.onLoad(
{ filter: htmlTypesRE, namespace: 'html' },
async ({ path }) => {
// 读取源码
let raw = fs.readFileSync(path, 'utf-8')
// 去掉注释,避免后面匹配到注释
raw = raw.replace(commentRE, '<!---->')
const isHtml = path.endsWith('.html')
// scriptModuleRE: <script type=module></script>
// scriptRE: <script></script>
// html 模块,需要匹配 module 类型的 script,因为只有 module 类型的 script 才能使用 import
const regex = isHtml ? scriptModuleRE : scriptRE
// 重置正则表达式的索引位置,因为同一个正则表达式对象,每次匹配后,lastIndex 都会改变
// regex 会被重复使用,每次都需要重置为 0,代表从第 0 个字符开始正则匹配
regex.lastIndex = 0
// load 钩子返回值,表示加载后的 js 代码
let js = ''
let scriptId = 0
let match: RegExpExecArray | null
// 匹配源码的 script 标签,用 while 循环,因为 html 可能有多个 script 标签
while ((match = regex.exec(raw))) {
// openTag: 它的值的例子: <script>
// content: script 标签的内容
const [, openTag, content] = match
// 正则匹配出 openTag 中的 type 和 lang 属性
const typeMatch = openTag.match(typeRE)
const type =
typeMatch && (typeMatch[1] || typeMatch[2] || typeMatch[3])
const langMatch = openTag.match(langRE)
const lang =
langMatch && (langMatch[1] || langMatch[2] || langMatch[3])
// 跳过 type="application/ld+json" 和其他非 non-JS 类型
if (
type &&
!(
type.includes('javascript') ||
type.includes('ecmascript') ||
type === 'module'
)
) {
continue
}
// esbuild load 钩子可以设置 应的 loader
let loader: Loader = 'js'
if (lang === 'ts' || lang === 'tsx' || lang === 'jsx') {
loader = lang
} else if (path.endsWith('.astro')) {
loader = 'ts'
}
// 正则匹配出 script src 属性
const srcMatch = openTag.match(srcRE)
// 有 src 属性,证明是外部 script
if (srcMatch) {
const src = srcMatch[1] || srcMatch[2] || srcMatch[3]
// 外部 script,改为用 import 用引入外部 script
js += `import ${JSON.stringify(src)}\n`
} else if (content.trim()) {
// 内联的 script,它的内容要做成虚拟模块
// 缓存虚拟模块的内容
// 一个 html 可能有多个 script,用 scriptId 区分
const key = `${path}?id=${scriptId++}`
scripts[key] = {
loader,
content,
pluginData: {
htmlType: { loader }
}
}
// 虚拟模块的路径,如 virtual-module:D:/project/index.html?id=0
const virtualModulePath = virtualModulePrefix + key
js += `export * from ${virtualModulePath}\n`
}
}
return {
loader: 'js',
contents: js
}
}
)</script>加载阶段的主要做有以下流程:
srcMatch[1] || srcMatch[2] || srcMatch[3] 是干嘛?
我们来看看匹配的表达式:
const srcRE = /\bsrc\s*=\s*(?:"([^"]+)"|'([^']+)'|([^\s'">]+))/im
因为 src 可以有以下三种写法:
三种情况会出现其中一种,因此是三个捕获组
虚拟模块是如何加载成对应的 script 代码的?
export const virtualModuleRE = /^virtual-module:.*/

// 匹配所有的虚拟模块,namespace 标记为 script
build.onResolve({ filter: virtualModuleRE }, ({ path }) => {
  return {
    // 去掉 prefix
    // virtual-module:D:/project/index.html?id=0 => D:/project/index.html?id=0
    path: path.replace(virtualModulePrefix, ''),
    namespace: 'script'
  }
})

// 之前的内联 script 内容,保存到 script 对象,加载虚拟模块的时候取出来
build.onLoad({ filter: /.*/, namespace: 'script' }, ({ path }) => {
  return scripts[path]
})虚拟模块的加载很简单,直接从 script 对象中,读取之前缓存起来的内容即可。
这样之后,我们就可以把 html 类型的模块,转换成 JS 了
扫描结果
下面是一个 depImport 对象的例子:
{
  "vue": "D:/app/vite/node_modules/.pnpm/vue@3.2.37/node_modules/vue/dist/vue.runtime.esm-bundler.js",
  "vue/dist/vue.d.ts": "D:/app/vite/node_modules/.pnpm/vue@3.2.37/node_modules/vue/dist/vue.d.ts",
  "lodash-es": "D:/app/vite/node_modules/.pnpm/lodash-es@4.17.21/node_modules/lodash-es/lodash.js"
}依赖扫描是预构建前的一个非常重要的步骤,这决定了 Vite 需要对哪些依赖进行预构建。
本文介绍了 Vite 会对哪些内容进行依赖预构建,然后分析了实现依赖扫描的基本思路 —— 深度遍历依赖树,并对各种类型的模块进行处理。然后介绍了 Vite 如何巧妙的使用 esbuild 实现这一过程。最后对这部分的源码进行了解析:
最后获取到的 depImport 是一个记录依赖以及其真实路径的对象
以上是Vite學習之深度解析'依賴掃描”的詳細內容。更多資訊請關注PHP中文網其他相關文章!


