亞馬遜網站相較於國內的購物網站,可以直接使用python的最基本的requests進行請求。存取不是過於頻繁,在未觸發保護機制的情況下,可以取得我們想要的資料。本次透過以下三部分簡單介紹下基本爬取流程:
使用requests的get請求,取得亞馬遜清單和詳情頁的頁面內容
使用css/xpath對取得的內容進行解析,取得關鍵資料
#動態IP的作用及其使用方法
以遊戲區為例:
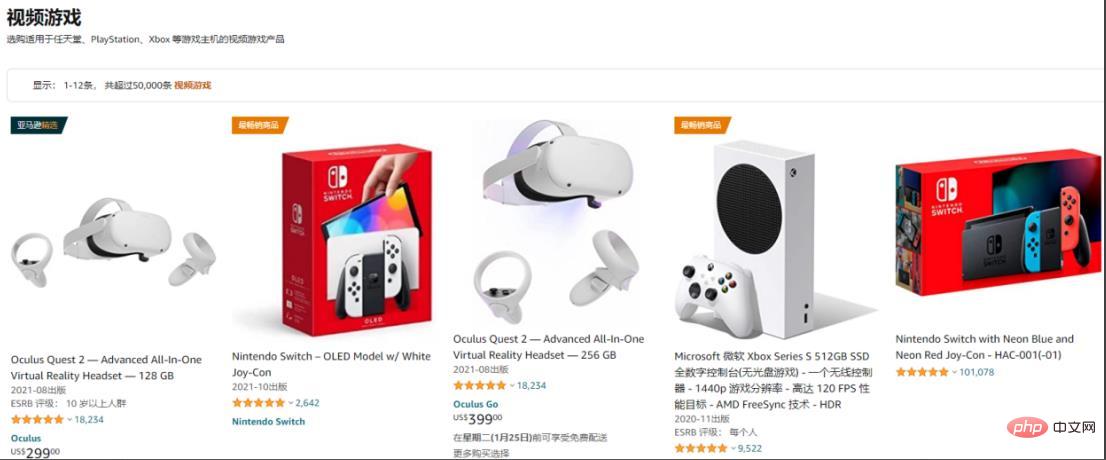
取得清單內能取得的商品資訊,如商品名,詳情鏈接,進一步獲取其他內容。
用requests.get()取得網頁內容,設定好header,利用xpath選擇器選取相關標籤的內容:
import requests
from parsel import Selector
from urllib.parse import urljoin

spiderurl = 'https://www.amazon.com/s?i=videogames-intl-ship'
headers = {
    "authority": "www.amazon.com",
    "user-agent": "Mozilla/5.0 (iPhone; CPU iPhone OS 10_3_3 like Mac OS X) AppleWebKit/603.3.8 (KHTML, like Gecko) Mobile/14G60 MicroMessenger/6.5.19 NetType/4G Language/zh_TW",
}
resp = requests.get(spiderurl, headers=headers)
content = resp.content.decode('utf-8')
select = Selector(text=content)
nodes = select.xpath("//a[@title='product-detail']")
for node in nodes:
    itemUrl = node.xpath("./@href").extract_first()
    itemName = node.xpath("./div/h2/span/text()").extract_first()
    if itemUrl and itemName:
        itemUrl = urljoin(spiderurl,itemUrl)#用urljoin方法凑完整链接
print(itemUrl,itemName)此時已經取得的目前清單頁目前能獲得的資訊:

進入詳情頁:
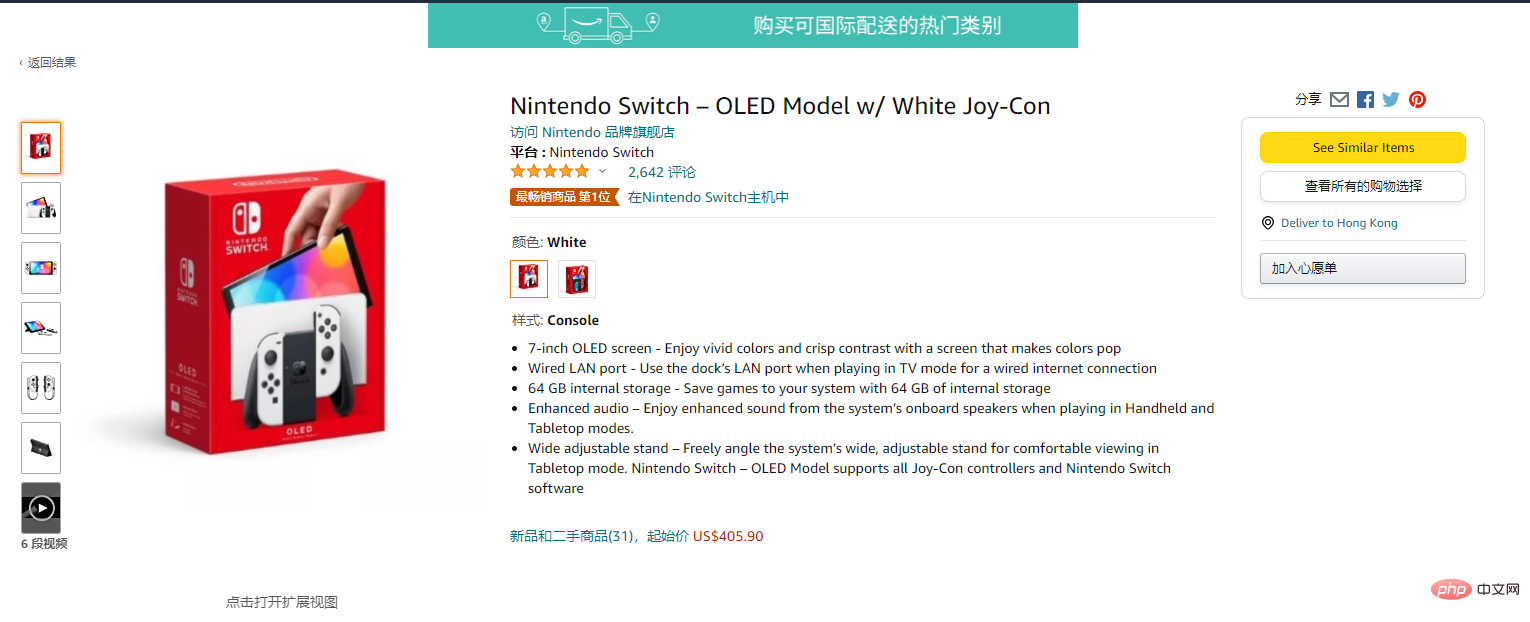
進入詳情頁之後,能獲得更多的內容
用requests.get()取得網頁內容,css選取相關標籤的內容:
res = requests.get(itemUrl, headers=headers)
content = res.content.decode('utf-8')
Select = Selector(text=content)
itemPic = Select.css('#main-image::attr(src)').extract_first()
itemPrice = Select.css('.a-offscreen::text').extract_first()
itemInfo = Select.css('#feature-bullets').extract_first()
data = {}
data['itemUrl'] = itemUrl
data['itemName'] = itemName
data['itemPic'] = itemPic
data['itemPrice'] = itemPrice
data['itemInfo'] = itemInfo
print(data)此時已經產生詳情頁資料的資訊:

目前涉及的就是最基本的requests請求亞馬遜並用css/xpath取得對應的資訊。
目前,國內造訪亞馬遜會很不穩定,我這邊大機率會出現連線不上的狀況。如果真的需要去爬取亞馬遜的訊息,最好使用一些穩定的代理,我這邊自己使用的是ipidea的代理,可以白嫖500M流量。如果有代理的話訪問的成功率會高,速度也會快一點。
網址在這裡:http://www.ipidea.net/?utm-source=PHP&utm-keyword=?PHP
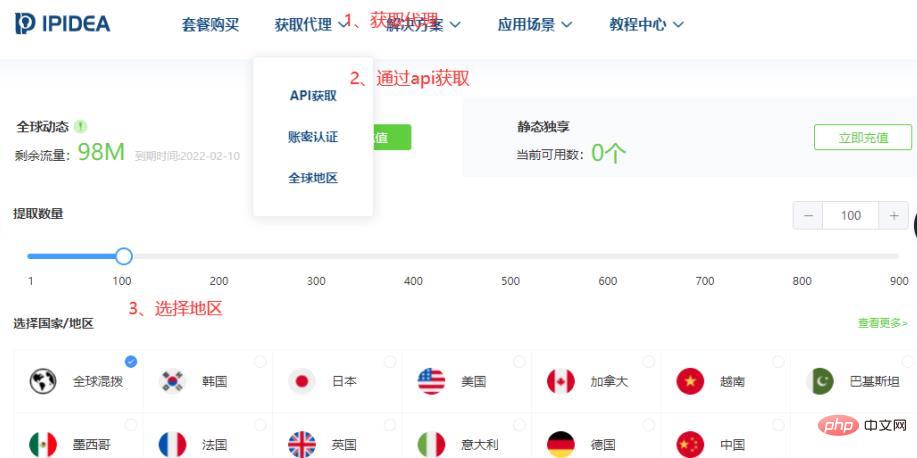
代理程式使用有兩種方式,一是透過api取得IP位址,還有用帳密的方式使用,方法如下:
3.1.1 api取得代理
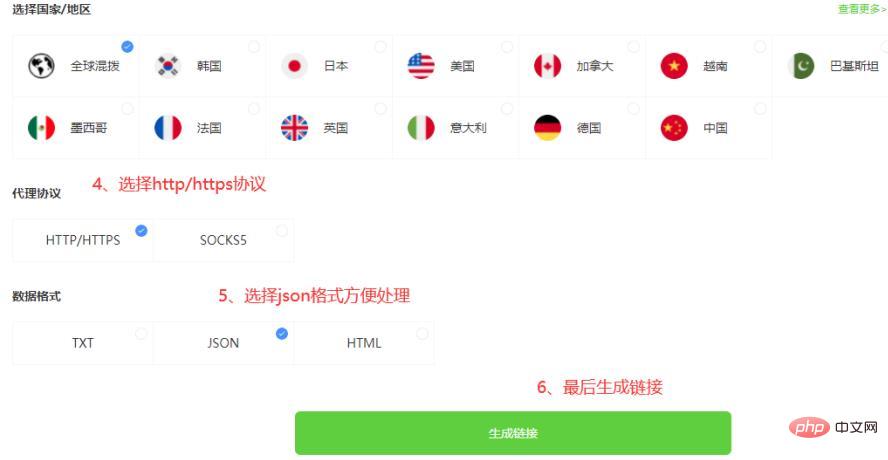
3.1.2 api取得ip代碼
def getProxies():
    # 获取且仅获取一个ip
    api_url = '生成的api链接'
    res = requests.get(api_url, timeout=5)
    try:
        if res.status_code == 200:
            api_data = res.json()['data'][0]
            proxies = {
                'http': 'http://{}:{}'.format(api_data['ip'], api_data['port']),
                'https': 'http://{}:{}'.format(api_data['ip'], api_data['port']),
            }
            print(proxies)
            return proxies
        else:
            print('获取失败')
    except:
print('获取失败')3.2.1 帳密取得代理程式(註冊位址:http: //www.ipidea.net/?utm-source=PHP&utm-keyword=?PHP )
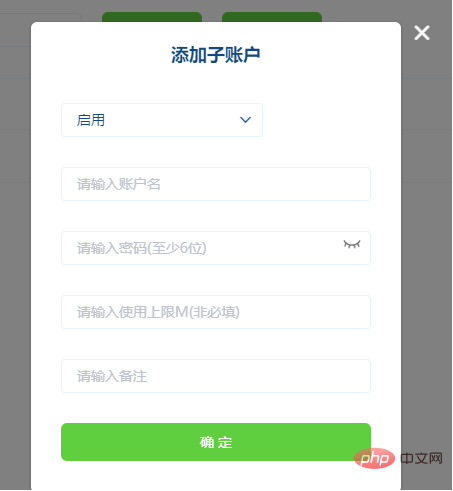
因為是帳務驗證,所以需要去到帳號中心填寫資料建立子帳號: 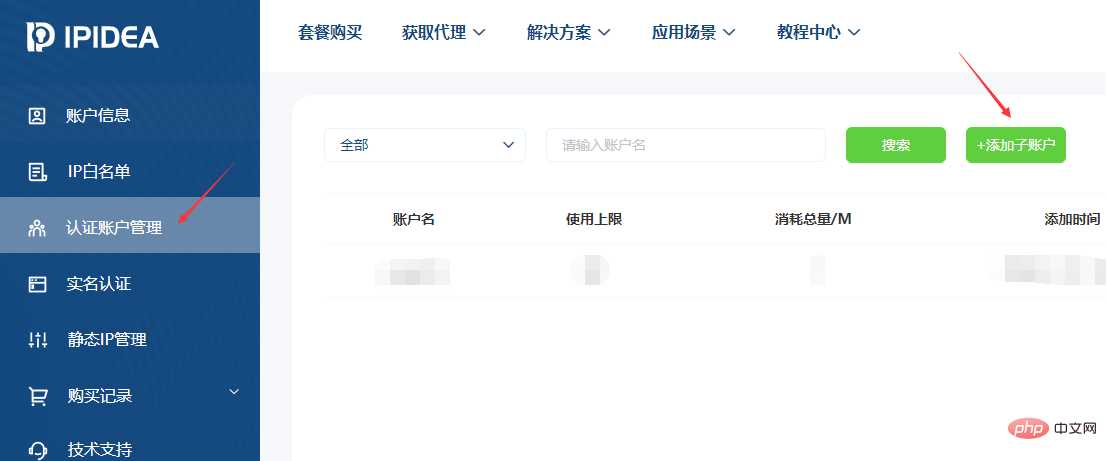
# 获取账密ip
def getAccountIp():
    # 测试完成后返回代理proxy
    mainUrl = 'https://api.myip.la/en?json'
    headers = {
        "Accept": "text/html,application/xhtml+xml,application/xml;q=0.9,image/webp,image/apng,*/*;q=0.8",
        "User-Agent": "Mozilla/5.0 (iPhone; CPU iPhone OS 10_3_3 like Mac OS X) AppleWebKit/603.3.8 (KHTML, like Gecko) Mobile/14G60 MicroMessenger/6.5.19 NetType/4G Language/zh_TW",
    }
    entry = 'http://{}-zone-custom{}:proxy.ipidea.io:2334'.format("帐号", "密码")
    proxy = {
        'http': entry,
        'https': entry,
    }
    try:
        res = requests.get(mainUrl, headers=headers, proxies=proxy, timeout=10)
        if res.status_code == 200:
            return proxy
    except Exception as e:
        print("访问失败", e)
pass# coding=utf-8
import requests
from parsel import Selector
from urllib.parse import urljoin
def getProxies():
# 获取且仅获取一个ip
api_url = '生成的api链接'
res = requests.get(api_url, timeout=5)
try:
if res.status_code == 200:
api_data = res.json()['data'][0]
proxies = {
'http': 'http://{}:{}'.format(api_data['ip'], api_data['port']),
'https': 'http://{}:{}'.format(api_data['ip'], api_data['port']),
}
print(proxies)
return proxies
else:
print('获取失败')
except:
print('获取失败')
spiderurl = 'https://www.amazon.com/s?i=videogames-intl-ship'
headers = {
"authority": "www.amazon.com",
"user-agent": "Mozilla/5.0 (iPhone; CPU iPhone OS 10_3_3 like Mac OS X) AppleWebKit/603.3.8 (KHTML, like Gecko) Mobile/14G60 MicroMessenger/6.5.19 NetType/4G Language/zh_TW",
}
proxies = getProxies()
resp = requests.get(spiderurl, headers=headers, proxies=proxies)
content = resp.content.decode('utf-8')
select = Selector(text=content)
nodes = select.xpath("//a[@title='product-detail']")
for node in nodes:
itemUrl = node.xpath("./@href").extract_first()
itemName = node.xpath("./div/h2/span/text()").extract_first()
if itemUrl and itemName:
itemUrl = urljoin(spiderurl,itemUrl)
proxies = getProxies()
res = requests.get(itemUrl, headers=headers, proxies=proxies)
content = res.content.decode('utf-8')
Select = Selector(text=content)
itemPic = Select.css('#main-image::attr(src)').extract_first()
itemPrice = Select.css('.a-offscreen::text').extract_first()
itemInfo = Select.css('#feature-bullets').extract_first()
data = {}
data['itemUrl'] = itemUrl
data['itemName'] = itemName
data['itemPic'] = itemPic
data['itemPrice'] = itemPrice
data['itemInfo'] = itemInfo
print(data)通过上面的步骤,可以实现最基础的亚马逊的信息获取。
目前只获得最基本的数据,若想获得更多也可以自行修改xpath/css选择器去拿到你想要的内容。而且稳定的动态IP能是你进行请求的时候少一点等待的时间,无论是编写中的测试还是小批量的爬取,都能提升工作的效率。以上就是全部的内容。
以上是用Python取得Amazon亞馬遜的商品訊息的詳細內容。更多資訊請關注PHP中文網其他相關文章!
