Laravel中怎麼實作Repository設計模式

在本文中,我會向你展示如何在 Laravel 中從頭開始實作 repository 設計模式。我將使用 Laravel 5.8.3 版,但 Laravel 版本不是最重要的。在開始寫程式碼之前,你需要了解一些關於 repository 設計模式的相關資訊。

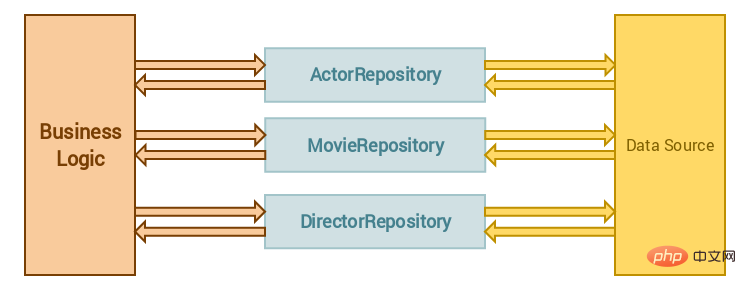
repository 設計模式讓你可以使用對象,而不需要了解這些物件是如何持久化的。本質上,它是資料層的抽象。
這意味著你的業務邏輯不需要了解如何檢索資料或資料來源是什麼,而業務邏輯依賴 repository 來檢索正確的資料。
關於這個模式,我看到有人將它誤解為 repository 被用來建立或更新資料。這不是 repository 應該做的,repository 不應該創建或更新數據,僅用於檢索數據。
理解透了吧?接下來一起寫程式碼
既然我們從頭開始,那麼我們先創建一個新的 Laravel 專案吧:
composer create-project --prefer-dist laravel/laravel repository
對於本教程,我們將建立一個小型的部落格應用程式。現在我們已經創建好了一個新的 Laravel 項目,接下來應該為它建立一個控制器和模型。
php artisan make:controller BlogController
這將在 app/Http/Controllers 目錄中建立 BlogController 。
php artisan make:model Models/Blog -m
提示:-m 選項會建立一個對應的資料庫遷移,你可以在 *database/migrations 目錄中找到所產生的遷移。 *
現在你應該可以在 app/Models 目錄中找到剛產生的模型 Blog 了吧。這只是一種我喜歡的存放模型的方式。
現在我們有了控制器和模型,是時候看看我們建立的遷移檔案了。除了預設的 Laravel 時間戳欄位外,我們的部落格只需要 標題、內容 和 用戶ID 欄位。
<?php
use Illuminate\Support\Facades\Schema;
use Illuminate\Database\Schema\Blueprint;
use Illuminate\Database\Migrations\Migration;
class CreateBlogsTable extends Migration
{
public function up()
{
Schema::create('blogs', function (Blueprint $table) {
$table->bigIncrements('id');
$table->string('title');
$table->text('content');
$table->integer('user_id');
$table->timestamps();
$table->foreign('user_id')
->references('id')
->on('users');
});
}
public function down()
{
Schema::dropIfExists('blogs');
}
}提示:
如果你使用的是Laravel 5.8 以下的舊版本,請將
$table->bigIncrements('id');
替換為:
$table->increments('id');
設定資料庫
我將使用MySQL 資料庫作為範例,第一步就是建立一個新的資料庫。
mysql -u root -p
create database laravel_repository;
以上指令將會建立一個叫 laravel_repository 的新資料庫。接下來我們需要新增資料庫資訊到 Laravel 根目錄的 .env 檔案中。
DB_DATABASE=laravel_repositoryDB_USERNAME=rootDB_PASSWORD=secret
當你更新了.env 檔案後我們需要清空快取:
php artisan config:clear
##執行遷移
現在我們已經設定好了資料庫,可以開始執行遷移了:php artisan migrate
blogs 表,包含了我們在遷移中宣告的title , content 和user_id 欄位。
實作repository 設計模式
#一切就緒,我們現在可以開始實作repository 設計風格了。我們將會在 app 目錄中建立 Repositories 目錄。我們將要建立的第二個目錄是 Interfaces 目錄,這個目錄位於 Repositories 目錄中。
在Interfaces 檔案中我們將建立一個包含兩個方法的 BlogRepositoryInterface 介面。
- 傳回所有部落格文章的
all 方法
- #傳回特定使用者所有部落格文章的
getByUser 方法
<?php

namespace App\Repositories\Interfaces;

use App\User;

interface BlogRepositoryInterface
{
    public function all();

    public function getByUser(User $user);
}BlogRepositoryInterface 的BlogRepository ,我們會寫一個最簡單的實作方式。
<?php
namespace App\Repositories;
use App\Models\Blog;
use App\User;
use App\Repositories\Interfaces\BlogRepositoryInterface;
class BlogRepository implements BlogRepositoryInterface
{
public function all()
{
return Blog::all();
}
public function getByUser(User $user)
{
return Blog::where('user_id',$user->id)->get();
}
}Repositories 目錄應該要這樣:
app/└── Repositories/
    ├── BlogRepository.php
    └── Interfaces/
└── BlogRepositoryInterface.phprepository 了。但我們還沒完成,是時候開始使用我們的 repository 了。
在控制器中使用Repository
#要開始使用BlogRepository ,我們首先需要將其註入到BlogController 。由於 Laravel 的依賴注入,我們很容易用另一個來替換它。這就是我們控制器的樣子:
<?php
namespace App\Http\Controllers;
use App\Repositories\Interfaces\BlogRepositoryInterface;
use App\User;
class BlogController extends Controller
{
private $blogRepository;
public function __construct(BlogRepositoryInterface $blogRepository)
{
$this->blogRepository = $blogRepository;
}
public function index()
{
$blogs = $this->blogRepository->all();
return view('blog')->withBlogs($blogs);
}
public function detail($id)
{
$user = User::find($id);
$blogs = $this->blogRepository->getByUser($user);
return view('blog')->withBlogs($blogs);
}
}repository ,所有這些邏輯都可以在一行程式碼中完成。這對單元測試也很好,因為 repository 的方法很容易重複使用。
repository 设计模式也使更改数据源变得更加容易。在这个例子中,我们使用 MySQL 数据库来检索我们的博客内容。我们使用 Eloquent 来完成查询数据库操作。但是假设我们在某个网站上看到了一个很棒的博客 API,我们想使用这个 API 作为数据源,我们所要做的就是重写 BlogRepository 来调用这个 API 替换 Eloquent 。
RepositoryServiceProvider
我们将注入 BlogController 中的 BlogRepository ,而不是注入 BlogController 中的 BlogRepositoryInterface ,然后让服务容器决定将使用哪个存储库。这将在 AppServiceProvider 的 boot 方法中实现,但我更喜欢为此创建一个新的 provider 来保持整洁。
php artisan make:provider RepositoryServiceProvider
我们为此创建一个新的 provider 的原因是,当您的项目开始发展为大型项目时,结构会变得非常凌乱。设想一下,一个拥有 10 个以上模型的项目,每个模型都有自己的 repository ,你的 AppServiceProvider 可读性将会大大降低。
我们的 RepositoryServiceProvider 会像下面这样:
<?php

namespace App\Providers;

use App\Repositories\BlogRepository;
use App\Repositories\Interfaces\BlogRepositoryInterface;
use Illuminate\Support\ServiceProvider;

class RepositoryServiceProvider extends ServiceProvider
{
    public function register()
    {
        $this->app->bind(
            BlogRepositoryInterface::class,
            BlogRepository::class
        );
    }
}留意用另一个 repository 替代 BlogRepository 是多么容易!
不要忘记添加 RepositoryServiceProvider 到 config/app.php 文件的 providers 列表中。完成了这些后我们需要清空缓存:
'providers' => [
  \App\Providers\RepositoryServiceProvider::class
],
php artisan config:clear
就是这样
现在你已经成功实现了 repository 设计模式,不是很难吧?
你可以选择增加一些路由和视图来拓展代码,但本文将在这里结束,因为本文主要是介绍 repository 设计模式的。
如果你喜欢这篇文章,或者它帮助你实现了 repository 设计模式,请确保你也查看了我的其他文章。如果你有任何反馈、疑问,或希望我撰写另一个有关 Laravel 的主题,请随时发表评论。
原文地址:https://itnext.io/repository-design-pattern-done-right-in-laravel-d177b5fa75d4
译文地址:https://learnku.com/laravel/t/31798
【相关推荐:laravel视频教程】
以上是Laravel中怎麼實作Repository設計模式的詳細內容。更多資訊請關注PHP中文網其他相關文章!

熱AI工具

Undresser.AI Undress
人工智慧驅動的應用程序,用於創建逼真的裸體照片

AI Clothes Remover
用於從照片中去除衣服的線上人工智慧工具。

Undress AI Tool
免費脫衣圖片

Clothoff.io
AI脫衣器

Video Face Swap
使用我們完全免費的人工智慧換臉工具,輕鬆在任何影片中換臉!

熱門文章

熱工具

記事本++7.3.1
好用且免費的程式碼編輯器

SublimeText3漢化版
中文版,非常好用

禪工作室 13.0.1
強大的PHP整合開發環境

Dreamweaver CS6
視覺化網頁開發工具

SublimeText3 Mac版
神級程式碼編輯軟體(SublimeText3)
 PHP的目的:構建動態網站
Apr 15, 2025 am 12:18 AM
PHP用於構建動態網站,其核心功能包括:1.生成動態內容,通過與數據庫對接實時生成網頁;2.處理用戶交互和表單提交,驗證輸入並響應操作;3.管理會話和用戶認證,提供個性化體驗;4.優化性能和遵循最佳實踐,提升網站效率和安全性。
 PHP和Python:解釋了不同的範例
Apr 18, 2025 am 12:26 AM
PHP主要是過程式編程,但也支持面向對象編程(OOP);Python支持多種範式,包括OOP、函數式和過程式編程。 PHP適合web開發,Python適用於多種應用,如數據分析和機器學習。
 為什麼要使用PHP?解釋的優點和好處
Apr 16, 2025 am 12:16 AM
PHP的核心優勢包括易於學習、強大的web開發支持、豐富的庫和框架、高性能和可擴展性、跨平台兼容性以及成本效益高。 1)易於學習和使用,適合初學者;2)與web服務器集成好,支持多種數據庫;3)擁有如Laravel等強大框架;4)通過優化可實現高性能;5)支持多種操作系統;6)開源,降低開發成本。
 在PHP和Python之間進行選擇:指南
Apr 18, 2025 am 12:24 AM
PHP適合網頁開發和快速原型開發,Python適用於數據科學和機器學習。 1.PHP用於動態網頁開發,語法簡單,適合快速開發。 2.Python語法簡潔,適用於多領域,庫生態系統強大。
 laravel入門實例
Apr 18, 2025 pm 12:45 PM
Laravel 是一款 PHP 框架,用於輕鬆構建 Web 應用程序。它提供一系列強大的功能,包括:安裝: 使用 Composer 全局安裝 Laravel CLI,並在項目目錄中創建應用程序。路由: 在 routes/web.php 中定義 URL 和處理函數之間的關係。視圖: 在 resources/views 中創建視圖以呈現應用程序的界面。數據庫集成: 提供與 MySQL 等數據庫的開箱即用集成,並使用遷移來創建和修改表。模型和控制器: 模型表示數據庫實體,控制器處理 HTTP 請求。
 PHP和Python:深入了解他們的歷史
Apr 18, 2025 am 12:25 AM
PHP起源於1994年,由RasmusLerdorf開發,最初用於跟踪網站訪問者,逐漸演變為服務器端腳本語言,廣泛應用於網頁開發。 Python由GuidovanRossum於1980年代末開發,1991年首次發布,強調代碼可讀性和簡潔性,適用於科學計算、數據分析等領域。
 PHP:服務器端腳本語言的簡介
Apr 16, 2025 am 12:18 AM
PHP是一種服務器端腳本語言,用於動態網頁開發和服務器端應用程序。 1.PHP是一種解釋型語言,無需編譯,適合快速開發。 2.PHP代碼嵌入HTML中,易於網頁開發。 3.PHP處理服務器端邏輯,生成HTML輸出,支持用戶交互和數據處理。 4.PHP可與數據庫交互,處理表單提交,執行服務器端任務。
 PHP與Python:用例和應用程序
Apr 17, 2025 am 12:23 AM
PHP適用於Web開發和內容管理系統,Python適合數據科學、機器學習和自動化腳本。 1.PHP在構建快速、可擴展的網站和應用程序方面表現出色,常用於WordPress等CMS。 2.Python在數據科學和機器學習領域表現卓越,擁有豐富的庫如NumPy和TensorFlow。


