聊聊怎麼使用Node將Excel轉為JSON
怎麼使用Node將Excel轉為JSON?以下這篇文章跟大家介紹一下Node中轉換Excel成JSON的方法,希望對大家有幫助!

目前想使用Cocos Creator做一個文字遊戲,類似於我的人生重開模擬器。
那麼其中最重要的一點就是關於資料的儲存了。在我的人生重開模擬器中大部分事件和天賦的資料是儲存在excel表格當中的,當然如果要使用Cocos Creator,因為我不准備佈置伺服器,所以需要將資料提前轉換成JSON文件,那麼可以創建一個項目,使用node讀取excel文件,並透過格式轉換,將資料轉換成JSON。 【相關教學推薦:nodejs影片教學】
這裡網路上有一些node呼叫excel的函式庫,我使用了node-xlsx
SheetJS 構建,對xlsx 文件的格式相容性足夠好。
node-xlsx - npm (npmjs.com)開始
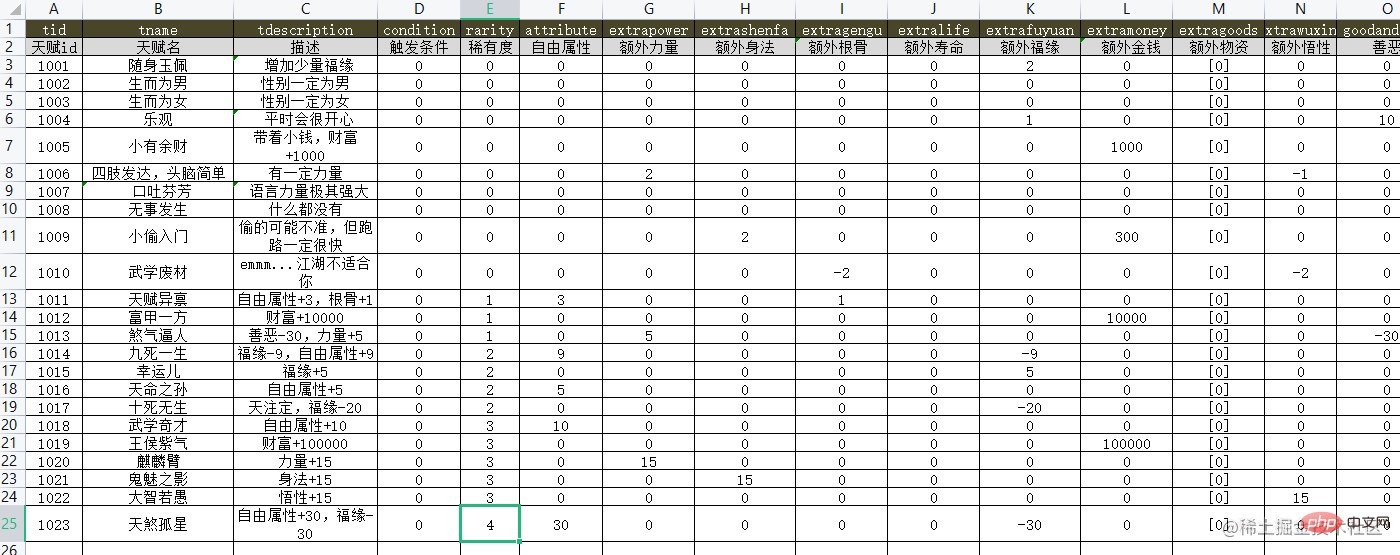
talentTable.xlsx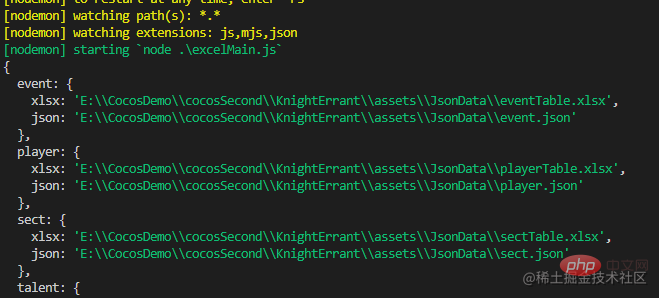 ,裡面已經加入了許多天賦,有不同的屬性加成
pnpm init
pnpm add node-xlsx將庫導入項目當中。
excelMain.js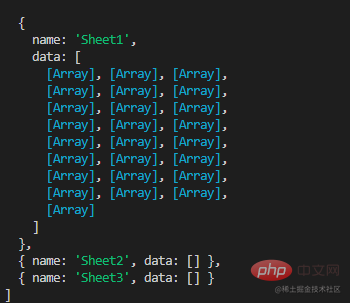 ,此檔案中需要引入需要的函式庫
import { fileURLToPath } from 'node:url'
import path from 'path';
import fs from 'fs';
import xlsx from 'node-xlsx';可以提前先將需要的儲存的json檔案 talent. json
path將xlsx和json的資料夾相對路徑找到
// 获取 __dirname 的 ESM 写法
const __dirname = path.dirname(fileURLToPath(import.meta.url))
// xlsx文件路径
const xlsxPath = path.resolve(__dirname, '../../assets/JsonData');
// 事件, 玩家, 门派, 天赋, 武学
let dataNames = ['event', 'player', 'sect', 'talent', 'skill']
let dataPaths = {};
for(let iname of dataNames) {
    dataPaths[iname] = {
        xlsx: path.resolve(xlsxPath, `./${iname}Table.xlsx`),
        json: path.resolve(xlsxPath, `./${iname}.json`)
    }
}
然後建立一個讀取檔案方法,這裡需要用到fs
readFileSync
// 读取数据表方法
const readFileData = (tableName)=>{
    let fname = dataPaths[tableName].xlsx
    const xlsxData = xlsx.parse(fs.readFileSync(fname));
    ......
} 這裡讀取到的xlsxData
是數組對象,數組中的元素代表的其實是一張張sheet表格,xlsx表格中並不是只有一個表格,所以才會是數組對象,不過我需要的只是第一張表格。

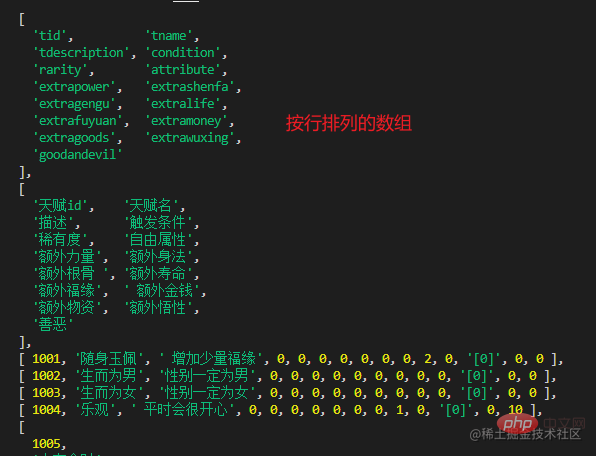
xlsxData[0].data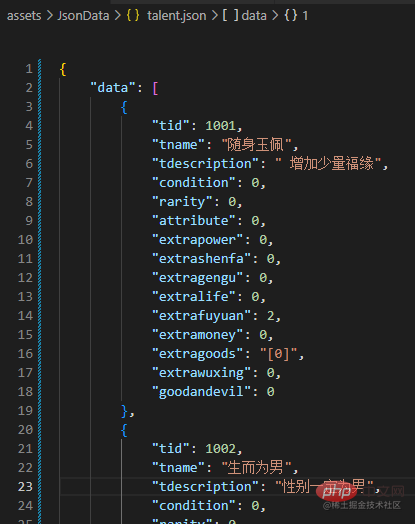 的資料即可,data的資料是依照行排列的陣列物件
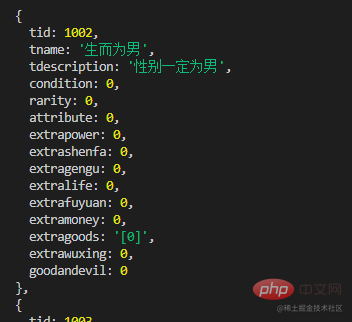
然後到轉換成JSON格式資料是,需要變成屬性:屬性值的格式,所以可建立一個方法,將第一行屬性和從第三行開始的資料結合,建立一個物件數組。
const oneAndTwo = (arr)=>{
    if (arr.length <= 2) return [];
    let newarr = []
    for(let i = 2; i < arr.length; i++) {
        let newobj = {};
        for(let j = 0; j < arr[0].length; j++) {
            let jname = arr[0][j];
            newobj[jname] = (arr[i][j] != undefined)? arr[i][j] : null;
        }
        newarr.push(newobj)
    }
    return newarr;
}這樣傳回的物件就如下了fs.writeFile# ##方法,格式使用###utf-8###即可###// 写入JSON文件方法
const writeJson = (arr, jsonName)=>{
let path = dataPaths[jsonName].json;
let d = { data: arr }
fs.writeFile(path, JSON.stringify(d), 'utf-8', (err)=>{
console.log(`${jsonName}写入成功`);
});
}以上是聊聊怎麼使用Node將Excel轉為JSON的詳細內容。更多資訊請關注PHP中文網其他相關文章!

熱AI工具

Undresser.AI Undress
人工智慧驅動的應用程序,用於創建逼真的裸體照片

AI Clothes Remover
用於從照片中去除衣服的線上人工智慧工具。

Undress AI Tool
免費脫衣圖片

Clothoff.io
AI脫衣器

AI Hentai Generator
免費產生 AI 無盡。

熱門文章

熱工具

記事本++7.3.1
好用且免費的程式碼編輯器

SublimeText3漢化版
中文版,非常好用

禪工作室 13.0.1
強大的PHP整合開發環境

Dreamweaver CS6
視覺化網頁開發工具

SublimeText3 Mac版
神級程式碼編輯軟體(SublimeText3)

熱門話題
 excel列印表格框線消失怎麼辦
Mar 21, 2024 am 09:50 AM
如果在開啟一份需要列印的文件時,在列印預覽裡我們會發現表格框線不知為何消失不見了,遇到這樣的情況,我們就要及時進行處理,如果你的列印文件裡也出現了此類的問題,那麼就和小編一起來學習下邊的課程吧:excel列印表格框線消失怎麼辦? 1.開啟一份需要列印的文件,如下圖所示。 2、選取所有需要的內容區域,如下圖所示。 3、按滑鼠右鍵,選擇「設定儲存格格式」選項,如下圖所示。 4、點選視窗上方的「邊框」選項,如下圖所示。 5、在左側的線條樣式中選擇細實線圖樣,如下圖所示。 6、選擇“外邊框”
 excel同時篩選3個以上關鍵字怎麼操作
Mar 21, 2024 pm 03:16 PM
在日常辦公中經常使用Excel來處理數據,時常遇到需要使用「篩選」功能。當我們在Excel中選擇執行「篩選」時,對於同一列而言,最多只能篩選兩個條件,那麼,你知道excel同時篩選3個以上關鍵字該怎麼操作嗎?接下來,就請小編為大家示範一次。第一種方法是將條件逐步加入篩選器。如果要同時篩選出三個符合條件的明細,首先需要逐步篩選出其中一個。開始時,可以先依照條件篩選出姓「王」的員工。然後按一下【確定】,接著在篩選結果中勾選【將目前所選內容新增至篩選器】。操作步驟如下圖所示。 同樣,再次分別執行篩選
 excel表格相容模式改正常模式的方法
Mar 20, 2024 pm 08:01 PM
在我們日常的工作學習中,從他人處拷貝了Excel文件,打開進行內容添加或重新編輯後,再保存的有時候,有時會提示出現兼容性檢查的對話框,非常的麻煩,不知道Excel軟體,可不可改為正常模式呢?那麼下面就由小編為大家帶來解決這個問題的詳細步驟,讓我們一起來學習吧。最後一定記得收藏保存。 1.開啟一個工作表,在工作表的名稱中顯示多出來一個相容模式,如圖所示。 2.在這個工作表中,進行了內容的修改後保存,結果總是彈出兼容檢查器的對話框,很麻煩看見這個頁面,如圖所示。 3、點選Office按鈕,點另存為,然
 excel上標應該如何設定
Mar 20, 2024 pm 04:30 PM
在處理資料時,有時我們會遇到資料包含了倍數、溫度等等各種符號的時候,你知道excel上標應該如何設定嗎?我們在使用excel處理資料時,如果不會設定上標,這可是會讓我們的許多資料在輸入時就會比較麻煩。今天小編就為大家帶來了excel上標的具體設定方法。 1.首先,讓我們打開桌面上的MicrosoftOfficeExcel文檔,選擇需要修改為上標的文字,具體如圖所示。 2.然後,點擊右鍵,點擊後出現的選單中,選擇「設定儲存格格式」選項,具體如圖所示。 3.接下來,在系統自動彈出的「儲存格格式」對話框
 excel中iif函數的用法
Mar 20, 2024 pm 06:10 PM
大部分使用者使用Excel都是用來處理表格資料的,其實Excel還有vba程式編寫,這個除了專人士應該沒有多少使用者用過此功能,在vba編寫時常常會用到iif函數,它其實跟if函數的功能差不多,下面小編跟大家介紹下iif函數的用法。 Excel中SQL語句和VBA程式碼中都有iif函數。 iif函數和excel工作表中的IF函數用法相似,執行真假值判斷,根據邏輯計算的真假值,傳回不同結果。 IF函數用法是(條件,是,否)。 VBA中的IF語句和IIF函數,前者IF語句是控制語句可以依照條件執行不同的語句,後者
 excel閱讀模式在哪裡設置
Mar 21, 2024 am 08:40 AM
在軟體的學習中,我們習慣用excel,不僅是因為需要方便,更因為它可以滿足多種實際工作中需要的格式,而且excel運用起來非常的靈活,有種模式是方便閱讀的,今天帶給大家的就是:excel閱讀模式在哪裡設定。 1.開啟電腦,然後再開啟Excel應用,找到目標資料。 2.要想在Excel中,設定閱讀模式,有兩種方式。第一種:Excel中,有大量的便利處理方式,分佈在Excel中佈局中。在Excel的右下角,有設定閱讀模式的快捷方式,找到十字標誌的圖案,點擊即可進入閱讀模式,在十字標誌的右邊有一個小的三
 PPT幻燈片插入excel圖示的操作方法
Mar 26, 2024 pm 05:40 PM
1.開啟PPT,翻頁至需要插入excel圖示的頁面。點選插入選項卡。 2、點選【對象】。 3、跳出以下對話框。 4.點選【由檔案建立】,點選【瀏覽】。 5、選擇需要插入的excel表格。 6.點選確定後跳出如下頁面。 7.勾選【顯示為圖示】。 8.點選確定即可。
 excel排版有哪些操作技巧
Mar 20, 2024 pm 05:01 PM
為了整個文件的視覺效果,無論是word還是excel文件都是需要進行排版處理的,但是,很多新手小伙伴並不知道excel排版如何進行,下邊,我們就分享一些排版操作技巧,希望能夠給你一些操作技巧上的啟發! 1.首先,我們新建並開啟一個excel表格,輸入一些簡單的內容,以便於示範操作。 2、我們在文件上方選單列中找到列印預覽功能選單。 3.點擊列印預覽功能,我們發現表格沒有進行排版的時候是左右不對稱的。我們需要在文件上方的選單列中找到頁面設定功能。 4.點選頁面設置,在開啟的功能選單中找到頁邊距功能。 5.點擊


