react怎麼改變組件大小
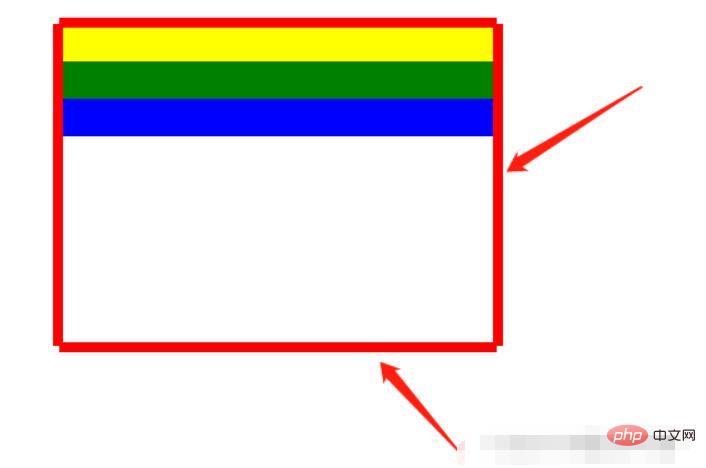
react改變組件大小的方法:1、使用「React.cloneElement」加強包裹組件;2、在包裹的組件設定絕對定位,並在組件內加上四個可調整大小的拖曳條;3、點選拖曳條並進行拖曳即會改變DragBox的大小。

本教學操作環境:Windows10系統、react18版、Dell G3電腦。
react怎麼改變元件大小?
手寫一個React拖曳調整大小的元件
一、實作流程
1.使用React.cloneElement加強包裹元件,在包裹的元件設定絕對定位,並在元件內加上四個可調整大小的拖曳條,在點擊拖曳條並進行拖曳時會改變DragBox的大小,如下:

2.使用:
<DragBox dragAble={true} minWidth={350} minHeight={184} edgeDistance={[10, 10, 10, 10]} dragCallback={this.dragCallback} >
{/* 使用DragBox拖动组件包裹需要调整大小的盒子 */}
<div style={{ top: 100 + 'px', left: 100 + 'px', width: 350, height: 184, backgroundColor: "white" }}>
<div style={{ backgroundColor: "yellow", width: "100%", height: 30 }}></div>
<div style={{ backgroundColor: "green", width: "100%", height: 30 }}></div>
<div style={{ backgroundColor: "blue", width: "100%", height: 30 }}></div>
</div>
</DragBox>二、程式碼
DragBox元件
import React, { Component, Fragment } from 'react';
import styles from "./DragBox.less";
/**
* 拖拽的公共组件
* 接收参数:
* dragAble:是否开启拖拽
* minWidth:最小调整宽度
* minHeight:最小调整高度
* edgeDistance:数组,拖拽盒子里浏览器上下左右边缘的距离,如果小于这个距离就不会再进行调整宽高
* dragCallback:拖拽回调
*
* 使用:
* 在DragBox组件放需要实现拖拽的div,DragBox组件内会设置position:absolute(React.cloneElement)
*/
class DragBox extends Component {
constructor(props) {
super(props);
// 父组件盒子
this.containerRef = React.createRef();
// 是否开启尺寸修改
this.reSizeAble = false;
// 鼠标按下时的坐标,并在修改尺寸时保存上一个鼠标的位置
this.clientX, this.clientY;
// 鼠标按下时的位置,使用n、s、w、e表示
this.direction = "";
// 拖拽盒子里浏览器上下左右边缘的距离,如果小于这个距离就不会再进行调整宽高
this.edgeTopDistance = props.edgeDistance[0] || 10;
this.edgeBottomDistance = props.edgeDistance[1] || 10;
this.edgeLeftDistance = props.edgeDistance[2] || 10;
this.edgeRightDistance = props.edgeDistance[3] || 10;
}
componentDidMount(){
// body监听移动事件
document.body.addEventListener('mousemove', this.move);
// 鼠标松开事件
document.body.addEventListener('mouseup', this.up);
}
/**
* 清除调整宽高的监听
*/
clearEventListener() {
document.body.removeEventListener('mousemove', this.move);
document.body.removeEventListener('mouseup', this.up);
}
componentWillUnmount() {
this.clearEventListener();
}
/**
* 鼠标松开时结束尺寸修改
*/
up = () => {
this.reSizeAble = false;
this.direction = "";
}
/**
* 鼠标按下时开启尺寸修改
* @param {*} e
* @param {String} direction 记录点击上下左右哪个盒子的标识
*/
down = (e, direction) => {
this.direction = direction;
this.reSizeAble = true;
this.clientX = e.clientX;
this.clientY = e.clientY;
}
/**
* 鼠标按下事件 监听鼠标移动,修改父节dom位置
* @param {DocumentEvent} e 事件参数
* @param {Boolean} changeLeft 是否需要调整left
* @param {Boolean} changeTop 是否需要调整top
* @param {Number} delta 调整位置的距离差
*/
changeLeftAndTop = (event, changeLeft, changeTop, delta) => {
let ww = document.documentElement.clientWidth;
let wh = window.innerHeight;
if (event.clientY < 0 || event.clientX < 0 || event.clientY > wh || event.clientX > ww) {
return false;
}
if (changeLeft) {
this.containerRef.current.style.left = Math.max(this.containerRef.current.offsetLeft + delta, this.edgeLeftDistance) + 'px';
}
if (changeTop) {
this.containerRef.current.style.top = Math.max(this.containerRef.current.offsetTop + delta, this.edgeTopDistance) + 'px';
}
}
/**
* 鼠标移动事件
* @param {*} e
*/
move = (e) => {
// 当开启尺寸修改时,鼠标移动会修改div尺寸
if (this.reSizeAble) {
let finalValue;
// 鼠标按下的位置在上部,修改高度
if (this.direction === "top") {
// 1.距离上边缘10 不修改
// 2.因为按着顶部修改高度会修改top、height,所以需要判断e.clientY是否在offsetTop和this.clientY之间(此时说明处于往上移动且鼠标位置在盒子上边缘之下),不应该移动和调整盒子宽高
if (e.clientY <= this.edgeTopDistance || (this.containerRef.current.offsetTop < e.clientY && e.clientY < this.clientY)){
this.clientY = e.clientY;
return;
}
finalValue = Math.max(this.props.minHeight, this.containerRef.current.offsetHeight + (this.clientY - e.clientY));
// 移动的距离,如果移动的距离不为0需要调整高度和top
let delta = this.containerRef.current.offsetHeight - finalValue;
if(delta !== 0){
this.changeLeftAndTop(e, false, true, delta);
this.containerRef.current.style.height = finalValue + "px";
}
this.clientY = e.clientY;
} else if (this.direction === "bottom") {// 鼠标按下的位置在底部,修改高度
// 1.距离下边缘10 不修改
// 2.判断e.clientY是否处于往下移动且鼠标位置在盒子下边缘之上,不应该调整盒子宽高
if (window.innerHeight - e.clientY <= this.edgeBottomDistance || (this.containerRef.current.offsetTop + this.containerRef.current.offsetHeight > e.clientY && e.clientY > this.clientY)) {
this.clientY = e.clientY;
return;
}
finalValue = Math.max(this.props.minHeight, this.containerRef.current.offsetHeight + (e.clientY - this.clientY));
this.containerRef.current.style.height = finalValue + "px";
this.clientY = e.clientY;
} else if (this.direction === "right") { // 鼠标按下的位置在右边,修改宽度
// 1.距离右边缘10 不修改
// 2.判断e.clientY是否处于往右移动且鼠标位置在盒子右边缘之左,不应该调整盒子宽高
if (document.documentElement.clientWidth - e.clientX <= this.edgeRightDistance || (this.containerRef.current.offsetLeft + this.containerRef.current.offsetWidth > e.clientX && e.clientX > this.clientX)) {
this.clientX = e.clientX;
return;
}
// 最小为UI设计this.props.minWidth,最大为 改边距离屏幕边缘-10,其他同此
let value = this.containerRef.current.offsetWidth + (e.clientX - this.clientX);
finalValue = step(value, this.props.minWidth, document.body.clientWidth - this.edgeRightDistance - this.containerRef.current.offsetLeft);
this.containerRef.current.style.width = finalValue + "px";
this.clientX = e.clientX;
} else if (this.direction === "left") {// 鼠标按下的位置在左边,修改宽度
// 1.距离左边缘10 不修改
// 2.因为按着顶部修改高度会修改left、height,所以需要判断e.clientY是否在offsetLeft和this.clientY之间(此时说明处于往左移动且鼠标位置在盒子左边缘之左),不应该移动和调整盒子宽高
if (e.clientX <= this.edgeLeftDistance || (this.containerRef.current.offsetLeft < e.clientX && e.clientX < this.clientX)) {
this.clientX = e.clientX;
return;
}
let value = this.containerRef.current.offsetWidth + (this.clientX - e.clientX);
finalValue = step(value, this.props.minWidth, this.containerRef.current.offsetWidth - this.edgeLeftDistance + this.containerRef.current.offsetLeft);
// 移动的距离,如果移动的距离不为0需要调整宽度和left
let delta = this.containerRef.current.offsetWidth - finalValue;
if(delta !== 0){
// 需要修改位置,直接修改宽度只会向右增加
this.changeLeftAndTop(e, true, false, delta);
this.containerRef.current.style.width = finalValue + "px";
}
this.clientX = e.clientX;
}
this.props.dragCallback && this.props.dragCallback(this.direction, finalValue);
}
}
render() {
// 四个红色盒子 用于鼠标移动到上面按下进行拖动
const children = (
<Fragment key={"alphaBar"}>
<div key={1} className={styles.alphaTopBar} onMouseDown={(e) => this.down(e, "top")}></div>
<div key={2} className={styles.alphaBottomBar} onMouseDown={(e) => this.down(e, "bottom")}></div>
<div key={3} className={styles.alphaLeftBar} onMouseDown={(e) => this.down(e, "left")}></div>
<div key={4} className={styles.alphaRightBar} onMouseDown={(e) => this.down(e, "right")}></div>
</Fragment>
);
// 给传进来的children进行加强:添加position:"absolute",添加四个用于拖动的透明盒子
const childrenProps = this.props.children.props;
const cloneReactElement = React.cloneElement(
this.props.children,
{
style: {
// 复用原来的样式
...childrenProps.style,
// 添加position:"absolute"
position: "absolute"
},
ref: this.containerRef
},
// 复用children,添加四个用于拖动的红色盒子
[childrenProps.children, children]
);
return (
<Fragment>
{
cloneReactElement
}
</Fragment>
);
}
}
/**
* 取最大和最小值之间的值
* @param {*} value
* @param {*} min
* @param {*} max
* @returns
*/
function step(value, min, max) {
if (value < min) {
return min;
} else if (value > max) {
return max;
} else {
return value;
}
}
export default DragBox;DragBox元件拖曳條的樣式
  .alphaTopBar{
    position: absolute;
    width: 100%;
    height: 8px;
    top: -5px;
    left: 0;
    background-color: red;
    cursor: row-resize;
  }
  .alphaBottomBar{
    position: absolute;
    width: 100%;
    height: 8px;
    bottom: -5px;
    left: 0;
    background-color: red;
    cursor: row-resize;
  }
  .alphaLeftBar{
    position: absolute;
    width: 8px;
    height: 100%;
    top: 0;
    left: -5px;
    background-color: red;
    cursor: col-resize;
  }
  .alphaRightBar{
    position: absolute;
    width: 8px;
    height: 100%;
    top: 0;
    right: -5px;
    background-color: red;
    cursor: col-resize;
}推薦學習:《react影片教學》
以上是react怎麼改變組件大小的詳細內容。更多資訊請關注PHP中文網其他相關文章!

熱AI工具

Undresser.AI Undress
人工智慧驅動的應用程序,用於創建逼真的裸體照片

AI Clothes Remover
用於從照片中去除衣服的線上人工智慧工具。

Undress AI Tool
免費脫衣圖片

Clothoff.io
AI脫衣器

Video Face Swap
使用我們完全免費的人工智慧換臉工具,輕鬆在任何影片中換臉!

熱門文章

熱工具

記事本++7.3.1
好用且免費的程式碼編輯器

SublimeText3漢化版
中文版,非常好用

禪工作室 13.0.1
強大的PHP整合開發環境

Dreamweaver CS6
視覺化網頁開發工具

SublimeText3 Mac版
神級程式碼編輯軟體(SublimeText3)
 如何安裝Win10舊版元件DirectPlay
Dec 28, 2023 pm 03:43 PM
不少用戶在玩win10的的一些遊戲的時候總是會遇到一些問題,比如說卡屏和花屏等等情況,這個時候我們是可以採用打開directplay這個功能來解決的,而且功能的操作方法也很簡單。 win10舊版元件directplay怎麼安裝1、在搜尋框裡面輸入「控制台」然後開啟2、檢視方式選擇大圖示3、找到「程式與功能」4、點選左側的啟用或關閉win功能5、選擇舊版這裡的勾選上就可以了
 PHP、Vue和React:如何選擇最適合的前端框架?
Mar 15, 2024 pm 05:48 PM
PHP、Vue和React:如何選擇最適合的前端框架?隨著互聯網技術的不斷發展,前端框架在Web開發中起著至關重要的作用。 PHP、Vue和React作為三種代表性的前端框架,每一種都具有其獨特的特徵和優勢。在選擇使用哪種前端框架時,開發人員需要根據專案需求、團隊技能和個人偏好做出明智的決策。本文將透過比較PHP、Vue和React這三種前端框架的特徵和使
 Angular元件及其顯示屬性:了解非block預設值
Mar 15, 2024 pm 04:51 PM
Angular框架中元件的預設顯示行為不是區塊級元素。這種設計選擇促進了元件樣式的封裝,並鼓勵開發人員有意識地定義每個元件的顯示方式。透過明確設定CSS屬性 display,Angular組件的顯示可以完全控制,從而實現所需的佈局和響應能力。
 如何開啟win10舊版組件的設置
Dec 22, 2023 am 08:45 AM
win10舊版元件是需要使用者自己去設定裡面打開的,因為很多的元件平時都是預設關閉的狀態,首先我們需要進入到設定裡面,操作很簡單,跟著下面的步驟來就可以了win10舊版元件在哪裡開啟1、點選開始,然後點選「win系統」2、點選進入控制台3、再點選下面的程式4、點選「啟用或關閉win功能」5、在這裡就可以選擇你要的開啟了
 Java框架與前端React框架的整合
Jun 01, 2024 pm 03:16 PM
Java框架與React框架的整合:步驟:設定後端Java框架。建立專案結構。配置建置工具。建立React應用程式。編寫RESTAPI端點。配置通訊機制。實戰案例(SpringBoot+React):Java程式碼:定義RESTfulAPI控制器。 React程式碼:取得並顯示API回傳的資料。
 Vue元件開發:進度條元件實作方法
Nov 24, 2023 am 08:56 AM
Vue元件開發:進度條元件實作方法前言:在Web開發中,進度列是一種常見的UI元件,在資料要求、檔案上傳、表單提交等場景中常用來顯示作業的進度。在Vue.js中,透過自訂元件的方式,我們可以很方便地實作一個進度條元件,本文將介紹一種實作方法,並提供具體的程式碼範例。希望能對Vue.js初學者有幫助。組件的結構和樣式首先,我們需要定義進度條組件的基本結構和樣
 Vue組件實戰:分頁組件開發
Nov 24, 2023 am 08:56 AM
Vue元件實戰:分頁元件開發介紹在網路應用程式中,分頁功能是不可或缺的一個元件。一個好的分頁元件應該展示簡潔明了,功能豐富,而且易於整合和使用。在本文中,我們將介紹如何使用Vue.js框架來開發一個高度可自訂化的分頁元件。我們將透過程式碼範例來詳細說明如何使用Vue元件開發。技術堆疊Vue.js2.xJavaScript(ES6)HTML5和CSS3開發環
 Vue元件開發:下拉式選單元件實作方法
Nov 24, 2023 am 08:29 AM
Vue元件開發:下拉式選單元件實作方法在Vue.js中,下拉式選單是一個常見的UI元件,用來顯示一組選項供使用者選擇。本文將介紹如何使用Vue.js開發一個下拉式選單元件,並提供具體的程式碼範例。建立Vue元件首先,我們需要建立一個Vue元件來表示下拉式選單。在Vue實例的components選項中註冊這個元件,讓它可以在其他元件中使用。 //DropdownMenu.


