

深入詳解React中的ref


對於Ref 理解與使用,有些讀者可能還會停留在用ref 取得真實DOM 元素和取得類別元件實例層面上
其實ref 除了這兩項常用功能之外,還有很多別的小技巧
透過本篇文章的學習,你將收穫React ref 的基本和進階用法,並且能夠明白React 內部是如何處理ref 的,並通過一個小Demo 提問的方式帶你更深刻地理解ref 的底層原理
1. ref 的理解與使用
對於Ref 的理解,要從兩個角度去分析:
Ref 物件的建立:使用
createRef或useRef建立Ref 物件【相關推薦:Redis影片教學、程式設計影片】React 本身對Ref 的處理:對於標籤中的ref 屬性,React 是如何處理的
1.1. ref 物件的建立
1.1.1. createRef在類別元件中,我們會透過createRef
packages/react/src/ReactCreateRef.js#
export function createRef(): RefObject {
  const refObject = {
    current: null,
  }

  return refObject
}current
屬性的對象,僅此而已1.1.2. useRef
這也意味著我們不能在函數元件中使用createRef,因為每次函數元件渲染都是一次新的函數執行,每次執行createRef
useRef 建立Ref 對象,React 會將useRef 和函數元件對應的fiber 物件關聯,將useRef建立的ref 物件掛載到對應的fiber 物件上
1.2. React 對標籤中ref 屬性的處理
首先要明確一個結論,在React 中取得DOM 元素或元件實例並不是只能透過ref 物件取得! ! !也就是說不是只能透過先呼叫createRef
 :::tip
只有類別元件才有取得元件實例這一說法,函數元件沒有實例,不能被ref 標記,但是可以透過
forwardRef結合
useImperativeHandle給予函數元件ref 標記的
:::
1.2.1. string ref#當我們給元素或類別元件標籤中的ref 屬性傳遞字串時,能夠在元件實例的 this.refs
class Child extends React.Component<PropsWithChildren> {
render(): React.ReactNode {
const { children } = this.props
return (
<div>
<p>Child</p>
{children}
</div>
)
}
}
/** @description ref 属性传递字符串 */
class RefDemo1 extends React.Component {
logger = createLoggerWithScope('RefDemo1')
componentDidMount(): void {
this.logger.log(this.refs)
}
render(): React.ReactNode {
return (
<>
<div ref="refDemo1DOM">ref 属性传递字符串获取 DOM 元素</div>
<Child ref="refDemo1Component">ref 属性传递字符串获取类组件实例</Child>
</>
)
}
}登入後複製
##::: warningclass Child extends React.Component<PropsWithChildren> {
render(): React.ReactNode {
const { children } = this.props
return (
<div>
<p>Child</p>
{children}
</div>
)
}
}
/** @description ref 属性传递字符串 */
class RefDemo1 extends React.Component {
logger = createLoggerWithScope('RefDemo1')
componentDidMount(): void {
this.logger.log(this.refs)
}
render(): React.ReactNode {
return (
<>
<div ref="refDemo1DOM">ref 属性传递字符串获取 DOM 元素</div>
<Child ref="refDemo1Component">ref 属性传递字符串获取类组件实例</Child>
</>
)
}
}這種方式已經被React 官方廢棄,盡量不要使用##:::
#ref 屬性傳遞函數時,會在commit 階段建立真實DOM 時執行ref 指定的函數,並將元素作為第一個參數傳入,此時我們就可以利用它進行賦值以取得DOM 元素或元件實例/** @description ref 属性传递函数 */
class RefDemo2 extends React.Component {
logger = createLoggerWithScope('RefDemo2')
refDemo2DOM: HTMLElement | null = null
refDemo2Component: Child | null = null
componentDidMount(): void {
this.logger.log(this.refDemo2DOM)
this.logger.log(this.refDemo2Component)
}
render(): React.ReactNode {
return (
<>
<div ref={(el) => (this.refDemo2DOM = el)}>
ref 属性传递函数获取 DOM 元素
</div>
<Child ref={(child) => (this.refDemo2Component = child)}>
ref 属性传递函数获取类组件实例
</Child>
</>
)
}
}登入後複製
/** @description ref 属性传递函数 */
class RefDemo2 extends React.Component {
  logger = createLoggerWithScope('RefDemo2')

  refDemo2DOM: HTMLElement | null = null
  refDemo2Component: Child | null = null

  componentDidMount(): void {
    this.logger.log(this.refDemo2DOM)
    this.logger.log(this.refDemo2Component)
  }

  render(): React.ReactNode {
    return (
      <>
        <div ref={(el) => (this.refDemo2DOM = el)}>
          ref 属性传递函数获取 DOM 元素
        </div>

        <Child ref={(child) => (this.refDemo2Component = child)}>
          ref 属性传递函数获取类组件实例
        </Child>
      </>
    )
  }
}1.2.3. object ref
這種方式就是我們最常用的方式了,使用createRef
或###useRef### 建立Ref 對象,並將其傳給標籤的ref 屬性即可######這種方式取得到的ref 需要先呼叫###current### 屬性才能取得對應的DOM 元素或元件實例###/** @description ref 属性传递对象 */
class RefDemo3 extends React.Component {
logger = createLoggerWithScope('RefDemo3')
refDemo3DOM = React.createRef<HTMLDivElement>()
refDemo3Component = React.createRef<Child>()
componentDidMount(): void {
this.logger.log(this.refDemo3DOM)
this.logger.log(this.refDemo3Component)
}
render(): React.ReactNode {
return (
<>
<div ref={this.refDemo3DOM}>ref 属性传递对象获取 DOM 元素</div>
<Child ref={this.refDemo3Component}>
ref 属性传递对象获取类组件实例
</Child>
</>
)
}
}/** @description 孙组件 */
const Child: React.FC<{ grandRef: LegacyRef<HTMLDivElement> }> = (props) => {
const { grandRef } = props
return (
<>
<p>Child</p>
<div ref={grandRef}>要获取的目标元素</div>
</>
)
}
/**
* @description 父组件
*
* 第一个泛型参数是 ref 的类型
* 第二个泛型参数是 props 的类型
*/
const Father = forwardRef<HTMLDivElement, {}>((props, ref) => {
return (
<div>
<Child grandRef={ref} />
</div>
)
})
/** @description 爷组件 */
const GrandFather: React.FC = () => {
let grandChildDiv: HTMLDivElement | null = null
useEffect(() => {
logger.log(grandChildDiv)
}, [])
return (
<div>
<Father ref={(el) => (grandChildDiv = el)} />
</div>
)
}子组件 Bar 的组件实例
Bar 组件中的 DOM 元素 button
孙组件 Baz 的组件实例
:::
这种在一个 ref 里能够访问多个元素和实例的就是“合并后的自定义 ref”
/** @description 自定义 ref 的类型 */
interface CustomRef {
  bar: Bar
  barButton: HTMLButtonElement
  baz: Baz
}

class Baz extends React.Component {
  render(): React.ReactNode {
    return <div>Baz</div>
  }
}

class Bar extends React.Component<{
  customRef: ForwardedRef<CustomRef>
}> {
  buttonEl: HTMLButtonElement | null = null
  bazInstance: Baz | null = null

  componentDidMount(): void {
    const { customRef } = this.props

    if (customRef) {
      ;(customRef as MutableRefObject<CustomRef>).current = {
        bar: this,
        barButton: this.buttonEl!,
        baz: this.bazInstance!,
      }
    }
  }

  render() {
    return (
      <>
        <button ref={(el) => (this.buttonEl = el)}>Bar button</button>
        <Baz ref={(instance) => (this.bazInstance = instance)} />
      </>
    )
  }
}
const FowardRefBar = forwardRef<CustomRef>((props, ref) => (
  <Bar {...props} customRef={ref} />
))

const Foo: React.FC = () => {
  const customRef = useRef<CustomRef>(null)

  useEffect(() => {
    logger.log(customRef.current)
  }, [])

  return <FowardRefBar ref={customRef} />
}
2.1.3. 高阶组件转发 ref
如果我们在高阶组件中直接使用 ref,它会直接指向 WrapComponent
class TestComponent extends React.Component {
render(): React.ReactNode {
return <p>TestComponent</p>
}
}
/** @description 不使用 forwardRef 转发 HOC 中的 ref */
const HOCWithoutForwardRef = (Component: typeof React.Component) => {
class WrapComponent extends React.Component {
render(): React.ReactNode {
return (
<div>
<p>WrapComponent</p>
<Component />
</div>
)
}
}
return WrapComponent
}
const HOCComponent1 = HOCWithoutForwardRef(TestComponent)
const RefHOCWithoutForwardRefDemo = () => {
const logger = createLoggerWithScope('RefHOCWithoutForwardRefDemo')
const wrapRef = useRef(null)
useEffect(() => {
// wrapRef 指向的是 WrapComponent 实例 而不是 HOCComponent1 实例
logger.log(wrapRef.current)
}, [])
return <HOCComponent1 ref={wrapRef} />
}
如果我们希望 ref 指向的是被包裹的 TestComponent 而不是 HOC 内部的 WrapComponent 时该怎么办呢?
这时候就可以用 forwardRef 进行转发了
/** @description HOC 中使用 forwardRef 转发 ref */
const HOCWithForwardRef = (Component: typeof React.Component) => {
class WrapComponent extends React.Component<{
forwardedRef: LegacyRef<any>
}> {
render(): React.ReactNode {
const { forwardedRef } = this.props
return (
<div>
<p>WrapComponent</p>
<Component ref={forwardedRef} />
</div>
)
}
}
return React.forwardRef((props, ref) => (
<WrapComponent forwardedRef={ref} {...props} />
))
}
const HOCComponent2 = HOCWithForwardRef(TestComponent)
const RefHOCWithForwardRefDemo = () => {
const logger = createLoggerWithScope('RefHOCWithForwardRefDemo')
const hocComponent2Ref = useRef(null)
useEffect(() => {
// hocComponent2Ref 指向的是 HOCComponent2 实例
logger.log(hocComponent2Ref.current)
}, [])
return <HOCComponent2 ref={hocComponent2Ref} />
}
2.2. ref 实现组件通信
一般我们可以通过父组件改变子组件 props 的方式触发子组件的更新渲染完成组件间通信
但如果我们不希望通过这种改变子组件 props 的方式的话还能有别的办法吗?
可以通过 ref 获取子组件实例,然后子组件暴露出通信的方法,父组件调用该方法即可触发子组件的更新渲染
对于函数组件,由于其不存在组件实例这样的说法,但我们可以通过 useImperativeHandle 这个 hook 来指定 ref 引用时得到的属性和方法,下面我们分别用类组件和函数组件都实现一遍
2.2.1. 类组件 ref 暴露组件实例
/**
* 父 -> 子 使用 ref
* 子 -> 父 使用 props 回调
*/
class CommunicationDemoFather extends React.Component<
{},
CommunicationDemoFatherState
> {
state: Readonly<CommunicationDemoFatherState> = {
fatherToChildMessage: '',
childToFatherMessage: '',
}
childRef = React.createRef<CommunicationDemoChild>()
/** @description 提供给子组件修改父组件中的状态 */
handleChildToFather = (message: string) => {
this.setState((state) => ({
...state,
childToFatherMessage: message,
}))
}
constructor(props: {}) {
super(props)
this.handleChildToFather = this.handleChildToFather.bind(this)
}
render(): React.ReactNode {
const { fatherToChildMessage, childToFatherMessage } = this.state
return (
<div className={s.father}>
<h3 id="父组件">父组件</h3>
<p>子组件对我说:{childToFatherMessage}</p>
<div className={s.messageInputBox}>
<section>
<label htmlFor="to-father">我对子组件说:</label>
<input
type="text"
id="to-child"
onChange={(e) =>
this.setState((state) => ({
...state,
fatherToChildMessage: e.target.value,
}))
}
/>
</section>
{/* 父 -> 子 -- 使用 ref 完成组件通信 */}
<button
onClick={() =>
this.childRef.current?.setFatherToChildMessage(
fatherToChildMessage,
)
}
>
发送
</button>
</div>
<CommunicationDemoChild
ref={this.childRef}
onChildToFather={this.handleChildToFather}
/>
</div>
)
}
}
interface CommunicationDemoChildProps {
onChildToFather: (message: string) => void
}
// 子组件自己维护状态 不依赖于父组件 props
interface CommunicationDemoChildState {
fatherToChildMessage: string
childToFatherMessage: string
}
class CommunicationDemoChild extends React.Component<
CommunicationDemoChildProps,
CommunicationDemoChildState
> {
state: Readonly<CommunicationDemoChildState> = {
fatherToChildMessage: '',
childToFatherMessage: '',
}
/** @description 暴露给父组件使用的 API -- 修改父到子的消息 fatherToChildMessage */
setFatherToChildMessage(message: string) {
this.setState((state) => ({ ...state, fatherToChildMessage: message }))
}
render(): React.ReactNode {
const { onChildToFather: emitChildToFather } = this.props
const { fatherToChildMessage, childToFatherMessage } = this.state
return (
<div className={s.child}>
<h3 id="子组件">子组件</h3>
<p>父组件对我说:{fatherToChildMessage}</p>
<div className={s.messageInputBox}>
<section>
<label htmlFor="to-father">我对父组件说:</label>
<input
type="text"
id="to-father"
onChange={(e) =>
this.setState((state) => ({
...state,
childToFatherMessage: e.target.value,
}))
}
/>
</section>
{/* 子 -> 父 -- 使用 props 回调完成组件通信 */}
<button onClick={() => emitChildToFather(childToFatherMessage)}>
发送
</button>
</div>
</div>
)
}
}
2.2.2. 函数组件 ref 暴露指定方法
使用 useImperativeHandle hook 可以让我们指定 ref 引用时能获取到的属性和方法,个人认为相比类组件的 ref,使用这种方式能够更加好的控制组件想暴露给外界的 API
而不像类组件那样直接全部暴露出去,当然,如果你想在类组件中只暴露部分 API 的话,可以用前面说的合并转发自定义 ref 的方式去完成
接下来我们就用 useImperativeHandle hook 改造上面的类组件实现的 demo 吧
interface ChildRef {
setFatherToChildMessage: (message: string) => void
}
/**
* 父 -> 子 使用 ref
* 子 -> 父 使用 props 回调
*/
const CommunicationDemoFunctionComponentFather: React.FC = () => {
const [fatherToChildMessage, setFatherToChildMessage] = useState('')
const [childToFatherMessage, setChildToFatherMessage] = useState('')
const childRef = useRef<ChildRef>(null)
return (
<div className={s.father}>
<h3 id="父组件">父组件</h3>
<p>子组件对我说:{childToFatherMessage}</p>
<div className={s.messageInputBox}>
<section>
<label htmlFor="to-father">我对子组件说:</label>
<input
type="text"
id="to-child"
onChange={(e) => setFatherToChildMessage(e.target.value)}
/>
</section>
{/* 父 -> 子 -- 使用 ref 完成组件通信 */}
<button
onClick={() =>
childRef.current?.setFatherToChildMessage(fatherToChildMessage)
}
>
发送
</button>
</div>
<CommunicationDemoFunctionComponentChild
ref={childRef}
onChildToFather={(message) => setChildToFatherMessage(message)}
/>
</div>
)
}
interface CommunicationDemoFunctionComponentChildProps {
onChildToFather: (message: string) => void
}
const CommunicationDemoFunctionComponentChild = forwardRef<
ChildRef,
CommunicationDemoFunctionComponentChildProps
>((props, ref) => {
const { onChildToFather: emitChildToFather } = props
// 子组件自己维护状态 不依赖于父组件 props
const [fatherToChildMessage, setFatherToChildMessage] = useState('')
const [childToFatherMessage, setChildToFatherMessage] = useState('')
// 定义暴露给外界的 API
useImperativeHandle(ref, () => ({ setFatherToChildMessage }))
return (
<div className={s.child}>
<h3 id="子组件">子组件</h3>
<p>父组件对我说:{fatherToChildMessage}</p>
<div className={s.messageInputBox}>
<section>
<label htmlFor="to-father">我对父组件说:</label>
<input
type="text"
id="to-father"
onChange={(e) => setChildToFatherMessage(e.target.value)}
/>
</section>
{/* 子 -> 父 -- 使用 props 回调完成组件通信 */}
<button onClick={() => emitChildToFather(childToFatherMessage)}>
发送
</button>
</div>
</div>
)
})2.3. 函数组件缓存数据
当我们在函数组件中如果数据更新后不希望视图改变,也就是说视图不依赖于这个数据,这个时候可以考虑用 useRef 对这种数据进行缓存
为什么 useRef 可以对数据进行缓存?
还记得之前说的 useRef 在函数组件中的作用原理吗?
React 会将 useRef 和函数组件对应的 fiber 对象关联,将 useRef 创建的 ref 对象挂载到对应的 fiber 对象上,这样一来每次函数组件执行,只要函数组件不被销毁,那么对应的 fiber 对象实例也会一直存在,所以 ref 也能够被保留下来
利用这个特性,我们可以将数据放到 useRef 中,由于它在内存中一直都是同一块内存地址,所以无论如何变化都不会影响到视图的改变
:::warning{title=注意}
一定要看清前提,只适用于与视图无关的数据
:::
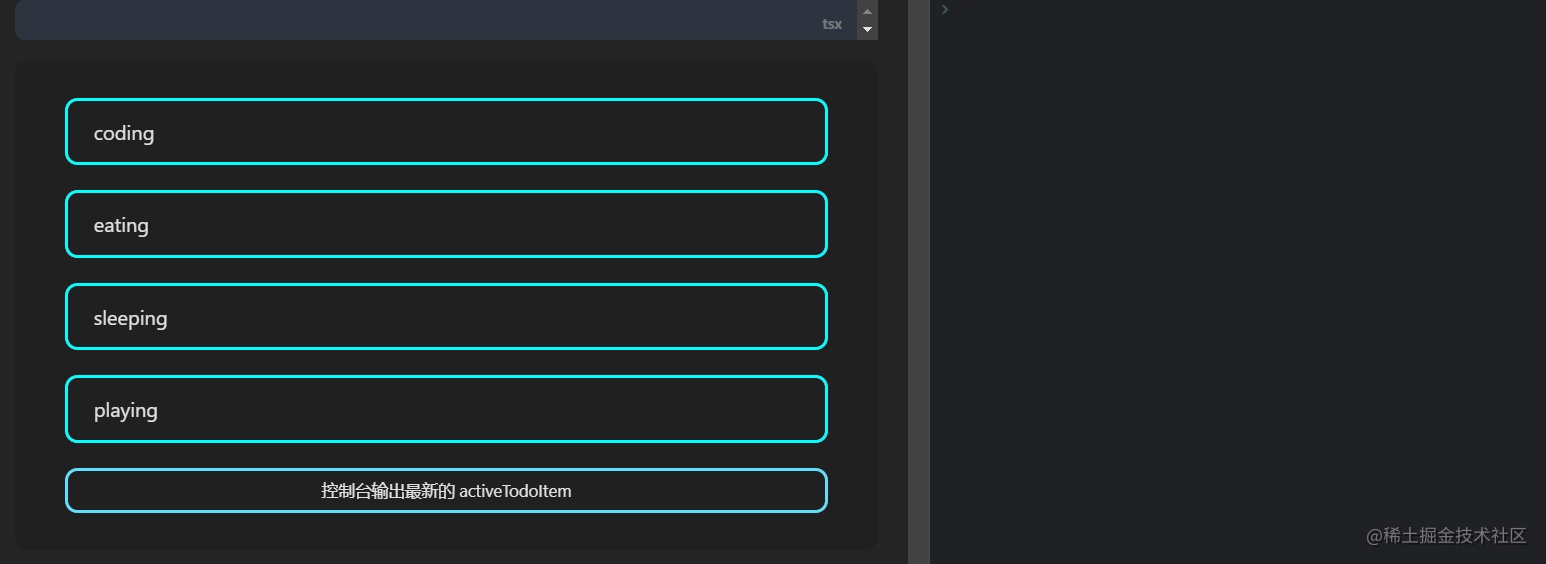
我们通过一个简单的 demo 来更清楚地体会下这个应用场景
假设我有一个 todoList 列表,视图上会把这个列表渲染出来,并且有一个数据 activeTodoItem 是控制当前选中的是哪个 todoItem
点击 todoItem 会切换这个 activeTodoItem,但是并不需要在视图上作出任何变化,如果使用 useState 去保存 activeTodoItem,那么当其变化时会导致函数组件重新执行,视图重新渲染,但在这个场景中我们并不希望更新视图
相对的,我们希望这个 activeTodoItem 数据被缓存起来,不会随着视图的重新渲染而导致其作为 useState 的执行结果重新生成一遍,因此我们可以改成用 useRef 实现,因为其在内存中一直都是同一块内存地址,这样就不会因为它的改变而更新视图了
同理,在 useEffect 中如果使用到了 useRef 的数据,也不需要将其声明到 deps 数组中,因为其内存地址不会变化,所以每次在 useEffect 中获取到的 ref 数据一定是最新的
interface TodoItem {
  id: number
  name: string
}

const todoList: TodoItem[] = [
  {
    id: 1,
    name: 'coding',
  },
  {
    id: 2,
    name: 'eating',
  },
  {
    id: 3,
    name: 'sleeping',
  },
  {
    id: 4,
    name: 'playing',
  },
]

const CacheDataWithRefDemo: React.FC = () => {
  const activeTodoItem = useRef(todoList[0])

  // 模拟 componentDidUpdate -- 如果改变 activeTodoItem 后组件没重新渲染,说明视图可以不依赖于 activeTodoItem 数据
  useEffect(() => {
    logger.log('检测组件是否有更新')
  })

  return (
    <div className={s.container}>
      <div className={s.list}>
        {todoList.map((todoItem) => (
          <div
            key={todoItem.id}
            className={s.item}
            onClick={() => (activeTodoItem.current = todoItem)}
          >
            <p>{todoItem.name}</p>
          </div>
        ))}
      </div>

      <button onClick={() => logger.log(activeTodoItem.current)}>
        控制台输出最新的 activeTodoItem
      </button>
    </div>
  )
}
3. 通过 callback ref 探究 ref 原理
首先先看一个关于 callback ref 的小 Demo 来引出我们后续的内容
interface RefDemo8State {
counter: number
}
class RefDemo8 extends React.Component<{}, RefDemo8State> {
state: Readonly<RefDemo8State> = {
counter: 0,
}
el: HTMLDivElement | null = null
render(): React.ReactNode {
return (
<div>
<div
ref={(el) => {
this.el = el
console.log('this.el -- ', this.el)
}}
>
ref element
</div>
<button
onClick={() => this.setState({ counter: this.state.counter + 1 })}
>
add
</button>
</div>
)
}
}
为什么会执行两次?为什么第一次 this.el === null?为什么第二次又正常了?
3.1. ref 的底层原理
还记得 React 底层是有 render 阶段和 commit 阶段的吗?关于 ref 的处理逻辑就在 commit 阶段进行的
React 底层有两个关于 ref 的处理函数 -- commitDetachRef 和 commitAttachRef
上面的 Demo 中 callback ref 执行了两次正是对应着这两次函数的调用,大致来讲可以理解为 commitDetachRef 在 DOM 更新之前执行,commitAttachRef 在 DOM 更新之后执行
这也就不难理解为什么会有上面 Demo 中的现象了,但我们还是要结合源码来看看,加深自己的理解
3.1.1. commitDetachRef
在新版本的 React 源码中它改名为了 safelyDetachRef,但是核心逻辑没变,这里我将核心逻辑简化出来供大家阅读:
packages/react-reconciler/src/ReactFiberCommitWork.js
function commitDetachRef(current: Fiber) {
  // current 是已经调和完了的 fiber 对象
  const currentRef = current.ref

  if (currentRef !== null) {
    if (typeof currentRef === 'function') {
      // callback ref 和 string ref 执行时机
      currentRef(null)
    } else {
      // object ref 处理时机
      currentRef.current = null
    }
  }
}可以看到,就是从 fiber 中取出 ref,然后根据 callback ref、string ref、object ref 的情况进行处理
并且也能看到 commitDetachRef 主要是将 ref 置为 null,这也就是为什么 RefDemo8 中第一次执行的 callback ref 中看到的 this.el 是 null 了
3.1.2. commitAttachRef
核心逻辑代码如下:
function commitAttachRef(finishedWork: Fiber) {
  const ref = finishedWork.ref
  if (ref !== null) {
    const instance = finishedWork.stateNode
    let instanceToUse

    // 处理 ref 来源
    switch (finishedWork.tag) {
      // HostComponent 代表 DOM 元素类型的 tag
      case HostComponent:
        instanceToUse = getPublicInstance(instance)
        break

      // 类组件使用组件实例
      default:
        instanceToUse = instance
    }

    if (typeof ref === 'function') {
      // callback ref 和 string ref
      ref(instanceToUse)
    } else {
      // object ref
      ref.current = instanceToUse
    }
  }
}3.2. 为什么 string ref 也是以函数的方式调用?
从上面的核心源码中能看到,对于 callback ref 和 string ref,都是统一以函数的方式调用,将 null 或 instanceToUse 传入
callback ref 这样做还能理解,但是为什么 string ref 也是这样处理呢?
因为当 React 检测到是 string ref 时,会自动绑定一个函数用于处理 string ref,核心源码逻辑如下:
packages/react-reconciler/src/ReactChildFiber.js
// 从元素上获取 ref
const mixedRef = element.ref
const stringRef = '' + mixedRef
const ref = function (value) {
  // resolvedInst 就是组件实例
  const refs = resolvedInst.refs

  if (value === null) {
    delete refs[stringRef]
  } else {
    refs[stringRef] = value
  }
}这样一来 string ref 也变成了一个函数了,从而可以在 commitDetachRef 和 commitAttachRef 中被执行,并且也能印证为什么 string ref 会在类组件实例的 refs 属性中获取到
3.3. ref 的执行时机
为什么在 RefDemo8 中我们每次点击按钮时都会触发 commitDetachRef 和 commitAttachRef 呢?这就需要聊聊 ref 的执行时机了,而从上文也能够了解到,ref 底层实际上是由 commitDetachRef 和 commitAttachRef 在处理核心逻辑
那么我们就得来看看这两个函数的执行时机才能行
3.3.1. commitDetachRef 执行时机
packages/react-reconciler/src/ReactFiberCommitWork.js
function commitMutationEffectsOnFiber(
  finishedWork: Fiber,
  root: FiberRoot,
  lanes: Lanes,
) {
  const current = finishedWork.alternate
  const flags = finishedWork.flags

  if (flags & Ref) {
    if (current !== null) {
      // 也就是 commitDetachRef
      safelyDetachRef(current, current.return)
    }
  }
}3.3.2. commitAttachRef 执行时机
packages/react-reconciler/src/ReactFiberCommitWork.js
function commitLayoutEffectOnFiber(
  finishedRoot: FiberRoot,
  current: Fiber | null,
  finishedWork: Fiber,
  committedLanes: Lanes,
) {
  const flags = finishedWork.flags

  if (flags & Ref) {
    safelyAttachRef(finishedWork, finishedWork.return)
  }
}3.3.3. fiber 何时打上 Ref tag?
可以看到,只有当 fiber 被打上了 Ref 这个 flag tag 时才会去执行 commitDetachRef/commitAttachRef
那么什么时候会标记 Ref tag 呢?
packages/react-reconciler/src/ReactFiberBeginWork.js
function markRef(current: Fiber | null, workInProgress: Fiber) {
  const ref = workInProgress.ref

  if (
    // current === null 意味着是初次挂载,fiber 首次调和时会打上 Ref tag
    (current === null && ref !== null) ||
    // current !== null 意味着是更新,此时需要 ref 发生了变化才会打上 Ref tag
    (current !== null && current.ref !== ref)
  ) {
    // Schedule a Ref effect
    workInProgress.flags |= Ref
  }
}3.3.4. 为什么每次点击按钮 callback ref 都会执行?
那么现在再回过头来思考 RefDemo8 中为什么每次点击按钮都会执行 commitDetachRef 和 commitAttachRef 呢?
注意我们使用 callback ref 的时候是如何使用的
<div
ref={(el) => {
this.el = el
console.log('this.el -- ', this.el)
}}
>
ref element
</div>是直接声明了一个箭头函数,这样的方式会导致每次渲染这个 div 元素时,给 ref 赋值的都是一个新的箭头函数,尽管函数的内容是一样的,但内存地址不同,因而 current.ref !== ref 这个判断条件会成立,从而每次都会触发更新
3.3.5. 如何解决?
那么要如何解决这个问题呢?既然我们已经知道了问题的原因,那么就好说了,只要让每次赋值给 ref 的函数都是同一个就可以了呗~
const logger = createLoggerWithScope('RefDemo9')
interface RefDemo9Props {}
interface RefDemo9State {
counter: number
}
class RefDemo9 extends React.Component<RefDemo9Props, RefDemo9State> {
state: Readonly<RefDemo9State> = {
counter: 0,
}
el: HTMLDivElement | null = null
constructor(props: RefDemo9Props) {
super(props)
this.setElRef = this.setElRef.bind(this)
}
setElRef(el: HTMLDivElement | null) {
this.el = el
logger.log('this.el -- ', this.el)
}
render(): React.ReactNode {
return (
<div>
<div ref={this.setElRef}>ref element</div>
<button
onClick={() => this.setState({ counter: this.state.counter + 1 })}
>
add
</button>
</div>
)
}
}
这样就完美解决啦,既修复了 bug,又搞懂了 ref 的底层原理,一举两得!
4. 总结
本篇文章我们学习到了:
- ref 的理解与使用,包括如何创建 ref 对象,以及除了 object ref 之外的 string ref 和 callback ref 的方式去使用 ref
- ref 的高阶用法,包括 forwardRef 转发 ref、ref 实现组件通信、利用 ref 在函数组件中缓存数据等
- 通过一个简单的 callback ref 的 Demo 研究 ref 的底层原理,string ref 为何也是以函数的方式被调用,以及 ref 的执行时机
【推荐学习:javascript视频教程】
以上是深入詳解React中的ref的詳細內容。更多資訊請關注PHP中文網其他相關文章!

熱AI工具

Undresser.AI Undress
人工智慧驅動的應用程序,用於創建逼真的裸體照片

AI Clothes Remover
用於從照片中去除衣服的線上人工智慧工具。

Undress AI Tool
免費脫衣圖片

Clothoff.io
AI脫衣器

Video Face Swap
使用我們完全免費的人工智慧換臉工具,輕鬆在任何影片中換臉!

熱門文章
熱工具

記事本++7.3.1
好用且免費的程式碼編輯器

SublimeText3漢化版
中文版,非常好用

禪工作室 13.0.1
強大的PHP整合開發環境

Dreamweaver CS6
視覺化網頁開發工具

SublimeText3 Mac版
神級程式碼編輯軟體(SublimeText3)


 如何利用React和WebSocket建立即時聊天應用
Sep 26, 2023 pm 07:46 PM
如何利用React和WebSocket建立即時聊天應用
Sep 26, 2023 pm 07:46 PM
如何利用React和WebSocket建立即時聊天應用程式引言:隨著網路的快速發展,即時通訊越來越受到人們的關注。即時聊天應用程式已成為現代社交和工作生活中不可或缺的一部分。本文將介紹如何利用React和WebSocket建立一個簡單的即時聊天應用,並提供具體的程式碼範例。一、技術準備在開始建立即時聊天應用之前,我們需要準備以下技術和工具:React:一個用於構建
 React前後端分離指南:如何實作前後端的解耦與獨立部署
Sep 28, 2023 am 10:48 AM
React前後端分離指南:如何實作前後端的解耦與獨立部署
Sep 28, 2023 am 10:48 AM
React前後端分離指南:如何實現前後端的解耦和獨立部署,需要具體程式碼範例在當今的Web開發環境中,前後端分離已經成為一種趨勢。透過將前端和後端程式碼分開,可以讓開發工作更加靈活、高效,並且方便進行團隊協作。本文將介紹如何使用React實現前後端分離,從而實現解耦和獨立部署的目標。首先,我們要先理解什麼是前後端分離。傳統的Web開發模式中,前端和後端是耦合在
 如何利用React和Flask建構簡單易用的網路應用
Sep 27, 2023 am 11:09 AM
如何利用React和Flask建構簡單易用的網路應用
Sep 27, 2023 am 11:09 AM
如何利用React和Flask建構簡單易用的網路應用引言:隨著網路的發展,網路應用的需求也越來越多樣化和複雜化。為了滿足使用者對於易用性和效能的要求,使用現代化的技術堆疊來建立網路應用變得越來越重要。 React和Flask是兩個在前端和後端開發中非常受歡迎的框架,它們可以很好的結合在一起,用來建立簡單易用的網路應用。本文將詳細介紹如何利用React和Flask
 如何利用React和RabbitMQ建立可靠的訊息應用
Sep 28, 2023 pm 08:24 PM
如何利用React和RabbitMQ建立可靠的訊息應用
Sep 28, 2023 pm 08:24 PM
如何利用React和RabbitMQ建立可靠的訊息傳遞應用程式引言:現代化的應用程式需要支援可靠的訊息傳遞,以實現即時更新和資料同步等功能。 React是一種流行的JavaScript庫,用於建立使用者介面,而RabbitMQ是一種可靠的訊息傳遞中間件。本文將介紹如何結合React和RabbitMQ建立可靠的訊息傳遞應用,並提供具體的程式碼範例。 RabbitMQ概述:
 React Router使用指南:如何實現前端路由控制
Sep 29, 2023 pm 05:45 PM
React Router使用指南:如何實現前端路由控制
Sep 29, 2023 pm 05:45 PM
ReactRouter使用指南:如何實現前端路由控制隨著單頁應用的流行,前端路由成為了一個不可忽視的重要部分。 ReactRouter作為React生態系統中最受歡迎的路由庫,提供了豐富的功能和易用的API,使得前端路由的實作變得非常簡單和靈活。本文將介紹ReactRouter的使用方法,並提供一些具體的程式碼範例。安裝ReactRouter首先,我們需要
 如何利用React與Apache Kafka建構即時資料處理應用
Sep 27, 2023 pm 02:25 PM
如何利用React與Apache Kafka建構即時資料處理應用
Sep 27, 2023 pm 02:25 PM
如何利用React和ApacheKafka來建立即時資料處理應用介紹:隨著大數據與即時資料處理的興起,建構即時資料處理應用成為了許多開發者的追求。 React作為一個流行的前端框架,與ApacheKafka作為一個高效能的分散式訊息系統的結合,可以幫助我們建立即時資料處理應用。本文將介紹如何利用React和ApacheKafka建構即時資料處理應用,並
 PHP、Vue和React:如何選擇最適合的前端框架?
Mar 15, 2024 pm 05:48 PM
PHP、Vue和React:如何選擇最適合的前端框架?
Mar 15, 2024 pm 05:48 PM
PHP、Vue和React:如何選擇最適合的前端框架?隨著互聯網技術的不斷發展,前端框架在Web開發中起著至關重要的作用。 PHP、Vue和React作為三種代表性的前端框架,每一種都具有其獨特的特徵和優勢。在選擇使用哪種前端框架時,開發人員需要根據專案需求、團隊技能和個人偏好做出明智的決策。本文將透過比較PHP、Vue和React這三種前端框架的特徵和使
 Java框架與前端React框架的整合
Jun 01, 2024 pm 03:16 PM
Java框架與前端React框架的整合
Jun 01, 2024 pm 03:16 PM
Java框架與React框架的整合:步驟:設定後端Java框架。建立專案結構。配置建置工具。建立React應用程式。編寫RESTAPI端點。配置通訊機制。實戰案例(SpringBoot+React):Java程式碼:定義RESTfulAPI控制器。 React程式碼:取得並顯示API回傳的資料。
