

fcpx快捷鍵有哪些

fcpx快捷鍵有:1、「Command-H」快捷鍵,用於隱藏應用程式;2、「Option-Command-H」快捷鍵,用於隱藏其他應用程式;3、「Option -Command-K」快速鍵,用於鍵盤自定;4、「Command-M」快速鍵,用於最小化;5、「Command-O」快捷鍵,用於開啟資源庫等。

本教學操作環境:windows10系統、Final Cut Pro 10.5.1版、Dell G3電腦。
fcpx快速鍵有哪些?
FCPX快捷鍵大全
非常有助於我們提高工作效率,備用下面的表格,在我們使用FCPX軟體時,會非常輕鬆的查詢到鍵盤與操作對應的說明。可以收藏以備不時之需!
Final Cut Pro X 鍵盤快速鍵
透過Contorl F 輸入關鍵字可以快速找到對應的快速鍵
| 指令 | 快速鍵 | |
|---|---|---|
| #隱藏應用程式 | Command-H | 隱藏Final Cut Pro |
| 隱藏其他應用程式 | Option-Command-H | 隱藏除Final Cut Pro 之外的所有應用程式 |
| 鍵盤自定 | Option-Command-K | 開啟命令編輯器 |
| 最小化 | Command-M | 最小化Final Cut Pro |
| #開啟資源庫 | ##Command-O開啟現有資源庫或新資源庫 | |
| Command-逗號(,) | 開啟Final Cut Pro 的“偏好設定」視窗 | |
| Command-Q | #退出Final Cut Pro | |
| Shift-Command-Z | 重做上一個指令 | |
| ##Command-Z | 撤銷上一個指令 |
| 指令 | 快速鍵 | 操作 |
|---|---|---|
| #調整音量(絕對) | #Control-Option-L | 將所有所選片段的音訊音量調整為特定的dB 值 |
| 調整音量(相對) | Control -L | 使用相同的dB 值來調整所有所選片段的音訊音量 |
| #追加到故事情節 | E | 將所選部分加入故事情節的結尾 |
| 試演:加入試演 | Control-Shift-Y | ##將所選片段新增至試演|
| Option-Command-Y | #複製試演中的片段並新增效果 | |
| Option-Y | 使用時間軸片段和該片段(包括應用的效果)的複製版本創建試演, | |
| Shift-Command-Y | 複製選取的試演片段,但不包含應用的效果 | |
| Shift-Y | 建立試演並使用目前所選部分取代時間線片段 | |
| Command-B | 剪下瀏覽列或播放頭位置處的主要故事情節片段(或所選部分) | |
| Shift-Command-B | 剪下瀏覽列或播放頭位置的所有片段 | |
| Shift-Command-G | 將所選選項拆分為其元件部分 | |
| Control-D | 更改所選部分的時間長度 | |
| Q | 將所選內容連接到主要故事情節 | |
| Shift-Q | 將所選內容連接到主要故事情節,並將所選內容的結束點與瀏覽條或播放頭對齊 | |
| Command-C | 拷貝所選部分 | |
| Command-Y | 從所選部分創建試演 | |
| Command-G | 從連接的片段中的所選內容建立故事情節 | |
| ##Command-X | 剪切所選部分 | |
| 1 | 將多機位片段剪切並切換到目前傾斜角度組的角度1 | |
| 2 | 將多機位片段剪切並切換到目前傾斜角度組的角度2 | |
| 3 | 將多機位片段剪切並切換到目前傾斜角度組的角度3 | |
| 將多機位片段剪切並切換到目前傾斜角度組的角度4 | 剪下並切換到檢視器角度5 | |
| 將多機位片段剪切並切換到目前傾斜角度組的角度5 | 剪切並切換到檢視器角度6 | |
| 將多機位元片段剪切並切換到目前傾斜角度組的角度6 | 剪切並切換到檢視器角度7 | |
| 將多機位片段剪切並切換到目前傾斜角度組的角度7 | 剪切和切換到檢視器角度8 | |
| #將多機位片段剪切並切換到目前傾斜角度組的角度8 | 剪切和切換到檢視器角度9 | |
| #將多機位元片段剪下並切換到目前傾斜角度群組的角度9 | Delete | |
| 刪除所選時間線,拒絕所選瀏覽器,或移除直通編輯 | 僅刪除所選部分 | |
| ##刪除所選部分並將連接片段連接到產生的空隙片段 | 取消選取全部 | |
| 取消選取所有選取項目 | 複製 | |
| 複製瀏覽器選擇 | 啟用/停用片段 | |
| 對所選部分啟用或停用回放 | 展開音訊/視訊 | |
| 單獨查看選定片段的音訊和視訊 | 展開/折迭音訊元件 | |
| 在時間軸中展開或折迭所選部分的音訊元件 | 延長編輯 | |
| 將選取的編輯點延長到瀏覽條或播放頭位置 | 向下擴充所選部分 | |
| 在瀏覽器中,將下一個項目新增至所選內容 | #向上擴充所選部分 | |
| 在瀏覽器中,將上一個項目新增至所選內容 | 最終確定試演 | |
| 迭化試演並將其替換為試演挑選項 | 插入 | |
| 在瀏覽列或播放頭位置插入所選內容 | # | |
| 插入/連接靜態幀 | Option-F | 在時間軸的播放頭或瀏覽條位置插入一個靜幀,或將一個靜態幀從事件中的瀏覽條或播放頭位置連接到時間軸中的播放頭位置 |
| 插入空隙 | Option-W | 在瀏覽條或播放頭位置插入空隙片段 |
| 插入佔位符 | Option-Command-W | 在瀏覽條或播放頭位置插入佔位片段 |
| 從故事情節中提取 | Option–Command–上箭頭鍵 | 從故事情節中提出選擇並將其連接到產生的空隙片段 |
| 將音量調低1 dB | Control-連字鍵(-) | 將音量調低1 dB |
| #移動播放頭位置 | Control-P | 透過輸入時間碼值來移動播放頭 |
| 新複合片段 | Option-G | 建立新的複合片段(如果無選擇,請建立空複合片段) |
| 向左挪動音訊子訊框 | Option-逗號鍵(,) | 將選定的音訊編輯點向左移動1 個子幀,從而建立拆分編輯 |
| 向左挪動音訊子幀很多 | Option-Shift-逗號鍵(,) | 將選定的音訊編輯點向左移動10 個子幀,從而建立拆分編輯 |
| 向右挪動音訊子幀 | Option-句點鍵(.) | 將選定的音訊編輯點向右移動1 個子幀,從而建立拆分編輯 |
| 向右挪動音訊子幀很多 | Option-Shift-句點鍵(.) | 將選定的音訊編輯點向右移動10 個子幀,從而建立拆分編輯 |
| 向下挪動 | Option–下箭頭鍵 | 在動畫編輯器中向下挪動選定關鍵幀的值 |
| 向左移 | #逗號鍵(,) | 將所選部分向左挪動1 個單位 |
| 向左挪動很多 | Shift-逗號鍵(,) | #將所選部分向左挪動10 個單位 |
| 向右挪動 | 句點鍵(.) | 將所選部分向右挪動1 個單位 |
| 向右挪動很多 | Shift-句點鍵(.) | 將所選部分向右挪動10 個單位 |
| #向上挪動 | Option–上箭頭鍵 | 在動畫編輯器中向上移動選取關鍵影格的值 |
| #開啟試演 | Y | #開啟選定的試演 |
| 覆蓋連接 | 重音符(`) | 暫時覆寫所選部分的片段連接 |
| #覆蓋 | D | 在瀏覽條或播放頭位置覆蓋 |
| 「覆蓋– 反向時序 | Shift -D | 從瀏覽條或播放頭位置反向覆蓋 |
| 覆蓋到主要故事情節 | Option–Command–下箭頭鍵 | 在主要故事情節的瀏覽條或播放頭位置覆蓋 |
| 粘貼為連接 | Option-V | 貼上選擇並將其連接到主要故事情節 |
| 在播放頭貼上插入 | Command-V | 在瀏覽條或播放頭位置插入剪貼簿內容 |
| 上一個角度 | Control–Shift–左箭頭鍵 | #切換到多機位片段中的上一個角度 |
| 上一個音訊角度 | Option–Shift–左箭頭鍵 | 切換到多機位片段中的上一個音訊角度 |
| 上一個挑選項 | Control–左箭頭鍵 | 選擇「試演」視窗中的上一個片段,使其成為試演挑選項 |
| #上一個視訊角度 | Shift–Command–左箭頭鍵 | 切換到多機位片段中的上一個視訊角度 |
| 將音量調高1 dB | Control–等號鍵(=) | 將音量調高1 dB |
| 取代 | #Shift-R | 使用瀏覽器中的所選部分來替換時間軸中的所選片段 |
| 從開始處替換 | ||
| ## Option-R | 將時間軸中的所選片段替換為瀏覽器選擇,其中從其開始點開始 | |
| 替換為空隙 | Shift-Delete | 將選取的時間軸片段取代為空隙片段 |
| 全選 | Command-A | #選取所有片段 |
| 選擇片段 | C | 選擇時間軸中指標下方的片段 |
| 選擇下一個音訊角度 | Option–Shift–右箭頭鍵 | #切換到多機位片段中的下一個音訊角度 |
| 選擇下一個挑選項 | Control–右箭頭鍵 | 選擇「試演」視窗中的下一個片段,使其成為試演挑選項 |
| #選擇下一個視訊角度 | Shift–Command–右箭頭鍵 | #切換到多機位元片段中的下一個視訊角度 |
| 選擇右音訊邊緣 | Shift–右方括號(]) | 對於展開視圖中的音訊/視訊片段,選擇音訊編輯點的右邊緣 |
| 選擇右邊緣 | 右邊括號(]) | 選擇編輯點的右邊緣 |
| 設定附加所選部分結尾 | Shift-Command-O | 在播放頭或瀏覽條位置設定附加範圍選擇結束點 |
| 設定附加所選部分開頭 | Shift-Command-I | 在播放頭或瀏覽條位置設定附加範圍選擇起始點 |
| Control-E | 選擇編輯點時,顯示或隱藏精確度編輯器 | |
| N | 開啟或關閉吸附 | |
| Option-S | 單獨播放時間軸中所選的項目 | |
| Shift-1 | 開啟音訊/視訊模式以將選取的視訊和音訊部分新增至時間軸 | |
| Shift-3 | 開啟僅音訊模式以將選擇的音訊部分新增至時間軸 | |
| Shift-2 | 開啟僅視訊模式以將選取的視訊部分新增至時間軸 | |
| Option-1 | 將多機位片段切換到目前傾斜角度群組的角度1 | |
| Option-2 | 將多機位片段切換到目前傾斜角度群組的角度2 | |
| Option-3 | 將多機位片段切換到目前傾斜角度群組的角度3 | |
| Option-4 | 將多機位片段切換到目前傾斜角度群組的角度4 | |
| Option-5 | 將多機位片段切換到目前傾斜角度群組的角度5 | |
| Option- 6 | 將多機位片段切換到目前傾斜角度群組的角度6 | |
| Option-7 | 將多機位片段切換到目前傾斜角度群組的角度7 | |
| Option-8 | 將多機位片段切換到目前傾斜角度組的角度8 | |
| Option-9 | #將多機位片段切換到目前傾斜角度群組的角度9 | |
| G | 打開或關閉在時間軸中拖曳片段時建構故事情節的功能 | |
| Option–右方括號(]) | 將選定或最頂部的片段的結尾處修剪到瀏覽條或播放頭位置 | |
| Option–左方括號([) | 將片段開始點修剪到瀏覽條或播放頭位置 | |
| Option-反斜線鍵(\) | 將片段開始點和結束點修剪到範圍選擇 |
| 命令 | 快速鍵 | |
|---|---|---|
| #新增基本下三分之一 | ||
| 將基本下三分之一字幕連接到主要故事情節 | 添加基本字幕 | |
| 將基本字幕連接到主要故事情節 | 新增預設音訊效果 | |
| 將預設音訊效果新增至所選部分 | 新增預設轉場 | |
| 將預設轉場新增至所選部分 | 新增預設影片效果 | |
| 將預設影片效果新增至所選部分 | 顏色板:還原目前板控制 | |
| 還原目前「顏色板」面板中的控制項 | 顏色板:切換到「顏色」面板 | |
| 切換到顏色板中的「顏色」面板 | 顏色板:切換到「曝光」面板 | |
| 切換到顏色板中的「曝光」面板 | ##顏色板:切換到「飽和度」面板 | Control-Command-S |
| 拷貝效果 | Option-Command-C | |
| #拷貝關鍵影格 | ##Option-Shift-C | |
| 剪下關鍵影格 | Option-Shift-X | |
| 啟用/停用平衡色彩 | Option-Command-B | |
| 匹配音訊 | Shift-Command-M | |
| 匹配顏色 | #Option- Command-M | |
| 下一個文字 | Option-Tab | ##導航到下一個文本項目|
| 貼上屬性 | Shift-Command-V | 將所選屬性及其設定貼上到所選部分 |
| 貼上效果 | Option-Command-V | 將效果及其設定貼到所選部分 |
| 貼上關鍵幀 | Option-Shift-V | 將關鍵影格及其設定貼到所選部分 |
| 上一個文字 | Option -Shift-Tab | 導覽到上一個文字項目 |
| 重新定時編輯器 | Command-R | #顯示或隱藏重新定時編輯器 |
| 重新定時:建立正常速度分段 | Shift-N | 將選擇設定為以正常(100%)速度播放 |
| 重新定時:保留 | Shift-H | 建立2 秒靜止分段 |
重新定時:還原
| 單獨播放動畫 | Control-Shift-V | |
|---|---|---|
| ##常規 | ||
| 指令 | 快速鍵 | 操作 |
| #Delete | #Delete | 刪除所選時間軸,拒絕所選瀏覽器,或移除直通編輯 |
| #Command-F | 顯示或隱藏「過濾器」視窗(瀏覽器中)或時間軸索引(時間軸中) | |
| #前往事件檢視器 | Option-Command-3 | 啟動事件檢視器 |
| 匯入媒體 | Command-I | 從裝置、攝影機或歸檔匯入媒體 |
| 資源庫屬性 | Control-Command-J | 開啟目前資源庫的「資源庫屬性」檢查器 |
| 移到廢紙簍 | Command-Delete | 將選擇移到Finder 廢紙簍 |
| 新項目 | Command- N | 建立新專案 |
| 專案屬性 | Command-J | 開啟目前專案的「屬性」檢查器 |
| 渲染全部 | Control-Shift-R | 啟動目前專案的所有渲染任務 |
標記
| 命令 | 快速鍵 | |
|---|---|---|
| M | 在瀏覽條或播放頭位置新增標記 | |
| ##Control-C | 更改瀏覽器過濾器設定來顯示所有片段 | |
| Option-M | 新增標記並編輯標記文字 | |
| Control-1 | 將關鍵字1 應用到所選部分 | |
| Control-2 | 將關鍵字2 應用到所選部分 | |
| Control-3 | 將關鍵字3 應用到所選部分 | |
| 將關鍵字4 應用到所選部分 | 應用關鍵字標記5 | |
| 將關鍵字5 應用到所選部分 | 應用關鍵字標記6 | |
| 將關鍵字6 應用到所選部分 | 應用關鍵字標記7 | |
| 將關鍵字7 應用到所選部分 | 應用關鍵單字標記8 | |
| 將關鍵字8 應用到所選部分 | ##應用關鍵字標記9 | |
| 將關鍵字9 應用到所選部分 | #清除所選範圍 | |
| 清除範圍選擇 | 清除範圍結尾 | |
| #清除範圍的結束點 | 清除範圍開頭 | |
| 清除範圍的開始點 | #刪除標記 | |
| 刪除選取的標記 | 刪除選取中的標記 | |
| 刪除選取範圍中的所有標記 | 取消選擇全部 | |
| 取消選取所有選取項目 | 個人收藏 | |
| 將瀏覽器選擇評分為個人收藏 | 個人收藏 | ##Control-F|
| 隱藏被拒絕的項目 | Control-H | |
| 新關鍵字精選 | Shift-Command-K | |
| 新智慧精選 | Option-Command-N | |
| 範圍選擇工具 | #R | |
| 拒絕 | #刪除 | |
| 已拒絕的 | Control-Delete | |
| 從選擇中移除所有關鍵字 | Control-0 | |
| ##角色:應用對話角色 | Control-Option-D | |
| ##角色:套用效果角色 | Control-Option-E | 將「效果」角色套用到選定的片段 |
| 角色:套用音樂角色 | ##Control-Option-M | 將「音樂」角色套用到選定的片段 |
| 角色:套用字幕角色 | ##Control-Option-T# #將“字幕”角色應用於選定的片段 | |
| Control-Option-V | 將“視訊”角色套用於選取的片段 | |
| Command-A | 選擇所有片段 | |
| X | 將範圍選擇設定為與瀏覽條或播放頭下方的片段邊界相符。 | |
| Shift-Command-O | 在播放頭或瀏覽條位置設定附加範圍選擇結束點 | |
| Shift-Command-I | #在播放頭或瀏覽條位置設定附加範圍選擇起始點 | |
| O | #設定範圍的結束點 | |
| Control-O | 編輯文字列時設定範圍的結束點 | |
| I | 設定範圍的開始點 | |
| Control-I | 編輯文字列時設定範圍的開始點 |
整理
| 命令 | 快速鍵 | |
|---|---|---|
| #新事件 | Option-N | 建立新事件 |
| #新資料夾 | Shift-Command-N | 建立新資料夾 |
回放/導航
| Command | Shortcut keys | Operation |
|---|---|---|
| Audio browsing | Shift- S | Turn audio browsing on or off |
| Audition: Preview | Control-Command-Y | In the context of the timeline Playback Selection |
| Clip Browsing | Option-Command-S | Turn clip browsing on or off |
| Cut/Switch multicam audio only | Option-Shift-3 | Turn on audio-only mode for multicam cutting and switching |
| Cut/Switch multi-camera audio and video | Option-Shift-1 | Turn on audio/video mode for multi-cam cutting and switching |
| Cut/switch multi-cam video only | Option-Shift-2 | Turn on video-only mode for multi-cam cutting and switching |
| Down | Down arrow key | Go to the next item (in the browser) or next edit point (in the timeline) |
| Down | Control–Down Arrow key | When editing a text field, go to the next item (in the browser) or the next edit point (in the timeline) |
| Go back 10 frames | Shift–Left Arrow key | Move the playhead back 10 frames |
| Forward 10 frames | Shift–right arrow key | Move the playhead forward 10 frames |
| Jump to the beginning | PersonalButton | Move the playhead to the beginning of the timeline or the first clip in the browser |
| Skip to the end | " End button | Move the playhead to the end of the timeline or the last clip in the browser |
| Jump to the next tilt angle group | Option-Shift-Apostrophe Key(') | Next tilt angle group showing angles in the current multicam clip |
| Skip to next Edit point | Apostrophe key(') | Move the playhead to the next edit point in the timeline |
| Jump to the next column | Option – Right Arrow Key | Move the playhead to the next column in the interlaced clip |
| Skip to the next frame | Right Arrow Key | Move the playhead to the next frame |
| Jump to the next subframe | Command–Right Arrow Key | Move the playhead to the next audio subframe |
| Jump to the previous tilt angle group | Option-Shift-Semicolon key (;) | Show the previous tilt angle group of angles in the current multicam clip |
| Jump to the previous edit point | Semicolon key ( ;) | Move the playhead to the previous edit point in the timeline |
| Jump to the previous column | Option–Left Arrow | Move the playhead to the previous column in the interlaced clip |
| Jump to the previous frame | Left arrow key | Move the playhead to the previous frame |
| Jump to the previous subframe | Command–Left Arrow | Move the playhead to the previous frame Audio Subframe |
| Jump to end of range | Shift-O | Move the playhead to the end of the range selection. |
| Jump to the beginning of the range | Shift-I | Move the playhead to the beginning of the range selection. |
| Loop playback | Command-L | Turn on or off loop playback |
| Monitor audio | Shift-A | Turn audio monitoring on or off for the angle you want to browse |
| Navigate timecode input | Hyphen key (-) | Entering a negative timecode value will move the playhead backward, move the clip backward, or trim the range or clip, depending on the selection |
| Next Clip | Control–Command–right arrow key | Go to the next item (in the browser) or the next edit point (in the timeline) |
| Next Marker | Control-apostrophe key(') | Move the playhead to the next marker |
| Play the clips before and after the current position | Shift–Question Mark Key (?) | Play around the playhead position |
| Play forward | L | Toward Play forward (press the L key multiple times to increase the playback speed) |
| Play from the playhead position | Option–Spacebar | Play from the playhead position Play |
| Play full screen | Shift-Command-F | Play full screen from the browser bar or playhead position |
| Reverse playback | J | Reverse playback (press the J key multiple times to increase the reverse playback speed) |
| Reverse playback | Control-J | Reverse playback when editing the text field (press the J key multiple times to increase the reverse playback speed) |
| Reverse playback | Shift–Spacebar | Backward play |
| Play selected part | Forward slash key (/) | Play selection |
| Play to end | Control-Shift-O | Play from playhead to selected end |
| Play/Pause | Spacebar | Start or pause playback |
| Play/Pause | Control–Spacebar | Start or pause playback when editing the text field |
| Positive time code input | Equal sign key (=) | Enter positive time code value will Move playhead forward, move clip forward, or trim range or clip, depending on selection |
| Previous clip | Control–Command–Left Arrow | Go to the previous item (in the browser) or previous edit point (in the timeline) |
| Previous mark | Control-semicolon ( ;) | Move the playhead to the previous mark |
| Set the surveillance angle | Shift-V | To browse The angle is set to the monitoring angle |
| Browse | S | Turn browsing on or off |
| Start/ Stop Voiceover Recording | Option-Shift-A | Start or stop recording audio using the Record Voiceover window |
| Stop | K | Stop playback |
| Stop | Control-K | Stop playback while editing text field |
| Timeline History Backward | Command–Left Square Bracket ([) | Go back one level in Timeline History |
| Timeline history forward | Command–right bracket (]) | Go forward one level in the timeline history |
| Up | Up arrow key | Go to the previous item (in the browser) or previous edit point (in the timeline) |
| Up | Control–Up Arrow | When editing a text field, go to the previous item (in the browser) or the previous edit point (in the timeline) |
Sharing and Tools
| Command | Shortcut Key | Operation |
|---|---|---|
| Share to default destination | Command-E | Share selected items or clips using the default destination |
| Select the Arrow tool | A | Set the Selection tool to active |
| Cut tool | B | Set the Cut tool to Active |
| Crop Tool | Shift-C | Activate the Crop Tool and display the selected clip or on-screen controls for the topmost clip below the playhead |
| Warp Tool | Option-D | Activates the Warp Tool and displays on-screen controls for the selected clip or the topmost clip below the playhead |
| Hand Tool | H | Set the "Hand" tool active |
| Position Tool | P | Set the Position tool active |
| Transform tool | Shift-T | Activate the Transform tool and display the selected clip or the on-screen controls for the topmost clip below the playhead |
| Trim tool | T | Set the Trim tool active |
| Zoom tool | Z | Set the Zoom tool active |
Display
| Command | Shortcut key | Operation |
|---|---|---|
| Control-Option-6 | Shows timeline clips with only clip names, character names, or active angle names, depending on the clip name setting | |
| Control–Option–Down Arrow key | Reduce the audio waveform size of timeline clips | |
| Control-Option-5 | Display timeline clips with only large footage | |
| Control–Option–Up Arrow | Increase the audio waveform size of the timeline clip | |
| Control-Option-4 | Display timeline clip with small audio waveform and large footage | |
| Control-Option-2 | Show timeline clips with large audio waveforms and small footage | |
| Control-Option-3 | Display timeline clip with equal-sized audio waveforms and video footage | |
| Control-Option-1 | Show timeline clips with only large audio waveforms | |
| Shift- Command-Hyphen key (-) | Decrease browser fragment height | |
| Shift–Command–Equal sign key (=) | Increase browser fragment height | |
| Shift-Command-Comma key (,) | Show fewer footage frames in browser clips | |
| Control-A | Show or hide selected clips Audio Animation Editor | |
| Control-Y | Show or hide clip information while browsing in the browser | |
| Control-V | Show or hide the video animation editor for selected timeline clips | |
| Shift-Command-Period(.) | Show more footage frames in the browser snippet | |
| Option-Shift-Command-Comma key(,) | Display one frame per sequence | |
| Option-Shift-N | Show or hide fragment names in the browser | |
| Option-Command-1 | Switch the browser to filmstrip view | |
| Option-Command-2 | Switch the browser to list view | |
| Command–equal sign key (=) | Zoom in the timeline, browser or viewer | |
| Command-hyphen key(-) | Zoom out the timeline , browser, or viewer | |
| Shift-Z | Zoom content to fit browser, viewer, or timeline Size | |
| Control-Z | Turn amplified audio samples on or off |
| Command | Shortcut key | Operation |
|---|---|---|
| Background Tasks | Command-9 | Show or hide the Background Tasks window |
| Go to Audio Enhancement | Command- 8 | Set the Audio Enhancement inspector to active |
| Go to the color palette | Command-6 | Change the color palette Set active |
| Go to browser | Command-1 | Set browser active |
| Go to Inspector | Option-Command-4 | Make current inspector active |
| Go to Timeline | Command-2 | Make timeline active |
| Go to viewer | Command-3 | Will view Make the tool active |
| Next Tab | Control-Tab | Go to the next panel in the Inspector or Color Palette |
| Previous Tab | Control-Shift-Tab | Go to the previous panel in the Inspector or Color Palette |
| Record Voiceover | Option-Command-8 | Show or hide the "Record Voiceover" window |
| Show histogram | Control-Command-H | Show histogram in viewer |
| Show vector monitor | Control-Command-V | Show vector monitor in viewer |
| Show video waveform | Control-Command-W | Show waveform monitor in viewer |
| Show/Hide Angle | Shift-Command-7 | Show or Hide Angle Viewer |
| Shift-Command-8 | Show or Hide Audio Indicator | |
| Control-Command-1 | Show or hide the browser | |
| Command-5 | Show Or hide the effect browser | |
| Shift-Command-1 | Show or hide the resource library list | |
| Control-Command-3 | Show or Hide Event Viewer | |
| Command-4 | Show or hide the Inspector panel | |
| Command-K | Show or hide keyword editor | |
| Shift-Command-2 | Show or hide the timeline index of open projects | |
| Command-7 | Show in the viewer Or hide the video observer |
FAQ column!
以上是fcpx快捷鍵有哪些的詳細內容。更多資訊請關注PHP中文網其他相關文章!

熱AI工具

Undresser.AI Undress
人工智慧驅動的應用程序,用於創建逼真的裸體照片

AI Clothes Remover
用於從照片中去除衣服的線上人工智慧工具。

Undress AI Tool
免費脫衣圖片

Clothoff.io
AI脫衣器

AI Hentai Generator
免費產生 AI 無盡。

熱門文章
熱工具

記事本++7.3.1
好用且免費的程式碼編輯器

SublimeText3漢化版
中文版,非常好用

禪工作室 13.0.1
強大的PHP整合開發環境

Dreamweaver CS6
視覺化網頁開發工具

SublimeText3 Mac版
神級程式碼編輯軟體(SublimeText3)
熱門話題


 mac鍵盤輸入密碼無反應?
Feb 20, 2024 pm 01:33 PM
mac鍵盤輸入密碼無反應?
Feb 20, 2024 pm 01:33 PM
導讀:這篇文章本站來跟大家介紹mac鍵盤輸入密碼無反應的相關內容,希望對大家有幫助,一起來看看。蘋果Mac系統無法輸入密碼如何解決還可以嘗試在其他電腦上連接這個鍵盤,看看是否正常運作。如果在另一台電腦上也出現同樣的問題,那麼很可能是鍵盤本身的故障。您可以考慮更換鍵盤或修理它。第一次用你的Mac電腦登入支付寶時,你會發現登入介面,無法輸入密碼。密碼輸入欄顯示:“請點此安裝控制項”,所以支付寶登入需要安裝安全控制。安全控件,可以對你輸入的資訊(金額、密碼等)進行加密保護,提高帳號安全。系
 3 招教你輕鬆自訂 Mac 電腦名稱、主機名稱和 Bonjour 名稱
Mar 06, 2024 pm 12:20 PM
3 招教你輕鬆自訂 Mac 電腦名稱、主機名稱和 Bonjour 名稱
Mar 06, 2024 pm 12:20 PM
許多Mac用戶往往習慣保留設備的預設名稱,可能從未考慮過更改。很多人選擇沿用初始設定時的名稱,例如「張三的MacBookAir」或簡單的「iMac」。學會如何修改Mac的名稱是一項非常實用的技能,尤其是在擁有多台裝置時,可以幫助你快速區分和管理它們。接下來,我們將一步步教你如何在macOS系統中更改電腦名稱、主機名稱和Bonjour名稱(本地主機名稱)。為什麼要更改Mac名稱?修改Mac名稱不僅能彰顯個性,還能有助於提升使用體驗:個人化你的Mac:預設名稱可能不符合你的口味,換一個自己喜歡的名字
 mac裝程式密碼忘了?
Feb 20, 2024 pm 01:00 PM
mac裝程式密碼忘了?
Feb 20, 2024 pm 01:00 PM
導讀:本篇文章本站來跟大家介紹mac裝程式密碼忘了的相關內容,希望對大家有幫助,一起來看看吧。蘋果電腦安裝軟體密碼忘了怎麼辦首先,在手機設定中找到iCloud並點選開啟。接著,輸入帳號和密碼。在登入按鈕下方有一行小字,提示是否忘記ID或密碼,點選這個選項。通常情況下,當您在登入介面多次輸入錯誤密碼後,MacBookPro會提示您使用已綁定的AppleID來重設密碼。您只需按照系統提示的步驟進行操作即可完成密碼重設。 3.先將Mac關機,然後重新開機,按下電源鍵的同時,立刻按住鍵盤上的com
 pkg檔安裝mac?
Feb 20, 2024 pm 03:21 PM
pkg檔安裝mac?
Feb 20, 2024 pm 03:21 PM
前言:今天本站來給各位分享關於pkg檔案安裝mac的相關內容,如果能正好解決你現在面臨的問題,別忘了關注本站,現在開始吧! macos過往版本pkg無法安裝升級作業系統:如果您的筆記型電腦正在使用較舊的作業系統版本,建議升級到最新的作業系統版本。因為較舊的版本可能無法支援安裝最新的macOS系統。在磁碟工具中選擇“抹掉”,然後在格式中選擇Macos擴展,不要勾選加密選項,也不要選擇apfs格式,最後點擊“抹掉”按鈕,這樣就可以解決無法完成macOS安裝的問題。將應用程式的圖示拖曳到以App開頭的文件
 蘋果mac打字怎麼翻頁?
Feb 20, 2024 pm 12:54 PM
蘋果mac打字怎麼翻頁?
Feb 20, 2024 pm 12:54 PM
導語:今天本站來給各位分享關於蘋果mac打字怎麼翻頁的相關內容,如果能正好解決你現在面臨的問題,別忘了關注本站,現在開始吧!蘋果MacBook筆記型電腦的觸控板使用技巧蘋果電腦設定雙指滑動的步驟如下:在電腦桌面上找到「設定」圖示並點擊。在設定介面中選擇“觸控板”,然後點選“捲動縮放”。在滾動縮放選項中勾選“滾動方向:自然”即可完成設定。在蘋果電腦上設定使用兩指滑動的方法很簡單。首先,打開電腦並點擊螢幕頂部的「設定」圖示。在設定介面中,選擇“觸控板”選項。然後點擊“滾動縮放”,確保勾選了“滾動方向
 微信mac如何設定語音訊息自動轉成文字-設定語音轉成文字的方法
Mar 19, 2024 am 08:28 AM
微信mac如何設定語音訊息自動轉成文字-設定語音轉成文字的方法
Mar 19, 2024 am 08:28 AM
近日有一些小夥伴諮詢小編微信mac如何設定語音訊息自動轉成文字?下面就為大家帶來了微信mac設定語音訊息自動轉成文字的方法,有需要的小夥伴可以來了解了解哦。第一步:首先,打開Mac版微信。如圖:第二步:接著,點選『設定』。如圖:第三步:然後,點選『通用』。如圖:第四步:再勾選『聊天中的語音訊息自動轉成文字』選項即可。如圖:第五步:最後,關閉視窗即可。如圖:
 mac對檔案剪切到硬碟?
Feb 20, 2024 pm 01:00 PM
mac對檔案剪切到硬碟?
Feb 20, 2024 pm 01:00 PM
導語:本文本站來為大家介紹mac對檔案剪下到硬碟的相關內容,希望對大家有幫助,一起來看看吧。 Mac電腦如何將照片匯出到行動硬碟Mac電腦可以利用「訪問」(Finder)或「照片」(Photos)應用程式將照片匯出到行動硬碟。使用「訪問」(Finder)匯出照片時,首先要確保行動硬碟已連接到Mac,並且Mac已成功識別。將Mac中的照片轉移到硬碟的步驟很簡單:首先,連接行動硬碟到電腦,然後開啟【啟動台】圖示。接著,在彈出的視窗中找到並點選【照片】圖示。在開啟的【照片】視窗中,按住【Shift】鍵
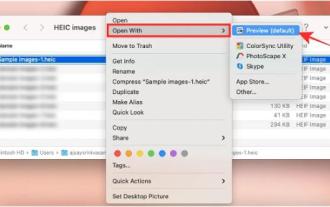 在Mac上將HEIC照片轉換為JPG的3種方法
Mar 15, 2024 pm 08:43 PM
在Mac上將HEIC照片轉換為JPG的3種方法
Mar 15, 2024 pm 08:43 PM
預設情況下,iPhone以HEIC格式從相機拍攝照片。 HEIC代表高效影像容器,可容納比PNG或JPG檔案更多的像素數據,與其他格式相比,在iPhone儲存上佔用的空間顯著減少。這些檔案在iPhone上效果最佳,但並未在網路上廣泛接受,因為當您與非Apple裝置共用這些檔案時,它們通常會導致圖片模糊/有顆粒感。為了確保HEIC圖片在其他裝置上可相容,可能需要將其轉換為JPG格式。本文將介紹在Mac上將HEIC影像轉換為JPG的方法。如何在Mac上將HEIC照片轉換為JPG[3種方法]方法