

深入了解vuex的實現原理

當面試被問到vuex的實現原理,你要怎麼回答?以下這篇文章就來帶大家深入了解vuex的實作原理,希望對大家有幫助!

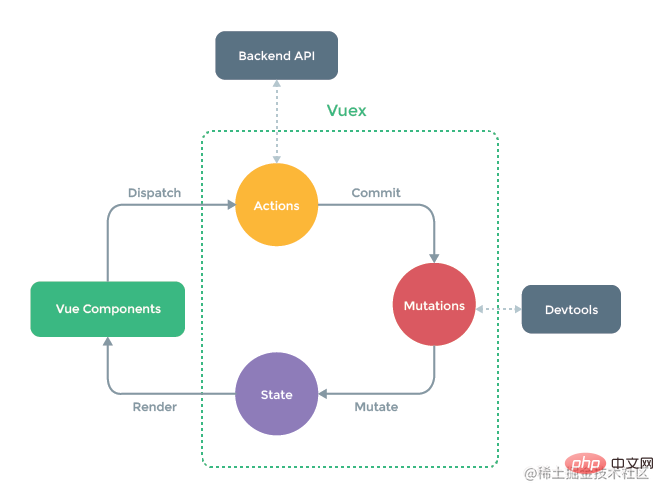
關於vuex就不再贅述,簡單回顧一下:當應用程式碰到多個元件共享狀態時,簡單的單向資料流很容易被破壞:第一,多個視圖依賴相同狀態;第二,來自不同視圖的行為需要變更相同狀態。若解決前者使用傳參的方式,則不適用於多層嵌套的組件以及兄弟組件;若解決後者使用父子組件直接引用或事件變更和同步狀態的多份拷貝,則不利於代碼維護。
所以,最好的方法是:把元件的共享狀態抽出,以一個全域單例模式管理!這也正是vuex背後的基本想法。
所以,vuex的大致框架如下:
class Store {
    constructor() {
        // state
        // getters
        // mutations
        // actions
    }
    // commit
    // dipatch
}接下來,就寫寫看。
一、建立vue專案
vue create vue2-vuex//创建vue2项目

yarn add vuex@next --save//安装vuex

yarn serve//启动项目
#二、實作原理
1、State
#(1)使用<div class="code" style="position:relative; padding:0px; margin:0px;"><pre class='brush:php;toolbar:false;'>//store.js
// 仓库
import Vue from &#39;vue&#39;
import Vuex from &#39;vuex&#39;
import extra from &#39;./extra.js&#39;
Vue.use(Vuex) //引入vuex的方式,说明Store需要install方法
export default new Vuex.Store({
// 仓库数据源
state: {
count: 1,
dowhat: &#39;addCount&#39;
},
}</pre><div class="contentsignin">登入後複製</div></div><div class="code" style="position:relative; padding:0px; margin:0px;"><pre class='brush:php;toolbar:false;'>//app.vue
<template>
<div class="testState">
<p>{{mycount}}</p>
<p>{{dowhat}}:{{count}}</p>
</div>
</template>
<script>
export default {
import {
mapState
} from &#39;vuex&#39;
// 推荐方式
computed: mapState()({
mycount: state => state.count
}),
// 推荐方式的简写方式
computed: {
// 解构的是getters
...mapState([&#39;count&#39;, &#39;dowhat&#39;])
},
}
</script></pre><div class="contentsignin">登入後複製</div></div>
由於Vuex 的狀態儲存是響應式的,從store實例中讀取狀態最簡單的方法就是在計算屬性 中傳回某個狀態,這種模式
。在模組化的建置系統中,在每個需要使用state 的元件中需要頻繁地導入,並且在測試元件時需要模擬狀態Vuex 通過
store 選項,提供了一種機制將狀態從根元件「注入」到每一個子元件中(需呼叫Vue.use(Vuex))
所以除了Store內部的五大屬性以外,還需要考慮外掛程式的一個install方法,所以大致框架如下:<div class="code" style="position:relative; padding:0px; margin:0px;"><pre class='brush:php;toolbar:false;'>class Store {
constructor() {
// state
// getters
// mutations
// actions
//modules
}
// commit
// dipatch
}
let Vuex = {
Store,
Install
}
export default Vuex</pre><div class="contentsignin">登入後複製</div></div>所以,接下來就可以具體實現了,<div class="code" style="position:relative; padding:0px; margin:0px;"><pre class='brush:php;toolbar:false;'>class Store {
constructor(options) {
// state
this.state = options.state
}
}
let install = function(_Vue) {
_Vue.mixin({
beforeCreate() { //在组件创建之前自动调用,每个组件都有这个钩子
if (this.$options && this.$options.store) { //this.$options读取根组件
this.$store = this.$options.store
} else {
this.$store = this.$parent && this.$parent.$store
}
}
})
}</pre><div class="contentsignin">登入後複製</div></div>然而,上述的state的實作有一個缺點:當改變資料的時候,state的資料不能動態的渲染。所以如何把state裡的資料變成響應式成為關鍵問題?實際上,類似
裡的data,也可以透過這種方式讓其成為響應式。那就得從install方法傳入
Vue#,所以改變後:let Vue=null
class Store {
constructor(options) {
// state
this.vm = new _Vue({
data: {
state: options.state//data中的数据才是响应式
}
})
}
get state() {
return this.vm.state
}
}
let install = function(_Vue) {//用于Vue.use(plugin)
Vue=_Vue
_Vue.mixin({
onBeforeCreate() { //在组件创建之前自动调用,每个组件都有这个钩子
if (this.$options && this.$options.store) { //this.$options读取根组件
this.$store = this.$options.store
} else {
this.$store = this.$parent && this.$parent.$store
}
}
})
}
2、getters
##(1)使用
//store.js
export default new Vuex.Store({
    // 计算属性
    getters: {
        // 这里的函数不需要调用,可以直接使用,官方默认前面有get
        getCount(state) {//接受 state 作为其第一个参数
            return state.count * 100;
        }
    },
}有時我們需要從store 中的state 衍生出一些狀態(例如增加,刪除,過濾等等),Vuex 允許我們在store 中定義「getter」(可以認為是store 的計算屬性)。就像計算屬性一樣,getter 的返回值會根據它的依賴被緩存起來,並且只有當它的依賴值發生了改變才會被重新計算,Getter 接受state 作為其第一個參數,getter 在通過方法訪問時,每次都會去進行調用,而不會緩存結果##(3)實現
# // getters
let getters = options.getters || {}
this.getters = {}
Object.keys(getters).forEach(getterName => {
Object.defineProperty(this.getters, getterName, {
get: () => {
return getters[getterName](this.state)
}
})
})3、mutations
(1)使用
//store.js
export default new Vuex.Store({
// 相当于methods
mutations: {
// mutations内部的函数,天生具备一个形参
add(state, n) {
state.count += n;
},
decrease(state, n) {
state.count -= n;
}
},
}methods: {
submit() {
console.log('success');
},
// 解构仓库mutations里面的方法,要啥解构啥
...mapMutations(['add', 'decrease']),
// this.$store.commit('add'),
...mapActions(['addAction', 'decreaseAction']),
// this.addAction()调用actions里面的方法
// this.$store.dispatch('add'),
}更改Vuex 的store 中的狀態的唯一方法是提交mutation。 Vuex 中的 mutation 類似於事件:每個 mutation 都有一個字串的 事件類型 (type) 和 一個
。這個回呼函數就是進行狀態變更的地方,而且它會接受 state 作為第一個參數,不能直接呼叫一個 mutation handler。這個選項更像是事件註冊:「當觸發一個類型為increment 的mutation 時,呼叫此函數。」要喚醒一個mutation handler,你需要以對應的type 呼叫store.commit 方法
可以向store.commit 傳入額外的參數,即mutation 的
負載(payload),在大多數情況下,負載應該是一個對象,這樣可以包含多個欄位且記錄的mutation 會更易讀(3)實作
// mutations
let mutations = options.mutations || {}
this.mutations = {}
Object.keys(mutations).forEach(mutationName => {
this.mutations[mutationName] = (arg) => {//保证多个(第二个)参数的传入
mutations[mutationName](this.state, arg)
}
})
commit = (method, arg) => {//使用箭头函数改变被调用的this的指向
// console.log(this);
this.mutations[method](arg)
}4、actions
#(1)使用######
//store.js
export default new Vuex.Store({
actions: {
addAction(context) {
// 在这里调用add方法
context.commit('add', 10);
},
decreaseAction({
commit
}) {
commit('decreaseAction', 5)
}
},
}- Action 提交的是 mutation,而不是直接变更状态。
- Action 可以包含任意异步操作
- Action 函数接受一个与 store 实例具有相同方法和属性的 context 对象
- Action 通过
store.dispatch方法触发 - Action 通常是异步的,
store.dispatch可以处理被触发的 action 的处理函数返回的 Promise,并且store.dispatch仍旧返回 Promise - 一个
store.dispatch在不同模块中可以触发多个 action 函数。在这种情况下,只有当所有触发函数完成后,返回的 Promise 才会执行
(3)实现
// actions
let actions = options.actions || {}
this.actions = {}
Object.keys(actions).forEach(actionName => {
this.actions[actionName] = (arg) => {
actions[actionName](this, arg)
}
})
dispatch=(method, arg) =>{
this.actions[method](arg)
}5、modules
(1)使用
// actions
let actions = options.actions || {}
this.actions = {}
Object.keys(actions).forEach(actionName => {
this.actions[actionName] = (arg) => {
actions[actionName](this, arg)
}
})
dispatch=(method, arg) =>{
this.actions[method](arg)
} //store.js
modules: {
extra: extra
}(2)注意
- 由于使用单一状态树,应用的所有状态会集中到一个比较大的对象。当应用变得非常复杂时,store 对象就有可能变得相当臃肿,Vuex 允许我们将 store 分割成模块(module) 。每个模块拥有自己的 state、mutation、action、getter、甚至是嵌套子模块——从上至下进行同样方式的分割
- 对于模块内部的 mutation 和 getter,接收的第一个参数是模块的局部状态对象
- 对于模块内部的 action,局部状态通过
context.state暴露出来,根节点状态则为context.rootState 对于模块内部的 getter,根节点状态(rootState)会作为第三个参数暴露出来
三、整体代码
let Vue = null//全局的_Vue
class Store {
constructor (options) {
// state
//this.state = options.state 写法不完美,当改变数据的时候,不能动态的渲染,所以需要把data中的数据做成响应式的
this.vm = new _Vue({
data: {
state: options.state//data中的数据才是响应式
}
})
 // getters
    let getters = options.getters || {}
    this.getters = {}
    Object.keys(getters).forEach(getterName => {
      Object.defineProperty(this.getters, getterName, {
        get: () => {
          return getters[getterName](this.state)
        }
      })
    })
// mutations
let mutations = options.mutations || {}
this.mutations = {}
Object.keys(mutations).forEach(mutationName => {
this.mutations[mutationName] = (arg) => {//保证多个(第二个)参数的传入
mutations[mutationName](this.state, arg)
}
})
// actions
let actions = options.actions || {}
this.actions = {}
Object.keys(actions).forEach(actionName => {
this.actions[actionName] = (arg) => {
actions[actionName](this, arg)
}
})
}
dispatch=(method, arg) =>{
this.actions[method](arg)
}
commit = (method, arg) => {
// console.log(this);
this.mutations[method](arg)
}
get state() {
return this.vm.state
}
}
let install = function(_Vue) {
Vue = _Vue
Vue.mixin({
beforeCreate() {//在组件创建之前自动调用,每个组件都有这个钩子
if (this.$options && this.$options.store) { // this.$options读取到根组件
this.$store = this.$options.store
} else { // //如果不是根组件的话,也把$store挂到上面,因为是树状组件
this.$store = this.$parent && this.$parent.$store
}
}
})
}
let Vuex = {
Store,
install
}
export default Vuex以上是深入了解vuex的實現原理的詳細內容。更多資訊請關注PHP中文網其他相關文章!

熱AI工具

Undresser.AI Undress
人工智慧驅動的應用程序,用於創建逼真的裸體照片

AI Clothes Remover
用於從照片中去除衣服的線上人工智慧工具。

Undress AI Tool
免費脫衣圖片

Clothoff.io
AI脫衣器

AI Hentai Generator
免費產生 AI 無盡。

熱門文章
熱工具

記事本++7.3.1
好用且免費的程式碼編輯器

SublimeText3漢化版
中文版,非常好用

禪工作室 13.0.1
強大的PHP整合開發環境

Dreamweaver CS6
視覺化網頁開發工具

SublimeText3 Mac版
神級程式碼編輯軟體(SublimeText3)
熱門話題


 如何使用WebSocket和JavaScript實現線上語音辨識系統
Dec 17, 2023 pm 02:54 PM
如何使用WebSocket和JavaScript實現線上語音辨識系統
Dec 17, 2023 pm 02:54 PM
如何使用WebSocket和JavaScript實現線上語音辨識系統引言:隨著科技的不斷發展,語音辨識技術已成為了人工智慧領域的重要組成部分。而基於WebSocket和JavaScript實現的線上語音辨識系統,具備了低延遲、即時性和跨平台的特點,成為了廣泛應用的解決方案。本文將介紹如何使用WebSocket和JavaScript來實現線上語音辨識系
 WebSocket與JavaScript:實現即時監控系統的關鍵技術
Dec 17, 2023 pm 05:30 PM
WebSocket與JavaScript:實現即時監控系統的關鍵技術
Dec 17, 2023 pm 05:30 PM
WebSocket與JavaScript:實現即時監控系統的關鍵技術引言:隨著互聯網技術的快速發展,即時監控系統在各個領域中得到了廣泛的應用。而實現即時監控的關鍵技術之一就是WebSocket與JavaScript的結合使用。本文將介紹WebSocket與JavaScript在即時監控系統中的應用,並給出程式碼範例,詳細解釋其實作原理。一、WebSocket技
 如何利用JavaScript和WebSocket實現即時線上點餐系統
Dec 17, 2023 pm 12:09 PM
如何利用JavaScript和WebSocket實現即時線上點餐系統
Dec 17, 2023 pm 12:09 PM
如何利用JavaScript和WebSocket實現即時線上點餐系統介紹:隨著網路的普及和技術的進步,越來越多的餐廳開始提供線上點餐服務。為了實現即時線上點餐系統,我們可以利用JavaScript和WebSocket技術。 WebSocket是一種基於TCP協定的全雙工通訊協議,可實現客戶端與伺服器的即時雙向通訊。在即時線上點餐系統中,當使用者選擇菜餚並下訂單
 如何使用WebSocket和JavaScript實現線上預約系統
Dec 17, 2023 am 09:39 AM
如何使用WebSocket和JavaScript實現線上預約系統
Dec 17, 2023 am 09:39 AM
如何使用WebSocket和JavaScript實現線上預約系統在當今數位化的時代,越來越多的業務和服務都需要提供線上預約功能。而實現一個高效、即時的線上預約系統是至關重要的。本文將介紹如何使用WebSocket和JavaScript來實作一個線上預約系統,並提供具體的程式碼範例。一、什麼是WebSocketWebSocket是一種在單一TCP連線上進行全雙工
 JavaScript與WebSocket:打造高效率的即時天氣預報系統
Dec 17, 2023 pm 05:13 PM
JavaScript與WebSocket:打造高效率的即時天氣預報系統
Dec 17, 2023 pm 05:13 PM
JavaScript和WebSocket:打造高效的即時天氣預報系統引言:如今,天氣預報的準確性對於日常生活以及決策制定具有重要意義。隨著技術的發展,我們可以透過即時獲取天氣數據來提供更準確可靠的天氣預報。在本文中,我們將學習如何使用JavaScript和WebSocket技術,來建立一個高效的即時天氣預報系統。本文將透過具體的程式碼範例來展示實現的過程。 We
 簡易JavaScript教學:取得HTTP狀態碼的方法
Jan 05, 2024 pm 06:08 PM
簡易JavaScript教學:取得HTTP狀態碼的方法
Jan 05, 2024 pm 06:08 PM
JavaScript教學:如何取得HTTP狀態碼,需要具體程式碼範例前言:在Web開發中,經常會涉及到與伺服器進行資料互動的場景。在與伺服器進行通訊時,我們經常需要取得傳回的HTTP狀態碼來判斷操作是否成功,並根據不同的狀態碼來進行對應的處理。本篇文章將教你如何使用JavaScript來取得HTTP狀態碼,並提供一些實用的程式碼範例。使用XMLHttpRequest
 javascript如何使用insertBefore
Nov 24, 2023 am 11:56 AM
javascript如何使用insertBefore
Nov 24, 2023 am 11:56 AM
用法:在JavaScript中,insertBefore()方法用於在DOM樹中插入一個新的節點。這個方法需要兩個參數:要插入的新節點和參考節點(即新節點將要插入的位置的節點)。
 如何在JavaScript中取得HTTP狀態碼的簡單方法
Jan 05, 2024 pm 01:37 PM
如何在JavaScript中取得HTTP狀態碼的簡單方法
Jan 05, 2024 pm 01:37 PM
JavaScript中的HTTP狀態碼取得方法簡介:在進行前端開發中,我們常常需要處理與後端介面的交互,而HTTP狀態碼就是其中非常重要的一部分。了解並取得HTTP狀態碼有助於我們更好地處理介面傳回的資料。本文將介紹使用JavaScript取得HTTP狀態碼的方法,並提供具體程式碼範例。一、什麼是HTTP狀態碼HTTP狀態碼是指當瀏覽器向伺服器發起請求時,服務
