五個方便好用的Python自動化腳本

比起大家都聽過自動化生產線、自動化辦公室等詞彙,在沒有人工幹預的情況下,機器可以自己完成各項任務,這大大提升了工作效率。
程式設計世界裡有各種各樣的自動化腳本,來完成不同的任務。
尤其Python非常適合編寫自動化腳本,因為它語法簡潔易懂,而且有豐富的第三方工具庫。
這次我們使用Python來實現幾個自動化場景,或許可以用到你的作品中。
1、自動化閱讀網頁新聞
這個腳本能夠實現從網頁中抓取文本,然後自動化語音朗讀,當你想聽新聞的時候,這是個不錯的選擇。
程式碼分為兩大部分,第一個透過爬蟲抓取網頁文字呢,第二透過閱讀工具來朗讀文字。
所需的第三方函式庫:
Beautiful Soup - 經典的HTML/XML文字解析器,用來擷取爬下來的網頁資訊
requests - 好用到逆天的HTTP工具,用來向網頁發送請求獲取數據
Pyttsx3 - 將文字轉換為語音,並控制速率、頻率和語音
import pyttsx3
import requests
from bs4 import BeautifulSoup
engine = pyttsx3.init('sapi5')
voices = engine.getProperty('voices')
newVoiceRate = 130 ## Reduce The Speech Rate
engine.setProperty('rate',newVoiceRate)
engine.setProperty('voice', voices[1].id)
def speak(audio):
engine.say(audio)
engine.runAndWait()
text = str(input("Paste articlen"))
res = requests.get(text)
soup = BeautifulSoup(res.text,'html.parser')
articles = []
for i in range(len(soup.select('.p'))):
article = soup.select('.p')[i].getText().strip()
articles.append(article)
text = " ".join(articles)
speak(text)
# engine.save_to_file(text, 'test.mp3') ## If you want to save the speech as a audio file
engine.runAndWait()2、自動生成素描草圖
這個腳本可以把彩色圖片轉化為鉛筆素描草圖,對人像、景色都有很好的效果。
而且只需幾行程式碼就可以一鍵生成,適合批次操作,非常的快捷。
所需的第三方函式庫:
Opencv - 電腦視覺工具,可以實現多元化的影像視訊處理,有Python介面
""" Photo Sketching Using Python """
import cv2
img = cv2.imread("elon.jpg")
## Image to Gray Image
gray_image = cv2.cvtColor(img,cv2.COLOR_BGR2GRAY)
## Gray Image to Inverted Gray Image
inverted_gray_image = 255-gray_image
## Blurring The Inverted Gray Image
blurred_inverted_gray_image = cv2.GaussianBlur(inverted_gray_image, (19,19),0)
## Inverting the blurred image
inverted_blurred_image = 255-blurred_inverted_gray_image
### Preparing Photo sketching
sketck = cv2.divide(gray_image, inverted_blurred_image,scale= 256.0)
cv2.imshow("Original Image",img)
cv2.imshow("Pencil Sketch", sketck)
cv2.waitKey(0)
3、自動發送多封郵件
這個腳本可以幫助我們批量定時發送郵件,郵件內容、附件也可以自訂調整,非常的實用。
比較郵件用戶端,Python腳本的優點在於可以智慧、大量、高客製化地部署郵件服務。
需要的第三方函式庫:
Email - 用於管理電子郵件訊息
Smtlib - 向SMTP伺服器發送電子郵件,它定義了一個SMTP 用戶端會話對象,該物件可將郵件傳送至網際網路上任何帶有SMTP 或ESMTP 監聽程式的電腦
Pandas - 用於資料分析清洗地工具
import smtplib
from email.message import EmailMessage
import pandas as pd
def send_email(remail, rsubject, rcontent):
email = EmailMessage()## Creating a object for EmailMessage
email['from'] = 'The Pythoneer Here'## Person who is sending
email['to'] = remail## Whom we are sending
email['subject'] = rsubject ## Subject of email
email.set_content(rcontent) ## content of email
with smtplib.SMTP(host='smtp.gmail.com',port=587)as smtp:
smtp.ehlo() ## server object
smtp.starttls() ## used to send data between server and client
smtp.login("deltadelta371@gmail.com","delta@371") ## login id and password of gmail
smtp.send_message(email)## Sending email
print("email send to ",remail)## Printing success message
if __name__ == '__main__':
df = pd.read_excel('list.xlsx')
length = len(df)+1
for index, item in df.iterrows():
email = item[0]
subject = item[1]
content = item[2]
send_email(email,subject,content)4、自動化資料探索
#資料探索是資料科學專案的第一步,你需要了解資料的基本資訊才能進一步分析更深的價值。
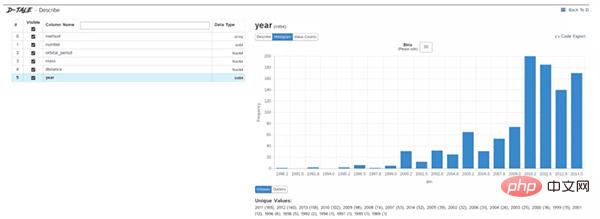
一般我們會用pandas、matplotlib等工具來探索數據,但需要自己寫大量程式碼,如果想提高效率,Dtale是個不錯的選擇。
Dtale特點是用一行程式碼產生自動化分析報告,它結合了Flask後端和React前端,為我們提供了一種查看和分析Pandas資料結構的簡單方法。
我們可以在Jupyter上實用Dtale。
所需的第三方函式庫:
Dtale - 自動產生分析報告
### Importing Seaborn Library For Some Datasets
import seaborn as sns
### Printing Inbuilt Datasets of Seaborn Library
print(sns.get_dataset_names())
### Loading Titanic Dataset
df=sns.load_dataset('titanic')
### Importing The Library
import dtale
#### Generating Quick Summary
dtale.show(df)
from win10toast import ToastNotifier
import time
toaster = ToastNotifier()
header = input("What You Want Me To Remembern")
text = input("Releated Messagen")
time_min=float(input("In how many minutes?n"))
time_min = time_min * 60
print("Setting up reminder..")
time.sleep(2)
print("all set!")
time.sleep(time_min)
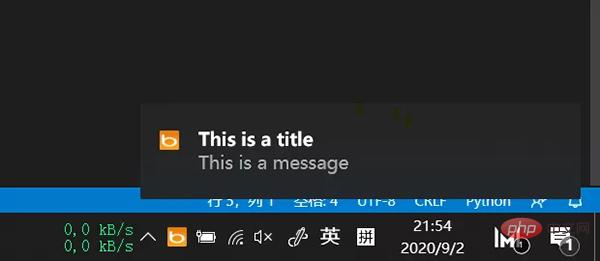
toaster.show_toast(f"{header}", f"{text}", duration=10, threaded=True)
while toaster.notification_active(): time.sleep(0.005)
以上是五個方便好用的Python自動化腳本的詳細內容。更多資訊請關注PHP中文網其他相關文章!

熱AI工具

Undresser.AI Undress
人工智慧驅動的應用程序,用於創建逼真的裸體照片

AI Clothes Remover
用於從照片中去除衣服的線上人工智慧工具。

Undress AI Tool
免費脫衣圖片

Clothoff.io
AI脫衣器

AI Hentai Generator
免費產生 AI 無盡。

熱門文章

熱工具

記事本++7.3.1
好用且免費的程式碼編輯器

SublimeText3漢化版
中文版,非常好用

禪工作室 13.0.1
強大的PHP整合開發環境

Dreamweaver CS6
視覺化網頁開發工具

SublimeText3 Mac版
神級程式碼編輯軟體(SublimeText3)

熱門話題
 PHP和Python:代碼示例和比較
Apr 15, 2025 am 12:07 AM
PHP和Python各有優劣,選擇取決於項目需求和個人偏好。 1.PHP適合快速開發和維護大型Web應用。 2.Python在數據科學和機器學習領域佔據主導地位。
 Python vs. JavaScript:社區,圖書館和資源
Apr 15, 2025 am 12:16 AM
Python和JavaScript在社區、庫和資源方面的對比各有優劣。 1)Python社區友好,適合初學者,但前端開發資源不如JavaScript豐富。 2)Python在數據科學和機器學習庫方面強大,JavaScript則在前端開發庫和框架上更勝一籌。 3)兩者的學習資源都豐富,但Python適合從官方文檔開始,JavaScript則以MDNWebDocs為佳。選擇應基於項目需求和個人興趣。
 CentOS上PyTorch的GPU支持情況如何
Apr 14, 2025 pm 06:48 PM
在CentOS系統上啟用PyTorchGPU加速,需要安裝CUDA、cuDNN以及PyTorch的GPU版本。以下步驟將引導您完成這一過程:CUDA和cuDNN安裝確定CUDA版本兼容性:使用nvidia-smi命令查看您的NVIDIA顯卡支持的CUDA版本。例如,您的MX450顯卡可能支持CUDA11.1或更高版本。下載並安裝CUDAToolkit:訪問NVIDIACUDAToolkit官網,根據您顯卡支持的最高CUDA版本下載並安裝相應的版本。安裝cuDNN庫:前
 docker原理詳解
Apr 14, 2025 pm 11:57 PM
Docker利用Linux內核特性,提供高效、隔離的應用運行環境。其工作原理如下:1. 鏡像作為只讀模板,包含運行應用所需的一切;2. 聯合文件系統(UnionFS)層疊多個文件系統,只存儲差異部分,節省空間並加快速度;3. 守護進程管理鏡像和容器,客戶端用於交互;4. Namespaces和cgroups實現容器隔離和資源限制;5. 多種網絡模式支持容器互聯。理解這些核心概念,才能更好地利用Docker。
 minio安裝centos兼容性
Apr 14, 2025 pm 05:45 PM
MinIO對象存儲:CentOS系統下的高性能部署MinIO是一款基於Go語言開發的高性能、分佈式對象存儲系統,與AmazonS3兼容。它支持多種客戶端語言,包括Java、Python、JavaScript和Go。本文將簡要介紹MinIO在CentOS系統上的安裝和兼容性。 CentOS版本兼容性MinIO已在多個CentOS版本上得到驗證,包括但不限於:CentOS7.9:提供完整的安裝指南,涵蓋集群配置、環境準備、配置文件設置、磁盤分區以及MinI
 CentOS上PyTorch的分佈式訓練如何操作
Apr 14, 2025 pm 06:36 PM
在CentOS系統上進行PyTorch分佈式訓練,需要按照以下步驟操作:PyTorch安裝:前提是CentOS系統已安裝Python和pip。根據您的CUDA版本,從PyTorch官網獲取合適的安裝命令。對於僅需CPU的訓練,可以使用以下命令:pipinstalltorchtorchvisiontorchaudio如需GPU支持,請確保已安裝對應版本的CUDA和cuDNN,並使用相應的PyTorch版本進行安裝。分佈式環境配置:分佈式訓練通常需要多台機器或單機多GPU。所
 CentOS上PyTorch版本怎麼選
Apr 14, 2025 pm 06:51 PM
在CentOS系統上安裝PyTorch,需要仔細選擇合適的版本,並考慮以下幾個關鍵因素:一、系統環境兼容性:操作系統:建議使用CentOS7或更高版本。 CUDA與cuDNN:PyTorch版本與CUDA版本密切相關。例如,PyTorch1.9.0需要CUDA11.1,而PyTorch2.0.1則需要CUDA11.3。 cuDNN版本也必須與CUDA版本匹配。選擇PyTorch版本前,務必確認已安裝兼容的CUDA和cuDNN版本。 Python版本:PyTorch官方支
 CentOS上如何更新PyTorch到最新版本
Apr 14, 2025 pm 06:15 PM
在CentOS上更新PyTorch到最新版本,可以按照以下步驟進行:方法一:使用pip升級pip:首先確保你的pip是最新版本,因為舊版本的pip可能無法正確安裝最新版本的PyTorch。 pipinstall--upgradepip卸載舊版本的PyTorch(如果已安裝):pipuninstalltorchtorchvisiontorchaudio安裝最新


