Java如何實作JDK動態代理
概念
代理:為控制A對象,而建立出新B對象,由B對象取代執行A對象所有操作,稱為代理。一個代理體系建立涉及3個參與角色:真實物件(A),代理物件(B),客戶端。
其中的代理物件(B)起到中介作用,連通真實物件(A)與客戶端,如果進一步拓展,代理物件可以實現更加複雜邏輯,例如對真實物件進行存取控制。
案例
需求:員工業務層介面呼叫save需要admin權限,呼叫list不需要權限,沒權限呼叫時拋出例外提示。
靜態代理
/**
 * 代理接口
 */
public interface IEmployeeService {
    void save();

    void list();
}/**
* 真实对象
*/
public class EmployeeServiceImpl implements IEmployeeService {
@Override
public void save() {
System.out.println("EmployeeServiceImpl-正常的save....");
}
@Override
public void list() {
System.out.println("EmployeeServiceImpl-正常的list....");
}
}/**
* 模拟当前登录用户对象
*/
public class SessionHolder {
private static String currentUser;
public static String getCurrentUser(){
return currentUser;
}
public static void setCurrentUser(String currentUser){
SessionHolder.currentUser = currentUser;
}
}/**
* 代理对象
*/
public class EmployeeProxy implements IEmployeeService {
//真实对象
private EmployeeServiceImpl employeeService;
public EmployeeProxy(EmployeeServiceImpl employeeService){
this.employeeService = employeeService;
}
@Override
public void save() {
//权限判断
if("admin".equals(SessionHolder.getCurrentUser())){
employeeService.save();
}else{
throw new RuntimeException("当前非admin用户,不能执行save操作");
}
}
@Override
public void list() {
employeeService.list();
}
}public class App {
public static void main(String[] args) {
System.out.println("----------------真实对象--------------------");
EmployeeServiceImpl employeeService = new EmployeeServiceImpl();
employeeService.list();
employeeService.save();
System.out.println("----------------代理对象--------------------");
SessionHolder.setCurrentUser("dafei"); //设置权限(当前登录用户)
EmployeeProxy employeeProxy = new EmployeeProxy(employeeService);
employeeProxy.list();
employeeProxy.save();
}
}----------------真实对象-------------------- EmployeeServiceImpl-正常的list.... EmployeeServiceImpl-正常的save.... ----------------代理对象-------------------- EmployeeServiceImpl-正常的list.... Exception in thread "main" java.lang.RuntimeException: 当前非admin用户,不能执行save操作 at com.langfeiyes.pattern.proxy.demo.EmployeeProxy.save(EmployeeProxy.java:20) at com.langfeiyes.pattern.proxy.demo.App.main(App.java:16)
使用真實物件EmployeeServiceImpl 直接呼叫時,不管是list 還是save都能直接訪問,但不符合需求上的admin權限限制。如果使用代理對象EmployeeProxy,可以完成需求實作。
透過直接建立新類別新類別代理物件方式完成代理邏輯,這種方式稱之為靜態代理模式。
JDK動態代理模式
Java常用的動態代理模式有JDK動態代理,也有cglib動態代理,此處重點講解JDK的動態代理
還是原來的需求,前面的IEmployeeService EmployeeServiceImpl SessionHolder 都沒變,新加一個JDK代理控制器-EmployeeInvocationHandler
/**
 * jdk动态代理控制类,由它牵头代理类获取,代理方法的执行
 */
public class EmployeeInvocationHandler  implements InvocationHandler {
    //真实对象-EmployeeServiceImpl
    private Object target;
    public EmployeeInvocationHandler(Object target){
        this.target = target;
    }
    //获取jvm在内存中生成代理对象
    public Object getProxy(){
        return  Proxy.newProxyInstance(
                target.getClass().getClassLoader(),
                target.getClass().getInterfaces(),
                this);
    }
    //代理对象控制执行方法
    //参数1:代理对象
    //参数2:真实对象的方法(使用方式得到方法对象)
    //参数3:真实对象方法参数列表
    //此处是代理对象对外暴露的可编辑的方法处理场所,代理对象每调用一个次方法,就会执行一次invoke
    @Override
    public Object invoke(Object proxy, Method method, Object[] args) throws Throwable {
        String name = method.getName();
        if("save".equals(name) && !"admin".equals(SessionHolder.getCurrentUser())){
            throw new RuntimeException("当前非admin用户,不能执行save操作");
        }
        return method.invoke(target, args);
    }
}測試App類別稍微改動下:
public class App {
    public static void main(String[] args) {
        System.out.println("----------------真实对象--------------------");
        EmployeeServiceImpl employeeService = new EmployeeServiceImpl();
        employeeService.list();
        employeeService.save();

        System.out.println("----------------代理对象--------------------");
        SessionHolder.setCurrentUser("dafei");
        EmployeeInvocationHandler handler =
            new EmployeeInvocationHandler(employeeService);
        IEmployeeService proxy = (IEmployeeService) handler.getProxy();
        proxy.list();
        proxy.save();

    }
}上面程式碼一樣可以實現需求,跟靜態代理區別就在於少創建了代理物件。此時存在疑問點,沒有創建代理對象,為啥可以實現代理類別呼叫呢? ?
原理分析
先拋出結論JDK動態代理底層實作原理:使用介面實作方式,運行時,在記憶體中動態建構出一個類,然後編譯,執行。這個類別是一次性的,JVM停止,代理類別就消失。
參與角色 要理解JDK動態代理原理,首先得了解JDK動態代理所涉及的類別

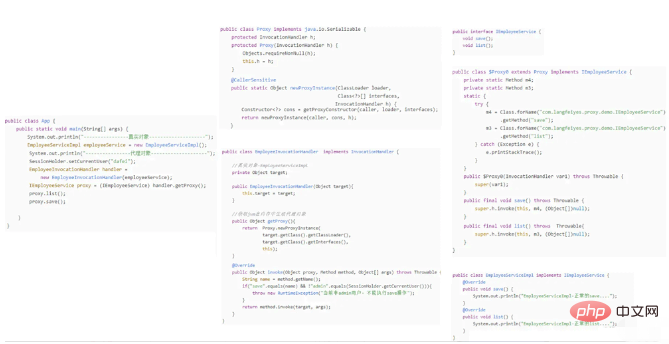
InvocationHandler :真實物件方法呼叫處理器,內建invoke方法,其功能:為真實物件自訂代理邏輯
EmployeeInvocationHandler:員工服務真實物件方法呼叫處理器,此類有3個用途: 1>設定真實物件
     //真实对象-EmployeeServiceImpl
    private Object target;
    public EmployeeInvocationHandler(Object target){
        this.target = target;
}2>自訂代理方法實作邏輯
為真實物件save方法新增了權限校驗邏輯
    //代理对象控制执行方法
    //参数1:代理对象
    //参数2:真实对象的方法(使用方式得到方法对象)
    //参数3:真实对象方法参数列表
    //此处是代理对象对外暴露的可编辑的方法处理场所,代理对象每调用一个次方法,就会执行一次invoke
    @Override
    public Object invoke(Object proxy, Method method, Object[] args) throws Throwable {
        String name = method.getName();
        if("save".equals(name) && !"admin".equals(SessionHolder.getCurrentUser())){
            throw new RuntimeException("当前非admin用户,不能执行save操作");
        }
        return method.invoke(target, args);
}#3>傳回代理物件
方法執行完之後,傳回一個名為:$ProxyX的代理類別(其中的X是序號,一般預設為0),而這個代理類別由JDK動態建構出來。
    //获取jvm在内存中生成代理对象
    public Object getProxy(){
        return  Proxy.newProxyInstance(
                target.getClass().getClassLoader(),
                target.getClass().getInterfaces(),
                this);
}Proxy:動態代理控制類,是JDK動態產生的$ProxyX類的父類,它作用如下:
1>透過呼叫ProxyBuilder 類別builder方法建構代理對象類別
private static Constructor<?> getProxyConstructor(Class<?> caller,
                                                      ClassLoader loader,
                                                      Class<?>... interfaces){
            return proxyCache.sub(intf).computeIfAbsent(
                loader,
                (ld, clv) -> new ProxyBuilder(ld, clv.key()).build()
            );
}2>透過newProxyInstance方法傳回$ProxyX類別的實例
   public static Object newProxyInstance(ClassLoader loader,
                                          Class<?>[] interfaces,
                                          InvocationHandler h) {
    //...
}$Proxy0:App類別運行時,JDK動態建構出來的代理類,繼承至Proxy類別
public class App {
    public static void main(String[] args) {
        //System.setProperty("sun.misc.ProxyGenerator.saveGeneratedFiles", "true");
        System.setProperty("jdk.proxy.ProxyGenerator.saveGeneratedFiles", "true");
        System.out.println("----------------真实对象--------------------");
        EmployeeServiceImpl employeeService = new EmployeeServiceImpl();
        employeeService.list();
        employeeService.save();
        System.out.println("----------------代理对象--------------------");
        SessionHolder.setCurrentUser("dafei");
        EmployeeInvocationHandler handler =
                     new EmployeeInvocationHandler(employeeService);
        IEmployeeService proxy = (IEmployeeService) handler.getProxy();
        proxy.list();
        proxy.save();

    }
}預設情況下JVM是不保存動態建立代理類別字節碼物件的,可以在main方法中配置代理參數讓字節碼保留
//JDK8之前
System.setProperty("sun.misc.ProxyGenerator.saveGeneratedFiles", "true");
//JDK8之后
System.setProperty("jdk.proxy.ProxyGenerator.saveGeneratedFiles", "true");執行完之後,會在專案根目錄產生代理類別字節碼物件。

為了方便解讀,將一些不需要的方法剔除之後
#$Proxy0類別
public class $Proxy0 extends Proxy implements IEmployeeService {
    private static Method m4;
    private static Method m3;
    static {
        try {
            m4 = Class.forName("com.langfeiyes.proxy.demo.IEmployeeService")
                 .getMethod("save");
            m3 = Class.forName("com.langfeiyes.proxy.demo.IEmployeeService")
                 .getMethod("list");
        } catch (Exception e) {
            e.printStackTrace();
        }
    }
    public $Proxy0(InvocationHandler var1) throws Throwable {
        super(var1);
    }
    public final void save() throws Throwable {
        super.h.invoke(this, m4, (Object[])null);
    }

    public final void list() throws  Throwable{
        super.h.invoke(this, m3, (Object[])null);
    }
}從原始碼上看,$Proxy0的特點:
1>繼承了Proxy類,實作了IEmployeeService 介面
2>透過靜態區塊的方式反射IEmployeeService介面save與list方法,得到他們的方法物件Method
3>呼叫父類別建構器,需要傳入InvocationHandler 參數
4>重寫IEmployeeService介面的save list方法靠的是父類別Proxy的h屬性.invoke方法
真相大白
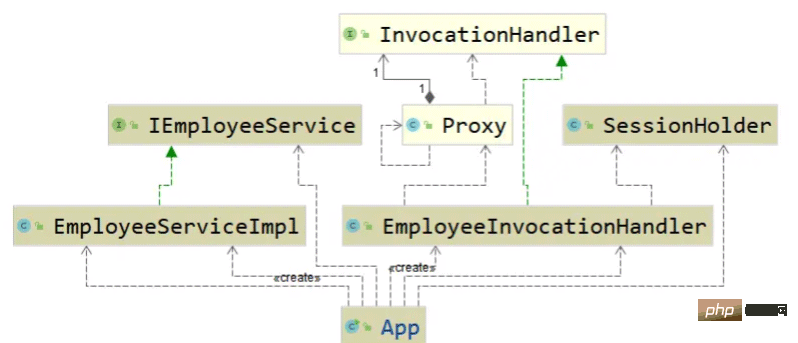
下圖所有參與動態代理的類別:

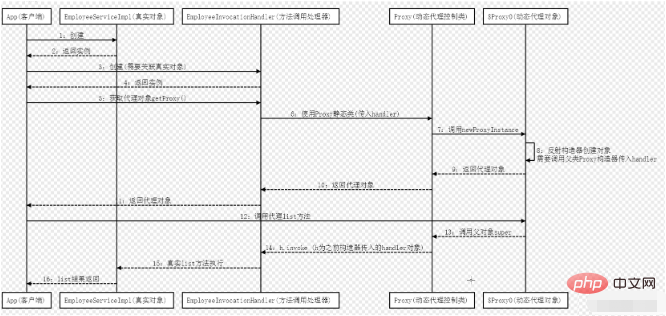
下圖是上圖的操作時序圖,跟著走就對了

以上是Java如何實作JDK動態代理的詳細內容。更多資訊請關注PHP中文網其他相關文章!

熱AI工具

Undresser.AI Undress
人工智慧驅動的應用程序,用於創建逼真的裸體照片

AI Clothes Remover
用於從照片中去除衣服的線上人工智慧工具。

Undress AI Tool
免費脫衣圖片

Clothoff.io
AI脫衣器

Video Face Swap
使用我們完全免費的人工智慧換臉工具,輕鬆在任何影片中換臉!

熱門文章

熱工具

記事本++7.3.1
好用且免費的程式碼編輯器

SublimeText3漢化版
中文版,非常好用

禪工作室 13.0.1
強大的PHP整合開發環境

Dreamweaver CS6
視覺化網頁開發工具

SublimeText3 Mac版
神級程式碼編輯軟體(SublimeText3)
 突破或從Java 8流返回?
Feb 07, 2025 pm 12:09 PM
Java 8引入了Stream API,提供了一種強大且表達力豐富的處理數據集合的方式。然而,使用Stream時,一個常見問題是:如何從forEach操作中中斷或返回? 傳統循環允許提前中斷或返回,但Stream的forEach方法並不直接支持這種方式。本文將解釋原因,並探討在Stream處理系統中實現提前終止的替代方法。 延伸閱讀: Java Stream API改進 理解Stream forEach forEach方法是一個終端操作,它對Stream中的每個元素執行一個操作。它的設計意圖是處
 PHP:網絡開發的關鍵語言
Apr 13, 2025 am 12:08 AM
PHP是一種廣泛應用於服務器端的腳本語言,特別適合web開發。 1.PHP可以嵌入HTML,處理HTTP請求和響應,支持多種數據庫。 2.PHP用於生成動態網頁內容,處理表單數據,訪問數據庫等,具有強大的社區支持和開源資源。 3.PHP是解釋型語言,執行過程包括詞法分析、語法分析、編譯和執行。 4.PHP可以與MySQL結合用於用戶註冊系統等高級應用。 5.調試PHP時,可使用error_reporting()和var_dump()等函數。 6.優化PHP代碼可通過緩存機制、優化數據庫查詢和使用內置函數。 7
 PHP與Python:了解差異
Apr 11, 2025 am 12:15 AM
PHP和Python各有優勢,選擇應基於項目需求。 1.PHP適合web開發,語法簡單,執行效率高。 2.Python適用於數據科學和機器學習,語法簡潔,庫豐富。
 Java程序查找膠囊的體積
Feb 07, 2025 am 11:37 AM
膠囊是一種三維幾何圖形,由一個圓柱體和兩端各一個半球體組成。膠囊的體積可以通過將圓柱體的體積和兩端半球體的體積相加來計算。本教程將討論如何使用不同的方法在Java中計算給定膠囊的體積。 膠囊體積公式 膠囊體積的公式如下: 膠囊體積 = 圓柱體體積 兩個半球體體積 其中, r: 半球體的半徑。 h: 圓柱體的高度(不包括半球體)。 例子 1 輸入 半徑 = 5 單位 高度 = 10 單位 輸出 體積 = 1570.8 立方單位 解釋 使用公式計算體積: 體積 = π × r2 × h (4
 PHP與Python:核心功能
Apr 13, 2025 am 12:16 AM
PHP和Python各有優勢,適合不同場景。 1.PHP適用於web開發,提供內置web服務器和豐富函數庫。 2.Python適合數據科學和機器學習,語法簡潔且有強大標準庫。選擇時應根據項目需求決定。
 PHP與其他語言:比較
Apr 13, 2025 am 12:19 AM
PHP適合web開發,特別是在快速開發和處理動態內容方面表現出色,但不擅長數據科學和企業級應用。與Python相比,PHP在web開發中更具優勢,但在數據科學領域不如Python;與Java相比,PHP在企業級應用中表現較差,但在web開發中更靈活;與JavaScript相比,PHP在後端開發中更簡潔,但在前端開發中不如JavaScript。


