影像分割是醫學影像分析中最重要的任務之一,在許多臨床應用中往往是第一步也是最關鍵的一步。在腦MRI分析中,影像分割通常用於測量和視覺化解剖結構,分析大腦變化,描繪病理區域以及手術計劃和影像引導幹預,分割是大多數形態學分析的先決條件。
本文我們將介紹如何使用QuickNAT對人腦的圖像進行分割。使用MONAI, PyTorch和用於資料視覺化和計算的常見Python函式庫,如NumPy, TorchIO和matplotlib。
本文將主要設計以下幾個面向:
完整的程式碼會在本文最後提供。
使用MONAI的第一步是設定MONAI_DATA_DIRECTORY環境變數指定目錄,如果未指定將使用暫存目錄。
<code>directory = os.environ.get("MONAI_DATA_DIRECTORY") root_dir = tempfile.mkdtemp() if directory is None else directory print(root_dir)</code>將CNN模型擴展到大腦分割的主要挑戰之一是手動註釋的訓練資料的有限性。作者引入了一種新的訓練策略,利用沒有手動標籤的大型資料集和有手動標籤的小型資料集。
首先,使用現有的軟體工具(例如FreeSurfer)從大型未標記資料集中獲得自動產生的分割,然後使用這些工具對網路進行預訓練。在第二步驟中,使用較小的手動註釋資料[2]對網路進行微調。
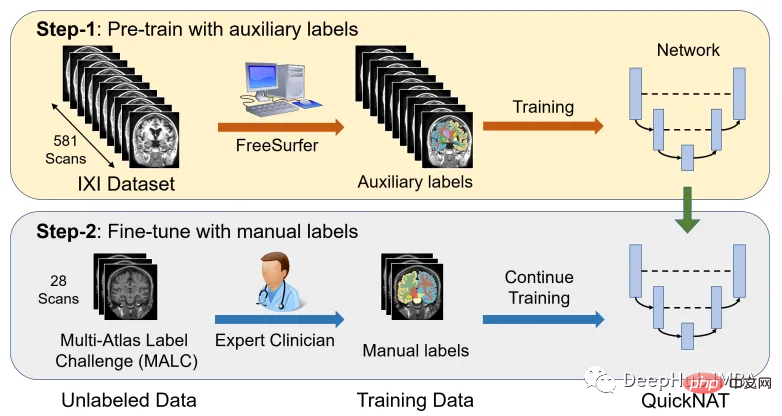
IXI資料集由581個健康受試者的未標記MRI T1掃描組成。這些數據是從倫敦3家不同的醫院收集來的。使用此資料集的主要缺點是標籤不是公開可用的,因此為了遵循與研究論文中相同的方法,本文將使用FreeSurfer為這些MRI T1掃描產生分割。
FreeSurfer是一個用於分析和視覺化結構的軟體包。下載和安裝說明可以在這裡找到。可以直接使用了「recon-all」指令來執行所有皮質重建過程。
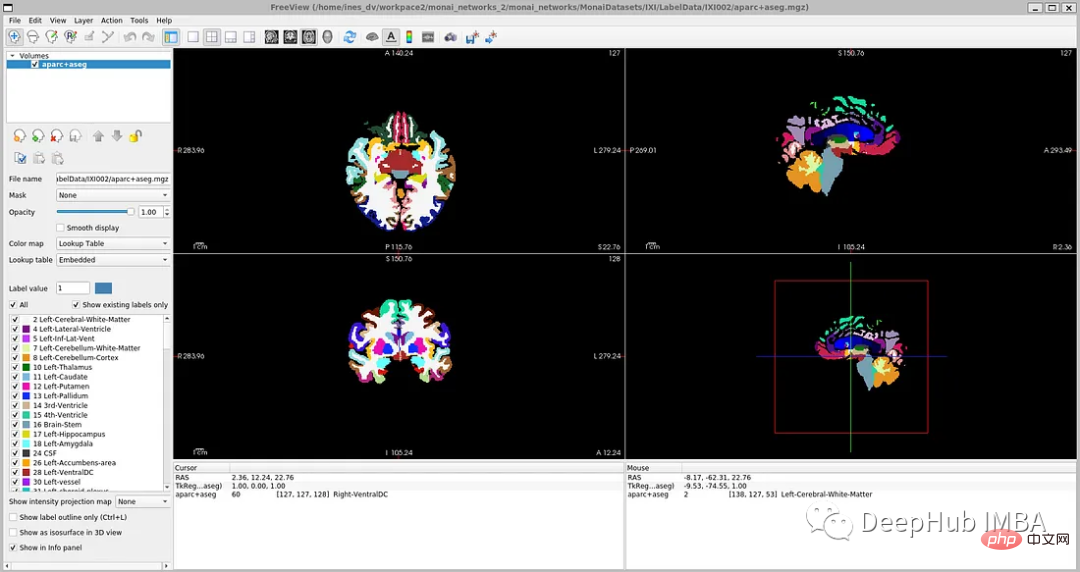
儘管FreeSurfer是一個非常有用的工具,可以利用大量未標記的數據,並以監督的方式訓練網絡,但是掃描生成這些標籤需要長達5個小時,所以我們在這裡直接使用OASIS資料集來訓練模型,OASIS資料集是一個較小的資料集,具有公開可用的手動註釋。
OASIS是一個向科學界免費提供大腦神經影像資料集的計畫。 OASIS-1是由39個受試者的橫斷面組成的資料集,取得方式如下:
<code>resource = "https://download.nrg.wustl.edu/data/oasis_cross-sectional_disc1.tar.gz" md5 = "c83e216ef8654a7cc9e2a30a4cdbe0cc" compressed_file = os.path.join(root_dir, "oasis_cross-sectional_disc1.tar.gz") data_dir = os.path.join(root_dir, "Oasis_Data") if not os.path.exists(data_dir): download_and_extract(resource, compressed_file, data_dir, md5)</code>
#如果你開啟' oasis_crosssectional_disc1 .tar.gz ',你會發現每個主題都有不同的資料夾。例如,對於主題OAS1_0001_MR1,是這樣的:
鏡像資料檔路徑:disc1\OAS1_0001_MR1\PROCESSED\MPRAGE\T88_111\ oas1_0001_mr1_mpr_n4_anon_111\ oas1_0001_mr1_mpr_n4_anon_111\ oas1_0001_mr1_mpr_n4_anon_111\ oas1_001_mr1_mpr_n4_anon_111\文件:disc1\OAS1_0001_MR1\FSL_SEG\OAS1_0001_MR1_mpr_n4_anon_111_t88_masked_gfc_fseg.img
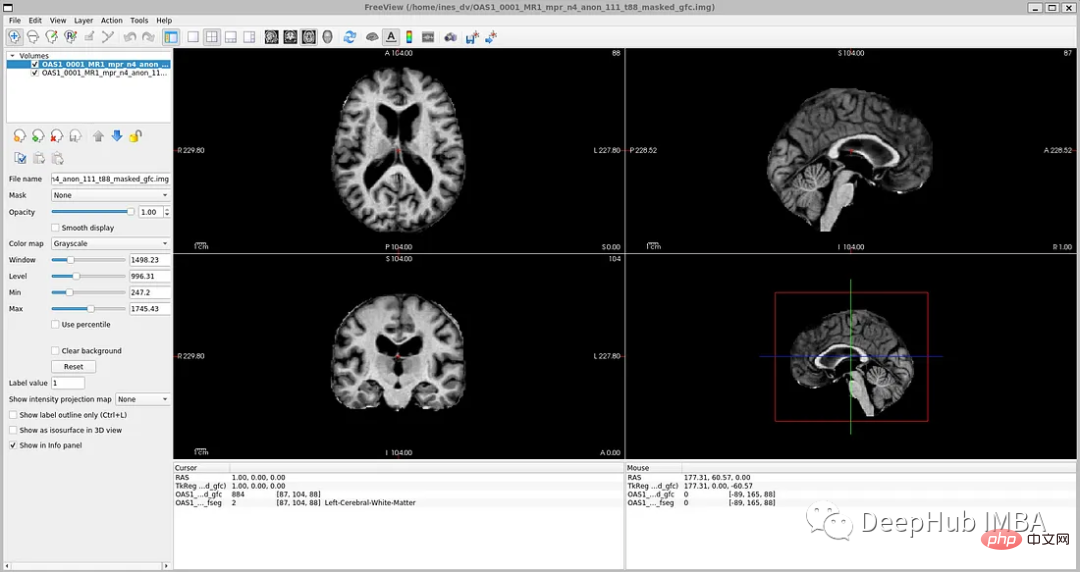
數據加載和預處理
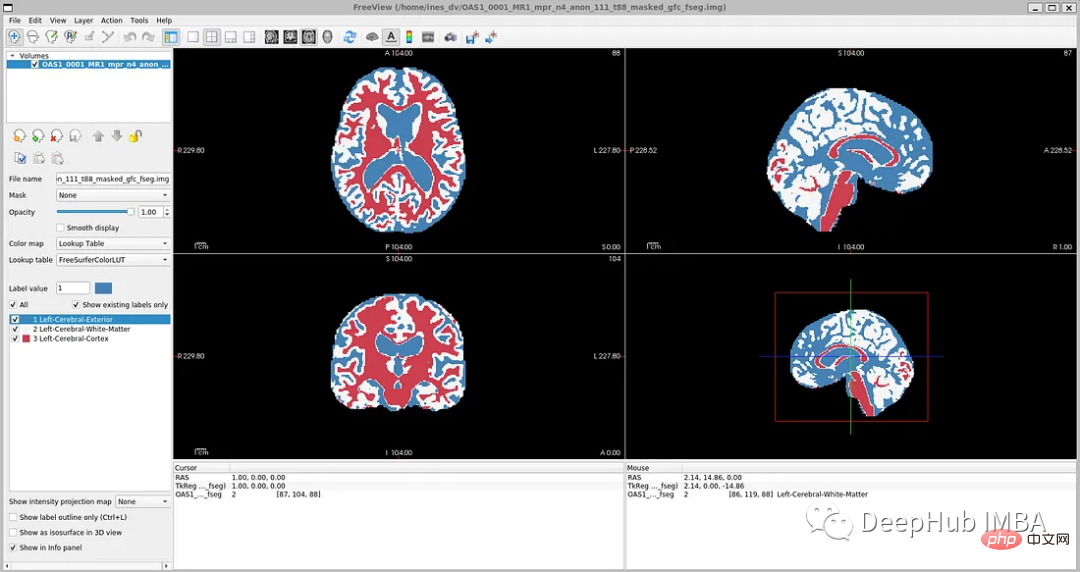 下載數據集並將其提取到臨時目錄後,需要對其進行重構,我們希望我們的目錄看起來像這樣:
所以需要按照下面的步驟加載數據:
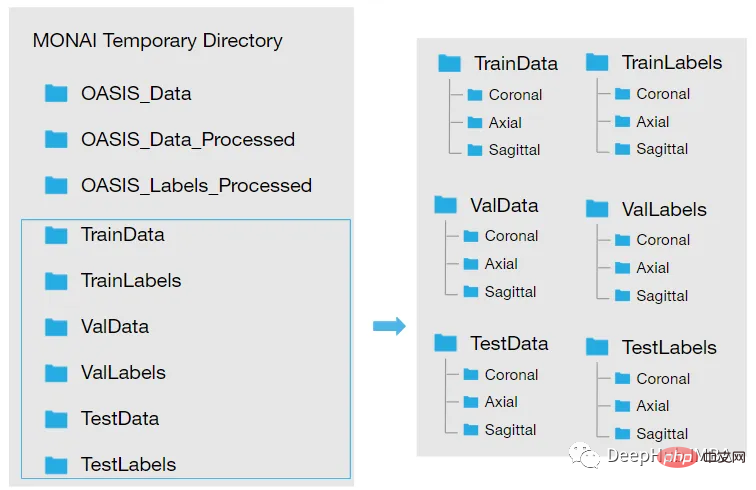 將。 img檔轉換為。 nii檔案並儲存到新資料夾:建立兩個新資料夾。 Oasis_Data_Processed包括每個受試者的處理過的MRI T1掃描,Oasis_Labels_Processed包括對應的標籤。
<code>new_path_data= root_dir + '/Oasis_Data_Processed/' if not os.path.exists(new_path_data): os.makedirs(new_path_data) new_path_labels= root_dir + '/Oasis_Labels_Processed/' if not os.path.exists(new_path_labels): os.makedirs(new_path_labels)</code>
<code>for i in [x for x in range(1, 43) if x != 8 and x != 24 and x != 36]: if i </code>
<code>image_files = sorted(glob(os.path.join(root_dir + '/Oasis_Data_Processed', '*.nii'))) label_files = sorted(glob(os.path.join(root_dir + '/Oasis_Labels_Processed', '*.nii'))) files = [{'image': image_name, 'label': label_name} for image_name, label_name in zip(image_files, label_files)]</code><code>image_filename = root_dir + '/Oasis_Data_Processed/OAS1_0001_MR1_mpr_n4_anon_111_t88_masked_gfc.nii' label_filename = root_dir + '/Oasis_Labels_Processed/OAS1_0001_MR1_mpr_n4_anon_111_t88_masked_gfc_fseg.nii' subject = torchio.Subject(image=torchio.ScalarImage(image_filename), label=torchio.LabelMap(label_filename)) subject.plot()</code>
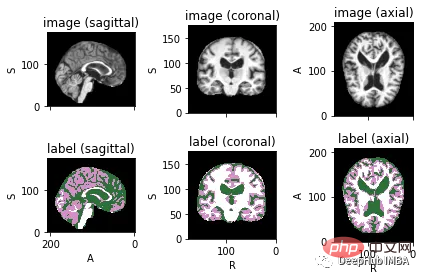
下面就是将数据分成3部分——训练、验证和测试。将数据分成三个不同的类别的目的是建立一个可靠的机器学习模型,避免过拟合。
我们将整个数据集分成三个部分:
Train: 80%,Validation: 10%,Test: 10%
<code>train_inds, val_inds, test_inds = partition_dataset(data = np.arange(len(files)), ratios = [8, 1, 1], shuffle = True) train = [files[i] for i in sorted(train_inds)] val = [files[i] for i in sorted(val_inds)] test = [files[i] for i in sorted(test_inds)] print(f"Training count: {len(train)}, Validation count: {len(val)}, Test count: {len(test)}")</code>因为模型需要的是二维切片,所以将每个切片保存在不同的文件夹中,如下图所示。这两个代码单元将训练集的每个MRI体积的切片保存为“.png”格式。
<code>Save coronal slices for training images dir = root_dir + '/TrainData' os.makedirs(os.path.join(dir, "Coronal")) path = root_dir + '/TrainData/Coronal/' for file in sorted(glob(os.path.join(root_dir + '/TrainData', '*.nii'))): image=torchio.ScalarImage(file) data = image.data filename = os.path.basename(file) filename = os.path.splitext(filename) for i in range(0, 208): slice = data[0, :, i] array = slice.numpy() data_dir = root_dir + '/TrainData/Coronal/' + filename[0] + '_slice' + str(i) + '.png' plt.imsave(fname = data_dir, arr = array, format = 'png', cmap = plt.cm.gray)</code>
同理,下面是保存标签:
<code>dir = root_dir + '/TrainLabels' os.makedirs(os.path.join(dir, "Coronal")) path = root_dir + '/TrainLabels/Coronal/' for file in sorted(glob(os.path.join(root_dir + '/TrainLabels', '*.nii'))): label = torchio.LabelMap(file) data = label.data filename = os.path.basename(file) filename = os.path.splitext(filename) for i in range(0, 208): slice = data[0, :, i] array = slice.numpy() data_dir = root_dir + '/TrainLabels/Coronal/' + filename[0] + '_slice' + str(i) + '.png' plt.imsave(fname = data_dir, arr = array, format = 'png')</code>
在本例中,我们将使用Dictionary Transforms,其中数据是Python字典。
<code>train_images_coronal = [] for file in sorted(glob(os.path.join(root_dir + '/TrainData/Coronal', '*.png'))): train_images_coronal.append(file) train_images_coronal = natsort.natsorted(train_images_coronal) train_labels_coronal = [] for file in sorted(glob(os.path.join(root_dir + '/TrainLabels/Coronal', '*.png'))): train_labels_coronal.append(file) train_labels_coronal= natsort.natsorted(train_labels_coronal) val_images_coronal = [] for file in sorted(glob(os.path.join(root_dir + '/ValData/Coronal', '*.png'))): val_images_coronal.append(file) val_images_coronal = natsort.natsorted(val_images_coronal) val_labels_coronal = [] for file in sorted(glob(os.path.join(root_dir + '/ValLabels/Coronal', '*.png'))): val_labels_coronal.append(file) val_labels_coronal = natsort.natsorted(val_labels_coronal) train_files_coronal = [{'image': image_name, 'label': label_name} for image_name, label_name in zip(train_images_coronal, train_labels_coronal)] val_files_coronal = [{'image': image_name, 'label': label_name} for image_name, label_name in zip(val_images_coronal, val_labels_coronal)]</code>现在我们将应用以下变换:
LoadImaged:加载图像数据和元数据。我们使用' PILReader '来加载图像和标签文件。ensure_channel_first设置为True,将图像数组形状转换为通道优先。
Rotate90d:我们将图像和标签旋转90度,因为当我们下载它们时,它们方向是不正确的。
ToTensord:将输入的图像和标签转换为张量。
NormalizeIntensityd:对输入进行规范化。
<code>train_transforms = Compose([ LoadImaged(keys = ['image', 'label'], reader=PILReader(converter=lambda image: image.convert("L")), ensure_channel_first = True), Rotate90d(keys = ['image', 'label'], k = 2), ToTensord(keys = ['image', 'label']), NormalizeIntensityd(keys = ['image'])]) val_transforms = Compose([ LoadImaged(keys = ['image', 'label'], reader=PILReader(converter=lambda image: image.convert("L")), ensure_channel_first = True), Rotate90d(keys = ['image', 'label'], k = 2), ToTensord(keys = ['image', 'label']), NormalizeIntensityd(keys = ['image'])])</code>MaskColorMap将我们定义了一个新的转换,将相应的像素值以一种格式映射为多个标签。这种转换在语义分割中是必不可少的,因为我们必须为每个可能的类别提供二元特征。One-Hot Encoding将对应于原始类别的每个样本的特征赋值为1。
因为OASIS-1数据集只有3个大脑结构标签,对于更详细的分割,理想的情况是像他们在研究论文中那样对28个皮质结构进行注释。在OASIS-1下载说明中,可以找到使用FreeSurfer获得的更多大脑结构的标签。
所以本文将分割更多的神经解剖结构。我们要将模型的参数num_classes修改为相应的标签数量,以便模型的输出是具有N个通道的特征映射,等于num_classes。
为了简化本教程,我们将使用以下标签,比OASIS-1但是要比FreeSurfer的少:
所以MaskColorMap的代码如下:
<code>class MaskColorMap(Enum):Background = (30)LeftCerebralExterior = (91)LeftWhiteMatter = (137)LeftCerebralCortex = (215)</code>
数据集和数据加载器从存储中提取数据,并将其分批发送给训练循环。这里我们使用monai.data.Dataset加载之前定义的训练和验证字典,并对输入数据应用相应的转换。dataloader用于将数据集加载到内存中。我们将为训练和验证以及每个视图定义一个数据集和数据加载器。
为了方便演示,我们使用通过使用torch.utils.data.Subset,在指定的索引处创建一个子集,只是用部分数据训练加快演示速度。
<code>train_dataset_coronal = Dataset(data=train_files_coronal, transform = train_transforms) train_loader_coronal = DataLoader(train_dataset_coronal, batch_size = 1, shuffle = True) val_dataset_coronal = Dataset(data = val_files_coronal, transform = val_transforms) val_loader_coronal = DataLoader(val_dataset_coronal, batch_size = 1, shuffle = False) # We will use a subset of the dataset subset_train = list(range(90, len(train_dataset_coronal), 120)) train_dataset_coronal_subset = torch.utils.data.Subset(train_dataset_coronal, subset_train) train_loader_coronal_subset = DataLoader(train_dataset_coronal_subset, batch_size = 1, shuffle = True) subset_val = list(range(90, len(val_dataset_coronal), 50)) val_dataset_coronal_subset = torch.utils.data.Subset(val_dataset_coronal, subset_val) val_loader_coronal_subset = DataLoader(val_dataset_coronal_subset, batch_size = 1, shuffle = False)</code>
给定一组MRI脑扫描I = {I1,…In}及其对应的分割S = {S1,…Sn},我们想要学习一个函数fseg: I -> S。我们将这个函数表示为F-CNN模型,称为QuickNAT:
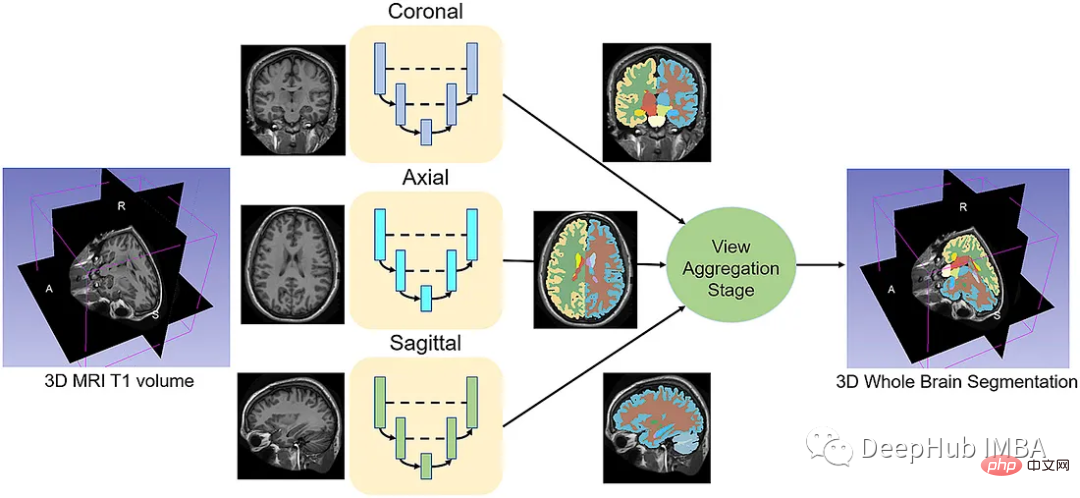
QuickNAT由三个二维f - cnn组成,分别在coronal, axial, sagittal视图上操作,然后通过聚合步骤推断最终的分割结果,该分割结果由三个网络的概率图组合而成。每个F-CNN都有一个编码器/解码器架构,其中有4个编码器和4个解码器,并由瓶颈层分隔。最后一层是带有softmax的分类器块。该架构还包括每个编码器/解码器块内的残差链接。
<code>class QuickNat(nn.Module): """A PyTorch implementation of QuickNAT """ def __init__(self, params): """:param params: {'num_channels':1,'num_filters':64,'kernel_h':5,'kernel_w':5,'stride_conv':1,'pool':2,'stride_pool':2,'num_classes':28'se_block': False,'drop_out':0.2}""" super(QuickNat, self).__init__() # from monai.networks.blocks import squeeze_and_excitation as se # self.cSE = ChannelSELayer(num_channels, reduction_ratio) # self.encode1 = sm.EncoderBlock(params, se_block_type=se.SELayer.CSSE) # params["num_channels"] = params["num_filters"] # self.encode2 = sm.EncoderBlock(params, se_block_type=se.SELayer.CSSE) # self.encode3 = sm.EncoderBlock(params, se_block_type=se.SELayer.CSSE) # self.encode4 = sm.EncoderBlock(params, se_block_type=se.SELayer.CSSE) # self.bottleneck = sm.DenseBlock(params, se_block_type=se.SELayer.CSSE) # params["num_channels"] = params["num_filters"] * 2 # self.decode1 = sm.DecoderBlock(params, se_block_type=se.SELayer.CSSE) # self.decode2 = sm.DecoderBlock(params, se_block_type=se.SELayer.CSSE) # self.decode3 = sm.DecoderBlock(params, se_block_type=se.SELayer.CSSE) # self.decode4 = sm.DecoderBlock(params, se_block_type=se.SELayer.CSSE) # self.encode1 = EncoderBlock(params, se_block_type=se.ChannelSELayer) self.encode1 = EncoderBlock(params, se_block_type=se.SELayer.CSSE) params["num_channels"] = params["num_filters"] self.encode2 = EncoderBlock(params, se_block_type=se.SELayer.CSSE) self.encode3 = EncoderBlock(params, se_block_type=se.SELayer.CSSE) self.encode4 = EncoderBlock(params, se_block_type=se.SELayer.CSSE) self.bottleneck = DenseBlock(params, se_block_type=se.SELayer.CSSE) params["num_channels"] = params["num_filters"] * 2 self.decode1 = DecoderBlock(params, se_block_type=se.SELayer.CSSE) self.decode2 = DecoderBlock(params, se_block_type=se.SELayer.CSSE) self.decode3 = DecoderBlock(params, se_block_type=se.SELayer.CSSE) self.decode4 = DecoderBlock(params, se_block_type=se.SELayer.CSSE) params["num_channels"] = params["num_filters"] self.classifier = ClassifierBlock(params) def forward(self, input): """:param input: X:return: probabiliy map """ e1, out1, ind1 = self.encode1.forward(input) e2, out2, ind2 = self.encode2.forward(e1) e3, out3, ind3 = self.encode3.forward(e2) e4, out4, ind4 = self.encode4.forward(e3) bn = self.bottleneck.forward(e4) d4 = self.decode4.forward(bn, out4, ind4) d3 = self.decode1.forward(d4, out3, ind3) d2 = self.decode2.forward(d3, out2, ind2) d1 = self.decode3.forward(d2, out1, ind1) prob = self.classifier.forward(d1) return prob def enable_test_dropout(self): """Enables test time drop out for uncertainity:return:""" attr_dict = self.__dict__["_modules"] for i in range(1, 5): encode_block, decode_block = ( attr_dict["encode" + str(i)], attr_dict["decode" + str(i)],) encode_block.drop_out = encode_block.drop_out.apply(nn.Module.train) decode_block.drop_out = decode_block.drop_out.apply(nn.Module.train) @property def is_cuda(self): """Check if model parameters are allocated on the GPU.""" return next(self.parameters()).is_cuda def save(self, path): """Save model with its parameters to the given path. Conventionally thepath should end with '*.model'. Inputs:- path: path string""" print("Saving model... %s" % path) torch.save(self.state_dict(), path) def predict(self, X, device=0, enable_dropout=False): """Predicts the output after the model is trained.Inputs:- X: Volume to be predicted""" self.eval() print("tensor size before transformation", X.shape) if type(X) is np.ndarray: # X = torch.tensor(X, requires_grad=False).type(torch.FloatTensor) X = ( torch.tensor(X, requires_grad=False).type(torch.FloatTensor).cuda(device, non_blocking=True)) elif type(X) is torch.Tensor and not X.is_cuda: X = X.type(torch.FloatTensor).cuda(device, non_blocking=True) print("tensor size ", X.shape) if enable_dropout: self.enable_test_dropout() with torch.no_grad(): out = self.forward(X) max_val, idx = torch.max(out, 1) idx = idx.data.cpu().numpy() prediction = np.squeeze(idx) print("prediction shape", prediction.shape) del X, out, idx, max_val return prediction</code>神经网络的训练需要一个损失函数来计算模型误差。训练的目标是最小化预测输出和目标输出之间的损失。我们的模型使用Dice Loss 和Weighted Logistic Loss的联合损失函数进行优化,其中权重补偿数据中的高类不平衡,并鼓励正确分割解剖边界。

优化算法允许我们继续更新模型的参数并最小化损失函数的值,我们设置了以下的超参数:
学习率:初始设置为0.1,10次后降低1阶。这可以通过学习率调度器来实现。
权重衰减:0.0001。
批量大小:1。
动量:设置为0.95的高值,以补偿由于小批量大小而产生的噪声梯度。
现在可以训练模型了。对于QuickNAT需要在3个(coronal, axial, sagittal)2d切片上训练3个模型。然后再聚合步骤中组合三个模型的概率生成最终结果,但是本文中只演示在coronal视图的2D切片上训练一个F-CNN模型,因为其他两个与之类似。
<code>num_epochs = 20 start_epoch = 1 val_interval = 1 train_loss_epoch_values = [] val_loss_epoch_values = [] best_ds_mean = -1 best_ds_mean_epoch = -1 ds_mean_train_values = [] ds_mean_val_values = [] # ds_LCE_values = [] # ds_LWM_values = [] # ds_LCC_values = [] print("START TRAINING. : model name = ", "quicknat") for epoch in range(start_epoch, num_epochs): print("==== Epoch ["+ str(epoch) + " / "+ str(num_epochs)+ "] DONE ====") checkpoint_name = CHECKPOINT_DIR + "/checkpoint_epoch_" + str(epoch) + "." + CHECKPOINT_EXTENSION print(checkpoint_name) state = { "epoch": epoch, "arch": "quicknat", "state_dict": model_coronal.state_dict(), "optimizer": optimizer.state_dict(), "scheduler": scheduler.state_dict(),} save_checkpoint(state = state, filename = checkpoint_name) print("\n==== Epoch [ %d / %d ] START ====" % (epoch, num_epochs)) steps_per_epoch = len(train_dataset_coronal_subset) / train_loader_coronal_subset.batch_size model_coronal.train() train_loss_epoch = 0 val_loss_epoch = 0 step = 0 predictions_train = [] labels_train = [] predictions_val = [] labels_val = [] for i_batch, sample_batched in enumerate(train_loader_coronal_subset): inputs = sample_batched['image'].type(torch.FloatTensor) labels = sample_batched['label'].type(torch.LongTensor) # print(f"Train Input Shape: {inputs.shape}") labels = labels.squeeze(1) _img_channels, _img_height, _img_width = labels.shape encoded_label= np.zeros((_img_height, _img_width, 1)).astype(int) for j, cls in enumerate(MaskColorMap): encoded_label[np.all(labels == cls.value, axis = 0)] = j labels = encoded_label labels = torch.from_numpy(labels) labels = torch.permute(labels, (2, 1, 0)) # print(f"Train Label Shape: {labels.shape}") # plt.title("Train Label") # plt.imshow(labels[0, :, :]) # plt.show() optimizer.zero_grad() outputs = model_coronal(inputs) loss = loss_function(outputs, labels) loss.backward() optimizer.step() scheduler.step() with torch.no_grad(): _, batch_output = torch.max(outputs, dim = 1) # print(f"Train Prediction Shape: {batch_output.shape}") # plt.title("Train Prediction") # plt.imshow(batch_output[0, :, :]) # plt.show() predictions_train.append(batch_output.cpu()) labels_train.append(labels.cpu()) train_loss_epoch += loss.item() print(f"{step}/{len(train_dataset_coronal_subset) // train_loader_coronal_subset.batch_size}, Training_loss: {loss.item():.4f}") step += 1 predictions_train_arr, labels_train_arr = torch.cat(predictions_train), torch.cat(labels_train) # print(predictions_train_arr.shape) dice_metric(predictions_train_arr, labels_train_arr) ds_mean_train = dice_metric.aggregate().item() ds_mean_train_values.append(ds_mean_train) dice_metric.reset() train_loss_epoch /= step train_loss_epoch_values.append(train_loss_epoch) print(f"Epoch {epoch + 1} Train Average Loss: {train_loss_epoch:.4f}") if (epoch + 1) % val_interval == 0: model_coronal.eval() step = 0 with torch.no_grad(): for i_batch, sample_batched in enumerate(val_loader_coronal_subset): inputs = sample_batched['image'].type(torch.FloatTensor) labels = sample_batched['label'].type(torch.LongTensor) # print(f"Val Input Shape: {inputs.shape}") labels = labels.squeeze(1) integer_encoded_labels = [] _img_channels, _img_height, _img_width = labels.shape encoded_label= np.zeros((_img_height, _img_width, 1)).astype(int) for j, cls in enumerate(MaskColorMap): encoded_label[np.all(labels == cls.value, axis = 0)] = j labels = encoded_label labels = torch.from_numpy(labels) labels = torch.permute(labels, (2, 1, 0)) # print(f"Val Label Shape: {labels.shape}") # plt.title("Val Label") # plt.imshow(labels[0, :, :]) # plt.show() val_outputs = model_coronal(inputs) val_loss = loss_function(val_outputs, labels) predicted = torch.argmax(val_outputs, dim = 1) # print(f"Val Prediction Shape: {predicted.shape}") # plt.title("Val Prediction") # plt.imshow(predicted[0, :, :]) # plt.show() predictions_val.append(predicted) labels_val.append(labels) val_loss_epoch += val_loss.item() print(f"{step}/{len(val_dataset_coronal_subset) // val_loader_coronal_subset.batch_size}, Validation_loss: {val_loss.item():.4f}") step += 1 predictions_val_arr, labels_val_arr = torch.cat(predictions_val), torch.cat(labels_val) dice_metric(predictions_val_arr, labels_val_arr) # dice_metric_batch(predictions_val_arr, labels_val_arr) ds_mean_val = dice_metric.aggregate().item() ds_mean_val_values.append(ds_mean_val) # ds_mean_val_batch = dice_metric_batch.aggregate() # ds_LCE = ds_mean_val_batch[0].item() # ds_LCE_values.append(ds_LCE) # ds_LWM = ds_mean_val_batch[1].item() # ds_LWM_values.append(ds_LWM) # ds_LCC = ds_mean_val_batch[2].item() # ds_LCC_values.append(ds_LCC) dice_metric.reset() # dice_metric_batch.reset() if ds_mean_val > best_ds_mean: best_ds_mean = ds_mean_val best_ds_mean_epoch = epoch + 1 torch.save(model_coronal.state_dict(), os.path.join(BESTMODEL_DIR, "best_metric_model_coronal.pth")) print("Saved new best metric model coronal") print( f"Current Epoch: {epoch + 1} Current Mean Dice score is: {ds_mean_val:.4f}" f"\nBest Mean Dice score: {best_ds_mean:.4f} " # f"\nMean Dice score Left Cerebral Exterior: {ds_LCE:.4f} Mean Dice score Left White Matter: {ds_LWM:.4f} Mean Dice score Left Cerebral Cortex: {ds_LCC:.4f} " f"at Epoch: {best_ds_mean_epoch}") val_loss_epoch /= step val_loss_epoch_values.append(val_loss_epoch) print(f"Epoch {epoch + 1} Average Validation Loss: {val_loss_epoch:.4f}") print("FINISH.")</code>代码也是传统的Pytorch的训练步骤,就不详细解释了
训练曲线表示模型的学习情况,验证曲线表示模型泛化到未见实例的情况。我们使用matplotlib来绘制图形。还可以使用TensorBoard,它使理解和调试深度学习程序变得更容易,并且是实时的。
<code>epoch = range(1, num_epochs + 1) # Plot Loss Curves plt.figure(figsize=(18, 6)) plt.subplot(1, 3, 1) plt.plot(epoch, train_loss_epoch_values, label='Training Loss') plt.plot(epoch, val_loss_epoch_values, label='Validation Loss') plt.title('Training and Validation Loss') plt.xlabel('Epoch') plt.legend() plt.figure() plt.show() # Plot Train Dice Coefficient Curve plt.figure(figsize=(18, 6)) plt.subplot(1, 3, 2) x = [(i + 1) for i in range(len(ds_mean_train_values))] plt.plot(x, ds_mean_train_values, 'blue', label = 'Train Mean Dice Score') plt.title("Training Mean Dice Coefficient") plt.xlabel('Epoch') plt.ylabel('Mean Dice Score') plt.show() # Plot Validation Dice Coefficient Curve plt.figure(figsize=(18, 6)) plt.subplot(1, 3, 3) x = [(i + 1) for i in range(len(ds_mean_val_values))] plt.plot(x, ds_mean_val_values, 'orange', label = 'Validation Mean Dice Score') plt.title("Validation Mean Dice Coefficient") plt.xlabel('Epoch') plt.ylabel('Mean Dice Score') plt.show()</code>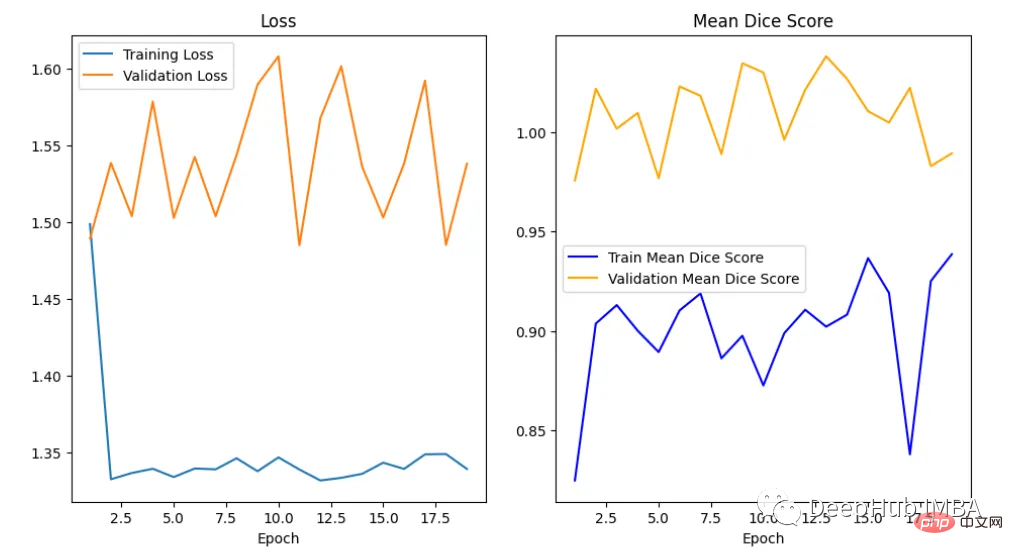
在曲线中,我们可以看到模型是过拟合的,因为验证损失上升而训练损失下降。这是深度学习算法中一个常见的陷阱,其中模型最终会记住训练数据,而无法对未见过的数据进行泛化。
避免过度拟合的技巧:
我们如何度量模型的性能?一个成功的预测是一个最大限度地扩大预测和真实之间的重叠。
这一目标的两个相关但不同的指标是Dice和Intersection / Union (IoU)系数,后者也被称为Jaccard系数。两个指标都在0(无重叠)和1(完全重叠)之间。

这两种指标都可以用于类似的情况,但是区别在于Dice Score倾向于平均表现,而IoU则帮助你理解最坏情况下的表现。

我们可以逐个类地检查度量标准,或者取所有类的平均值。这里将使用monai.metrics.DiceMetric来计算分数。一个更通用的方法是使用torchmetrics,但是因为这里使用了monai框架,所以就直接使用它内置的函数了。
我们可以看到Dice得分曲线的行为相当不寻常。主要是因为验证平均Dice得分高于1,这是不可能的,因为这个度量是在0和1之间。我们无法确定这种行为的主要原因,但我们建议在多类问题中为每个类单独提供度量计算,并始终提供可视化示例以进行可视化评估。
最后我们要看看模型是如何推广到未知数据的这个模型预测的几乎所有东西都是左脑白质,一些像素是左脑皮层。尽管它的预测似乎是正确的,但仍有很大的改进空间,因为我们的模型太小了,可以选择更深的模型获得更好的效果。
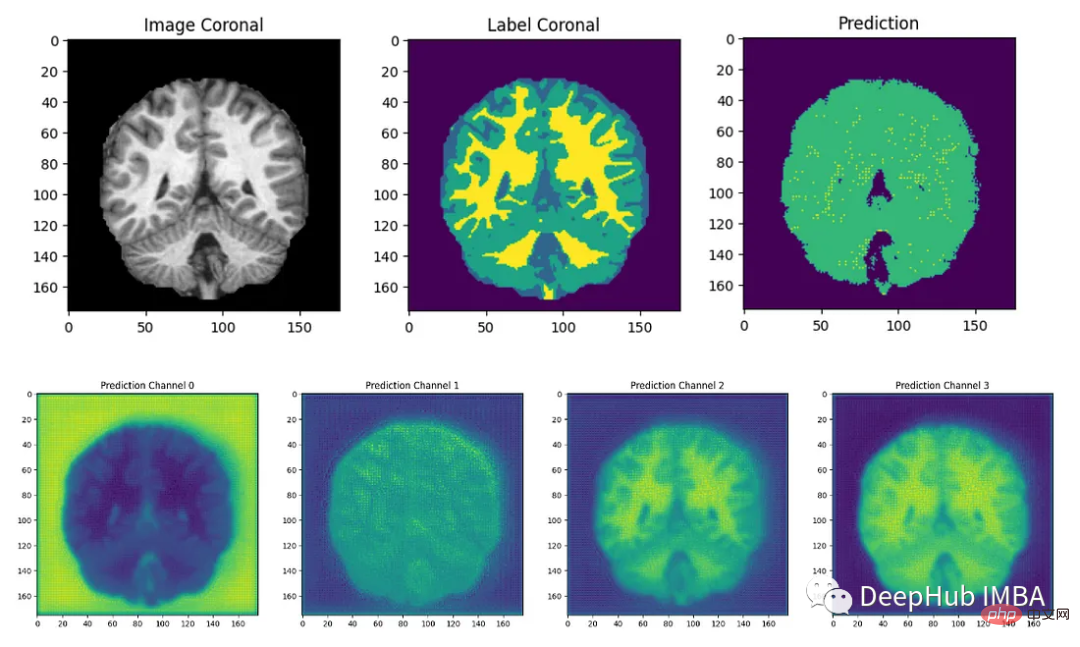
在本文中,我们介绍了如何训练QuickNAT来完成具有挑战性的大脑分割任务。我们尽可能遵循作者在他们的研究论文中解释的学习策略,这是本教程为了方便演示只在最简单的步骤上进行了演示,文本的完整代码:
https://github.com/inesdv26/Brain-Segmentation
以上是醫學影像的深度學習的完整程式碼範例:使用Pytorch對MRI腦掃描的影像進行分割的詳細內容。更多資訊請關注PHP中文網其他相關文章!


