十個有趣的Python高級腳本,建議收藏!

大家好,我是菜鳥哥。
在日常的工作中,我們總是會面臨到各式各樣的問題。
其中不少的問題,使用一些簡單的Python程式碼就能解決。例如不久前的復旦大佬,用130行Python程式碼硬派搞定核酸統計,大大提升了效率,節省了不少時間。
今天,菜鳥哥就帶大家學習10個Python腳本程式。雖然簡單,不過還蠻有用的。有興趣的可以自己去實現,找到對自己有幫助的技巧。
1、Jpg轉Png
圖片格式轉換,以前J哥可能第一時間想到的是【格式工廠】這個軟體。
如今寫一個Python腳本就能完成各種圖片格式的轉換,此處以jpg轉成png為例。
有兩種解決方法,都分享給大家。
# 图片格式转换, Jpg转Png
# 方法①
from PIL import Image
img = Image.open('test.jpg')
img.save('test1.png')
# 方法②
from cv2 import imread, imwrite
image = imread("test.jpg", 1)
imwrite("test2.png", image)2、PDF加密與解密
如果你有100個或更多的PDF檔案需要加密,手動進行加密肯定是不可行的,極度浪費時間。
使用Python的pikepdf模組,即可對文件進行加密,寫一個循環就能進行批次加密文件。
# PDF加密
import pikepdf
pdf = pikepdf.open("test.pdf")
pdf.save('encrypt.pdf', encryption=pikepdf.Encryption(owner="your_password", user="your_password", R=4))
pdf.close()有加密那麼就會有解密,程式碼如下。
# PDF解密
import pikepdf
pdf = pikepdf.open("encrypt.pdf",password='your_password')
pdf.save("decrypt.pdf")
pdf.close()3、取得電腦的設定資訊
許多小夥伴可能會使用魯大師來看自己的電腦配置,這樣還需要下載一個軟體。
使用Python的WMI模組,方便查看你的電腦資訊。
# 获取计算机信息
import wmi
def System_spec():
 Pc = wmi.WMI()
 os_info = Pc.Win32_OperatingSystem()[0]
 processor = Pc.Win32_Processor()[0]
 Gpu = Pc.Win32_VideoController()[0]
 os_name = os_info.Name.encode('utf-8').split(b'|')[0]
 ram = float(os_info.TotalVisibleMemorySize) / 1048576
 print(f'操作系统: {os_name}')
 print(f'CPU: {processor.Name}')
 print(f'内存: {ram} GB')
 print(f'显卡: {Gpu.Name}')
 print("n计算机信息如上 ↑ ↑ ↑ ↑ ↑ ↑ ↑ ↑ ↑ ↑ ↑ ↑")
System_spec()就以J哥自己的電腦為例,運行程式碼就能看到設定。

4、解壓縮檔案
#使用zipfile模組進行檔案解壓縮,同理也可以壓縮檔案。
# 解压文件
from zipfile import ZipFile
unzip = ZipFile("file.zip", "r")
unzip.extractall("output Folder")5、Excel工作表合併
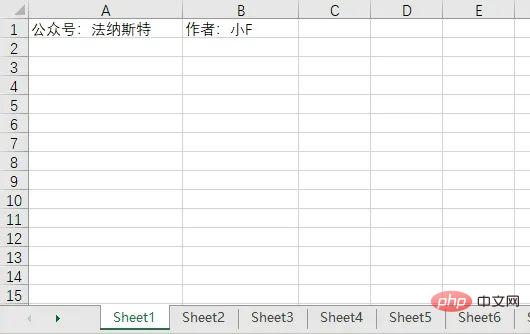
幫助你將Excel工作表合併到一張表上,表格內容如下圖。

6張表,其餘表的內容和第一張表都一樣。
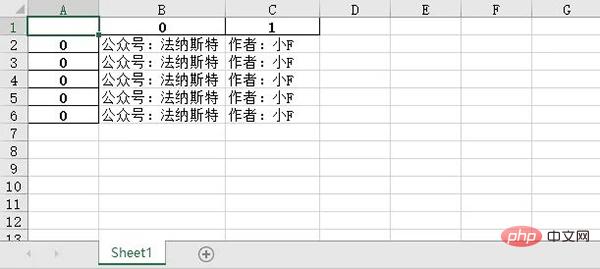
設定表格數量為5,將會合併前5張表格的內容。
import pandas as pd
# 文件名
filename = "test.xlsx"
# 表格数量
T_sheets = 5
df = []
for i in range(1, T_sheets+1):
 sheet_data = pd.read_excel(filename, sheet_name=i, header=None)
 df.append(sheet_data)
# 合并表格
output = "merged.xlsx"
df = pd.concat(df)
df.to_excel(output)
結果如下。

6、將影像轉換為素描圖
和先前的圖片格式轉換有點類似,就是對影像進行處理。
以前大家可能會使用到美圖秀秀,現在可能就是抖音的濾鏡了。
其實使用Python的OpenCV,就能夠快速實現很多你想要的效果。
# 图像转换
import cv2
# 读取图片
img = cv2.imread("img.jpg")
# 灰度
grey = cv2.cvtColor(img, cv2.COLOR_BGR2GRAY)
invert = cv2.bitwise_not(grey)
# 高斯滤波
blur_img = cv2.GaussianBlur(invert, (7, 7), 0)
inverse_blur = cv2.bitwise_not(blur_img)
sketch_img = cv2.divide(grey, inverse_blur, scale=256.0)
# 保存
cv2.imwrite('sketch.jpg', sketch_img)
cv2.waitKey(0)
cv2.destroyAllWindows()原圖如下。

素描圖如下,還蠻好看的。

7、取得CPU溫度
#有了這個Python腳本,你將不需要任何軟體來了解CPU的溫度。
# 获取CPU温度
from time import sleep
from pyspectator.processor import Cpu
cpu = Cpu(monitoring_latency=1)
with cpu:
 while True:
 print(f'Temp: {cpu.temperature} °C')
sleep(2)8、提取PDF表格
有的時候,我們需要從PDF中提取表格資料。
第一時間你可能會先想到手工整理,但是當工作量特別大,手工可能就比較費勁。
然後你可能會想到一些軟體和網路工具來提取 PDF 表格。
下面這個簡單的腳本將幫助你在一秒鐘內完成相同的操作。
# 方法①
import camelot
tables = camelot.read_pdf("tables.pdf")
print(tables)
tables.export("extracted.csv", f="csv", compress=True)
# 方法②, 需要安装Java8
import tabula
tabula.read_pdf("tables.pdf", pages="all")
tabula.convert_into("table.pdf", "output.csv", output_format="csv", pages="all")PDF文件的內容如下,包含了一個表格。

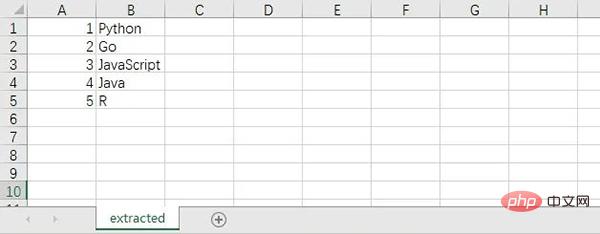
擷取到的CSV檔案內容如下。

9、截圖
該腳本將簡單地截取螢幕截圖,而無需使用任何螢幕截圖軟體。
在下面的程式碼中,給大家展示了兩種Python截取螢幕截圖的方法。
# 方法①
from mss import mss
with mss() as screenshot:
 screenshot.shot(output='scr.png')
# 方法②
import PIL.ImageGrab
scr = PIL.ImageGrab.grab()
scr.save("scr.png")10、拼字檢查器
這個Python腳本可以進行拼字檢查,當然只對英文有效,畢竟中文博大精深吶。
# 拼写检查
# 方法①
import textblob
text = "mussage"
print("original text: " + str(text))
checked = textblob.TextBlob(text)
print("corrected text: " + str(checked.correct()))
# 方法②
import autocorrect
spell = autocorrect.Speller(lang='en')
# 以英语为例
print(spell('cmputr'))
print(spell('watr'))
print(spell('survice'))以上是十個有趣的Python高級腳本,建議收藏!的詳細內容。更多資訊請關注PHP中文網其他相關文章!

熱AI工具

Undresser.AI Undress
人工智慧驅動的應用程序,用於創建逼真的裸體照片

AI Clothes Remover
用於從照片中去除衣服的線上人工智慧工具。

Undress AI Tool
免費脫衣圖片

Clothoff.io
AI脫衣器

Video Face Swap
使用我們完全免費的人工智慧換臉工具,輕鬆在任何影片中換臉!

熱門文章

熱工具

記事本++7.3.1
好用且免費的程式碼編輯器

SublimeText3漢化版
中文版,非常好用

禪工作室 13.0.1
強大的PHP整合開發環境

Dreamweaver CS6
視覺化網頁開發工具

SublimeText3 Mac版
神級程式碼編輯軟體(SublimeText3)
 PHP和Python:解釋了不同的範例
Apr 18, 2025 am 12:26 AM
PHP主要是過程式編程,但也支持面向對象編程(OOP);Python支持多種範式,包括OOP、函數式和過程式編程。 PHP適合web開發,Python適用於多種應用,如數據分析和機器學習。
 在PHP和Python之間進行選擇:指南
Apr 18, 2025 am 12:24 AM
PHP適合網頁開發和快速原型開發,Python適用於數據科學和機器學習。 1.PHP用於動態網頁開發,語法簡單,適合快速開發。 2.Python語法簡潔,適用於多領域,庫生態系統強大。
 Python vs. JavaScript:學習曲線和易用性
Apr 16, 2025 am 12:12 AM
Python更適合初學者,學習曲線平緩,語法簡潔;JavaScript適合前端開發,學習曲線較陡,語法靈活。 1.Python語法直觀,適用於數據科學和後端開發。 2.JavaScript靈活,廣泛用於前端和服務器端編程。
 PHP和Python:深入了解他們的歷史
Apr 18, 2025 am 12:25 AM
PHP起源於1994年,由RasmusLerdorf開發,最初用於跟踪網站訪問者,逐漸演變為服務器端腳本語言,廣泛應用於網頁開發。 Python由GuidovanRossum於1980年代末開發,1991年首次發布,強調代碼可讀性和簡潔性,適用於科學計算、數據分析等領域。
 vs code 可以在 Windows 8 中運行嗎
Apr 15, 2025 pm 07:24 PM
VS Code可以在Windows 8上運行,但體驗可能不佳。首先確保系統已更新到最新補丁,然後下載與系統架構匹配的VS Code安裝包,按照提示安裝。安裝後,注意某些擴展程序可能與Windows 8不兼容,需要尋找替代擴展或在虛擬機中使用更新的Windows系統。安裝必要的擴展,檢查是否正常工作。儘管VS Code在Windows 8上可行,但建議升級到更新的Windows系統以獲得更好的開發體驗和安全保障。
 visual studio code 可以用於 python 嗎
Apr 15, 2025 pm 08:18 PM
VS Code 可用於編寫 Python,並提供許多功能,使其成為開發 Python 應用程序的理想工具。它允許用戶:安裝 Python 擴展,以獲得代碼補全、語法高亮和調試等功能。使用調試器逐步跟踪代碼,查找和修復錯誤。集成 Git,進行版本控制。使用代碼格式化工具,保持代碼一致性。使用 Linting 工具,提前發現潛在問題。
 notepad 怎麼運行python
Apr 16, 2025 pm 07:33 PM
在 Notepad 中運行 Python 代碼需要安裝 Python 可執行文件和 NppExec 插件。安裝 Python 並為其添加 PATH 後,在 NppExec 插件中配置命令為“python”、參數為“{CURRENT_DIRECTORY}{FILE_NAME}”,即可在 Notepad 中通過快捷鍵“F6”運行 Python 代碼。
 vscode 擴展是否是惡意的
Apr 15, 2025 pm 07:57 PM
VS Code 擴展存在惡意風險,例如隱藏惡意代碼、利用漏洞、偽裝成合法擴展。識別惡意擴展的方法包括:檢查發布者、閱讀評論、檢查代碼、謹慎安裝。安全措施還包括:安全意識、良好習慣、定期更新和殺毒軟件。


