

Linux系統下如何為Nginx安裝多版本PHP

linux版本:64位元centos 6.4
nginx版本:nginx1.8.0
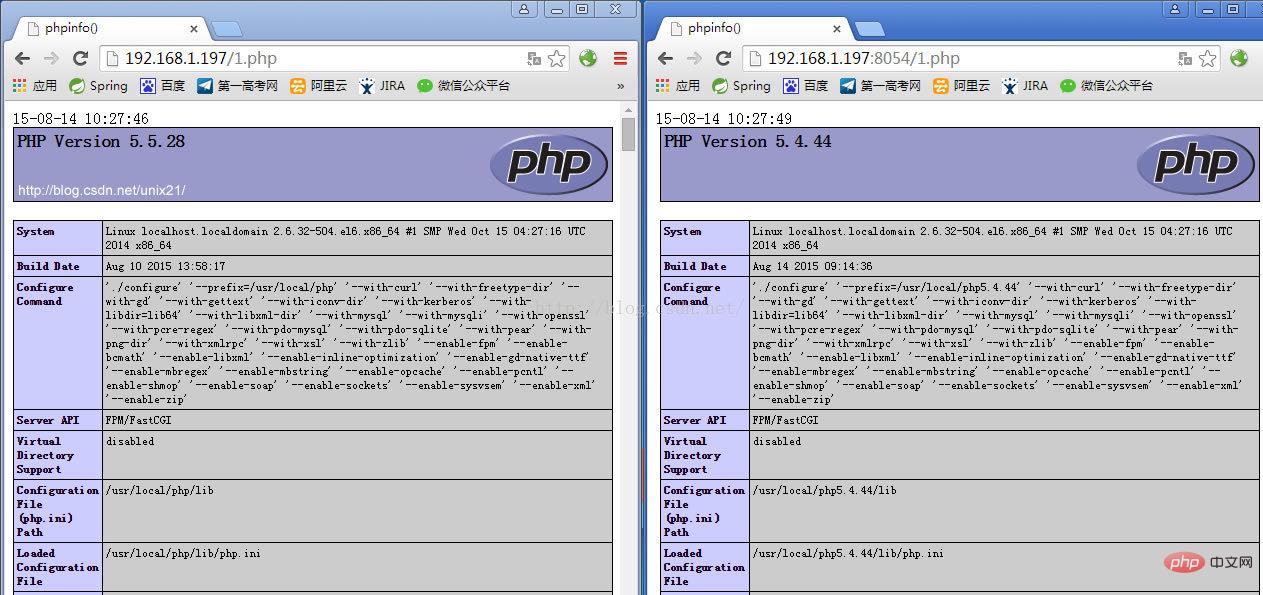
php版本:php5.5.28 & php5.4.44
#注意假如php5.5是主版本已經安裝在/usr/local/php目錄下,那麼再安裝其他版本的php再指定不同安裝目錄即可。
安裝php
# wget http://cn2.php.net/get/php-5.4.44.tar.gz/from/this/mirror
# tar zxvf php-5.4.44.tar.gz
# cd php-5.4.44
#./configure --prefix=/usr/local/php5.4.44 \
--with-curl \
--with-freetype-dir \
--with-gd \
--with-gettext \
--with-iconv-dir \
--with-kerberos \
--with-libdir=lib64 \
--with-libxml-dir \
--with-mysql \
--with-mysqli \
--with-openssl \
--with-pcre-regex \
--with-pdo-mysql \
--with-pdo-sqlite \
--with-pear \
--with-png-dir \
--with-xmlrpc \
--with-xsl \
--with-zlib \
--enable-fpm \
--enable-bcmath \
--enable-libxml \
--enable-inline-optimization \
--enable-gd-native-ttf \
--enable-mbregex \
--enable-mbstring \
--enable-pcntl \
--enable-shmop \
--enable-soap \
--enable-sockets \
--enable-sysvsem \
--enable-xml \
--enable-zip
# make && make install
# cp -r ./sapi/fpm/php-fpm.conf /usr/local/php5.4.44/etc/php-fpm.conf
# cp php.ini-development /usr/local/php5.4.44/lib/php.ini
# cp -r ./sapi/fpm/php-fpm /etc/init.d/php-fpm5.4.44
修改php-fpm.conf的偵聽埠為9001,因為主版本5.5.28是偵聽9000。
; note: this value is mandatory.
listen = 127.0.0.1:9001
啟動php-fpm
# /etc/init.d/php-fpm5.4.44
php安裝成功查看進程
#ps aux|grep php

這樣就已經起好php-fpm了。
設定nginx
增加一段新的連接埠8054的設定並指向到9001以及指定目錄即可:
server {
    listen    8054;
    server_name localhost;


    location / {
      #root  html;
root /usr/www5.4.44;
      index index.html index.htm;
    }


    error_page  500 502 503 504 /50x.html;
    location = /50x.html {
      root  html;
    }


location ~ \.php$ {
root html;
fastcgi_pass 127.0.0.1:9001;
fastcgi_index index.php;
include fastcgi_params;
fastcgi_param script_filename /usr/www5.4.44$fastcgi_script_name;
}

}nginx的設定檔nginx .conf在
# cd /usr/local/nginx/conf
完整的nginx配置如下:
#user nobody;
worker_processes 4;

#error_log logs/error.log;
#error_log logs/error.log notice;
#error_log logs/error.log info;

#pid    logs/nginx.pid;


events {
  worker_connections 1024;
}


http {
  include    mime.types;
  default_type application/octet-stream;

  #log_format main '$remote_addr - $remote_user [$time_local] "$request" '
  #         '$status $body_bytes_sent "$http_referer" '
  #         '"$http_user_agent" "$http_x_forwarded_for"';

  #access_log logs/access.log main;

  sendfile    on;
  #tcp_nopush   on;

  #keepalive_timeout 0;
  keepalive_timeout 65;

  #gzip on;

  server {
    listen    80;
    server_name localhost;

    #charset koi8-r;

    #access_log logs/host.access.log main;

    location / {
      #root  html;
			root /usr/www;
      index index.html index.htm;
    }

    #error_page 404       /404.html;

    # redirect server error pages to the static page /50x.html
    #
    error_page  500 502 503 504 /50x.html;
    location = /50x.html {
      root  html;
    }

    # proxy the php scripts to apache listening on 127.0.0.1:80
    #
    #location ~ \.php$ {
    #  proxy_pass  http://127.0.0.1;
    #}

    # pass the php scripts to fastcgi server listening on 127.0.0.1:9000
    #
    #location ~ \.php$ {
    #  root      html;
    #  fastcgi_pass  127.0.0.1:9000;
    #  fastcgi_index index.php;
    #  fastcgi_param script_filename /scripts$fastcgi_script_name;
    #  include    fastcgi_params;
    #}

		location ~ \.php$ {
		root html;
		fastcgi_pass 127.0.0.1:9000;
		fastcgi_index index.php;
		include fastcgi_params;
		fastcgi_param script_filename /usr/www$fastcgi_script_name;
		}

    # deny access to .htaccess files, if apache's document root
    # concurs with nginx's one
    #
    #location ~ /\.ht {
    #  deny all;
    #}
  }

	server {
    listen    8054;
    server_name localhost;

    location / {
      #root  html;
			root /usr/www5.4.44;
      index index.html index.htm;
    }

    error_page  500 502 503 504 /50x.html;
    location = /50x.html {
      root  html;
    }

		location ~ \.php$ {
		root html;
		fastcgi_pass 127.0.0.1:9001;
		fastcgi_index index.php;
		include fastcgi_params;
		fastcgi_param script_filename /usr/www5.4.44$fastcgi_script_name;
		}

  }


  # another virtual host using mix of ip-, name-, and port-based configuration
  #
  #server {
  #  listen    8000;
  #  listen    somename:8080;
  #  server_name somename alias another.alias;

  #  location / {
  #    root  html;
  #    index index.html index.htm;
  #  }
  #}


  # https server
  #
  #server {
  #  listen    443 ssl;
  #  server_name localhost;

  #  ssl_certificate   cert.pem;
  #  ssl_certificate_key cert.key;

  #  ssl_session_cache  shared:ssl:1m;
  #  ssl_session_timeout 5m;

  #  ssl_ciphers high:!anull:!md5;
  #  ssl_prefer_server_ciphers on;

  #  location / {
  #    root  html;
  #    index index.html index.htm;
  #  }
  #}

}重啟nginx
# /usr/local/nginx/sbin/nginx -s reload
注意需要防火牆增加新連接埠的開啟,不然無法存取:
防火牆設定
注意如果你希望在本機例如xp存取虛擬機器的網頁,如果是centos6需要修改防火牆啟動80埠
# cd /etc/sysconfig
修改iptables文件,或直接用vim編輯
# vim /etc/sysconfig/iptables
新增下面一行,開啟防火牆80埠:
-a input -m state --state new -m tcp -p tcp --dport 8054 -j accept
重啟防火牆
# /etc/init.d/iptables restart
測試是否成功,檢視phpinfo( )
以上是Linux系統下如何為Nginx安裝多版本PHP的詳細內容。更多資訊請關注PHP中文網其他相關文章!

熱AI工具

Undresser.AI Undress
人工智慧驅動的應用程序,用於創建逼真的裸體照片

AI Clothes Remover
用於從照片中去除衣服的線上人工智慧工具。

Undress AI Tool
免費脫衣圖片

Clothoff.io
AI脫衣器

AI Hentai Generator
免費產生 AI 無盡。

熱門文章
熱工具

記事本++7.3.1
好用且免費的程式碼編輯器

SublimeText3漢化版
中文版,非常好用

禪工作室 13.0.1
強大的PHP整合開發環境

Dreamweaver CS6
視覺化網頁開發工具

SublimeText3 Mac版
神級程式碼編輯軟體(SublimeText3)
熱門話題


 docker怎麼創建鏡像
Apr 15, 2025 am 11:27 AM
docker怎麼創建鏡像
Apr 15, 2025 am 11:27 AM
創建 Docker 鏡像步驟:編寫包含構建指令的 Dockerfile。在終端中構建鏡像,使用 docker build 命令。標記鏡像,使用 docker tag 命令分配名稱和標籤。
 docker容器名稱怎麼查
Apr 15, 2025 pm 12:21 PM
docker容器名稱怎麼查
Apr 15, 2025 pm 12:21 PM
可以通過以下步驟查詢 Docker 容器名稱:列出所有容器(docker ps)。篩選容器列表(使用 grep 命令)。獲取容器名稱(位於 "NAMES" 列中)。
 docker desktop怎麼用
Apr 15, 2025 am 11:45 AM
docker desktop怎麼用
Apr 15, 2025 am 11:45 AM
如何使用 Docker Desktop? Docker Desktop 是一款工具,用於在本地機器上運行 Docker 容器。其使用步驟包括:1. 安裝 Docker Desktop;2. 啟動 Docker Desktop;3. 創建 Docker 鏡像(使用 Dockerfile);4. 構建 Docker 鏡像(使用 docker build);5. 運行 Docker 容器(使用 docker run)。
 docker怎麼啟動容器
Apr 15, 2025 pm 12:27 PM
docker怎麼啟動容器
Apr 15, 2025 pm 12:27 PM
Docker 容器啟動步驟:拉取容器鏡像:運行 "docker pull [鏡像名稱]"。創建容器:使用 "docker create [選項] [鏡像名稱] [命令和參數]"。啟動容器:執行 "docker start [容器名稱或 ID]"。檢查容器狀態:通過 "docker ps" 驗證容器是否正在運行。
 PHP和網絡:探索其長期影響
Apr 16, 2025 am 12:17 AM
PHP和網絡:探索其長期影響
Apr 16, 2025 am 12:17 AM
PHP在過去幾十年中塑造了網絡,並將繼續在Web開發中扮演重要角色。 1)PHP起源於1994年,因其易用性和與MySQL的無縫集成成為開發者首選。 2)其核心功能包括生成動態內容和與數據庫的集成,使得網站能夠實時更新和個性化展示。 3)PHP的廣泛應用和生態系統推動了其長期影響,但也面臨版本更新和安全性挑戰。 4)近年來的性能改進,如PHP7的發布,使其能與現代語言競爭。 5)未來,PHP需應對容器化、微服務等新挑戰,但其靈活性和活躍社區使其具備適應能力。
 docker怎麼創建容器
Apr 15, 2025 pm 12:18 PM
docker怎麼創建容器
Apr 15, 2025 pm 12:18 PM
在 Docker 中創建容器: 1. 拉取鏡像: docker pull [鏡像名] 2. 創建容器: docker run [選項] [鏡像名] [命令] 3. 啟動容器: docker start [容器名]
 vscode需要什麼電腦配置
Apr 15, 2025 pm 09:48 PM
vscode需要什麼電腦配置
Apr 15, 2025 pm 09:48 PM
VS Code 系統要求:操作系統:Windows 10 及以上、macOS 10.12 及以上、Linux 發行版處理器:最低 1.6 GHz,推薦 2.0 GHz 及以上內存:最低 512 MB,推薦 4 GB 及以上存儲空間:最低 250 MB,推薦 1 GB 及以上其他要求:穩定網絡連接,Xorg/Wayland(Linux)
 docker鏡像失敗怎麼辦
Apr 15, 2025 am 11:21 AM
docker鏡像失敗怎麼辦
Apr 15, 2025 am 11:21 AM
Docker鏡像構建失敗的故障排除步驟:檢查Dockerfile語法和依賴項版本。檢查構建上下文中是否包含所需源代碼和依賴項。查看構建日誌以獲取錯誤詳細信息。使用--target選項構建分層階段以識別失敗點。確保使用最新版本的Docker引擎。使用--t [image-name]:debug模式構建鏡像以調試問題。檢查磁盤空間並確保足夠。禁用SELinux以防止干擾構建過程。向社區平台尋求幫助,提供Dockerfile和構建日誌描述以獲得更具體的建議。
