

vue3 table元件怎麼使用

基礎表格
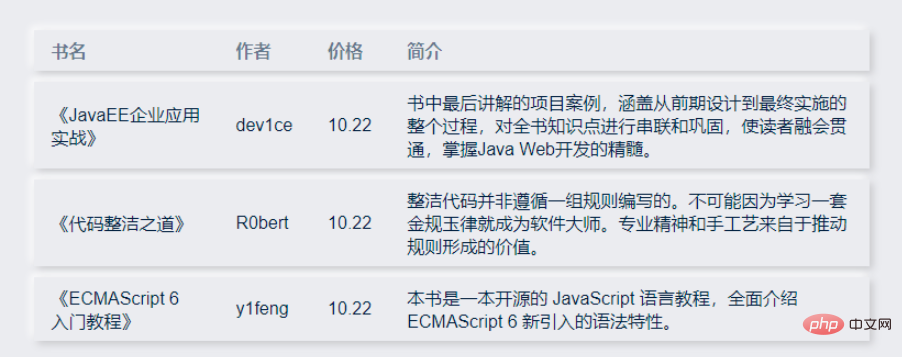
先開發table元件之前,先想好要用什麼樣式的api,因為筆者在生產工作中用的都是element,所以前面幾個元件風格和element類似,但是這次不打算用element的風格了,打算換一種,直接展示:
我們期望用戶這樣使用:
<script setup>
const dataList = [
{
id: 1,
name: '《JavaEE企业应用实战》',
author: 'dev1ce',
price: '10.22',
desc: '书中最后讲解的项目案例,涵盖从前期设计到最终实施的整个过程,对全书知识点进行串联和巩固,使读者融会贯通,掌握Java Web开发的精髓。'
},
{
id: 2,
name: '《代码整洁之道》',
author: 'R0bert',
price: '10.22',
desc: '整洁代码并非遵循一组规则编写的。不可能因为学习一套金规玉律就成为软件大师。专业精神和手工艺来自于推动规则形成的价值。'
},
{
id: 3,
name: '《ECMAScript 6 入门教程》',
author: 'y1feng',
price: '10.22',
desc: '本书是一本开源的 JavaScript 语言教程,全面介绍 ECMAScript 6 新引入的语法特性。'
},
]
const columnsList = [
{
title: '书名',
key: 'name'
},
{
title: '作者',
key: 'author'
},
{
title: '价格',
key: 'price'
},
{
title: '简介',
key: 'desc'
}
]
</script>
<template>
<sanorin-table :columns="columnsList" :data="dataList"/>
</template>依照這個寫出以下程式碼
<script setup>
import { ref, computed } from 'vue'
import { useProp, useNeumorphism } from '../mixin/neumorphism'
const props = defineProps({
...useProp,
...{
data: { // dataList
type: Array,
default: () => [],
},
columns: { // columnsList
type: Array,
default: () => [],
},
}
})
const { baseStyleObject } = useNeumorphism(props)
let styleObject = computed(() => ({
// '--font-size': `${props.size-26}px`, '--line-height': `${props.size-20}px`, '--limit-size': `${props.size-28}px`
}))
</script>
<template>
<div :>
<table >
<thead>
<tr class="neumorphism">
<!-- 表头循环 -->
<th v-for="col in columns" :key="col.key">{{col.title}}</th>
</tr>
</thead>
<tbody>
<!-- 表体循环 -->
<tr class="neumorphism" v-for="row in data" :key="row.id">
<td v-for="col in columns" :key="col.key">
<span>
{{row[col.key]}}
</span>
</td>
</tr>
</tbody>
</table>
</div>
</template>
<script>
export default {
name: 'sanorin-table',
}
</script>
<style scoped>
@import "../../style/index.css";
@import "../../style/neumorphism.css";
table {
width: 100%;
/* border-collapse: collapse; */
empty-cells: show;
border-collapse:separate;
border-spacing:0px 10px;
}
table td,
table th {
color: var(--text-color);
padding: 8px 16px 8px 16px;
text-align: left;
}
table th {
color: var(--text-back-color) !important;
font-weight: 600;
white-space: nowrap;
}
table tr{
margin-top: 20px;
}
</style>最後出來的效果就是:
然後實現了這個後我們開始做後面的,先從固定表頭開始。
固定表頭
這裡先採用第一種,以後不能滿足需求了再改成後面的方法。
效果與程式碼如下:
<script setup>
import { ref, computed } from 'vue'
import { useProp, useNeumorphism } from '../mixin/neumorphism'
const props = defineProps({
...useProp,
...{
data: { // dataList
type: Array,
default: () => [],
},
columns: { // columnsList
type: Array,
default: () => [],
},
}
})
const { baseStyleObject } = useNeumorphism(props)
let styleObject = computed(() => ({
}))
</script>
<template>
<div class="san-table scrollbar" :>
<table>
<thead>
<tr class="neumorphism">
<!-- 表头循环 -->
<th v-for="col in columns" :key="col.key">{{col.title}}</th>
</tr>
</thead>
<tbody>
<!-- 表体循环 -->
<tr class="neumorphism" v-for="row in data" :key="row.id">
<td v-for="col in columns" :key="col.key">
<span>
{{row[col.key]}}
</span>
</td>
</tr>
</tbody>
</table>
</div>
</template>
<script>
export default {
name: 'sanorin-table',
}
</script>
<style scoped>
@import "../../style/index.css";
@import "../../style/neumorphism.css";
.san-table{
padding: 0px 20px 20px 20px;
height: 200px;
position: relative;
width: 700px;
overflow: auto;
}
table {
width: 100%;
table-layout: fixed;
empty-cells: show;
border-collapse:separate;
border-spacing:0px 10px;
}
thead {
position: sticky;
top: 10px;
}
thead:before{
position: absolute;
content: '';
width: calc(100% + var(--shadow-blur) * 2);
transform: translate(calc(var(--shadow-blur) * -1) , -10px);
height: 20px;
background-color: var(--main-color);
z-index: -1;
}
table td,
table th {
color: var(--text-color);
padding: 8px 16px 8px 16px;
text-align: left;
}
table th {
color: var(--text-back-color) !important;
font-weight: 600;
white-space: nowrap;
}
</style>高度/流體高度
可以為 Table 設定一個高度。 (height)
當資料量動態變化時,可以為 Table 設定一個最大高度。 (maxHeight) 透過設定max-height屬性為 Table 指定最大高度。此時若表格所需的高度大於最大高度,則會顯示一個捲軸。
只要在sanorin-table元素中定義了height或maxHeight屬性,即可實現固定表頭的表格,而不需要額外的程式碼。
程式碼如下:
<script setup>
import { ref, computed, reactive } from 'vue'
import { useProp, useNeumorphism } from '../mixin/neumorphism'
const props = defineProps({
...useProp,
...{
data: { // dataList
type: Array,
default: () => [],
},
columns: { // columnsList
type: Array,
default: () => [],
},
height: {
type: Number,
},
maxHeight: {
type: Number,
}
}
})
// 高度设置
let tableHeightStyleObj = computed(() => {
let styleObj = ((e) => {
if (e.maxHeight) return { maxHeight: e.maxHeight + 'px' }
if (e.height) return { height: e.height + 'px' }
return {}
})({...props})
return styleObj
})
const { baseStyleObject } = useNeumorphism(props)
let styleObject = computed(() => ({
...tableHeightStyleObj.value
}))
</script>
<template>
<div class="san-table scrollbar" :>
<table>
<colgroup>
<col v-for="(col, index) in columns" :key="index">
</colgroup>
<thead>
<tr class="neumorphism">
<th v-for="col in columns" :key="col.key"> {{col.title}} </th>
</tr>
</thead>
<tbody>
<tr class="neumorphism" v-for="row in data" :key="row.id">
<td v-for="col in columns" :key="col.key"> {{row[col.key]}} </td>
</tr>
</tbody>
</table>
</div>
</template>
<script>
export default {
name: 'sanorin-table',
}
</script>
<style scoped>
@import "../../style/index.css";
@import "../../style/neumorphism.css";
.san-table{
padding: 0px 20px 20px 20px;
position: relative;
width: 700px;
overflow: auto;
}
table {
width: 100%;
table-layout: fixed;
empty-cells: show;
border-collapse:separate;
border-spacing:0px 10px;
}
thead {
position: sticky;
top: 10px;
}
thead:before{
position: absolute;
content: '';
width: calc(100% + var(--shadow-blur) * 2);
transform: translate(calc(var(--shadow-blur) * -1) , -10px);
height: 20px;
background-color: var(--main-color);
z-index: -1;
}
table td,
table th {
color: var(--text-color);
padding: 8px 16px 8px 16px;
text-align: left;
}
table th {
color: var(--text-back-color) !important;
font-weight: 600;
white-space: nowrap;
}
</style>自訂列寬
接下來加入寬度控制,希望在columns 傳入的陣列物件內加入寬度,範例如下:
const columnsList = [
  {
    title: '书名',
    key: 'name',
    width: 100,
  },
  {
    title: '作者',
    key: 'author',
    width: 100,
  },
  {
    title: '价格',
    key: 'price',
    width: 100,
  },
  {
    title: '简介',
    key: 'desc',
    minWidth: 350,
  }
]希望達到以下效果
1、含有width的列,寬度固定,不隨瀏覽器寬度變化而變化
2、含有minWidth的列,在大於設定值時,自動填充table 剩餘寬度,小於設定值時,固定該寬度
3、不包含width和minWidth的列,自動填充table 剩餘寬度
根據我們的需求,我們需要單獨控制每一列的寬度展示,並在瀏覽器寬度變化時即時的重新計算並且重新渲染列。
先定義出一個方法,用來計算每一列在目前情況下所要的寬度,再綁定要dom上。然後,每次表格變化/瀏覽器寬度變化時候就能即時回應改變Table的寬度了。
  const initColumns = () => {
    // 计算每一列在当前情况下所要的宽度
  }
  watch(() => props.columns, () => { initColumns() });
  onMounted(() => {
    nextTick(() => {
      initColumns();
      on(window, 'resize', throttle(() => initColumns(), 400));
    });
  });
onBeforeUnmount(() => off(window, 'resize', () => initColumns()));全部程式碼:
<script setup>
import { ref, computed, watch, onMounted, onBeforeUnmount, nextTick } from 'vue'
import { on, off } from '../../utils/listener'
import { throttle } from "../../utils/debounce&throttle"
import { useProp, useNeumorphism } from '../mixin/neumorphism'
const table = ref() // 与html中ref=""对应,定位dom元素
const props = defineProps({
...useProp,
...{
data: { // dataList
type: Array,
default: () => [],
},
columns: { // columnsList
type: Array,
default: () => [],
},
height: { // height
type: Number,
},
maxHeight: { // 流体高度
type: Number,
},
minUnsetWidth: { // 未设置宽度时最小宽度
type: Number,
default: 80
}
}
})
// 高度设置
let tableHeightStyleObj = computed(() => {
let styleObj = ((e) => {
if (e.maxHeight) return { maxHeight: e.maxHeight + 'px' }
if (e.height) return { height: e.height + 'px' }
return {}
})({...props})
return styleObj
})
// 列宽设置
let col = ref([])
const { columns, minUnsetWidth } = props
const _min_column_width = minUnsetWidth // 未设置宽度时最小宽度
const initColumns = () => {
col.value = (() => {
let _total_width = table.value.offsetWidth // 表格dom元素总宽度
let _needed_minWidth = columns.reduce((t, v) => { // 需要的最小宽度
t += v.width || v.minWidth || _min_column_width
return t
}, 0)
// 需要的最小宽度比总宽度大,则取minWidth即可
if (_needed_minWidth >= _total_width) return columns.reduce((t, v) => {
let n = v.width || v.minWidth || _min_column_width
t = [...t, n]
return t
}, [])
// 需要的最小宽度比总宽度大,则要把minWidth加权,权重为(未分配的宽度 / minWidth之和)
let _unassigned_width = columns.reduce((t, v) => {
t += v.minWidth || 0
return t
}, 0)
let _assigned_width = _needed_minWidth - _unassigned_width
let _width_power = (_total_width - _assigned_width) / _unassigned_width
return columns.reduce((t, v) => {
let n = v.width || (v.minWidth ? (_width_power * v.minWidth).toFixed(2) : _min_column_width)
t = [...t, n]
return t
}, [])
})()
}
watch(() => props.columns, () => { initColumns() })
const throttleInitColumns = () => throttle(() => initColumns(), 400)
onMounted(() => {
nextTick(() => {
initColumns()
on(window, 'resize', throttleInitColumns)
})
})
onBeforeUnmount(() => off(window, 'resize', throttleInitColumns))
const { baseStyleObject } = useNeumorphism(props)
let styleObject = computed(() => ({
...tableHeightStyleObj.value
}))
</script>
<template>
<div class="san-table scrollbar" :>
<table ref="table">
<colgroup>
<col v-for="(item, index) in col" :key="index" :width="`${item}px`">
</colgroup>
<thead>
<tr class="neumorphism">
<th v-for="col in columns" :key="col.key"> {{col.title}} </th>
</tr>
</thead>
<tbody>
<tr class="neumorphism" v-for="row in data" :key="row.id">
<td v-for="col in columns" :key="col.key"> {{row[col.key]}} </td>
</tr>
</tbody>
</table>
</div>
</template>
<script>
export default {
name: 'sanorin-table',
}
</script>
<style scoped>
@import "../../style/index.css";
@import "../../style/neumorphism.css";
.san-table{
padding: 0px 20px 20px 20px;
position: relative;
overflow: auto;
}
table {
width: 100%;
table-layout: fixed;
empty-cells: show;
border-collapse:separate;
border-spacing:0px 10px;
}
thead {
position: sticky;
top: 10px;
}
thead:before{
position: absolute;
content: '';
width: calc(100% + var(--shadow-blur) * 2);
transform: translate(calc(var(--shadow-blur) * -1) , -10px);
height: 20px;
background-color: var(--main-color);
z-index: -1;
}
table td,
table th {
color: var(--text-color);
padding: 8px 16px 8px 16px;
text-align: left;
word-break:break-all;
}
table th {
color: var(--text-back-color) !important;
font-weight: 600;
white-space: nowrap;
}
</style>其中用到的兩個js,防抖節流和註冊監聽這裡也放下吧
/* 防抖节流函数 */
let timeout = null // 创建一个标记用来存放定时器的返回值
let count = 0;
export function debounce(fn, wait = 1000, immediate = false) {
  return function () {
    const args = arguments;
    if (immediate) {
      if (count == 0) {
        fn.apply(this, arguments)
        count++;
      } else {
        if (timeout) {
          clearTimeout(timeout) // 每当用户输入的时候把前一个 setTimeout clear 掉
        }
        timeout = setTimeout(() => {
          fn.apply(this, arguments)
        }, wait)
      }
    } else {
      if (timeout) {
        clearTimeout(timeout) // 每当用户输入的时候把前一个 setTimeout clear 掉
      }
      timeout = setTimeout(() => {
        fn.apply(this, arguments)
      }, wait)
    }
  }()
}
let canRun = true;
let count1 = 0;
export function throttle(fn, wait = 1000, immediate = true) {
  return function () {
    if (immediate) {
      if (count1 == 0) {
        fn.apply(this, arguments);
        count1++;
      } else {
        if (canRun) {
          canRun = false
          setTimeout(function () {
            fn.apply(this, arguments)
            canRun = true
          }, wait);
        }
      }
    } else {
      if (!canRun) return
      canRun = false
      setTimeout(function () {
        fn.apply(this, arguments)
        canRun = true
      }, wait);
    }
  }()
}/**
* 绑定事件 on(element, event, handler)
*/
export const on = (element, event, handler) => {
if (document.addEventListener) {
if (element && event && handler) {
element.addEventListener(event, handler, false)
}
}
}
/**
* 解绑事件 off(element, event, handler)
*/
export const off = (element, event, handler) => {
if (document.removeEventListener) {
if (element && event) {
element.removeEventListener(event, handler, false)
}
}
}以上是vue3 table元件怎麼使用的詳細內容。更多資訊請關注PHP中文網其他相關文章!

熱AI工具

Undresser.AI Undress
人工智慧驅動的應用程序,用於創建逼真的裸體照片

AI Clothes Remover
用於從照片中去除衣服的線上人工智慧工具。

Undress AI Tool
免費脫衣圖片

Clothoff.io
AI脫衣器

Video Face Swap
使用我們完全免費的人工智慧換臉工具,輕鬆在任何影片中換臉!

熱門文章
熱工具

記事本++7.3.1
好用且免費的程式碼編輯器

SublimeText3漢化版
中文版,非常好用

禪工作室 13.0.1
強大的PHP整合開發環境

Dreamweaver CS6
視覺化網頁開發工具

SublimeText3 Mac版
神級程式碼編輯軟體(SublimeText3)


 vue3專案中怎麼使用tinymce
May 19, 2023 pm 08:40 PM
vue3專案中怎麼使用tinymce
May 19, 2023 pm 08:40 PM
tinymce是一個功能齊全的富文本編輯器插件,但在vue中引入tinymce並不像別的Vue富文本插件一樣那麼順利,tinymce本身並不適配Vue,還需要引入@tinymce/tinymce-vue,並且它是國外的富文本插件,沒有透過中文版本,需要在其官網下載翻譯包(可能需要翻牆)。 1.安裝相關依賴npminstalltinymce-Snpminstall@tinymce/tinymce-vue-S2、下載中文包3.引入皮膚和漢化包在項目public資料夾下新建tinymce資料夾,將下載的
 vue3+vite:src使用require動態匯入圖片報錯怎麼解決
May 21, 2023 pm 03:16 PM
vue3+vite:src使用require動態匯入圖片報錯怎麼解決
May 21, 2023 pm 03:16 PM
vue3+vite:src使用require動態導入圖片報錯和解決方法vue3+vite動態的導入多張圖片vue3如果使用的是typescript開發,就會出現require引入圖片報錯,requireisnotdefined不能像使用vue2這樣imgUrl:require(' …/assets/test.png')導入,是因為typescript不支援require所以用import導入,下面介紹如何解決:使用awaitimport
 Vue3如何實作刷新頁面局部內容
May 26, 2023 pm 05:31 PM
Vue3如何實作刷新頁面局部內容
May 26, 2023 pm 05:31 PM
想要實現頁面的局部刷新,我們只需要實現局部元件(dom)的重新渲染。在Vue中,想要實現這效果最簡單的方式方法就是使用v-if指令。在Vue2中我們除了使用v-if指令讓局部dom的重新渲染,也可以新建一個空白元件,需要刷新局部頁面時跳轉至這個空白元件頁面,然後在空白元件內的beforeRouteEnter守衛中又跳轉回原來的頁面。如下圖所示,如何在Vue3.X中實現點擊刷新按鈕實現紅框範圍內的dom重新加載,並展示對應的加載狀態。由於Vue3.X中scriptsetup語法中組件內守衛只有o
 Vue3怎麼解析markdown並實現程式碼高亮顯示
May 20, 2023 pm 04:16 PM
Vue3怎麼解析markdown並實現程式碼高亮顯示
May 20, 2023 pm 04:16 PM
Vue實作部落格前端,需要實作markdown的解析,如果有程式碼則需要實作程式碼的高亮。 Vue的markdown解析函式庫很多,如markdown-it、vue-markdown-loader、marked、vue-markdown等。這些庫都大同小異。這裡選用的是marked,程式碼高亮的函式庫選用的是highlight.js。具體實現步驟如下:一、安裝依賴庫在vue專案下開啟命令窗口,並輸入以下命令npminstallmarked-save//marked用於將markdown轉換成htmlnpmins
 怎麼使用vue3+ts+axios+pinia實現無感刷新
May 25, 2023 pm 03:37 PM
怎麼使用vue3+ts+axios+pinia實現無感刷新
May 25, 2023 pm 03:37 PM
vue3+ts+axios+pinia實作無感刷新1.先在專案中下載aiXos和pinianpmipinia--savenpminstallaxios--save2.封裝axios請求-----下載js-cookienpmiJS-cookie-s//引入aixosimporttype{AxiosRequestConfigig ,AxiosResponse}from"axios";importaxiosfrom'axios';import{ElMess
 Vue3復用元件怎麼使用
May 20, 2023 pm 07:25 PM
Vue3復用元件怎麼使用
May 20, 2023 pm 07:25 PM
前言無論是vue還是react,當我們遇到多處重複程式碼的時候,我們都會想著如何重複使用這些程式碼,而不是一個檔案裡充斥著一堆冗餘程式碼。實際上,vue和react都可以透過抽組件的方式來達到復用,但如果遇到一些很小的程式碼片段,你又不想抽到另外一個檔案的情況下,相比而言,react可以在相同文件裡面宣告對應的小元件,或透過renderfunction來實現,如:constDemo:FC=({msg})=>{returndemomsgis{msg}}constApp:FC=()=>{return(
 Vue3中怎麼實現選取頭像並裁剪
May 29, 2023 am 10:22 AM
Vue3中怎麼實現選取頭像並裁剪
May 29, 2023 am 10:22 AM
最終效果安裝VueCropper組件yarnaddvue-cropper@next上面的安裝值針對Vue3的,如果時Vue2或想使用其他的方式引用,請訪問它的npm官方地址:官方教程。在元件中引用使用時也很簡單,只需要引入對應的元件和它的樣式文件,我這裡沒有在全域引用,只在我的元件檔案中引入import{userInfoByRequest}from'../js/api' import{VueCropper}from'vue-cropper&
 vue3項目打包發佈到伺服器後訪問頁面顯示空白怎麼解決
May 17, 2023 am 08:19 AM
vue3項目打包發佈到伺服器後訪問頁面顯示空白怎麼解決
May 17, 2023 am 08:19 AM
vue3專案打包發佈到伺服器後存取頁面顯示空白1、處理vue.config.js檔案中的publicPath處理如下:const{defineConfig}=require('@vue/cli-service')module.exports=defineConfig({publicPath :process.env.NODE_ENV==='production'?'./':'/&
