

怎麼使用SpringBoot+SpringSecurity+JWT實現系統認證與授權

1. Spring Security簡介
Spring Security是Spring的一個核心項目,它是一個功能強大且高度可自訂的認證和存取控制框架。它提供了認證和授權功能以及抵禦常見的攻擊,它已經成為保護基於spring的應用程式的事實標準。
Spring Boot提供了自動配置,引入starter依賴即可使用。
Spring Security特性摘要:
使用簡單,提供Spring Boot starter依賴,極易與Spring Boot專案整合。
專業,提供CSRF防護、點擊劫持防護、XSS防護等,並提供各種安全頭整合(X-XSS-Protection,X-Frame-Options等)。
密碼加密存儲,支援多種加密演算法
#可擴展性和可自訂性極強
##OAuth3 JWT認證支援2. JWT簡介
… …
##JWT(Json web token ),是為了在網路應用環境間傳遞聲明而執行的一種基於JSON的開放標準(RFC 7519).該token被設計為緊湊且安全的,特別適用於分佈式站點的單點登錄(SSO)場景。 JWT的聲明一般被用來在身分提供者和服務提供者間傳遞被認證的使用者身分訊息,以便於從資源伺服器取得資源,也可以增加一些額外的其它業務邏輯所必須的聲明資訊(例如,權限資訊).一旦用戶被授予token,用戶即可透過該token存取伺服器上的資源。
3. Spring Boot整合Spring Security
在Spring Boot專案的pom.xml檔案中加入下面的依賴:注意這篇文章示範使用JDK和Spring Boot的版本如下:Spring Boot:2.7.2JDK: 11
不同的Spring Boot版本配置不同,但是原理相同。
<!-- Spring Security的Spring boot starter,引入后将自动启动Spring Security的自动配置 -->
<dependency>
    <groupId>org.springframework.boot</groupId>
    <artifactId>spring-boot-starter-security</artifactId>
</dependency>
<!-- 下面的依赖包含了OAuth3 JWT认证实现 -->
<dependency>
    <groupId>org.springframework.boot</groupId>
    <artifactId>spring-boot-starter-oauth3-resource-server</artifactId>
</dependency>
注意:
主要是設定HttpSecurity Bean產生SecurityFilterBean,設定如下:
import com.nimbusds.jose.jwk.JWK;
import com.nimbusds.jose.jwk.JWKSet;
import com.nimbusds.jose.jwk.RSAKey;
import com.nimbusds.jose.jwk.source.ImmutableJWKSet;
import com.nimbusds.jose.jwk.source.JWKSource;
import com.nimbusds.jose.proc.SecurityContext;
import org.springframework.beans.factory.annotation.Value;
import org.springframework.context.annotation.Bean;
import org.springframework.context.annotation.Configuration;
import org.springframework.security.config.annotation.method.configuration.EnableMethodSecurity;
import org.springframework.security.config.annotation.web.builders.HttpSecurity;
import org.springframework.security.config.http.SessionCreationPolicy;
import org.springframework.security.oauth3.jwt.JwtDecoder;
import org.springframework.security.oauth3.jwt.JwtEncoder;
import org.springframework.security.oauth3.jwt.NimbusJwtDecoder;
import org.springframework.security.oauth3.jwt.NimbusJwtEncoder;
import org.springframework.security.oauth3.server.resource.authentication.JwtAuthenticationConverter;
import org.springframework.security.oauth3.server.resource.authentication.JwtGrantedAuthoritiesConverter;
import org.springframework.security.oauth3.server.resource.web.BearerTokenAuthenticationEntryPoint;
import org.springframework.security.oauth3.server.resource.web.access.BearerTokenAccessDeniedHandler;
import org.springframework.security.web.SecurityFilterChain;

import java.security.interfaces.RSAPrivateKey;
import java.security.interfaces.RSAPublicKey;

/**
 * Spring Security 配置
 *
 * @author cloudgyb
 * @since 2022/7/30 18:31
 */
@Configuration(proxyBeanMethods = false)
@EnableMethodSecurity
public class WebSecurityConfigurer {
    //使用RSA对JWT做签名,所以这里需要一对秘钥。
    //秘钥文件的路径在application.yml文件中做了配置(具体配置在下面)。
    @Value("${jwt.public.key}")
    private RSAPublicKey key;
    @Value("${jwt.private.key}")
    private RSAPrivateKey priv;

     /**
      * 构建SecurityFilterChain bean
      */
    @Bean
    SecurityFilterChain defaultSecurityFilterChain(HttpSecurity http) throws Exception {
        //"/login"是系统的登录接口,所以需要匿名可访问
        http.authorizeRequests().antMatchers("/login").anonymous();
        //其他请求都需认证后才能访问
        http.authorizeRequests().anyRequest().authenticated()
                .and()

                //采用JWT认证无需session保持,所以禁用掉session管理器
                .sessionManagement().sessionCreationPolicy(SessionCreationPolicy.STATELESS).and()
                //login接口可能来自其他站点,所以对login不做csrf防护
                .csrf((csrf) -> csrf.ignoringAntMatchers("/login"))
                //配置认证方式为JWT,并且配置了一个JWT认证装换器,用于去掉解析权限时的SCOOP_前缀
                .oauth3ResourceServer().jwt().jwtAuthenticationConverter(
                        JwtAuthenticationConverter()
                );
        //配置认证失败或者无权限时的处理器
        http.exceptionHandling((exceptions) -> exceptions
                .authenticationEntryPoint(new BearerTokenAuthenticationEntryPoint())
                .accessDeniedHandler(new BearerTokenAccessDeniedHandler())
        );
         //根据配置生成SecurityFilterChain对象
        return http.build();
    }


    /**
     * JWT解码器,用于认证时的JWT解码
     */
    @Bean
    JwtDecoder jwtDecoder() {
        return NimbusJwtDecoder.withPublicKey(this.key).build();
    }
    /**
     * JWT编码器,生成JWT
     */
    @Bean
    JwtEncoder jwtEncoder() {
        JWK jwk = new RSAKey.Builder(this.key).privateKey(this.priv).build();
        JWKSource<SecurityContext> jwks = new ImmutableJWKSet<>(new JWKSet(jwk));
        return new NimbusJwtEncoder(jwks);
    }

    /**
     * JWT认证解码时,去掉Spring Security对权限附带的默认前缀SCOOP_
     */
    @Bean
    JwtAuthenticationConverter JwtAuthenticationConverter() {
        final JwtGrantedAuthoritiesConverter jwtGrantedAuthoritiesConverter = new JwtGrantedAuthoritiesConverter();
        jwtGrantedAuthoritiesConverter.setAuthorityPrefix("");
        final JwtAuthenticationConverter jwtAuthenticationConverter = new JwtAuthenticationConverter();
        jwtAuthenticationConverter.setJwtGrantedAuthoritiesConverter(jwtGrantedAuthoritiesConverter);
        return jwtAuthenticationConverter;
    }
}上邊的設定需要在Spring Boot專案的Resource目錄下產生一對RSA秘鑰。application.yml
jwt:
  private.key: classpath:app.key
  public.key: classpath:app.pub
登入後複製
可以使用下面的網站進行產生:http://tools.jb51.net/password/rsa_encode/,
注意: 金鑰格式使用 PKCS#8,私鑰密碼為空。
還有一點要說明,我在程式碼中使用了Spring Boot的值注入:
@Value("${jwt.public.key}")
 private RSAPublicKey key;
@Value("${jwt.private.key}")
private RSAPrivateKey priv;其實是Spring Security幫我們做了處理,在Spring Security中幫我們實作了一個轉換器ResourceKeyConverterAdapter,可以閱讀相關原始碼來更深入的了解。
至此我們的專案已經支援JWT認證了。
但是使用者需要在請求頭Authorization中攜帶合法的JWT才能通過認證,進而存取伺服器資源,那麼如何給使用者頒發一個合法的JWT呢?很簡單,可以提供一個登入接口,讓使用者輸入使用者名稱和密碼,匹配成功後頒發令牌即可。
其實並不是必須這樣做,還有其他方式,例如我們調用第三方接口,我們經常的做法是先去第三方申請,申請通過後我們就可以得到一個令牌。這個過程和上面的登入通過後頒發一個令牌是一樣的,都是透過合法的途徑獲得一個令牌!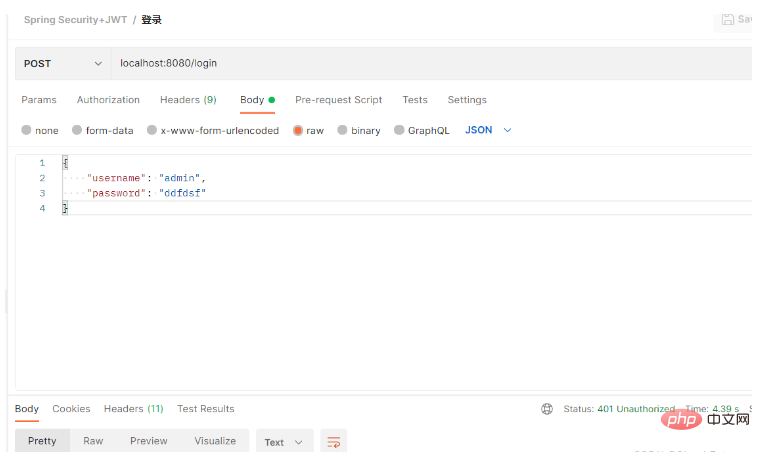 登入介面只有一個目的,就是要頒發給合法使用者令牌!
@RestController
public class SysLoginController {
    private final SysLoginService sysLoginService;

    public SysLoginController(SysLoginService sysLoginService) {
        this.sysLoginService = sysLoginService;
    }

    @PostMapping("/login")
    public String login(@RequestBody LoginInfo loginInfo) {
        return sysLoginService.login(loginInfo);
    }
}@Service
public class SysLoginService {
private final JwtEncoder jwtEncoder;
private final SpringSecurityUserDetailsService springSecurityUserDetailsService;
public SysLoginService(JwtEncoder jwtEncoder, SpringSecurityUserDetailsService springSecurityUserDetailsService) {
this.jwtEncoder = jwtEncoder;
this.springSecurityUserDetailsService = springSecurityUserDetailsService;
}
public String login(LoginInfo loginInfo) {
//从用户信息存储库中获取用户信息
final UserDetails userDetails = springSecurityUserDetailsService.loadUserByUsername(loginInfo.getUsername());
final String password = userDetails.getPassword();
//匹配密码,匹配成功生成JWT令牌
if (password.equals(loginInfo.getPassword())) {
return generateToken(userDetails);
}
//密码不匹配,抛出异常,Spring Security发现抛出该异常后会将http响应状态码设置为401 unauthorized
throw new BadCredentialsException("密码错误!");
}
private String generateToken(UserDetails userDetails) {
Instant now = Instant.now();
//JWT过期时间为36000秒,也就是600分钟,10小时
long expiry = 36000L;
String scope = userDetails.getAuthorities().stream()
.map(GrantedAuthority::getAuthority)
.collect(Collectors.joining(" "));
//将用户权限信息使用空格分割拼为字符串,放到JWT的payload的scope字段中,注意不要改变scope这个属性,这是Spring Security OAuth3 JWT默认处理方式,在JWT解码时需要读取该字段,转为用户的权限信息!
JwtClaimsSet claims = JwtClaimsSet.builder()
.issuer("self")
.issuedAt(now)
.expiresAt(now.plusSeconds(expiry))
.subject(userDetails.getUsername())
.claim("scope", scope)
.build();
return this.jwtEncoder.encode(JwtEncoderParameters.from(claims)).getTokenValue();
}
} 其他非核心程式碼這裡就不貼出來了,我將程式碼放到github上了,具體可以轉到https ://github.com/cloudgyb/spring-security-study-jwt。
 6. 測試
使用postman測試一下:
使用錯誤的密碼,會回傳401 Unauthorized的狀態碼,表示我們認證失敗!
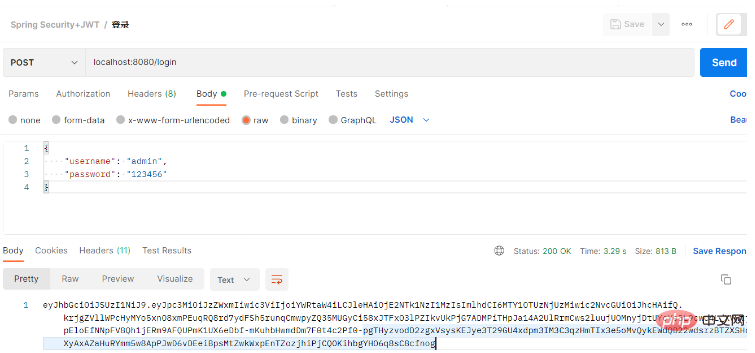
使用正確的使用者名稱和密碼: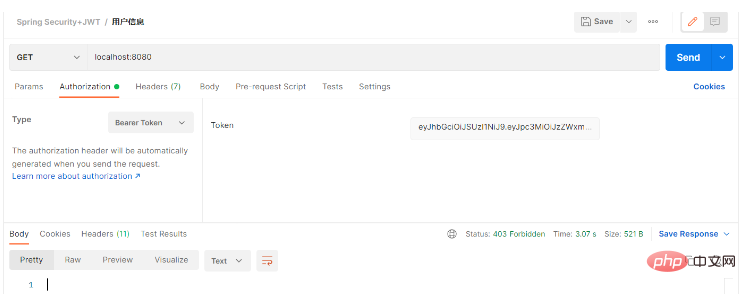
@RestController
public class HelloController {

    @GetMapping("/")
    @PreAuthorize("hasAuthority('test')")
    public String hello(Authentication authentication) {
        return "Hello, " + authentication.getName() + "!";
    }
}我们发送请求得到了403 Forbidden的响应,意思就是我们没有访问权限,此时我们将接口权限改为“app”:
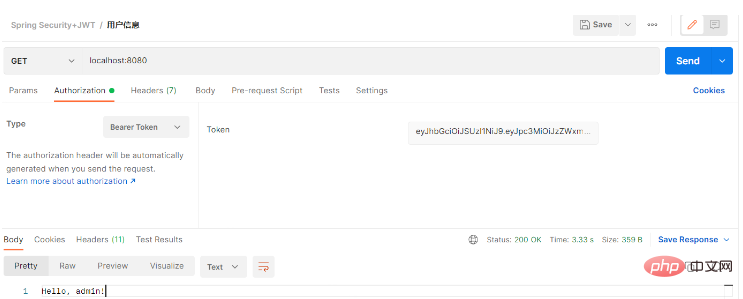
@RestController
public class HelloController {

    @GetMapping("/")
    @PreAuthorize("hasAuthority('app')")
    public String hello(Authentication authentication) {
        return "Hello, " + authentication.getName() + "!";
    }
}重启项目。再次发起请求:
以上是怎麼使用SpringBoot+SpringSecurity+JWT實現系統認證與授權的詳細內容。更多資訊請關注PHP中文網其他相關文章!

熱AI工具

Undresser.AI Undress
人工智慧驅動的應用程序,用於創建逼真的裸體照片

AI Clothes Remover
用於從照片中去除衣服的線上人工智慧工具。

Undress AI Tool
免費脫衣圖片

Clothoff.io
AI脫衣器

Video Face Swap
使用我們完全免費的人工智慧換臉工具,輕鬆在任何影片中換臉!

熱門文章
熱工具

記事本++7.3.1
好用且免費的程式碼編輯器

SublimeText3漢化版
中文版,非常好用

禪工作室 13.0.1
強大的PHP整合開發環境

Dreamweaver CS6
視覺化網頁開發工具

SublimeText3 Mac版
神級程式碼編輯軟體(SublimeText3)


 Springboot怎麼整合Jasypt實現設定檔加密
Jun 01, 2023 am 08:55 AM
Springboot怎麼整合Jasypt實現設定檔加密
Jun 01, 2023 am 08:55 AM
Jasypt介紹Jasypt是一個java庫,它允許開發員以最少的努力為他/她的專案添加基本的加密功能,並且不需要對加密工作原理有深入的了解用於單向和雙向加密的高安全性、基於標準的加密技術。加密密碼,文本,數字,二進位檔案...適合整合到基於Spring的應用程式中,開放API,用於任何JCE提供者...添加如下依賴:com.github.ulisesbocchiojasypt-spring-boot-starter2. 1.1Jasypt好處保護我們的系統安全,即使程式碼洩露,也可以保證資料來源的
 怎麼在SpringBoot中使用Redis實現分散式鎖
Jun 03, 2023 am 08:16 AM
怎麼在SpringBoot中使用Redis實現分散式鎖
Jun 03, 2023 am 08:16 AM
一、Redis實現分散式鎖原理為什麼需要分散式鎖在聊分散式鎖之前,有必要先解釋一下,為什麼需要分散式鎖。與分散式鎖相對就的是單機鎖,我們在寫多執行緒程式時,避免同時操作一個共享變數產生資料問題,通常會使用一把鎖來互斥以保證共享變數的正確性,其使用範圍是在同一個進程中。如果換做是多個進程,需要同時操作一個共享資源,如何互斥?現在的業務應用通常是微服務架構,這也意味著一個應用會部署多個進程,多個進程如果需要修改MySQL中的同一行記錄,為了避免操作亂序導致髒數據,此時就需要引入分佈式鎖了。想要實現分
 springboot讀取檔案打成jar包後存取不到怎麼解決
Jun 03, 2023 pm 04:38 PM
springboot讀取檔案打成jar包後存取不到怎麼解決
Jun 03, 2023 pm 04:38 PM
springboot讀取文件,打成jar包後訪問不到最新開發出現一種情況,springboot打成jar包後讀取不到文件,原因是打包之後,文件的虛擬路徑是無效的,只能通過流去讀取。文件在resources下publicvoidtest(){Listnames=newArrayList();InputStreamReaderread=null;try{ClassPathResourceresource=newClassPathResource("name.txt");Input
 Springboot+Mybatis-plus不使用SQL語句進行多表新增怎麼實現
Jun 02, 2023 am 11:07 AM
Springboot+Mybatis-plus不使用SQL語句進行多表新增怎麼實現
Jun 02, 2023 am 11:07 AM
在Springboot+Mybatis-plus不使用SQL語句進行多表添加操作我所遇到的問題準備工作在測試環境下模擬思維分解一下:創建出一個帶有參數的BrandDTO對像模擬對後台傳遞參數我所遇到的問題我們都知道,在我們使用Mybatis-plus中進行多表操作是極其困難的,如果你不使用Mybatis-plus-join這一類的工具,你只能去配置對應的Mapper.xml文件,配置又臭又長的ResultMap,然後再寫對應的sql語句,這種方法雖然看上去很麻煩,但具有很高的靈活性,可以讓我們
 SpringBoot怎麼自訂Redis實作快取序列化
Jun 03, 2023 am 11:32 AM
SpringBoot怎麼自訂Redis實作快取序列化
Jun 03, 2023 am 11:32 AM
1.自訂RedisTemplate1.1、RedisAPI預設序列化機制基於API的Redis快取實作是使用RedisTemplate範本進行資料快取操作的,這裡開啟RedisTemplate類,查看該類別的源碼資訊publicclassRedisTemplateextendsRedisAccessorimplementsRedisOperations,BeanClassLoaderAware{//聲明了value的各種序列化方式,初始值為空@NullableprivateRedisSe
 SpringBoot與SpringMVC的比較及差別分析
Dec 29, 2023 am 11:02 AM
SpringBoot與SpringMVC的比較及差別分析
Dec 29, 2023 am 11:02 AM
SpringBoot和SpringMVC都是Java開發中常用的框架,但它們之間有一些明顯的差異。本文將探究這兩個框架的特點和用途,並對它們的差異進行比較。首先,我們來了解一下SpringBoot。 SpringBoot是由Pivotal團隊開發的,它旨在簡化基於Spring框架的應用程式的建立和部署。它提供了一種快速、輕量級的方式來建立獨立的、可執行
 如何在PHP中使用JWT和JWE進行API身份驗證和加密
Jun 17, 2023 pm 02:42 PM
如何在PHP中使用JWT和JWE進行API身份驗證和加密
Jun 17, 2023 pm 02:42 PM
隨著網路的發展,越來越多的網站和應用需要提供API介面來進行資料互動。在這種情況下,API身份驗證和加密成為了非常重要的問題。而JWT和JWE作為一種流行的身份驗證和加密機制,在PHP的應用也越來越廣泛。那麼,本文將介紹如何在PHP中使用JWT和JWE進行API身份驗證和加密。 JWT的基本概念JWT代表JSONWe
 如何使用ThinkPHP6進行JWT認證?
Jun 12, 2023 pm 12:18 PM
如何使用ThinkPHP6進行JWT認證?
Jun 12, 2023 pm 12:18 PM
JWT(JSONWebToken)是一種輕量級的認證和授權機制,它使用JSON物件作為安全令牌,可以在多個系統之間安全地傳輸使用者身分資訊。而ThinkPHP6是一種基於PHP語言的高效、靈活的MVC框架,它提供了許多有用的工具和功能,其中就包括JWT認證機制。在本文中,我們將介紹如何使用ThinkPHP6進行JWT認證,以確保Web應用程式的安全性與可靠
