

怎麼使用vue3搭建後台系統

先使用npm 或yarn建立vue專案
// 使用npm创建一个基于vite构建的vue项目
npm create vite@latest
// 使用yarn创建一个基于vite构建的vue项目
yarn create vite@latest
在建立的構成中選擇
vue
vue-ts
建立完後將專案拖曳到編譯器開啟
一、
  // 此处配置项目服务参数
  server: {
    host: "0.0.0.0", // 项目运行地址,此处代表localhost
    port: 8888, // 项目运行端口
    open: true, //编译之后是否自动打开页面
    hmr: true, // 是否开启热加载
},完成後將專案拖曳到編譯器開啟
一、
設定vite
在vite.config.ts檔案中設定項目的服務數據,設定如下:
  // 配置src的别名@
  resolve: {
    alias: {
      "@": resolve(__dirname, "./src"),
    },
},之後server下方接著設定src的別名@,設定如下
    "baseUrl": "./",                                // 配置路径解析的起点
    "paths": {                                      // 配置src别名
      "@/*": ["src/*"]                              // 当我们输入@/时会被映射成src/
}此外還需在ts的設定檔tsconfig.json中加入以下設定:
npm install vue-router@latest
yarn add vue-router@latest
二、router路由
1、安裝router路由import { createRouter, createWebHistory, RouteRecordRaw} from 'vue-router';
import Layout from '@/components/HelloWorld.vue'
// 定义路由,此处为Array数组,数据类型为RouteRecordRaw
const routes: Array<RouteRecordRaw> = [
{
path: '/home',
name: 'home',
component: Layout
}
]
// 创建路由
const router = createRouter({
history: createWebHistory(),
routes // 将定义的路由传入
})
// 将创建的router路由暴露,使其在其他地方可以被引用
export default router
在src下新建router資料夾,同時建立index.ts並設定如下
import { createApp } from 'vue'
import './style.css'
import App from './App.vue'
// 此处引入定义的路由
import router from '@/router/index'

// createApp(App).mount('#app')
// 此处将链式创建拆解,从中注册路由
const app = createApp(App);
// 注册路由
app.use(router)
app.mount('#app')3、註冊router路由在main.ts中先透過
# import router from '@/router/index'引入路由,然後使用use函數註冊路由,如下:
<template>
  <!-- <div>
    <a href="https://vitejs.dev" rel="external nofollow"  target="_blank">
      <img class="logo lazy"  src="/static/imghw/default1.png"  data-src="/vite.svg"    alt="Vite logo" />
    </a>
    <a href="https://vuejs.org/" rel="external nofollow"  target="_blank">
      <img class="logo vue lazy"  src="/static/imghw/default1.png"  data-src="@/assets/vue.svg"    alt="Vue logo" />
    </a>
  </div> -->
  <!-- 在App的入口程序使用路由,会将我们注册的路由全部引入到App入口,通过路由的路径确定跳转的页面 -->
  <router-view></router-view>
</template>4、使用router路由
#註冊完成之後,在程式入口App.vue中透過
使用路由,如下:
# 选择一个你喜欢的包管理器

// 安装element-plus
npm install element-plus --save

yarn add element-plus

pnpm install element-plus

// 安装element-plus的图标库组件
npm install @element-plus/icons-vue

yarn add @element-plus/icons-vue

pnpm install @element-plus/icons-vue
三、安裝element plus等其他依賴
import { createApp } from "vue";
import "./style.css";
import App from "./App.vue";
// 次数引入定义的路由
import router from "@/router/index";
// 引入element-plus
import ElementPlus from "element-plus";
import "element-plus/dist/index.css";
// 引入element-plus的图标库
import * as ElementPlusIconsVue from "@element-plus/icons-vue";

// createApp(App).mount('#app')
// 此处将链式创建拆解,从中注册路由

const app = createApp(App);
// 注册路由、element-plus等
app.use(router).use(ElementPlus);
// 将所有配置挂载到index.html的id为app的容器上
app.mount("#app");

// 此处参考官网,意为将图标库中的每个图标都注册成组件
for (const [key, component] of Object.entries(ElementPlusIconsVue)) {
  app.component(key, component);
}1、註冊element plus並設定圖示
和router一樣都是在main.ts中註冊,設定如下:
yarn add pinia
# 或者使用 npm
npm install pinia
四、pinia使用 pinia官網
1、安裝pinia
// 从pinia中引入创建实例的函数
import { createPinia } from 'pinia'

// 使用createPinia函数创建一个pinia实例并注册
app.use(createPinia())2、註冊pinia
// 从pinia中引入defineStore函数来定义store
import { defineStore } from "pinia";

// 定义一个store并取名为useStore
// defineStore第一个参数是应用程序中store的唯一标识,也就是在定义其他store时该标识不能相同
// 此处可以类比为java中的实体类,useStore就是类名,state里的属性是成员属性,getters里的函数是getter方法,actions里的函数是setter方法
export const useStore = defineStore("useStore", {
  // 定义state
  // 推荐使用 完整类型推断的箭头函数
  state: () => {
    return {
      // 所有这些属性都将自动推断其类型
      count: 0,
      name: "Eduardo",
      isAdmin: true,
    };
  },

  // 定义getters,里面定义一些对state值的取值操作
  // 指向箭头函数定义的时候所处的对象,而不是其所使用的时候所处的对象,默认指向父级的this
  // 普通函数中的this指向它的调用者,如果没有调用者则默认指向window
  getters: {
    doubleCount: (state) => state.count * 2,
    doubleCountOne(state) {
      return state.count * 2;
    },
    doublePlusOne(): number {
      return this.count * 2 + 1;
    },
  },

  // 定义actions,里面定义一些对state的赋值操作
  actions: {
    setCounter(count:number){
        this.count = count
    }
  }
});

// 1、只有一个参数的时候,参数可以不加小括号,没有参数或2个及以上参数的,必须加上小括号
// 2、返回语句只有一条的时候可以不写{}和return,会自动加上return的,返回多条语句时必须加上{}和return
// 3、箭头函数在返回对象的时候必须在对象外面加上小括号
// 在vue中定义函数时,我们尽量都指明函数返回值类型以及参数的数据类型3、設定pinia
在src下面新建store資料夾並新建index .ts檔,並配置如下:
<template>
  <!-- 测试element-plus -->
  <el-button type="primary">Primary</el-button>

  <!-- 测试element-plus图标 -->
  <div >
    <Edit  />
    <Share  />
    <Delete  />
    <Search  />
  </div>

  <h3 id="方式一-直接通过store-count">方式一、直接通过store.count++</h3>
  <!-- 测试pinia -->
  <h4 id="直接从store取值并测试pinia-nbsp-count-nbsp">直接从store取值并测试pinia:{{ count }}</h4>
  <el-button type="primary" @click="addCount">增加</el-button>

  <h4 id="使用storeToRefs函数解析store后测试pinia-nbsp-count-nbsp">使用storeToRefs函数解析store后测试pinia:{{ count1 }}</h4>
  <el-button type="primary" @click="addCount1">增加</el-button>

    <h3 id="方式二-通过调用store中的函数">方式二、通过调用store中的函数</h3>
   <h4 id="通过store中的函数并测试pinia-nbsp-count-nbsp">通过store中的函数并测试pinia:{{ count1 }}</h4>
  <el-button type="primary" @click="addCount2">增加</el-button>
</template>

<script setup lang="ts">
import { useStore } from "@/store/index";
import { storeToRefs } from "pinia"; // 解析store中的数据,如成员属性、方法

// 创建了一个useStore实例对象
const store = useStore();
// 增加成员属性count的值,方式一、直接通过store.count++

// 拿到成员属性count,但这样取值会失去响应性,也就是不能实时同步,当我们点击增加按钮后,虽然操作已经完成,count也增加了,但展示有延迟
// 这个取值过程可能涉及解析数据,从而导致函数执行完后数据没有变化
const count = store.count;
const addCount = () => {
  store.count++;
};
// 通过pinia中的storeToRefs函数将store中的数据都进行解析
const count1 = storeToRefs(store).count;
const addCount1 = () => {
  store.count++;
};

// 方式二、通过调用store中的函数
const addCount2 = () => {
  store.setCounter(++store.count)
};
</script>

<style scoped>
.read-the-docs {
  color: #888;
}
</style>4、測試pinia
<!DOCTYPE html>
<html lang="en">
  <head>
    <meta charset="UTF-8" />
    <link rel="icon" type="image/svg+xml" href="/vite.svg" rel="external nofollow"  />
    <meta name="viewport" content="width=device-width, initial-scale=1.0" />
    <title>Vite + Vue + TS</title>
  </head>
  <body>
    <!-- 此处为程序的最终入口,会引入App.vue 并将相应的配置挂载到id为app <div id="app"></div> 上 -->
    <div id="app"></div>
    <script type="module" src="/src/main.ts"></script>
  </body>
</html>

<!-- 这里对html、body、挂载容器div做样式的初始化设置,去除原有的设置 -->
<style lang="less">
  html,body,#app {
    padding: 0px;
    margin: 0px;
    height: 100%;
    box-sizing: border-box;
  }
  #app {
    width: 100%;
    max-width: 100%;
  }
</style>五、layout佈局
在設定layout之前,我們還需要對一些標籤做初始化的樣式設置,例如:html、body等,具體如下
在專案的index.html檔案下添加樣式設定
<template>
<el-container class="container">
<!-- layout布局左侧菜单区 -->
<el-aside width="200px" class="aside">
<!-- 菜单项,通过组件的形式引入 -->
<Menu></Menu>
</el-aside>
<!-- layout布局内容区 -->
<el-container>
<!-- 内容区头部 -->
<el-header class="header">
<!-- 头部组件,抽离成组件形式 -->
<Header></Header>
</el-header>
<!-- 内容区的主体,用于数据展示 -->
<el-main class="content">Main</el-main>
</el-container>
</el-container>
</template>
<script setup lang="ts">
// vue3中组件引入后不需要使用conponents注册,可以直接使用
import Header from '@/layout/header/Header.vue'
import Menu from '@/layout/menu/Menu.vue'
</script>
<style scoped lang="less">
.container {
height: 100%;
.aside {
background-color: antiquewhite;
}
.header {
background-color: aquamarine;
}
.content {
background-color: pink
}
}
</style>之後在src下新建layout資料夾並新建index.vue文件,配置如下:
整個el-container為layout佈局的整體,其下又可以按照佈局的不同劃分出不同的區塊,但總結起來可以劃分為:1、側邊選單欄;2 、頭部區;3、內容展示區;4、尾部區,我們根據自己的需求進行選擇組合,這些劃分出來的區塊涉及不同的配置和處理,因此,我們可以將這些大的區塊從layout整體佈局中抽離成元件,讓程式碼有更好的可讀性;此外,每個抽離的元件本身也可能有需要分割的問題。我們透過拆分,可以很好的將一個問題化繁為簡,從而很輕鬆的解決。
<template>
<el-menu
default-active="2"
class="el-menu-vertical-demo"
:unique-opened='uniqueOpenedFlag'
>
<!-- 在为el-menu设置unique-opened属性时必须要确保el-sub-menu、el-menu-item中index的唯一性,如果index不唯一则不生效 -->
<!-- 本组件作为父组件向子组件传递数据menuList,子组件需要定义menuList属性以确保可以接受该数据 -->
<menu-item :menuList="menuList"></menu-item>
</el-menu>
</template>
<script setup lang="ts">
import { ref, reactive } from "vue";
import MenuItem from "@/layout/menu/item/MenuItem.vue";
// 自定义的假的树形菜单数据
// reactive函数用来处理响应式数据,处理的数据一般是复杂类型数据,如对象类型
// ref函数也可以处理响应式数据,不过数据一般是基本数据类型
const isCollapse = ref(false)
const uniqueOpenedFlag = ref(true)
const menuList = reactive([
{
path: "/system",
name: "system",
component: "Layout",
meta: {
title: "系统管理",
icon: "Setting",
roles: ["sys:manage"],
},
children: [
{
path: "/worker",
name: "worker",
component: "Layout",
meta: {
title: "员工管理",
icon: "Setting",
roles: ["sys:manage"],
},
},
{
path: "/happy",
name: "happy",
component: "Layout",
meta: {
title: "菜单管理",
icon: "Setting",
roles: ["sys:manage"],
},
},
],
},
{
path: "/mail",
name: "mail",
component: "Layout",
meta: {
title: "商场管理",
icon: "Setting",
roles: ["sys:manage"],
},
children: [
{
path: "/worker11",
name: "worker11",
component: "Layout",
meta: {
title: "员工管理22",
icon: "Setting",
roles: ["sys:manage"],
},
},
{
path: "/happy22",
name: "happy22",
component: "Layout",
meta: {
title: "菜单管理22",
icon: "Setting",
roles: ["sys:manage"],
},
},
],
},
]);
</script>
<style lang="less" scoped></style>從layout佈局抽離的選單列元件:
<template>
  <template v-for="item in menuList" :key="item.path">
    <!-- 判断该菜单项是否有子菜单 -->
    <el-sub-menu v-if="item.children && item.children.length > 0" :index="item.path" >
      <template #title>
        <el-icon>
          <!-- 通过动态组件展示图标,因为图标数据一般是通过后端查数据库拿到的 -->
          <component :is="item.meta.icon"></component>
        </el-icon>
        <span>{{ item.meta.title }}</span>
      </template>
      <!-- 递归调用,将子菜单传递给组件处理 -->
      <menu-item :menuList="item.children"></menu-item>
    </el-sub-menu>
    <el-menu-item v-else :index="item.path">
      <el-icon>
        <!-- 通过动态组件展示图标 -->
        <component :is="item.meta.icon"></component>
      </el-icon>
      <span>{{ item.meta.title }}</span>
    </el-menu-item>
  </template>
</template>

<script setup lang="ts">
import {
  Document,
  Menu as IconMenu,
  Location,
  Setting,
} from "@element-plus/icons-vue";

// 子组件接受父组件传递的数据
// 本组件为子组件,接受父组件传过来的数据,此处定义menuList属性,接受父组件传递的menuList数据
defineProps(["menuList"]);
</script>

<style lang="less" scoped></style>從選單列抽離的選單項目元件:
<template>
  <div class="logo">
    <img  src="/static/imghw/default1.png"  data-src="Logo"  class="lazy"  : / alt="怎麼使用vue3搭建後台系統" >
    <span class="logo-title">{{ title }}</span>
  </div>
</template>

<script setup lang="ts">
import { ref } from "vue";
import Logo from "@/assets/logo.png";
const title = ref("博客管理系统");
</script>

<style lang="less" scoped>
.logo {
  display: flex; // 弹性布局
  width: 100%;
  height: 60px;
  line-height: 60px;
  background-color: rgb(234, 255, 127);
  text-align: center;
  cursor: pointer; // 鼠标悬浮在元素上时,鼠标从箭头变成小手
  align-items: center;
  img {
    width: 36px;
    height: 36px;
    margin-left: 20px; // 元素的外边距
    margin-right: 12px;
  }
  .logo-title {
    font-weight: 800; // 800为加粗
    color: black;
    font-size: 20px;
    line-height: 60px; // 元素上下居中
    font-family: FangSong; // 字体类型
  }
}
</style>六、選單列logo
#首先,將自己準備的logo圖片放到src下的assets資料夾下,然後在layout的menu的logo資料夾下新建MenuLogo.vue文件,並配置如下: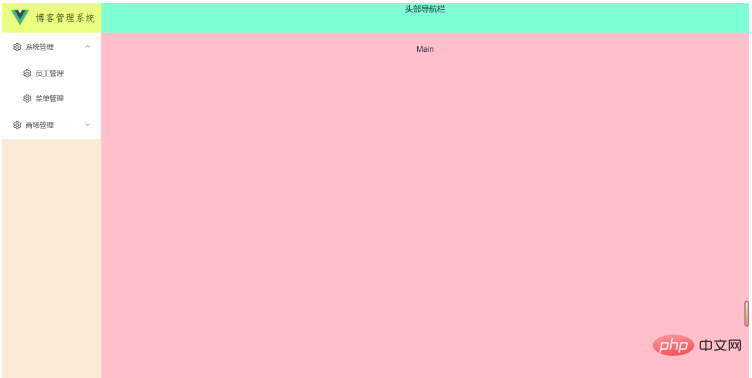
// 在script标签中引入
import MenuLogo from "@/layout/menu/logo/MenuLogo.vue";

// el-menu标签上方引入使用
<menu-logo></menu-logo>
{
    path: "/",
    component: Layout,      // 每个路由都需要通过component指定归属的布局组件
    redirect: "/index",
    name: "Root",
    children: [
      {
        path: "/index",
        name: "Index",
        component: () => import("@/views/index/index.vue"),
        meta: {
          title: "首页看板",
          icon: "icon-home",
          affix: true,
          noKeepAlive: true,
        },
      },
    ],
  },
  {
    path: "/comp",
    component: Layout,
    name: "Comp",
    meta: { title: "系统管理", icon: "icon-code" },
    children: [
      {
        path: "/element",
        name: "ElementComp",
        component: () => import("@/views/element/index.vue"),
        meta: {
          title: "菜单管理",
          icon: "icon-code",
        },
      },
      {
        path: "/iconPark",
        name: "IconPark",
        component: () => import("@/views/icon/index.vue"),
        meta: {
          title: "路由管理",
          icon: "icon-like",
        },
      },
      {
        path: "/chart",
        name: "Chart",
        component: () => import("@/views/echarts/index.vue"),
        meta: {
          title: "员工管理",
          icon: "icon-chart-line",
        },
        children: [
          {
            path: "/line",
            name: "Line",
            component: () => import("@/views/echarts/line.vue"),
            meta: {
              title: "商品管理",
            },
          },
          {
            path: "/bar",
            name: "Bar",
            component: () => import("@/views/echarts/bar.vue"),
            meta: {
              title: "手机管理",
            },
          },
          {
            path: "/otherChart",
            name: "OtherChart",
            component: () => import("@/views/echarts/other.vue"),
            meta: {
              title: "会员管理",
            },
          },
        ],
      },
    ],
  },
  {
    path: "/errorPage",
    name: "ErrorPage",
    component: Layout,
    meta: {
      title: "用户管理",
      icon: "icon-link-cloud-faild",
    },
    children: [
      {
        path: "/404Page",
        name: "404Page",
        component: () => import("@/views/errorPage/404.vue"),
        meta: {
          title: "角色管理",
          icon: "icon-link-cloud-faild",
        },
      },
      {
        path: "/401Page",
        name: "401Page",
        component: () => import("@/views/errorPage/401.vue"),
        meta: {
          title: "权限管理",
          icon: "icon-link-interrupt",
        },
      },
    ],
  },
登入後複製
效果如下:{
path: "/",
component: Layout, // 每个路由都需要通过component指定归属的布局组件
redirect: "/index",
name: "Root",
children: [
{
path: "/index",
name: "Index",
component: () => import("@/views/index/index.vue"),
meta: {
title: "首页看板",
icon: "icon-home",
affix: true,
noKeepAlive: true,
},
},
],
},
{
path: "/comp",
component: Layout,
name: "Comp",
meta: { title: "系统管理", icon: "icon-code" },
children: [
{
path: "/element",
name: "ElementComp",
component: () => import("@/views/element/index.vue"),
meta: {
title: "菜单管理",
icon: "icon-code",
},
},
{
path: "/iconPark",
name: "IconPark",
component: () => import("@/views/icon/index.vue"),
meta: {
title: "路由管理",
icon: "icon-like",
},
},
{
path: "/chart",
name: "Chart",
component: () => import("@/views/echarts/index.vue"),
meta: {
title: "员工管理",
icon: "icon-chart-line",
},
children: [
{
path: "/line",
name: "Line",
component: () => import("@/views/echarts/line.vue"),
meta: {
title: "商品管理",
},
},
{
path: "/bar",
name: "Bar",
component: () => import("@/views/echarts/bar.vue"),
meta: {
title: "手机管理",
},
},
{
path: "/otherChart",
name: "OtherChart",
component: () => import("@/views/echarts/other.vue"),
meta: {
title: "会员管理",
},
},
],
},
],
},
{
path: "/errorPage",
name: "ErrorPage",
component: Layout,
meta: {
title: "用户管理",
icon: "icon-link-cloud-faild",
},
children: [
{
path: "/404Page",
name: "404Page",
component: () => import("@/views/errorPage/404.vue"),
meta: {
title: "角色管理",
icon: "icon-link-cloud-faild",
},
},
{
path: "/401Page",
name: "401Page",
component: () => import("@/views/errorPage/401.vue"),
meta: {
title: "权限管理",
icon: "icon-link-interrupt",
},
},
],
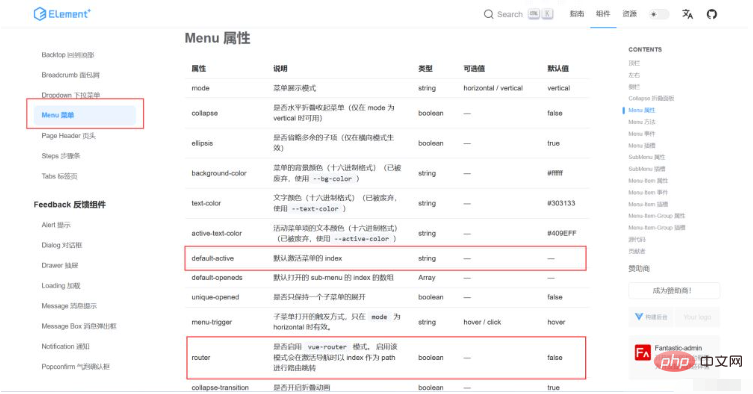
},#七、路由和頁面連動
在src的router的index.ts檔案下方新增以下路由配置並在views資料夾下建立對應的檔案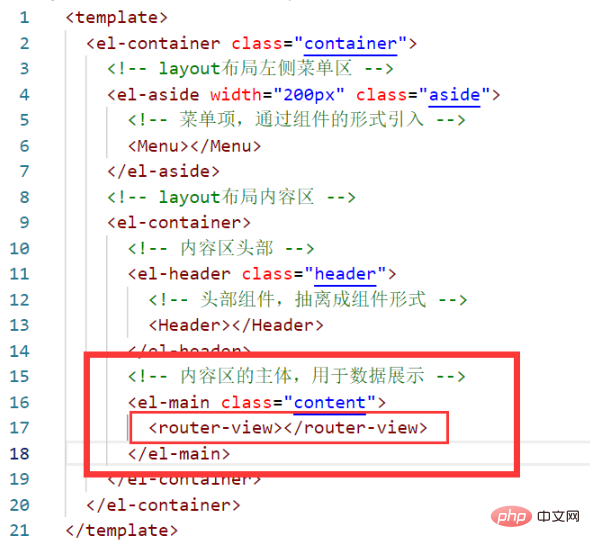
<template>
  <menu-logo></menu-logo>
  <el-menu
    :default-active="activeIndex"
    class="el-menu-vertical-demo"
    :unique-opened="uniqueOpenedFlag"
    router
  >
    <!-- 在为el-menu设置unique-opened属性时必须要确保el-sub-menu、el-menu-item中index的唯一性,如果index不唯一则不生效 ,一般我们为index绑定路由的path值 -->
    <!-- 本组件作为父组件向子组件传递数据menuList,子组件需要定义menuList属性以确保可以接受该数据 -->
    <!-- router属性可以激活以 index 作为 path 进行路由跳转 -->
    <!-- default-active属性用来指明当前被激活的菜单,其值为菜单项中index的值,也就是path值 -->
    <menu-item :menuList="menuList"></menu-item>
  </el-menu>
</template>

import { useRouter, useRoute } from "vue-router";

// 获取当前点击的路由
const route = useRoute();
// 从路由中获取path
const activeIndex = computed(() => {
  const { path } = route;
  return path;
});新增完路由設定之後,建立路由的對應檔案並新增一些描述文字,此時雖然路由和對應的頁面都已經創建完畢並關聯在了一起,但路由並沒有被引用,也就無法在正確的位置展示路由頁面的數據,所以,我們需要將路由引用到layout佈局的main區域,也就是資料展示區,確保當我們存取某個路由時,對應的路由頁面能夠在該區域顯示。
以上是怎麼使用vue3搭建後台系統的詳細內容。更多資訊請關注PHP中文網其他相關文章!

熱AI工具

Undresser.AI Undress
人工智慧驅動的應用程序,用於創建逼真的裸體照片

AI Clothes Remover
用於從照片中去除衣服的線上人工智慧工具。

Undress AI Tool
免費脫衣圖片

Clothoff.io
AI脫衣器

AI Hentai Generator
免費產生 AI 無盡。

熱門文章
熱工具

記事本++7.3.1
好用且免費的程式碼編輯器

SublimeText3漢化版
中文版,非常好用

禪工作室 13.0.1
強大的PHP整合開發環境

Dreamweaver CS6
視覺化網頁開發工具

SublimeText3 Mac版
神級程式碼編輯軟體(SublimeText3)
熱門話題


 vue3+vite:src使用require動態匯入圖片報錯怎麼解決
May 21, 2023 pm 03:16 PM
vue3+vite:src使用require動態匯入圖片報錯怎麼解決
May 21, 2023 pm 03:16 PM
vue3+vite:src使用require動態導入圖片報錯和解決方法vue3+vite動態的導入多張圖片vue3如果使用的是typescript開發,就會出現require引入圖片報錯,requireisnotdefined不能像使用vue2這樣imgUrl:require(' …/assets/test.png')導入,是因為typescript不支援require所以用import導入,下面介紹如何解決:使用awaitimport
 vue3專案中怎麼使用tinymce
May 19, 2023 pm 08:40 PM
vue3專案中怎麼使用tinymce
May 19, 2023 pm 08:40 PM
tinymce是一個功能齊全的富文本編輯器插件,但在vue中引入tinymce並不像別的Vue富文本插件一樣那麼順利,tinymce本身並不適配Vue,還需要引入@tinymce/tinymce-vue,並且它是國外的富文本插件,沒有透過中文版本,需要在其官網下載翻譯包(可能需要翻牆)。 1.安裝相關依賴npminstalltinymce-Snpminstall@tinymce/tinymce-vue-S2、下載中文包3.引入皮膚和漢化包在項目public資料夾下新建tinymce資料夾,將下載的
 Vue3如何實作刷新頁面局部內容
May 26, 2023 pm 05:31 PM
Vue3如何實作刷新頁面局部內容
May 26, 2023 pm 05:31 PM
想要實現頁面的局部刷新,我們只需要實現局部元件(dom)的重新渲染。在Vue中,想要實現這效果最簡單的方式方法就是使用v-if指令。在Vue2中我們除了使用v-if指令讓局部dom的重新渲染,也可以新建一個空白元件,需要刷新局部頁面時跳轉至這個空白元件頁面,然後在空白元件內的beforeRouteEnter守衛中又跳轉回原來的頁面。如下圖所示,如何在Vue3.X中實現點擊刷新按鈕實現紅框範圍內的dom重新加載,並展示對應的加載狀態。由於Vue3.X中scriptsetup語法中組件內守衛只有o
 Vue3怎麼解析markdown並實現程式碼高亮顯示
May 20, 2023 pm 04:16 PM
Vue3怎麼解析markdown並實現程式碼高亮顯示
May 20, 2023 pm 04:16 PM
Vue實作部落格前端,需要實作markdown的解析,如果有程式碼則需要實作程式碼的高亮。 Vue的markdown解析函式庫很多,如markdown-it、vue-markdown-loader、marked、vue-markdown等。這些庫都大同小異。這裡選用的是marked,程式碼高亮的函式庫選用的是highlight.js。具體實現步驟如下:一、安裝依賴庫在vue專案下開啟命令窗口,並輸入以下命令npminstallmarked-save//marked用於將markdown轉換成htmlnpmins
 vue3項目打包發佈到伺服器後訪問頁面顯示空白怎麼解決
May 17, 2023 am 08:19 AM
vue3項目打包發佈到伺服器後訪問頁面顯示空白怎麼解決
May 17, 2023 am 08:19 AM
vue3專案打包發佈到伺服器後存取頁面顯示空白1、處理vue.config.js檔案中的publicPath處理如下:const{defineConfig}=require('@vue/cli-service')module.exports=defineConfig({publicPath :process.env.NODE_ENV==='production'?'./':'/&
 Vue3中怎麼實現選取頭像並裁剪
May 29, 2023 am 10:22 AM
Vue3中怎麼實現選取頭像並裁剪
May 29, 2023 am 10:22 AM
最終效果安裝VueCropper組件yarnaddvue-cropper@next上面的安裝值針對Vue3的,如果時Vue2或想使用其他的方式引用,請訪問它的npm官方地址:官方教程。在元件中引用使用時也很簡單,只需要引入對應的元件和它的樣式文件,我這裡沒有在全域引用,只在我的元件檔案中引入import{userInfoByRequest}from'../js/api' import{VueCropper}from'vue-cropper&
 怎麼使用vue3+ts+axios+pinia實現無感刷新
May 25, 2023 pm 03:37 PM
怎麼使用vue3+ts+axios+pinia實現無感刷新
May 25, 2023 pm 03:37 PM
vue3+ts+axios+pinia實作無感刷新1.先在專案中下載aiXos和pinianpmipinia--savenpminstallaxios--save2.封裝axios請求-----下載js-cookienpmiJS-cookie-s//引入aixosimporttype{AxiosRequestConfigig ,AxiosResponse}from"axios";importaxiosfrom'axios';import{ElMess
 Vue3復用元件怎麼使用
May 20, 2023 pm 07:25 PM
Vue3復用元件怎麼使用
May 20, 2023 pm 07:25 PM
前言無論是vue還是react,當我們遇到多處重複程式碼的時候,我們都會想著如何重複使用這些程式碼,而不是一個檔案裡充斥著一堆冗餘程式碼。實際上,vue和react都可以透過抽組件的方式來達到復用,但如果遇到一些很小的程式碼片段,你又不想抽到另外一個檔案的情況下,相比而言,react可以在相同文件裡面宣告對應的小元件,或透過renderfunction來實現,如:constDemo:FC=({msg})=>{returndemomsgis{msg}}constApp:FC=()=>{return(
