首頁 運維 Nginx nginx代理模組怎麼使用

nginx代理模組怎麼使用

May 17, 2023 am 10:01 AM
nginx

nginx 代理模組

說明:代理模組的指令有很多我這裡只講解重要的proxy_pass,想了解更多代理指令請參考官方中文文件。
這個模組可以轉送請求到其他的伺服器。 http/1.0無法使用keepalive(後端伺服器將為每個請求建立並且刪除連線)。 nginx為瀏覽器發送http/1.1並為後端伺服器發送http/1.0,這樣瀏覽器就可以為瀏覽器處理keepalive。
如下例:

1

2

3

4

location / {

 proxy_pass    http://localhost:8000;

 proxy_set_header x-real-ip $remote_addr;

}

登入後複製

注意,當使用http proxy模組(甚至fastcgi),所有的連接請求在發送到後端伺服器之前nginx將快取它們,因此,在測量從後端傳送的數據時,它的進度顯示可能不正確。

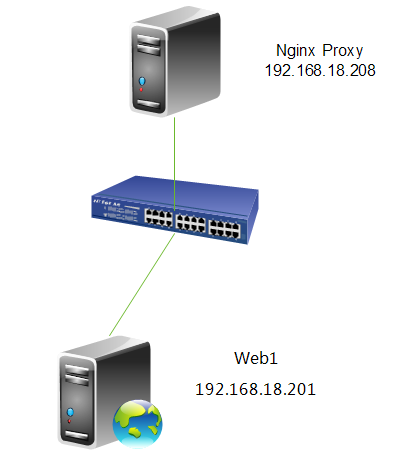
實驗拓樸:​​

nginx代理模組怎麼使用

#7.設定http反向代理

1

2

3

4

5

6

[root@nginx ~]# cd /etc/nginx/

[root@nginx nginx]# cp nginx.conf nginx.conf.bak #备份一个原配置文件

[root@nginx nginx]# vim nginx.conf

location / {

        proxy_pass   http://192.168.18.201;

    }

登入後複製

指令說明:proxy_pass

語法:proxy_pass url

預設值:no      

使用欄位:location, location中的if欄位      

這個指令設定被代理伺服器的位址和被映射的uri,位址可以使用主機名稱或ip加上連接埠號碼的形式,例如:proxy_pass http://localhost:8000/uri/;

8.重新載入一下設定檔

1

2

3

4

[root@nginx ~]# service nginx reload

nginx: the configuration file /etc/nginx/nginx.conf syntax is ok

nginx: configuration file /etc/nginx/nginx.conf test is successful

重新载入 nginx:                      [确定]

登入後複製
登入後複製

9.測試一下

nginx代理模組怎麼使用

註,大家可以看到,當我們造訪192.168.18.208時,被代理重新定向到web1上。

10.查看一下web伺服器日誌

1

2

3

4

5

6

7

8

9

10

11

[root@web1 ~]# tail /var/log/httpd/access_log

192.168.18.208 - - [04/sep/2013:00:14:20 +0800] "get /favicon.ico http/1.0" 404 289 "-" "mozilla/5.0 (windows nt 6.1; wow64) applewebkit/537.36 (khtml, like gecko) chrome/28.0.1500.95 safari/537.36"

192.168.18.208 - - [04/sep/2013:00:14:20 +0800] "get / http/1.0" 200 23 "-" "mozilla/5.0 (windows nt 6.1; wow64) applewebkit/537.36 (khtml, like gecko) chrome/28.0.1500.95 safari/537.36"

192.168.18.208 - - [04/sep/2013:00:14:20 +0800] "get /favicon.ico http/1.0" 404 289 "-" "mozilla/5.0 (windows nt 6.1; wow64) applewebkit/537.36 (khtml, like gecko) chrome/28.0.1500.95 safari/537.36"

192.168.18.138 - - [04/sep/2013:00:14:45 +0800] "get / http/1.1" 200 23 "-" "mozilla/5.0 (windows nt 6.1; wow64) applewebkit/537.36 (khtml, like gecko) chrome/28.0.1500.95 safari/537.36"

192.168.18.138 - - [04/sep/2013:00:14:48 +0800] "get /favicon.ico http/1.1" 404 289 "-" "mozilla/5.0 (windows nt 6.1; wow64) applewebkit/537.36 (khtml, like gecko) chrome/28.0.1500.95 safari/537.36"

192.168.18.208 - - [04/sep/2013:00:14:55 +0800] "get /favicon.ico http/1.0" 404 289 "-" "mozilla/5.0 (windows nt 6.1; wow64) applewebkit/537.36 (khtml, like gecko) chrome/28.0.1500.95 safari/537.36"

192.168.18.208 - - [04/sep/2013:00:15:05 +0800] "get /favicon.ico http/1.0" 404 289 "-" "mozilla/5.0 (windows nt 6.1; wow64) applewebkit/537.36 (khtml, like gecko) chrome/28.0.1500.95 safari/537.36"

192.168.18.208 - - [04/sep/2013:00:15:13 +0800] "get /favicon.ico http/1.0" 404 289 "-" "mozilla/5.0 (windows nt 6.1; wow64) applewebkit/537.36 (khtml, like gecko) chrome/28.0.1500.95 safari/537.36"

192.168.18.208 - - [04/sep/2013:00:15:16 +0800] "get / http/1.0" 200 23 "-" "mozilla/5.0 (windows nt 6.1; wow64) applewebkit/537.36 (khtml, like gecko) chrome/28.0.1500.95 safari/537.36"

192.168.18.208 - - [04/sep/2013:00:15:16 +0800] "get /favicon.ico http/1.0" 404 289 "-" "mozilla/5.0 (windows nt 6.1; wow64) applewebkit/537.36 (khtml, like gecko) chrome/28.0.1500.95 safari/537.36"

登入後複製

註,大家可以看到我們這裡的客戶的ip全是,nginx代理伺服器的ip,並不是真實客戶端的ip 。下面我們修改一下,讓日誌的ip顯示真實的客戶端的ip。

11.修改nginx設定檔

1

2

3

4

location / {

    proxy_pass   http://192.168.18.201;

    proxy_set_header x-real-ip $remote_addr; #加上这一行

}

登入後複製

指令說明:proxy_set_header

語法:proxy_set_header header value

預設值: host and connection

使用欄位:http, server, location

這個指令允許將傳送到被代理伺服器的請求頭重新定義或增加一些欄位。這個值可以是一個文本,變數或它們的組合。 proxy_set_header在指定的欄位中沒有定義時會從它的上級欄位繼承。

12.重新載入一下設定檔

1

2

3

4

[root@nginx ~]# service nginx reload

nginx: the configuration file /etc/nginx/nginx.conf syntax is ok

nginx: configuration file /etc/nginx/nginx.conf test is successful

重新载入 nginx:                      [确定]

登入後複製
登入後複製

13.測試並查看日誌

1

2

3

4

5

6

7

8

9

10

11

[root@web1 ~]# tail /var/log/httpd/access_log

192.168.18.208 - - [03/sep/2013:16:26:18 +0800] "get / http/1.0" 200 23 "-" "mozilla/5.0 (compatible; msie 10.0; windows nt 6.1; wow64; trident/6.0)"

192.168.18.208 - - [03/sep/2013:16:26:18 +0800] "get / http/1.0" 200 23 "-" "mozilla/5.0 (compatible; msie 10.0; windows nt 6.1; wow64; trident/6.0)"

192.168.18.208 - - [03/sep/2013:16:26:18 +0800] "get / http/1.0" 200 23 "-" "mozilla/5.0 (compatible; msie 10.0; windows nt 6.1; wow64; trident/6.0)"

192.168.18.208 - - [03/sep/2013:16:26:18 +0800] "get / http/1.0" 200 23 "-" "mozilla/5.0 (compatible; msie 10.0; windows nt 6.1; wow64; trident/6.0)"

192.168.18.208 - - [03/sep/2013:16:26:18 +0800] "get / http/1.0" 200 23 "-" "mozilla/5.0 (compatible; msie 10.0; windows nt 6.1; wow64; trident/6.0)"

192.168.18.208 - - [03/sep/2013:16:26:18 +0800] "get / http/1.0" 200 23 "-" "mozilla/5.0 (compatible; msie 10.0; windows nt 6.1; wow64; trident/6.0)"

192.168.18.208 - - [03/sep/2013:16:26:18 +0800] "get / http/1.0" 200 23 "-" "mozilla/5.0 (compatible; msie 10.0; windows nt 6.1; wow64; trident/6.0)"

192.168.18.208 - - [03/sep/2013:16:26:18 +0800] "get / http/1.0" 200 23 "-" "mozilla/5.0 (compatible; msie 10.0; windows nt 6.1; wow64; trident/6.0)"

192.168.18.208 - - [03/sep/2013:16:26:18 +0800] "get / http/1.0" 200 23 "-" "mozilla/5.0 (compatible; msie 10.0; windows nt 6.1; wow64; trident/6.0)"

192.168.18.208 - - [03/sep/2013:16:26:18 +0800] "get / http/1.0" 200 23 "-" "mozilla/5.0 (compatible; msie 10.0; windows nt 6.1; wow64; trident/6.0)"

登入後複製

注,大家可以看到日誌記錄的還是代理的ip,沒有顯示真實客戶端的ip,為什麼呢?我們來看看httpd的設定檔。

14.查看並修改httpd設定檔

1

[root@web1 ~]# vim /etc/httpd/conf/httpd.conf

登入後複製

nginx代理模組怎麼使用

#註,大家可以這裡記錄日誌的參數還是%h,下面我們修改一下參數。

nginx代理模組怎麼使用

註,這是修改後的參數,將h%修改為%{x-real-ip}i,好的下面我們再來測試一下。

15.重啟並測試

1

2

3

4

5

6

7

8

9

10

11

12

13

14

[root@web1 ~]# service httpd restart

停止 httpd:                        [确定]

正在启动 httpd:                      [确定]

[root@web1 ~]# tail /var/log/httpd/access_log

192.168.18.138 - - [03/sep/2013:17:09:14 +0800] "get / http/1.0" 200 23 "-" "mozilla/5.0 (compatible; msie 10.0; windows nt 6.1; wow64; trident/6.0)"

192.168.18.138 - - [03/sep/2013:17:09:14 +0800] "get / http/1.0" 200 23 "-" "mozilla/5.0 (compatible; msie 10.0; windows nt 6.1; wow64; trident/6.0)"

192.168.18.138 - - [03/sep/2013:17:09:15 +0800] "get / http/1.0" 200 23 "-" "mozilla/5.0 (compatible; msie 10.0; windows nt 6.1; wow64; trident/6.0)"

192.168.18.138 - - [03/sep/2013:17:09:15 +0800] "get / http/1.0" 200 23 "-" "mozilla/5.0 (compatible; msie 10.0; windows nt 6.1; wow64; trident/6.0)"

192.168.18.138 - - [03/sep/2013:17:09:15 +0800] "get / http/1.0" 200 23 "-" "mozilla/5.0 (compatible; msie 10.0; windows nt 6.1; wow64; trident/6.0)"

192.168.18.138 - - [03/sep/2013:17:09:15 +0800] "get / http/1.0" 200 23 "-" "mozilla/5.0 (compatible; msie 10.0; windows nt 6.1; wow64; trident/6.0)"

192.168.18.138 - - [03/sep/2013:17:09:15 +0800] "get / http/1.0" 200 23 "-" "mozilla/5.0 (compatible; msie 10.0; windows nt 6.1; wow64; trident/6.0)"

192.168.18.138 - - [03/sep/2013:17:09:15 +0800] "get / http/1.0" 200 23 "-" "mozilla/5.0 (compatible; msie 10.0; windows nt 6.1; wow64; trident/6.0)"

192.168.18.138 - - [03/sep/2013:17:09:15 +0800] "get / http/1.0" 200 23 "-" "mozilla/5.0 (compatible; msie 10.0; windows nt 6.1; wow64; trident/6.0)"

192.168.18.138 - - [03/sep/2013:17:09:15 +0800] "get / http/1.0" 200 23 "-" "mozilla/5.0 (compatible; msie 10.0; windows nt 6.1; wow64; trident/6.0)"

登入後複製

註,大家可以看到現在的日誌裡記錄的ip位址就是真實的客戶端位址了。

以上是nginx代理模組怎麼使用的詳細內容。更多資訊請關注PHP中文網其他相關文章!

本網站聲明
本文內容由網友自願投稿,版權歸原作者所有。本站不承擔相應的法律責任。如發現涉嫌抄襲或侵權的內容,請聯絡admin@php.cn

熱AI工具

Undresser.AI Undress

Undresser.AI Undress

人工智慧驅動的應用程序,用於創建逼真的裸體照片

AI Clothes Remover

AI Clothes Remover

用於從照片中去除衣服的線上人工智慧工具。

Undress AI Tool

Undress AI Tool

免費脫衣圖片

Clothoff.io

Clothoff.io

AI脫衣器

Video Face Swap

Video Face Swap

使用我們完全免費的人工智慧換臉工具,輕鬆在任何影片中換臉!

熱門文章

<🎜>:泡泡膠模擬器無窮大 - 如何獲取和使用皇家鑰匙
3 週前 By 尊渡假赌尊渡假赌尊渡假赌
北端:融合系統,解釋
3 週前 By 尊渡假赌尊渡假赌尊渡假赌

熱工具

記事本++7.3.1

記事本++7.3.1

好用且免費的程式碼編輯器

SublimeText3漢化版

SublimeText3漢化版

中文版,非常好用

禪工作室 13.0.1

禪工作室 13.0.1

強大的PHP整合開發環境

Dreamweaver CS6

Dreamweaver CS6

視覺化網頁開發工具

SublimeText3 Mac版

SublimeText3 Mac版

神級程式碼編輯軟體(SublimeText3)

熱門話題

Java教學
1664
14
CakePHP 教程
1423
52
Laravel 教程
1320
25
PHP教程
1269
29
C# 教程
1249
24
nginx在windows中怎麼配置 nginx在windows中怎麼配置 Apr 14, 2025 pm 12:57 PM

如何在 Windows 中配置 Nginx?安裝 Nginx 並創建虛擬主機配置。修改主配置文件並包含虛擬主機配置。啟動或重新加載 Nginx。測試配置並查看網站。選擇性啟用 SSL 並配置 SSL 證書。選擇性設置防火牆允許 80 和 443 端口流量。

docker容器名稱怎麼查 docker容器名稱怎麼查 Apr 15, 2025 pm 12:21 PM

可以通過以下步驟查詢 Docker 容器名稱:列出所有容器(docker ps)。篩選容器列表(使用 grep 命令)。獲取容器名稱(位於 "NAMES" 列中)。

docker怎麼啟動容器 docker怎麼啟動容器 Apr 15, 2025 pm 12:27 PM

Docker 容器啟動步驟:拉取容器鏡像:運行 "docker pull [鏡像名稱]"。創建容器:使用 "docker create [選項] [鏡像名稱] [命令和參數]"。啟動容器:執行 "docker start [容器名稱或 ID]"。檢查容器狀態:通過 "docker ps" 驗證容器是否正在運行。

怎麼查看nginx是否啟動 怎麼查看nginx是否啟動 Apr 14, 2025 pm 01:03 PM

確認 Nginx 是否啟動的方法:1. 使用命令行:systemctl status nginx(Linux/Unix)、netstat -ano | findstr 80(Windows);2. 檢查端口 80 是否開放;3. 查看系統日誌中 Nginx 啟動消息;4. 使用第三方工具,如 Nagios、Zabbix、Icinga。

docker怎麼創建容器 docker怎麼創建容器 Apr 15, 2025 pm 12:18 PM

在 Docker 中創建容器: 1. 拉取鏡像: docker pull [鏡像名] 2. 創建容器: docker run [選項] [鏡像名] [命令] 3. 啟動容器: docker start [容器名]

nginx怎麼查版本 nginx怎麼查版本 Apr 14, 2025 am 11:57 AM

可以查詢 Nginx 版本的方法有:使用 nginx -v 命令;查看 nginx.conf 文件中的 version 指令;打開 Nginx 錯誤頁,查看頁面的標題。

nginx怎麼配置雲服務器域名 nginx怎麼配置雲服務器域名 Apr 14, 2025 pm 12:18 PM

在雲服務器上配置 Nginx 域名的方法:創建 A 記錄,指向雲服務器的公共 IP 地址。在 Nginx 配置文件中添加虛擬主機塊,指定偵聽端口、域名和網站根目錄。重啟 Nginx 以應用更改。訪問域名測試配置。其他注意事項:安裝 SSL 證書啟用 HTTPS、確保防火牆允許 80 端口流量、等待 DNS 解析生效。

nginx服務器掛了怎麼辦 nginx服務器掛了怎麼辦 Apr 14, 2025 am 11:42 AM

當 Nginx 服務器宕機時,可執行以下故障排除步驟:檢查 nginx 進程是否正在運行。查看錯誤日誌以獲取錯誤消息。檢查 nginx 配置語法正確性。確保 nginx 具有訪問文件所需的權限。檢查文件描述符打開限制。確認 nginx 正在偵聽正確的端口。添加防火牆規則以允許nginx流量。檢查反向代理設置,包括後端服務器可用性。如需進一步幫助,請聯繫技術支持。

See all articles