CentOS如何設定Nginx反向代理

一、反向代理及示範環境描述
#1、反向代理
反向代理是一種代理伺服器,透過代表客戶端從一個或多個伺服器檢索資源。將這些資源重新傳送給客戶端,就好像它們從Web伺服器本身傳回一樣。與正向代理相反,正向代理是與其關聯的客戶端聯繫任何伺服器的中介,反向代理是任何用戶端與其關聯的伺服器進行聯繫的中介。
有關正向代理可參考:基於CentOS 7配置Nginx正向代理
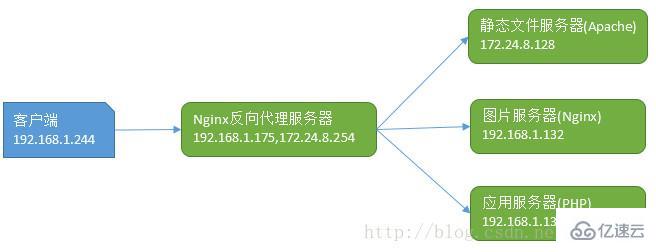
2、本示範中的幾個伺服器

二、常規反向代理程式設定
1、後端伺服器設定(Apache)
後端Apache伺服器主機名稱及IP
# hostname centos7-web.example.com# more /etc/redhat-release CentOS Linux release 7.2.1511 (Core)# ip addr|grep inet|grep global inet 172.24.8.128/24 brd 172.24.8.255 scope global eno16777728# systemctl start httpd.service# echo "This is a httpd test page.">/var/www/html/index.html# curl http://localhost This is a httpd test page.
2、前端Nginx反向代理伺服器設定
前端Nginx伺服器主機名稱及IP
# hostname centos7-router

 # more /etc/redhat-release CentOS Linux release 7.2.1511 (Core)
 # ip addr |grep inet|grep global inet 172.24.8.254/24 brd 172.24.8.255 scope global eno16777728
 inet 192.168.1.175/24 brd 192.168.1.255 scope global dynamic eno33554960
Nginx版本
# nginx -V nginx version: nginx/1.10.2
新增一個新的設定檔用作反向代理
# vim /etc/nginx/conf.d/reverse_proxy.conf server {
   listen 8090;
   server_name localhost;

 location / {
   proxy_pass http://172.24.8.128; ###反向代理核心指令   proxy_buffers 256 4k;
   proxy_max_temp_file_size 0;
   proxy_connect_timeout 30;

   proxy_cache_valid 200 302 10m;
   proxy_cache_valid 301 1h;
   proxy_cache_valid any 1m;
   }
}# systemctl reload nginx# ss -nltp|grep nginx|grep 8090LISTEN 0 128 *:8090 *:* users:(("nginx",pid=78023,fd=8),("nginx",pid=78021,fd=8))# curl http://localhost:8090 ##基于本地测试This is a httpd test page.查看Apache伺服器日誌
# more /var/log/httpd/access_log ##请求IP地址为172.24.8.254,当从其他机器请求时也是172.24.8.254这个IP172.24.8.254 - - [30/Oct/2017:14:02:38 +0800] "GET / HTTP/1.0" 200 27 "-" "curl/7.29.0"
3、反向代理伺服器及後端伺服器日誌格式設定
為Nginx伺服器新增proxy_set_header指令,修改後如下
# grep proxy_set_header -B2 /etc/nginx/conf.d/reverse_proxy.conf location / {
   proxy_pass http://172.24.8.128;
   proxy_set_header X-Real-IP $remote_addr;
}# systemctl reload nginx.service後端伺服器Apache日誌格式設定
# vim /etc/http/conf/httpd.conf# LogFormat "%h %l %u %t \"%r\" %>s %b \"%{Referer}i\" \"%{User-Agent}i\"" combined #注释此行,添加下一行   LogFormat "%{X-Real-IP}i %l %u %t \"%r\" %>s %b \"%{Referer}i\" \"%{User-Agent}i\"" combined #关键描述 {X-Real-IP}i# ip addr|grep inet|grep global    #从1.132主机访问 inet 192.168.1.244/24 brd 192.168.1.255 scope global eth0# curl http://192.168.1.175:8090  #从1.244主机访问 This is a httpd test page#再次查看apache访问日志,如下,不再是代理服务器IP地址,此时显示为1.244 192.168.1.244 - - [30/Oct/2017:15:49:07 +0800] "GET / HTTP/1.0" 200 27 "-" "curl/7.19.7 (x86_64-redhat-linux-gnu)
libcurl/7.19.7 NSS/3.14.0.0 zlib/1.2.3 libidn/1.18 libssh3/1.4.2"三、基於目錄符合反向代理
後端伺服器採用Nginx的設定
# more /etc/redhat-release ##os平台及ip地址 CentOS release 6.7 (Final)# ip addr|grep eth0|grep global inet 192.168.1.132/24 brd 192.168.1.255 scope global eth0# nginx -v ##nginx版本 nginx version: nginx/1.10.2# mkdir -pv /usr/share/nginx/html/images ##创建图片目录 mkdir: created directory `/usr/share/nginx/html/images'

# cp /usr/share/backgrounds/nature/*.jpg /usr/share/nginx/html/images/. ##复制图片文件

# cp /etc/nginx/conf.d/default.conf /etc/nginx/conf.d/default.conf.bk
# vim /etc/nginx/conf.d/default.conf ##此处直接修改缺省配置文件

 server {
 listen 80 default_server;
 listen [::]:80 default_server;
 server_name _;
 root /usr/share/nginx/html;

# Load configuration files for the default server block.
 include /etc/nginx/default.d/*.conf;

 location / {
   }

 location /images {
   alias /usr/share/nginx/html/images; ##此处配置了别名
   }

 error_page 404 /404.html;
 location = /40x.html {
   }

 error_page 500 502 503 504 /50x.html;
 location = /50x.html {
   }
 }

# /etc/init.d/nginx reload
Reloading nginx: [ OK ]前端Nginx設定
# vim /etc/nginx/conf.d/reverse_proxy.conf server { listen 8090; server_name localhost; location / { proxy_pass http://172.24.8.128; proxy_set_header X-Real-IP $remote_addr; } location /images { ##将images目录下的文件代理至192.168.1.132 proxy_pass http://192.168.1.132; proxy_set_header X-Real-IP $remote_addr; } }# systemctl reload nginx#驗證代理程式情況,在ip為192.168.1.244測試對images目錄下的jpg檔案請求
# ip addr|grep inet|grep global inet 192.168.1.244/24 brd 192.168.1.255 scope global eth0# curl -I http://192.168.1.175:8090/images/Garden.jpg HTTP/1.1 200 OK Server: nginx/1.12.2 Date: Tue, 31 Oct 2017 01:48:18 GMT Content-Type: image/jpeg Content-Length: 264831 Connection: keep-alive Last-Modified: Mon, 30 Oct 2017 08:21:28 GMT ETag: "59f6e108-40a7f" Accept-Ranges: bytes
四、基於特定檔案類型的反向代理程式設定
php伺服器端設定(ip 192.168.1.132)
# ss -nltp|grep php LISTEN 0 128 192.168.1.132:9000 *:* users:(("php-fpm",7147,8),("php-fpm",7148,0),("php-fpm",7149,0))# mkdir -pv /data ###存放php代码# echo "/data 192.168.1.0/24(rw)" >/etc/exports# /etc/init.d/rpcbind start# /etc/init.d/nfslock start# /etc/init.d/nfs start # echo "" > /data/index.phpNginx代理端設定(ip 192.168.1.175)
# mkdir /data# mount -t nfs 192.168.1.132:/data /data# ls /data index.php# vim /etc/nginx/conf.d/reverse_proxy.conf server { listen 8090; server_name localhost; location / { proxy_pass http://172.24.8.128; proxy_set_header X-Real-IP $remote_addr; } location /images { proxy_pass http://192.168.1.132; proxy_set_header X-Real-IP $remote_addr; } location ~ \.php$ { root /data; fastcgi_pass 192.168.1.132:9000; fastcgi_index index.php; fastcgi_param SCRIPT_FILENAME /scripts$fastcgi_script_name; include fastcgi_params; } }# systemctl restart nginx測試反向代理至php
[root@ydq05 ~]# ip addr|grep inet|grep global inet 192.168.1.244/24 brd 192.168.1.255 scope global eth0 [root@ydq05 ~]# curl -I http://192.168.1.175:8090/index.php HTTP/1.1 200 OK Server: nginx/1.12.2 Date: Tue, 31 Oct 2017 03:22:59 GMT Content-Type: text/html; charset=UTF-8 Connection: keep-alive X-Powered-By: PHP/5.6.0
五、基於upstream 配置反向代理至tomcat
#Nginx upstream指令也可以將請求代理到後端伺服器如下範例,結合upstream指令示範將其代理到tomcat
# vim /etc/nginx/conf.d/tomcat.confupstream app {
               server localhost:8080;
               keepalive 32;
}

server {
   listen 80;
   server_name localhost;
   location / {
       proxy_set_header Host $host;
       proxy_set_header x-for $remote_addr;
       proxy_set_header x-server $host;
       proxy_set_header x-agent $http_user_agent;
       proxy_pass http://app;
   }
}

[root@node132 conf.d]# ss -nltp|grep javaLISTEN    0  1    ::ffff:127.0.0.1:8005  :::*      users:(("java",39559,45))
LISTEN    0  100                :::8009  :::*      users:(("java",39559,43))
LISTEN    0  100                :::8080  :::*      users:(("java",39559,42))

tomcat版本
[root@node132 conf.d]# /usr/local/tomcat/bin/catalina.sh versionUsing CATALINA_BASE:  /usr/local/tomcat
Using CATALINA_HOME:  /usr/local/tomcat
           ....
Server version: Apache Tomcat/7.0.69
Server built:  Apr 11 2016 07:57:09 UTC
Server number:  7.0.69.0
OS Name:        Linux
OS Version:    2.6.32-573.el6.x86_64
Architecture:  amd64
JVM Version:    1.7.0_79-b15
JVM Vendor:    Oracle Corporation

验证结果# curl http://localhost


......六、proxy模組指令描述
proxy模組的可用設定指令非常多,它們分別用於定義proxy模組工作時的諸多屬性,如連接逾時時長、代理時使用http協定版本等。下面對常用的指令做一個簡單說明。
proxy_read_timeout 在連線中斷之前兩次從接收upstream server接收讀取作業的最大間隔時長;
如下面的範例:
proxy_redirect off;
   proxy_set_header Host $host;
   proxy_set_header X-Real-IP $remote_addr;
   proxy_set_header X-Forwarded-For $proxy_add_x_forwarded_for;
   client_max_body_size 10m;
   client_body_buffer_size 128k;
   proxy_connect_timeout 30;
   proxy_send_timeout 15;
   proxy_read_timeout 15;
以上是CentOS如何設定Nginx反向代理的詳細內容。更多資訊請關注PHP中文網其他相關文章!

熱AI工具

Undresser.AI Undress
人工智慧驅動的應用程序,用於創建逼真的裸體照片

AI Clothes Remover
用於從照片中去除衣服的線上人工智慧工具。

Undress AI Tool
免費脫衣圖片

Clothoff.io
AI脫衣器

AI Hentai Generator
免費產生 AI 無盡。

熱門文章

熱工具

記事本++7.3.1
好用且免費的程式碼編輯器

SublimeText3漢化版
中文版,非常好用

禪工作室 13.0.1
強大的PHP整合開發環境

Dreamweaver CS6
視覺化網頁開發工具

SublimeText3 Mac版
神級程式碼編輯軟體(SublimeText3)

熱門話題
 tomcat伺服器怎麼能讓外網訪問
Apr 21, 2024 am 07:22 AM
要讓 Tomcat 伺服器對外網訪問,需要:修改 Tomcat 設定文件,允許外部連接。新增防火牆規則,允許存取 Tomcat 伺服器連接埠。建立 DNS 記錄,將網域名稱指向 Tomcat 伺服器公有 IP。可選:使用反向代理提升安全性和效能。可選:設定 HTTPS 以提高安全性。
 SCP使用技巧-遞歸排除文件
Apr 22, 2024 am 09:04 AM
人們可以使用scp指令在網路主機之間安全地複製檔案。它使用ssh進行資料傳輸和身份驗證。典型的語法是:scpfile1user@host:/path/to/dest/scp-r/path/to/source/user@host:/path/to/dest/scp排除檔案我不認為你可以在使用scp指令時過濾或排除文件。但是,有一個很好的解決方法來排除檔案並使用ssh安全地複製它。本頁面說明如何在使用scp遞歸複製目錄時過濾或排除檔案。如何使用rsync指令排除檔案語法是:rsyncav-essh-
 html檔案怎麼產生網址
Apr 21, 2024 pm 12:57 PM
若要將 HTML 檔案轉換為網址,需要使用網頁伺服器,包括以下步驟:取得網頁伺服器。設定網路伺服器。上傳 HTML 文件。建立域名。路由請求。
 nodejs專案怎麼部署到伺服器
Apr 21, 2024 am 04:40 AM
Node.js 專案的伺服器部署步驟:準備部署環境:取得伺服器存取權限、安裝 Node.js、設定 Git 儲存庫。建置應用程式:使用 npm run build 產生可部署程式碼和相依性。上傳程式碼到伺服器:透過 Git 或檔案傳輸協定。安裝依賴項:SSH 登入伺服器並使用 npm install 安裝應用程式相依性。啟動應用程式:使用 node index.js 等命令啟動應用程序,或使用 pm2 等進程管理器。設定反向代理(可選):使用 Nginx 或 Apache 等反向代理路由流量到應用程式
 nodejs可以外網存取麼
Apr 21, 2024 am 04:43 AM
是的,Node.js 可以外網存取。您可以使用下列方法:使用 Cloud Functions 部署函數並公開存取。使用 Express 框架建立路由並定義端點。使用 Nginx 反向代理請求到 Node.js 應用程式。使用 Docker 容器運行 Node.js 應用程式並透過連接埠映射公開。
 如何使用 PHP 部署和維護網站
May 03, 2024 am 08:54 AM
要成功部署和維護PHP網站,需要執行以下步驟:選擇Web伺服器(如Apache或Nginx)安裝PHP建立資料庫並連接PHP上傳程式碼到伺服器設定網域名稱和DNS監控網站維護步驟包括更新PHP和Web伺服器、備份網站、監控錯誤日誌和更新內容。
 如何使用 Fail2Ban 保護伺服器免受暴力攻擊
Apr 27, 2024 am 08:34 AM
Linux管理員的一個重要任務是保護伺服器免受非法攻擊或存取。預設情況下,Linux系統附有配置良好的防火牆,例如iptables、UncomplicatedFirewall(UFW),ConfigServerSecurityFirewall(CSF)等,可防止多種攻擊。任何連接到網路的機器都是惡意攻擊的潛在目標。有一個名為Fail2Ban的工具可用來緩解伺服器上的非法存取。什麼是Fail2Ban? Fail2Ban[1]是一款入侵防禦軟體,可保護伺服器免受暴力攻擊。它是用Python程式語
 跟我一起來學習Linux安裝Nginx
Apr 28, 2024 pm 03:10 PM
而今天將來一起帶領大家在Linux環境安裝Nginx,這裡用的Linux系統是CentOS7.2.準備安裝工具1.從Nginx官網下載Nginx。這裡用的版本為:1.13.6.2.將下載下來的Nginx上傳到Linux上,這裡以/opt/nginx目錄為例。運行“tar-zxvfnginx-1.13.6.tar.gz”進行解壓縮。 3.切換到/opt/nginx/nginx-1.13.6目錄下,執行./configure進行初始化設定。如出現下面的提示,說明該機器沒有安裝PCRE,而Nginx需要依


