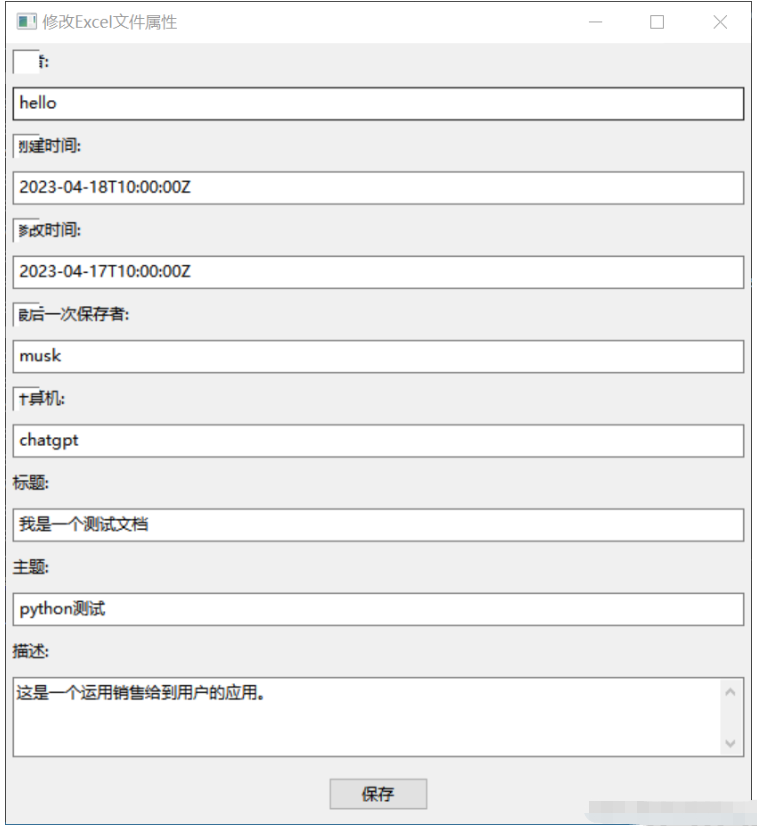
這段程式碼可以用於修改Excel檔案的元數據,例如作者、主題、描述等,透過使用Python和Openpyxl模組,以及wxPython庫,我們可以創建一個GUI介面來輸入元數據,然後將這些元數據與Excel檔案一起保存。
以下是幾個可能的應用程式場景:
使用元資料可以更快地識別和尋找大量 Excel 文件,特別是在需要對它們進行分類和管理的情況下。
資料共享:當你需要與他人分享Excel檔案時,元資料可以提供有用的信息,例如作者、主題和描述。
使用元資料可以讓您更輕鬆地識別和區分多個Excel文件,從而加速資料分析過程。
資料報告:當你需要在報告中引用Excel檔案時,元資料可以提供有用的信息,例如作者、主題和描述。
總之,這段程式碼可以用於任何需要修改Excel檔案的元資料的場景,從資料管理到資料分析再到資料報告,都可以透過這段程式碼實現。

hello
2023-04-18T10:00:00Z
2023-04-17T10:00:00Z
musk
chatgpt
我是一个测试文档
python测试
这是一个运用销售给到用户的应用。
import os
import wx
from openpyxl import load_workbook
# from openpyxl import __version__ as openpyxl_version
# from openpyxl import DocumentProperties

class PropertyEditor(wx.Frame):
    def __init__(self, parent, title):
        super(PropertyEditor, self).__init__(parent, title=title, size=(500, 400))

        # 创建GUI界面
        panel = wx.Panel(self)

        author_label = wx.StaticText(panel, label="作者:")
        self.author_text = wx.TextCtrl(panel)

        created_label = wx.StaticText(panel, label="创建时间:")
        self.created_text = wx.TextCtrl(panel)

        modified_label = wx.StaticText(panel, label="修改时间:")
        self.modified_text = wx.TextCtrl(panel)

        last_saved_by_label = wx.StaticText(panel, label="最后一次保存者:")
        self.last_saved_by_text = wx.TextCtrl(panel)

        computer_label = wx.StaticText(panel, label="计算机:")
        self.computer_text = wx.TextCtrl(panel)

        title_label = wx.StaticText(panel, label="标题:")
        self.title_text = wx.TextCtrl(panel)

        subject_label = wx.StaticText(panel, label="主题:")
        self.subject_text = wx.TextCtrl(panel)

        description_label = wx.StaticText(panel, label="描述:")
        self.description_text = wx.TextCtrl(panel, style=wx.TE_MULTILINE)

        save_button = wx.Button(panel, label="保存")
        save_button.Bind(wx.EVT_BUTTON, self.on_save)

        # 添加到Sizer中
        sizer = wx.BoxSizer(wx.VERTICAL)
        sizer.Add(author_label, flag=wx.ALL, border=5)
        sizer.Add(self.author_text, flag=wx.EXPAND|wx.ALL, border=5)
        sizer.Add(created_label, flag=wx.ALL, border=5)
        sizer.Add(self.created_text, flag=wx.EXPAND|wx.ALL, border=5)
        sizer.Add(modified_label, flag=wx.ALL, border=5)
        sizer.Add(self.modified_text, flag=wx.EXPAND|wx.ALL, border=5)
        sizer.Add(last_saved_by_label, flag=wx.ALL, border=5)
        sizer.Add(self.last_saved_by_text, flag=wx.EXPAND|wx.ALL, border=5)
        sizer.Add(computer_label, flag=wx.ALL, border=5)
        sizer.Add(self.computer_text, flag=wx.EXPAND|wx.ALL, border=5)
        sizer.Add(title_label, flag=wx.ALL, border=5)
        sizer.Add(self.title_text, flag=wx.EXPAND|wx.ALL, border=5)
        sizer.Add(subject_label, flag=wx.ALL, border=5)
        sizer.Add(self.subject_text, flag=wx.EXPAND|wx.ALL, border=5)
        sizer.Add(description_label, flag=wx.ALL, border=5)
        sizer.Add(self.description_text, proportion=1, flag=wx.EXPAND|wx.ALL, border=5)
        sizer.Add(save_button, flag=wx.ALL|wx.CENTER, border=10)

        panel.SetSizer(sizer)

    def on_save(self, event):
        dlg = wx.FileDialog(self, "选择要修改属性的Excel文件", "", "", "*.xlsx", wx.FD_OPEN)
        if dlg.ShowModal() == wx.ID_OK:
            file_path = dlg.GetPath()

            try:
                wb = load_workbook(filename=file_path)

                # 修改属性
                properties = wb.properties
                properties.creator = self.author_text.GetValue()
                properties.created = self.created_text.GetValue()
                properties.modified = self.modified_text.GetValue()
                properties.lastModifiedBy = self.last_saved_by_text.GetValue()
                properties.computer = self.computer_text.GetValue()
                properties.title = self.title_text.GetValue()
                properties.subject = self.subject_text.GetValue()
                properties.description = self.description_text.GetValue()

                wb.save(file_path)
                wx.MessageBox("属性已成功保存!", "提示", wx.OK|wx.ICON_INFORMATION)

            except Exception as e:
                wx.MessageBox("修改属性时出错: {}".format(str(e)), "错误", wx.OK|wx.ICON_ERROR)

        dlg.Destroy()

if __name__ == '__main__':
    app = wx.App()
    frame = PropertyEditor(None, title="修改Excel文件属性")
    frame.Show()
app.MainLoop()借助wxPython模組建構的GUI介面,使用者可以輸入需修改的Excel檔案的屬性。使用者可以輸入作者、建立時間、修改時間、標題、主題和描述,然後按一下「儲存」按鈕以儲存這些屬性,並將它們寫入Excel檔案的相應屬性中。
這段程式碼建立了一個名為PropertyEditor的wxPython窗口,其中包含用於輸入Excel檔案屬性的文字方塊和「儲存」按鈕。當按一下「儲存」按鈕時,它將取得使用者要修改的Excel文件,並將輸入的屬性值儲存到Excel文件的屬性中。然後,它會顯示一個訊息框,提示使用者儲存成功。
請注意,程式假設使用者已知道修改的Excel檔案的路徑。使用wxPython模組的檔案對話框,可以讓使用者瀏覽檔案系統來選擇Excel檔案。
以上是Python怎麼實作修改Excel檔案的元數據的詳細內容。更多資訊請關注PHP中文網其他相關文章!


