

nginx負載平衡執行個體分析

nginx之負載平衡
#註,大家可以看到,由於我們網站是發展初期,nginx只代理了後端一台伺服器,但由於我們網站名聲大漲訪問的人越來越多一台伺服器實在是頂不住,於是我們加了多台伺服器,那麼多台伺服器又怎麼配置代理呢,我們這裡以兩台伺服器為案例,為大家做演示。
1.upstream 負載平衡模組說明
案例:
下面設定負載平衡的伺服器清單。
upstream test.net{
ip_hash;
server 192.168.10.13:80;
server 192.168.10.14:80 down;
server 192.168.10.15:8009 max_fails=3 fail_timeout=20s;
server 192.168.10.16:8080;
}
server {
 location / {
  proxy_pass http://test.net;
 }
}upstream是nginx的http upstream模組,這個模組透過一個簡單的調度演算法來實現客戶端ip到後端伺服器的負載平衡。在上面的設定中,透過upstream指令指定了一個負載平衡器的名稱test.net。這個名稱可以任意指定,後面需要用到的地方直接呼叫即可。
2.upstream 支援的負載平衡演算法
nginx的負載平衡模組目前支援4種調度演算法,以下進行分別介紹,其中後兩項屬於第三方調度演算法。
輪詢(預設)。每個請求依時間順序逐一分配到不同的後端伺服器,如果後端某台伺服器宕機,故障系統會自動剔除,使用戶存取不受影響。 weight 指定輪詢權值,weight值越大,分配到的存取機率越高,主要用於後端每個伺服器效能不均的情況。
ip_hash。每個請求按訪問ip的hash結果分配,這樣來自同一個ip的訪客固定訪問一個後端伺服器,有效解決了動態網頁存在的session共享問題。
fair。這是比上面兩個更聰明的負載平衡演算法。此種演算法可以依據頁面大小和載入時間長短智慧地進行負載平衡,也就是根據後端伺服器的回應時間來分配請求,回應時間短的優先分配。 nginx本身是不支援fair的,如果需要使用這種調度演算法,必須下載nginx的upstream_fair模組。
url_hash。此方法按存取url的hash結果來分配請求,使每個url定向到同一個後端伺服器,可以進一步提高後端快取伺服器的效率。 nginx本身是不支援url_hash的,如果需要使用這種調度演算法,必須安裝nginx 的hash軟體包。
3.upstream 支援的狀態參數
#在http upstream模組中,可以透過server指令指定後端伺服器的ip位址和端口,同時也可以設定每個後端伺服器在負載平衡調度中的狀態。常用的狀態有:
#down,表示目前的server暫時不參與負載平衡。
backup,預留的備份機器。只有在其他所有非備用機器發生故障或忙碌時,才會向備用機器發送請求,因此備用機器的負載最輕。
max_fails,允許請求失敗的次數,預設為1。如果次數超過最大次數,則會傳回 proxy_next_upstream 模組定義的錯誤。
經過多次失敗(達到max_fails次),服務將被暫停一段時間,並觸發fail_timeout。 max_fails可以和fail_timeout一起使用。
註,當負載調度演算法為ip_hash時,後端伺服器在負載平衡調度中的狀態不能是weight和backup。
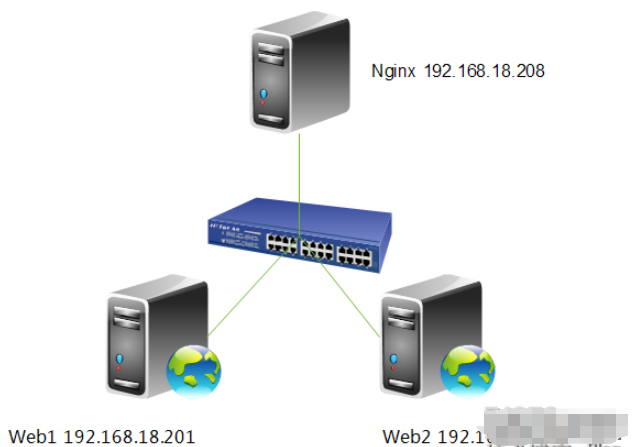
4.實驗拓樸
5.設定nginx負載平衡
[root@nginx ~]# vim /etc/nginx/nginx.conf
upstream webservers {
   server 192.168.18.201 weight=1;
   server 192.168.18.202 weight=1;
 }
 server {
   listen    80;
   server_name localhost;
   #charset koi8-r;
   #access_log logs/host.access.log main;
   location / {
       proxy_pass   http://webservers;
       proxy_set_header x-real-ip $remote_addr;
   }
}註,upstream是定義在server{ }之外的,不能定義在server{ }內部。定義好upstream之後,用proxy_pass引用即可。
6.重新載入一下設定檔
[root@nginx ~]# service nginx reload
nginx: the configuration file /etc/nginx/nginx.conf syntax is ok
nginx: configuration file /etc/nginx/nginx.conf test is successful
重新载入 nginx:                      [确定]
7.測試一下
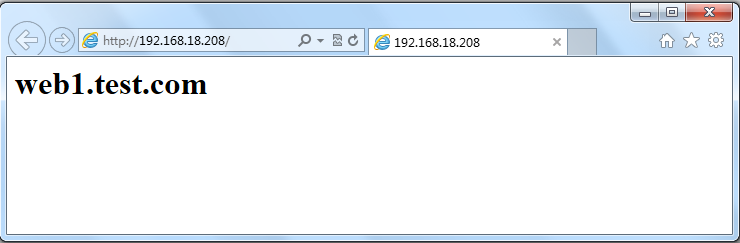
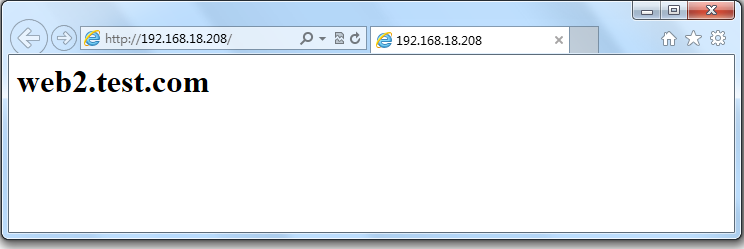
註,大家可以不斷的刷新瀏覽的內容,可以發現web1與web2是交替出現的,達到了負載平衡的效果。
8.查看一下web存取伺服器日誌
web1:
[root@web1 ~]# tail /var/log/httpd/access_log
192.168.18.138 - - [04/sep/2013:09:41:58 +0800] "get / http/1.0" 200 23 "-" "mozilla/5.0 (compatible; msie 10.0; windows nt 6.1; wow64; trident/6.0)"
192.168.18.138 - - [04/sep/2013:09:41:58 +0800] "get / http/1.0" 200 23 "-" "mozilla/5.0 (compatible; msie 10.0; windows nt 6.1; wow64; trident/6.0)"
192.168.18.138 - - [04/sep/2013:09:41:59 +0800] "get / http/1.0" 200 23 "-" "mozilla/5.0 (compatible; msie 10.0; windows nt 6.1; wow64; trident/6.0)"
192.168.18.138 - - [04/sep/2013:09:41:59 +0800] "get / http/1.0" 200 23 "-" "mozilla/5.0 (compatible; msie 10.0; windows nt 6.1; wow64; trident/6.0)"
192.168.18.138 - - [04/sep/2013:09:42:00 +0800] "get / http/1.0" 200 23 "-" "mozilla/5.0 (compatible; msie 10.0; windows nt 6.1; wow64; trident/6.0)"
192.168.18.138 - - [04/sep/2013:09:42:00 +0800] "get / http/1.0" 200 23 "-" "mozilla/5.0 (compatible; msie 10.0; windows nt 6.1; wow64; trident/6.0)"
192.168.18.138 - - [04/sep/2013:09:42:00 +0800] "get / http/1.0" 200 23 "-" "mozilla/5.0 (compatible; msie 10.0; windows nt 6.1; wow64; trident/6.0)"
192.168.18.138 - - [04/sep/2013:09:44:21 +0800] "get / http/1.0" 200 23 "-" "mozilla/5.0 (compatible; msie 10.0; windows nt 6.1; wow64; trident/6.0)"
192.168.18.138 - - [04/sep/2013:09:44:22 +0800] "get / http/1.0" 200 23 "-" "mozilla/5.0 (compatible; msie 10.0; windows nt 6.1; wow64; trident/6.0)"
192.168.18.138 - - [04/sep/2013:09:44:22 +0800] "get / http/1.0" 200 23 "-" "mozilla/5.0 (compatible; msie 10.0; windows nt 6.1; wow64; trident/6.0)"
web2:
#先修改一下,網頁伺服器記錄日誌的格式。
[root@web2 ~]# vim /etc/httpd/conf/httpd.conf
logformat "%{x-real-ip}i %l %u %t \"%r\" %>s %b \"%{referer}i\" \"%{user-agent}i\"" combined
[root@web2 ~]# service httpd restart
停止 httpd:                        [确定]
正在启动 httpd: [确定]接著,再訪問多次,繼續查看日誌。
[root@web2 ~]# tail /var/log/httpd/access_log
192.168.18.138 - - [04/sep/2013:09:50:28 +0800] "get / http/1.0" 200 23 "-" "mozilla/5.0 (compatible; msie 10.0; windows nt 6.1; wow64; trident/6.0)"
192.168.18.138 - - [04/sep/2013:09:50:28 +0800] "get / http/1.0" 200 23 "-" "mozilla/5.0 (compatible; msie 10.0; windows nt 6.1; wow64; trident/6.0)"
192.168.18.138 - - [04/sep/2013:09:50:28 +0800] "get / http/1.0" 200 23 "-" "mozilla/5.0 (compatible; msie 10.0; windows nt 6.1; wow64; trident/6.0)"
192.168.18.138 - - [04/sep/2013:09:50:28 +0800] "get / http/1.0" 200 23 "-" "mozilla/5.0 (compatible; msie 10.0; windows nt 6.1; wow64; trident/6.0)"
192.168.18.138 - - [04/sep/2013:09:50:28 +0800] "get / http/1.0" 200 23 "-" "mozilla/5.0 (compatible; msie 10.0; windows nt 6.1; wow64; trident/6.0)"
192.168.18.138 - - [04/sep/2013:09:50:28 +0800] "get / http/1.0" 200 23 "-" "mozilla/5.0 (compatible; msie 10.0; windows nt 6.1; wow64; trident/6.0)"
192.168.18.138 - - [04/sep/2013:09:50:28 +0800] "get / http/1.0" 200 23 "-" "mozilla/5.0 (compatible; msie 10.0; windows nt 6.1; wow64; trident/6.0)"
192.168.18.138 - - [04/sep/2013:09:50:28 +0800] "get / http/1.0" 200 23 "-" "mozilla/5.0 (compatible; msie 10.0; windows nt 6.1; wow64; trident/6.0)"
192.168.18.138 - - [04/sep/2013:09:50:29 +0800] "get / http/1.0" 200 23 "-" "mozilla/5.0 (compatible; msie 10.0; windows nt 6.1; wow64; trident/6.0)"
192.168.18.138 - - [04/sep/2013:09:50:29 +0800] "get / http/1.0" 200 23 "-" "mozilla/5.0 (compatible; msie 10.0; windows nt 6.1; wow64; trident/6.0)"
註,大家可以看到,兩台伺服器日誌都記錄是192.168.18.138存取的日誌,也說明了負載平衡配置成功。
9.設定nginx進行健康狀態檢查
#max_fails,允許請求失敗的次數,預設為1。如果次數超過最大次數,則會傳回 proxy_next_upstream 模組定義的錯誤。
在經歷了最大允許失敗次數(max_fails)後,服務會暫停一段時間(fail_timeout)。使用max_fails和fail_timeout可以進行健康狀態檢查。
[root@nginx ~]# vim /etc/nginx/nginx.conf
upstream webservers {
    server 192.168.18.201 weight=1 max_fails=2 fail_timeout=2;
    server 192.168.18.202 weight=1 max_fails=2 fail_timeout=2;
}10.重新加载一下配置文件
[root@nginx ~]# service nginx reload
nginx: the configuration file /etc/nginx/nginx.conf syntax is ok
nginx: configuration file /etc/nginx/nginx.conf test is successful
重新载入 nginx:                      [确定]
11.停止服务器并测试
先停止web1,进行测试。
[root@web1 ~]# service httpd stop
停止 httpd:                        [确定]
注,大家可以看到,现在只能访问web2,再重新启动web1,再次访问一下。
[root@web1 ~]# service httpd start
正在启动 httpd:                      [确定]
注,大家可以看到,现在又可以重新访问,说明nginx的健康状态查检配置成功。但大家想一下,如果不幸的是所有服务器都不能提供服务了怎么办,用户打开页面就会出现出错页面,那么会带来用户体验的降低,所以我们能不能像配置lvs是配置sorry_server呢,答案是可以的,但这里不是配置sorry_server而是配置backup。
12.配置backup服务器
[root@nginx ~]# vim /etc/nginx/nginx.conf
server {
        listen 8080;
        server_name localhost;
        root /data/www/errorpage;
        index index.html;
    }
upstream webservers {
    server 192.168.18.201 weight=1 max_fails=2 fail_timeout=2;
    server 192.168.18.202 weight=1 max_fails=2 fail_timeout=2;
    server 127.0.0.1:8080 backup;
  }
[root@nginx ~]# mkdir -pv /data/www/errorpage
[root@nginx errorpage]# cat index.html
<h1 id="sorry">sorry......</h1>13.重新加载配置文件
[root@nginx errorpage]# service nginx reload
nginx: the configuration file /etc/nginx/nginx.conf syntax is ok
nginx: configuration file /etc/nginx/nginx.conf test is successful
重新载入 nginx:                      [确定]
14.关闭web服务器并进行测试
[root@web1 ~]# service httpd stop
停止 httpd:                        [确定]
[root@web2 ~]# service httpd stop
停止 httpd:                        [确定]
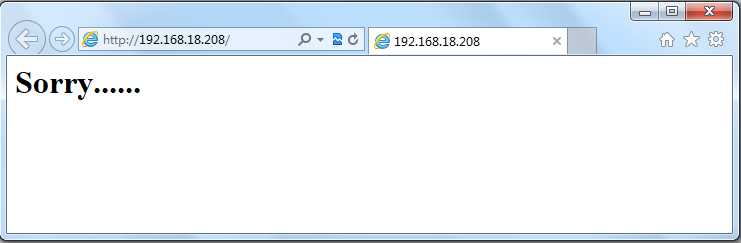
注,大家可以看到,当所有服务器都不能工作时,就会启动备份服务器。好了,backup服务器就配置到这里,下面我们来配置ip_hash负载均衡。
15.配置ip_hash负载均衡
ip_hash,每个请求按访问ip的hash结果分配,这样来自同一个ip的访客固定访问一个后端服务器,有效解决了动态网页存在的session共享问题。(一般电子商务网站用的比较多)
[root@nginx ~]# vim /etc/nginx/nginx.conf
upstream webservers {
    ip_hash;
    server 192.168.18.201 weight=1 max_fails=2 fail_timeout=2;
    server 192.168.18.202 weight=1 max_fails=2 fail_timeout=2;
    #server 127.0.0.1:8080 backup;
}注,当负载调度算法为ip_hash时,后端服务器在负载均衡调度中的状态不能有backup。(有人可能会问,为什么呢?大家想啊,如果负载均衡把你分配到backup服务器上,你能访问到页面吗?不能,所以了不能配置backup服务器)
16.重新加载一下服务器
[root@nginx ~]# service nginx reload
nginx: the configuration file /etc/nginx/nginx.conf syntax is ok
nginx: configuration file /etc/nginx/nginx.conf test is successful
重新载入 nginx:                      [确定]
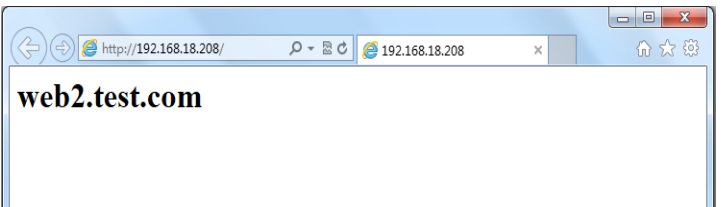
17.测试一下
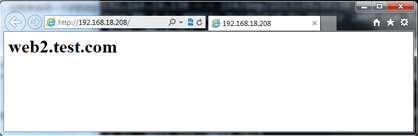
注,大家可以看到,你不断的刷新页面一直会显示的民web2,说明ip_hash负载均衡配置成功。下面我们来统计一下web2的访问连接数。
18.统计web2的访问连接数
[root@web2 ~]# netstat -an | grep :80 | wc -l
304
注,你不断的刷新,连接数会越来越多。
以上是nginx負載平衡執行個體分析的詳細內容。更多資訊請關注PHP中文網其他相關文章!

熱AI工具

Undresser.AI Undress
人工智慧驅動的應用程序,用於創建逼真的裸體照片

AI Clothes Remover
用於從照片中去除衣服的線上人工智慧工具。

Undress AI Tool
免費脫衣圖片

Clothoff.io
AI脫衣器

Video Face Swap
使用我們完全免費的人工智慧換臉工具,輕鬆在任何影片中換臉!

熱門文章
熱工具

記事本++7.3.1
好用且免費的程式碼編輯器

SublimeText3漢化版
中文版,非常好用

禪工作室 13.0.1
強大的PHP整合開發環境

Dreamweaver CS6
視覺化網頁開發工具

SublimeText3 Mac版
神級程式碼編輯軟體(SublimeText3)


 docker容器名稱怎麼查
Apr 15, 2025 pm 12:21 PM
docker容器名稱怎麼查
Apr 15, 2025 pm 12:21 PM
可以通過以下步驟查詢 Docker 容器名稱:列出所有容器(docker ps)。篩選容器列表(使用 grep 命令)。獲取容器名稱(位於 "NAMES" 列中)。
 nginx在windows中怎麼配置
Apr 14, 2025 pm 12:57 PM
nginx在windows中怎麼配置
Apr 14, 2025 pm 12:57 PM
如何在 Windows 中配置 Nginx?安裝 Nginx 並創建虛擬主機配置。修改主配置文件並包含虛擬主機配置。啟動或重新加載 Nginx。測試配置並查看網站。選擇性啟用 SSL 並配置 SSL 證書。選擇性設置防火牆允許 80 和 443 端口流量。
 怎麼查看nginx是否啟動
Apr 14, 2025 pm 01:03 PM
怎麼查看nginx是否啟動
Apr 14, 2025 pm 01:03 PM
確認 Nginx 是否啟動的方法:1. 使用命令行:systemctl status nginx(Linux/Unix)、netstat -ano | findstr 80(Windows);2. 檢查端口 80 是否開放;3. 查看系統日誌中 Nginx 啟動消息;4. 使用第三方工具,如 Nagios、Zabbix、Icinga。
 docker怎麼啟動容器
Apr 15, 2025 pm 12:27 PM
docker怎麼啟動容器
Apr 15, 2025 pm 12:27 PM
Docker 容器啟動步驟:拉取容器鏡像:運行 "docker pull [鏡像名稱]"。創建容器:使用 "docker create [選項] [鏡像名稱] [命令和參數]"。啟動容器:執行 "docker start [容器名稱或 ID]"。檢查容器狀態:通過 "docker ps" 驗證容器是否正在運行。
 nginx怎麼配置雲服務器域名
Apr 14, 2025 pm 12:18 PM
nginx怎麼配置雲服務器域名
Apr 14, 2025 pm 12:18 PM
在雲服務器上配置 Nginx 域名的方法:創建 A 記錄,指向雲服務器的公共 IP 地址。在 Nginx 配置文件中添加虛擬主機塊,指定偵聽端口、域名和網站根目錄。重啟 Nginx 以應用更改。訪問域名測試配置。其他注意事項:安裝 SSL 證書啟用 HTTPS、確保防火牆允許 80 端口流量、等待 DNS 解析生效。
 nginx怎麼查版本
Apr 14, 2025 am 11:57 AM
nginx怎麼查版本
Apr 14, 2025 am 11:57 AM
可以查詢 Nginx 版本的方法有:使用 nginx -v 命令;查看 nginx.conf 文件中的 version 指令;打開 Nginx 錯誤頁,查看頁面的標題。
 docker怎麼創建容器
Apr 15, 2025 pm 12:18 PM
docker怎麼創建容器
Apr 15, 2025 pm 12:18 PM
在 Docker 中創建容器: 1. 拉取鏡像: docker pull [鏡像名] 2. 創建容器: docker run [選項] [鏡像名] [命令] 3. 啟動容器: docker start [容器名]
 怎麼啟動nginx服務器
Apr 14, 2025 pm 12:27 PM
怎麼啟動nginx服務器
Apr 14, 2025 pm 12:27 PM
啟動 Nginx 服務器需要按照不同操作系統採取不同的步驟:Linux/Unix 系統:安裝 Nginx 軟件包(例如使用 apt-get 或 yum)。使用 systemctl 啟動 Nginx 服務(例如 sudo systemctl start nginx)。 Windows 系統:下載並安裝 Windows 二進製文件。使用 nginx.exe 可執行文件啟動 Nginx(例如 nginx.exe -c conf\nginx.conf)。無論使用哪種操作系統,您都可以通過訪問服務器 IP
