

如何利用Python和C語言分別實現哈夫曼編碼

1.C语言实现
1.1代码说明
a 创建双向链表:
在创建哈夫曼树的过程中,需要不断对结点进行更改和删除,所以选用双向链表的结构更容易
'''C
#include <stdlib.h>
#include <stdio.h>
#include <windows.h>
//哈夫曼树结构体,数据域存储字符及其权重
typedef struct node
{
char c;
int weight;
struct node *lchild, *rchild;
}Huffman, *Tree;
//双向链表结构体,数据域存储哈夫曼树结点
typedef struct list
{
Tree root;
struct list *pre;
struct list *next;
}List, *pList;
//创建双向链表,返回头结点指针
pList creatList()
{
pList head = (pList)malloc(sizeof(List));
pList temp1 = head;
pList temp2 = (pList)malloc(sizeof(List));
temp1->pre = NULL;
temp1->next = temp2;
temp1->root = (Tree)malloc(sizeof(Huffman));
temp1->root->c = 'a';
temp1->root->weight = 22;
temp1->root->lchild = NULL;
temp1->root->rchild = NULL;
temp2->pre = temp1;
temp1 = temp2;
temp2 = (pList)malloc(sizeof(List));
temp1->next = temp2;
temp1->root = (Tree)malloc(sizeof(Huffman));
temp1->root->c = 'b';
temp1->root->weight = 5;
temp1->root->lchild = NULL;
temp1->root->rchild = NULL;
temp2->pre = temp1;
temp1 = temp2;
temp2 = (pList)malloc(sizeof(List));
temp1->next = temp2;
temp1->root = (Tree)malloc(sizeof(Huffman));
temp1->root->c = 'c';
temp1->root->weight = 38;
temp1->root->lchild = NULL;
temp1->root->rchild = NULL;
temp2->pre = temp1;
temp1 = temp2;
temp2 = (pList)malloc(sizeof(List));
temp1->next = temp2;
temp1->root = (Tree)malloc(sizeof(Huffman));
temp1->root->c = 'd';
temp1->root->weight = 9;
temp1->root->lchild = NULL;
temp1->root->rchild = NULL;
temp2->pre = temp1;
temp1 = temp2;
temp2 = (pList)malloc(sizeof(List));
temp1->next = temp2;
temp1->root = (Tree)malloc(sizeof(Huffman));
temp1->root->c = 'e';
temp1->root->weight = 44;
temp1->root->lchild = NULL;
temp1->root->rchild = NULL;
temp2->pre = temp1;
temp1 = temp2;
temp2 = (pList)malloc(sizeof(List));
temp1->next = temp2;
temp1->root = (Tree)malloc(sizeof(Huffman));
temp1->root->c = 'f';
temp1->root->weight = 12;
temp1->root->lchild = NULL;
temp1->root->rchild = NULL;
temp2->pre = temp1;
temp1 = temp2;
temp1->next = NULL;
temp1->root = (Tree)malloc(sizeof(Huffman));
temp1->root->c = 'g';
temp1->root->weight = 65;
temp1->root->lchild = NULL;
temp1->root->rchild = NULL;
return head;
}b创建栈结构:
解码过程需要用到两个栈,一个用来存放树结点,一个用来存放码0和1
'''C
#define STACK_INIT_SIZE 100   //栈初始开辟空间大小
#define STACK_INCREMENT 10    //栈追加空间大小

//字符栈结构体,存放编码'0'和'1'
typedef struct {
    char *base;
    char *top;
    int size;
}charStack;


//栈初始化
charStack charStackInit()
{
    charStack s;
    s.base = (char *)malloc(sizeof(char)*STACK_INIT_SIZE);
    s.top = s.base;
    s.size = STACK_INIT_SIZE;
    return s;
}

//入栈
void charPush(charStack *s, char e)
{
    if(s->top - s->base >= s->size)
    {
        s->size += STACK_INCREMENT;
        s->base = realloc(s->base, sizeof(char)*s->size);
    }
    *s->top = e;
    s->top++;
}

//出栈
char charPop(charStack *s)
{
    if(s->top != s->base)
    {
        s->top--;
        return *s->top;
    }
    return -1;
}

//得到栈顶元素,但不出栈
char charGetTop(charStack *s)
{
    s->top--;
    char temp = *s->top;
    s->top++;
    return temp;
}

//栈结构体,存放哈夫曼树结点
typedef struct
{
    Huffman *base;
    Huffman *top;
    int size;
}BiStack;

//栈初始化
BiStack stackInit()
{
    BiStack s;
    s.base = (Huffman *)malloc(sizeof(Huffman)*STACK_INIT_SIZE);
    s.top = s.base;
    s.size =STACK_INIT_SIZE;
    return s;
}

//入栈
void push(BiStack *s, Huffman e)
{
    if(s->top - s->base >= s->size)
    {
        s->size += STACK_INCREMENT;
        s->base = (Huffman *)realloc(s->base, sizeof(Huffman)*s->size);
    }
    *s->top = e;
    s->top++;
}

//出栈
Huffman pop(BiStack *s)
{
    Huffman temp;
    s->top--;
    temp = *s->top;
    return temp;
}

//得到栈顶元素,但不出栈
Huffman getTop(BiStack s)
{
    Huffman temp;
    s.top--;
    temp = *s.top;
    return temp;
}

char stack[7][10];             //记录a~g的编码
//遍历栈,得到字符c的编码
void traverseStack(charStack s, char c)
{
    int index = c - 'a';
    int i = 0;
    while(s.base != s.top)
    {
        stack[index][i] = *s.base;
        i++;
        s.base++;
    }
}c 创建哈夫曼树:
'''C
//通过双向链表创建哈夫曼树,返回根结点指针
Tree creatHuffman(pList head)
{
    pList list1 = NULL;
    pList list2 = NULL;
    pList index = NULL;
    Tree root = NULL;
    while(head->next != NULL)   //链表只剩一个结点时循环结束,此结点数据域即为哈夫曼树的根结点
    {
        list1 = head;
        list2 = head->next;
        index = list2->next;
        root = (Tree)malloc(sizeof(Huffman));
        while(index != NULL)    //找到链表中权重最小的两个结点list1,list2
        {
            if(list1->root->weight > index->root->weight || list2->root->weight > index->root->weight)
            {
                if(list1->root->weight > list2->root->weight) list1 = index;
                else list2 = index;
            }
            index = index->next;
        }
        //list1和list2设为新结点的左右孩子
        if(list2->root->weight > list1->root->weight)
        {
            root->lchild = list1->root;
            root->rchild = list2->root;
        }
        else
        {
            root->lchild = list2->root;
            root->rchild = list1->root;
        }
        //新结点字符统一设为空格,权重设为list1与list2权重之和
        root->c = ' ';
        root->weight = list1->root->weight + list2->root->weight;
        //list1数据域替换成新结点,并删除list2
        list1->root = root;
        list2->pre->next = list2->next;
        if(list2->next != NULL)
            list2->next->pre = list2->pre;
    }
    return head->root;
}d编码:
'''C
char stack[7][10];             //记录a~g的编码
//遍历栈,得到字符c的编码
void traverseStack(charStack s, char c)
{
    int index = c - 'a';
    int i = 0;
    while(s.base != s.top)
    {
        stack[index][i] = *s.base;
        i++;
        s.base++;
    }
}


//通过哈夫曼树编码
void encodeHuffman(Tree T)
{
    BiStack bs = stackInit();
    charStack cs = charStackInit();
    Huffman root = *T;
    Tree temp = NULL;
    push(&bs, root);      //根结点入栈
    while(bs.top != bs.base)      //栈空表示遍历结束
    {
        root = getTop(bs);
        temp = root.lchild;       //先访问左孩子
        while(temp != NULL)       //左孩子不为空
        {
            //将结点左孩子设为空,代表已访问其左孩子
            root.lchild = NULL;
            pop(&bs);
            push(&bs, root);
            //左孩子入栈
            root = *temp;
            temp = root.lchild;
            push(&bs, root);
            //'0'入字符栈
            charPush(&cs, '0');
        }
        temp = root.rchild;     //后访问右孩子
        while(temp == NULL)     //右孩子为空,代表左右孩子均已访问,结点可以出栈
        {
            //结点出栈
            root = pop(&bs);
            //寻到叶子结点,可以得到结点中字符的编码
            if(root.c != ' ')
                traverseStack(cs, root.c);
            charPop(&cs);       //字符栈出栈
            if(bs.top == bs.base) break;    //根结点出栈,遍历结束
            //查看上一级结点是否访问完左右孩子
            root = getTop(bs);
            temp = root.rchild;
        }
        if(bs.top != bs.base)
        {
            //将结点右孩子设为空,代表已访问其右孩子
            root.rchild = NULL;
            pop(&bs);
            push(&bs, root);
            //右孩子入栈
            root = *temp;
            push(&bs, root);
            //'1'入字符栈
            charPush(&cs, '1');
        }
    }
}e解码:
'''C
char decode[100];   //记录解码得到的字符串
//通过哈夫曼树解码
void decodeHuffman(Tree T, char *code)
{
    int cnt = 0;
    Tree root;
    while(*code != '\0')                  //01编码字符串读完,解码结束
    {
        root = T;
        while(root->lchild != NULL)       //找到叶子结点
        {
            if(*code != '\0')
            {
                if(*code == '0')
                    root = root->lchild;
                else
                    root = root->rchild;
                code++;
            }
            else break;
        }
        decode[cnt] = root->c;             //叶子结点存放的字符即为解码得到的字符
        cnt++;
    }
}f主函数:
'''C
void main()
{
pList pl = creatList();
printf("字符的权重如下\n");
for(pList l = pl; l->next != NULL; l = l->next)
printf("字符%c的权重是 %d\n", l->root->c, l->root->weight);
Tree T = creatHuffman(pl);
encodeHuffman(T);
printf("\n\n字符编码结果如下\n");
for(int i = 0; i < 7; i++)
printf("%c : %s\n", i+'a', stack[i]);
char code[100];
printf("\n\n请输入编码:\n");
scanf("%s", code);
printf("解码结果如下:\n");
decodeHuffman(T, code);
printf("%s\n", decode);
printf("\n\n");
system("date /T");
system("TIME /T");
system("pause");
exit(0);
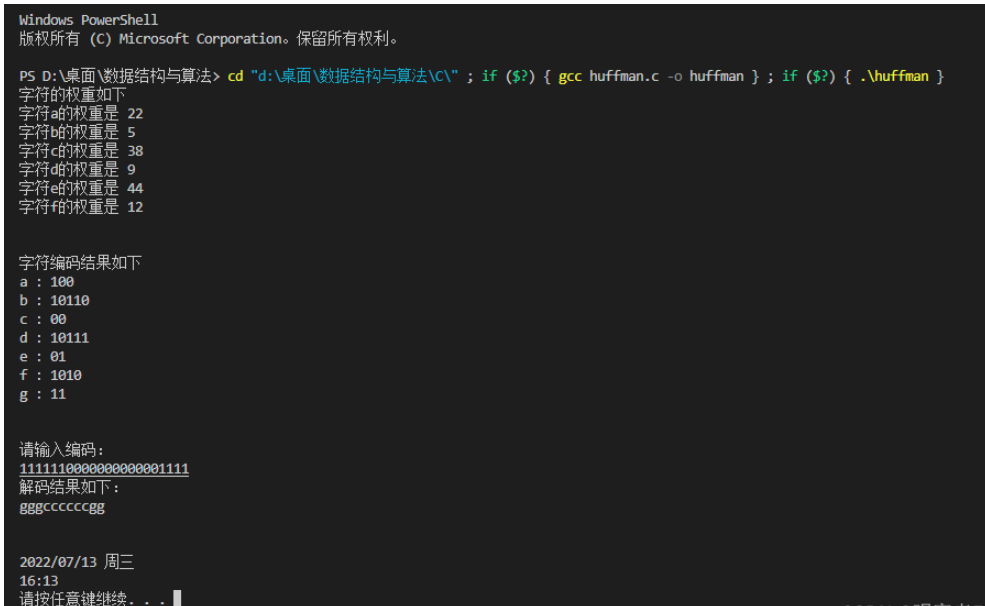
}1.2运行结果
2.Python实现
2.1代码说明
a创建哈夫曼树:
#coding=gbk
import datetime
import time
from pip._vendor.distlib.compat import raw_input
#哈夫曼树结点类
class Huffman:
def __init__(self, c, weight):
self.c = c
self.weight = weight
self.lchild = None
self.rchild = None
#创建结点左右孩子
def creat(self, lchild, rchild):
self.lchild = lchild
self.rchild = rchild
#创建列表
def creatList():
list = []
list.append(Huffman('a', 22))
list.append(Huffman('b', 5))
list.append(Huffman('c', 38))
list.append(Huffman('d', 9))
list.append(Huffman('e', 44))
list.append(Huffman('f', 12))
list.append(Huffman('g', 65))
return list
#通过列表创建哈夫曼树,返回树的根结点
def creatHuffman(list):
while len(list) > 1: #列表只剩一个结点时循环结束,此结点即为哈夫曼树的根结点
i = 0
j = 1
k = 2
while k < len(list): #找到列表中权重最小的两个结点list1,list2
if list[i].weight > list[k].weight or list[j].weight > list[k].weight:
if list[i].weight > list[j].weight:
i = k
else:
j = k
k += 1
root = Huffman(' ', list[i].weight + list[j].weight) #新结点字符统一设为空格,权重设为list1与list2权重之和
if list[i].weight < list[j].weight: #list1和list2设为新结点的左右孩子
root.creat(list[i], list[j])
else:
root.creat(list[j], list[i])
#list1数据域替换成新结点,并删除list2
list[i] = root
list.remove(list[j])
return list[0]b编码:
#通过哈夫曼树编码
def encodeHuffman(T):
    code = [[], [], [], [], [], [], []]
    #列表实现栈结构
    treeStack = []
    codeStack = []
    treeStack.append(T)
    while treeStack != []:        #栈空代表遍历结束
        root = treeStack[-1]
        temp = root.lchild
        while temp != None:
            #将结点左孩子设为空,代表已访问其左孩子
            root.lchild = None
            #左孩子入栈
            treeStack.append(temp)
            root = temp
            temp = root.lchild
            #0入编码栈
            codeStack.append(0)
        temp = root.rchild            #后访问右孩子
        while temp == None:           #右孩子为空,代表左右孩子均已访问,结点可以出栈
            root = treeStack.pop()           #结点出栈
            #寻到叶子结点,可以得到结点中字符的编码
            if root.c != ' ':
                codeTemp = codeStack.copy()
                code[ord(root.c) - 97] = codeTemp
            if treeStack == []:    #根结点出栈,遍历结束
                break
            codeStack.pop()        #编码栈出栈
            #查看上一级结点是否访问完左右孩子
            root = treeStack[-1]
            temp = root.rchild
        if treeStack != []:
            treeStack.append(temp)     #右孩子入栈
            root.rchild = None         #将结点右孩子设为空,代表已访问其右孩子
            codeStack.append(1)        #1入编码栈
return codec解码:
#通过哈夫曼树解码
def decodeHuffman(T, strCode):
decode = []
index = 0
while index < len(strCode): #01编码字符串读完,解码结束
root = T
while root.lchild != None: #找到叶子结点
if index < len(strCode):
if strCode[index] == '0':
root = root.lchild
else:
root = root.rchild
index += 1
else:
break
decode.append(root.c) #叶子结点存放的字符即为解码得到的字符
return decoded主函数:
if __name__ == '__main__':
    list = creatList()
    print("字符的权重如下")
    for i in range(len(list)):
        print("字符{}的权重为: {}".format(chr(i+97), list[i].weight))
    T = creatHuffman(list)
    code = encodeHuffman(T)
    print("\n字符编码结果如下")
    for i in range(len(code)):
        print(chr(i+97), end=' : ')
        for j in range(len(code[i])):
            print(code[i][j], end='')
        print("")
    strCode = input("\n请输入编码:\n")
    #哈夫曼树在编码时被破坏,必须重建哈夫曼树
    list = creatList()
    T = creatHuffman(list)
    decode = decodeHuffman(T, strCode)
    print("解码结果如下:")
    for i in range(len(decode)):
        print(decode[i], end='')
    print("\n\n")
    datetime = datetime.datetime.now()
    print(datetime.strftime("%Y-%m-%d\n%H:%M:%S"))
input("Press Enter to exit…")2.2运行结果

以上是如何利用Python和C語言分別實現哈夫曼編碼的詳細內容。更多資訊請關注PHP中文網其他相關文章!

熱AI工具

Undresser.AI Undress
人工智慧驅動的應用程序,用於創建逼真的裸體照片

AI Clothes Remover
用於從照片中去除衣服的線上人工智慧工具。

Undress AI Tool
免費脫衣圖片

Clothoff.io
AI脫衣器

Video Face Swap
使用我們完全免費的人工智慧換臉工具,輕鬆在任何影片中換臉!

熱門文章
熱工具

記事本++7.3.1
好用且免費的程式碼編輯器

SublimeText3漢化版
中文版,非常好用

禪工作室 13.0.1
強大的PHP整合開發環境

Dreamweaver CS6
視覺化網頁開發工具

SublimeText3 Mac版
神級程式碼編輯軟體(SublimeText3)


 PHP和Python:解釋了不同的範例
Apr 18, 2025 am 12:26 AM
PHP和Python:解釋了不同的範例
Apr 18, 2025 am 12:26 AM
PHP主要是過程式編程,但也支持面向對象編程(OOP);Python支持多種範式,包括OOP、函數式和過程式編程。 PHP適合web開發,Python適用於多種應用,如數據分析和機器學習。
 在PHP和Python之間進行選擇:指南
Apr 18, 2025 am 12:24 AM
在PHP和Python之間進行選擇:指南
Apr 18, 2025 am 12:24 AM
PHP適合網頁開發和快速原型開發,Python適用於數據科學和機器學習。 1.PHP用於動態網頁開發,語法簡單,適合快速開發。 2.Python語法簡潔,適用於多領域,庫生態系統強大。
 Python vs. JavaScript:學習曲線和易用性
Apr 16, 2025 am 12:12 AM
Python vs. JavaScript:學習曲線和易用性
Apr 16, 2025 am 12:12 AM
Python更適合初學者,學習曲線平緩,語法簡潔;JavaScript適合前端開發,學習曲線較陡,語法靈活。 1.Python語法直觀,適用於數據科學和後端開發。 2.JavaScript靈活,廣泛用於前端和服務器端編程。
 PHP和Python:深入了解他們的歷史
Apr 18, 2025 am 12:25 AM
PHP和Python:深入了解他們的歷史
Apr 18, 2025 am 12:25 AM
PHP起源於1994年,由RasmusLerdorf開發,最初用於跟踪網站訪問者,逐漸演變為服務器端腳本語言,廣泛應用於網頁開發。 Python由GuidovanRossum於1980年代末開發,1991年首次發布,強調代碼可讀性和簡潔性,適用於科學計算、數據分析等領域。
 vs code 可以在 Windows 8 中運行嗎
Apr 15, 2025 pm 07:24 PM
vs code 可以在 Windows 8 中運行嗎
Apr 15, 2025 pm 07:24 PM
VS Code可以在Windows 8上運行,但體驗可能不佳。首先確保系統已更新到最新補丁,然後下載與系統架構匹配的VS Code安裝包,按照提示安裝。安裝後,注意某些擴展程序可能與Windows 8不兼容,需要尋找替代擴展或在虛擬機中使用更新的Windows系統。安裝必要的擴展,檢查是否正常工作。儘管VS Code在Windows 8上可行,但建議升級到更新的Windows系統以獲得更好的開發體驗和安全保障。
 visual studio code 可以用於 python 嗎
Apr 15, 2025 pm 08:18 PM
visual studio code 可以用於 python 嗎
Apr 15, 2025 pm 08:18 PM
VS Code 可用於編寫 Python,並提供許多功能,使其成為開發 Python 應用程序的理想工具。它允許用戶:安裝 Python 擴展,以獲得代碼補全、語法高亮和調試等功能。使用調試器逐步跟踪代碼,查找和修復錯誤。集成 Git,進行版本控制。使用代碼格式化工具,保持代碼一致性。使用 Linting 工具,提前發現潛在問題。
 notepad 怎麼運行python
Apr 16, 2025 pm 07:33 PM
notepad 怎麼運行python
Apr 16, 2025 pm 07:33 PM
在 Notepad 中運行 Python 代碼需要安裝 Python 可執行文件和 NppExec 插件。安裝 Python 並為其添加 PATH 後,在 NppExec 插件中配置命令為“python”、參數為“{CURRENT_DIRECTORY}{FILE_NAME}”,即可在 Notepad 中通過快捷鍵“F6”運行 Python 代碼。
 vscode 擴展是否是惡意的
Apr 15, 2025 pm 07:57 PM
vscode 擴展是否是惡意的
Apr 15, 2025 pm 07:57 PM
VS Code 擴展存在惡意風險,例如隱藏惡意代碼、利用漏洞、偽裝成合法擴展。識別惡意擴展的方法包括:檢查發布者、閱讀評論、檢查代碼、謹慎安裝。安全措施還包括:安全意識、良好習慣、定期更新和殺毒軟件。
