

基於Nginx怎麼禁止指定IP、國外IP造訪網站

用Nginx禁止指定IP、國外IP訪問我的網站
想要實作這個功能有很多方法,下面我就來介紹基於Nginx 的ngx_http_geoip2 模組來禁止國外IP 存取網站。
①安裝geoip2 擴充依賴:
[root@fxkj ~]# yum install libmaxminddb-devel -y
②下載ngx_http_geoip2_module 模組:
[root@fxkj tmp]#  git clone https://github.com/leev/ngx_http_geoip2_module.git
[ro tmp]#
③解壓縮模組到指定路徑
我這裡解壓縮到/usr/ local 目錄下:
[root@fxkj tmp]# mv ngx_http_geoip2_module/ /usr/local/
[root@fxkj local]# ll ngx_http_geoip2_module/
total 60
-rw-r--r-- 1 root root  1199 Aug 13 17:20 config
-rw-r--r-- 1 root root  1311 Aug 13 17:20 LICENSE
-rw-r--r-- 1 root root 23525 Aug 13 17:20 ngx_http_geoip2_module.c
-rw-r--r-- 1 root root 21029 Aug 13 17:20 ngx_stream_geoip2_module.c
-rw-r--r-- 1 root root  3640 Aug 13 17:20 README.md
④安裝nginx 模組
首先說明下環境,我的nginx 版本是1.16,在網上查了一下安裝ngx_http_geoip2 模組至少需要1.18 版本及以上,因此此次安裝我是升級nginx1.18,新增ngx_http_geoip2 模組。
下載 nginx 1.18 版本:
[root@fxkj ~]# yum install libmaxminddb-devel -y
解壓縮 nginx1.18 軟體包,並升級為 nginx1.18,新增 ngx_http_geoip2 模組。
需要注意:
要升級nginx並新增模組,只需要編譯然後執行make操作。如果執行 make install,新版的 nginx 將完全取代線上的 nginx。
編譯前需要看下 nginx 目前安裝了哪些模組。
[root@fxkj tmp]# /usr/local/nginx/sbin/nginx -V
nginx version: nginx/1.16.0
built by gcc 4.8.5 20150623 (Red Hat 4.8.5-39) (GCC)
built with OpenSSL 1.0.2k-fips 26 Jan 2017
TLS SNI support enabled
configure arguments: –with-http_stub_status_module –prefix=/usr/local/nginx –user=nginx –group=nginx –with-http_ssl_module –with-stream
編譯安裝:
[root@fxkj tmp]# tar -xf nginx-1.18.0.tar.gz
[root@fxkj tmp]# cd nginx-1.18.0/
[root@fxkj nginx-1.18.0]# ./configure --with-http_stub_status_module \
 --prefix=/usr/local/nginx \
 --user=nginx --group=nginx --with-http_ssl_module --with-stream \
 --add-module=/usr/local/ngx_http_geoip2_module
[root@fxkj nginx-1.18.0]# make
[root@fxkj nginx-1.18.0]# cp /usr/loca/nginx/sbin/nginx /usr/loca/nginx/sbin/nginx1.16    #备份
[root@fxkj nginx-1.18.0]# cp objs/nginx /usr/local/nginx/sbin/    #用新的去覆盖旧的
[root@fxkj nginx-1.18.0]# pkill nginx     #杀死nginx
[root@fxkj nginx-1.18.0]# /usr/local/nginx/sbin/nginx    #再次启动Nginx
查看nginx 版本,以及安裝的模組:
[root@fxkj nginx-1.18.0]# /usr/local/nginx/sbin/nginx -V
nginx version: nginx/1.18.0
built by gcc 4.8.5 20150623 (Red Hat 4.8.5-39) (GCC)
built with OpenSSL 1.0.2k-fips 26 Jan 2017
TLS SNI support enabled
configure arguments: –with-http_stub_status_module –prefix=/usr/local/nginx –user=nginx –group=nginx –with-http_ssl_module –with-stream –add-module=/usr/local/ngx_http_geoip2_module
⑤下載最新的IP 位址資料庫檔案
模組安裝成功後,還要在Nginx 裡指定資料庫,在安裝運行庫時預設安裝了兩個,位於/usr/share/GeoIP/ 目錄下,一個只有IPv4,一個包含IPv4 和IPv6。
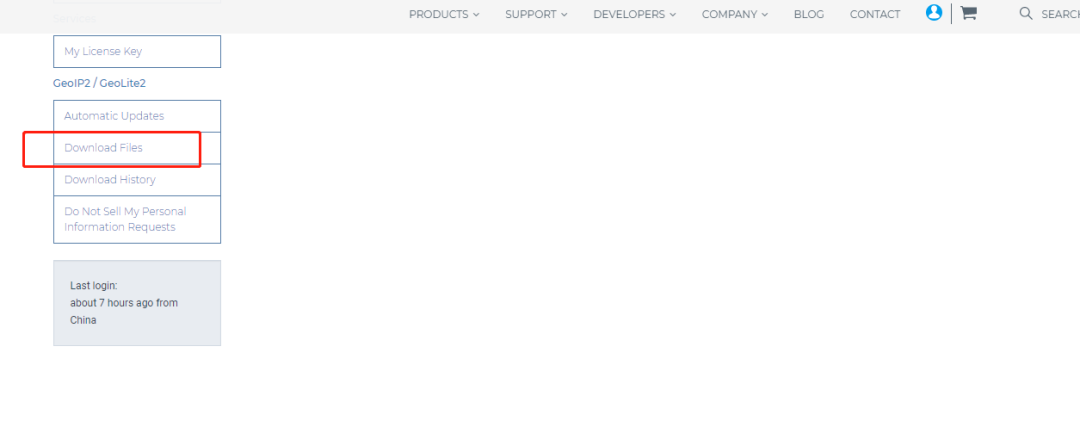
進入 www.maxmind.com 網站,註冊帳號並取得最新的庫檔案下載。左側點選Download Files,帳號建立步驟略過
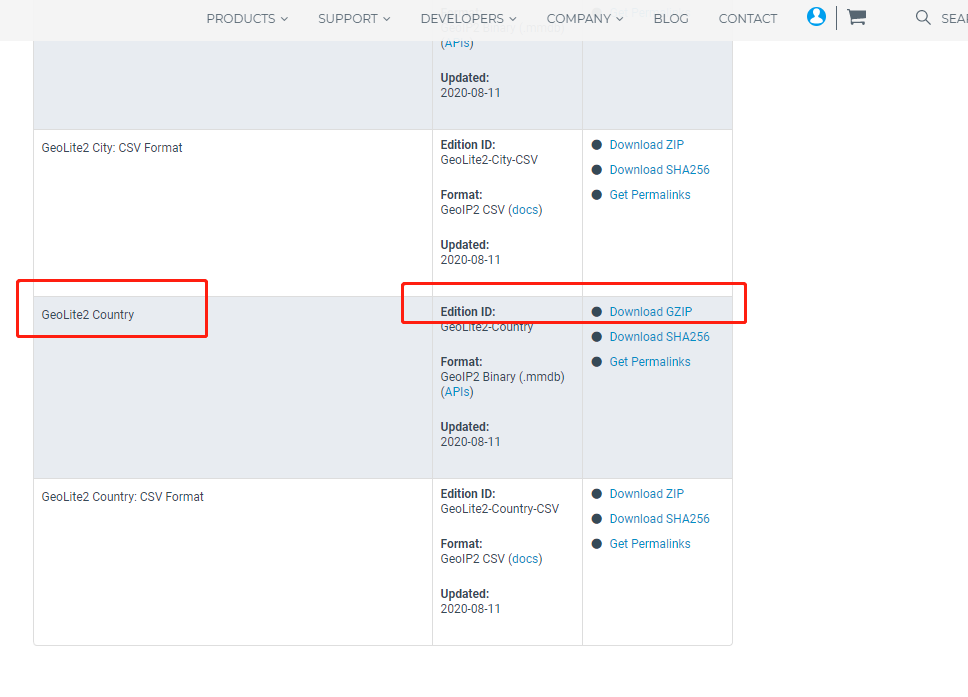
選擇GeoLite2 Country,點選Download GZIP 下載即可:
上傳到/usr/share/GeoIP/ 下並解壓縮:
[root@fxkj local]# cd /usr/share/GeoIP/
[root@fxkj GeoIP]# ll
total 69612
lrwxrwxrwx. 1 root root       17 Mar  7  2019 GeoIP.dat -> GeoIP-initial.dat
-rw-r--r--. 1 root root  1242574 Oct 30  2018 GeoIP-initial.dat
lrwxrwxrwx. 1 root root       19 Mar  7  2019 GeoIPv6.dat -> GeoIPv6-initial.dat
-rw-r--r--. 1 root root  2322773 Oct 30  2018 GeoIPv6-initial.dat
-rw-r--r--  1 root root  3981623 Aug 12 02:37 GeoLite2-Country.mmdb
⑥設定nginx 設定檔
修改前先備份設定檔:
[root@fxkj ~]# cp /usr/local/nginx/conf/nginx.conf /usr/local/nginx/conf/nginx.conf-bak
[root@fxkj ~]# vim /usr/local/nginx/conf/nginx.conf
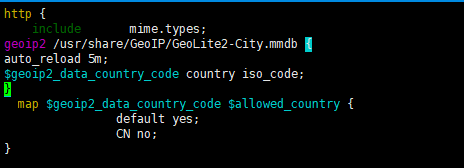
在http 中新增幾行,定義資料庫檔案位置:
geoip2 /usr/share/GeoIP/GeoLite2-City.mmdb {
auto_reload 5m;
$geoip2_data_country_code country iso_code;
}
  map $geoip2_data_country_code $allowed_country {
                default yes;
                CN no;
}
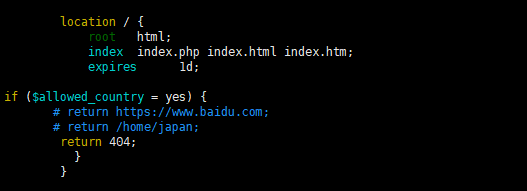
在server 中的location 下新增條件,如果滿足IP 是國外IP,就執行下面的return 動作,我這裡定義了3 種,註解了其中兩個。
當訪問IP 是國外IP,直接回傳404:
if ($allowed_country = yes) {
       # return https://www.baidu.com;
       # return /home/japan;
        return 404;
 }
#修改完畢後,偵測下設定文件,重新載入下nginx:
[root@fxkj ~]# /usr/local/nginx/sbin/nginx -t
nginx: the configuration file /usr/local/nginx/conf/nginx.conf syntax is ok
nginx: configuration file /usr/local/nginx/conf/nginx.conf test is successful
[roo@fxkj ~]# /usr/local/nginx/sbin/nginx -s reload
⑦模擬測試驗證
使用海外節點的伺服器去訪問網站,這裡我的IP 是來自於韓國:

“13.125.1.194 – – [14/Aug/2020:16:15:51 +0800] “GET /favicon.ico HTTP/1.1” 404 548 “https://www.fxkjnj.com/” “Mozilla/5.0 (Windows NT 10.0; Win64; x64) AppleWebKit/537.36 (KHTML, like Gecko) Chrome/84.0.4147.125 Safari/537.36”

以上是基於Nginx怎麼禁止指定IP、國外IP造訪網站的詳細內容。更多資訊請關注PHP中文網其他相關文章!

熱AI工具

Undresser.AI Undress
人工智慧驅動的應用程序,用於創建逼真的裸體照片

AI Clothes Remover
用於從照片中去除衣服的線上人工智慧工具。

Undress AI Tool
免費脫衣圖片

Clothoff.io
AI脫衣器

Video Face Swap
使用我們完全免費的人工智慧換臉工具,輕鬆在任何影片中換臉!

熱門文章
熱工具

記事本++7.3.1
好用且免費的程式碼編輯器

SublimeText3漢化版
中文版,非常好用

禪工作室 13.0.1
強大的PHP整合開發環境

Dreamweaver CS6
視覺化網頁開發工具

SublimeText3 Mac版
神級程式碼編輯軟體(SublimeText3)


 nginx在windows中怎麼配置
Apr 14, 2025 pm 12:57 PM
nginx在windows中怎麼配置
Apr 14, 2025 pm 12:57 PM
如何在 Windows 中配置 Nginx?安裝 Nginx 並創建虛擬主機配置。修改主配置文件並包含虛擬主機配置。啟動或重新加載 Nginx。測試配置並查看網站。選擇性啟用 SSL 並配置 SSL 證書。選擇性設置防火牆允許 80 和 443 端口流量。
 docker怎麼啟動容器
Apr 15, 2025 pm 12:27 PM
docker怎麼啟動容器
Apr 15, 2025 pm 12:27 PM
Docker 容器啟動步驟:拉取容器鏡像:運行 "docker pull [鏡像名稱]"。創建容器:使用 "docker create [選項] [鏡像名稱] [命令和參數]"。啟動容器:執行 "docker start [容器名稱或 ID]"。檢查容器狀態:通過 "docker ps" 驗證容器是否正在運行。
 docker容器名稱怎麼查
Apr 15, 2025 pm 12:21 PM
docker容器名稱怎麼查
Apr 15, 2025 pm 12:21 PM
可以通過以下步驟查詢 Docker 容器名稱:列出所有容器(docker ps)。篩選容器列表(使用 grep 命令)。獲取容器名稱(位於 "NAMES" 列中)。
 怎麼查看nginx是否啟動
Apr 14, 2025 pm 01:03 PM
怎麼查看nginx是否啟動
Apr 14, 2025 pm 01:03 PM
確認 Nginx 是否啟動的方法:1. 使用命令行:systemctl status nginx(Linux/Unix)、netstat -ano | findstr 80(Windows);2. 檢查端口 80 是否開放;3. 查看系統日誌中 Nginx 啟動消息;4. 使用第三方工具,如 Nagios、Zabbix、Icinga。
 docker怎麼創建容器
Apr 15, 2025 pm 12:18 PM
docker怎麼創建容器
Apr 15, 2025 pm 12:18 PM
在 Docker 中創建容器: 1. 拉取鏡像: docker pull [鏡像名] 2. 創建容器: docker run [選項] [鏡像名] [命令] 3. 啟動容器: docker start [容器名]
 nginx怎麼配置雲服務器域名
Apr 14, 2025 pm 12:18 PM
nginx怎麼配置雲服務器域名
Apr 14, 2025 pm 12:18 PM
在雲服務器上配置 Nginx 域名的方法:創建 A 記錄,指向雲服務器的公共 IP 地址。在 Nginx 配置文件中添加虛擬主機塊,指定偵聽端口、域名和網站根目錄。重啟 Nginx 以應用更改。訪問域名測試配置。其他注意事項:安裝 SSL 證書啟用 HTTPS、確保防火牆允許 80 端口流量、等待 DNS 解析生效。
 nginx怎麼查版本
Apr 14, 2025 am 11:57 AM
nginx怎麼查版本
Apr 14, 2025 am 11:57 AM
可以查詢 Nginx 版本的方法有:使用 nginx -v 命令;查看 nginx.conf 文件中的 version 指令;打開 Nginx 錯誤頁,查看頁面的標題。
 nginx服務器掛了怎麼辦
Apr 14, 2025 am 11:42 AM
nginx服務器掛了怎麼辦
Apr 14, 2025 am 11:42 AM
當 Nginx 服務器宕機時,可執行以下故障排除步驟:檢查 nginx 進程是否正在運行。查看錯誤日誌以獲取錯誤消息。檢查 nginx 配置語法正確性。確保 nginx 具有訪問文件所需的權限。檢查文件描述符打開限制。確認 nginx 正在偵聽正確的端口。添加防火牆規則以允許nginx流量。檢查反向代理設置,包括後端服務器可用性。如需進一步幫助,請聯繫技術支持。
