

Linux伺服器下Nginx與Apache共存如何實現

同一个端口是不能同时有两个程序监听的。所以换个思路解决同一台服务器下某些网站运行在nginx下,某些网站运行在apache下共存。
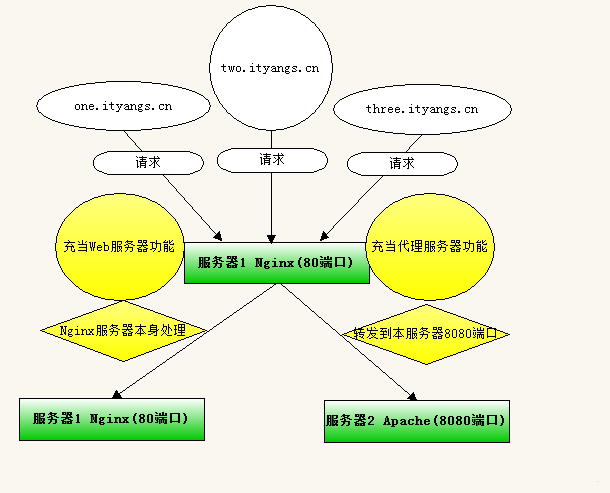
解决思路:
将nginx作为代理服务器和web服务器使用,nginx监听80端口,apache监听除80以外的端口,我这暂时使用8080端口。
解决方案:
在linux 一经搭建好环境 先后安装了nginx 和apache 由于 默认端口都是:80
一般客户请求的服务器端口默认为80 所以nginx作为静态页端口设置:80;apache设置端口为:8080(在httpd.conf 文件中修改listen:8080)
apache下的网站:
在nginx.conf中 添加
server {
   listen  80;
   server_name www.one.ityangs.cn one.ityangs.cn;
location / {
   proxy_pass    http://127.0.0.1:8080;
   proxy_redirect   off;
   proxy_set_header host $host;
   proxy_set_header x-real-ip $remote_addr;
   proxy_set_header x-forwarded-for $proxy_add_x_forwarded_for;
   }
}在httpd.conf中 添加
<virtualhost *:8080>
servername www.one.ityangs.cn
serveralias www.one.ityangs.cn one.ityangs.cn
documentroot /www/one
directoryindex index.php index.html
<directory /www/one>
options +includes +followsymlinks -indexes
allowoverride all
order deny,allow
allow from all
</directory>
</virtualhost>
nginx下的网站:
在nginx.conf中 添加
 server {
  listen  80;
  server_name two.ityangs.cn www.two.ityangs.cn;
  root /www/two;
  location /{
   index index.html index.htm index.php;
    if (!-e $request_filename) {
    rewrite ^(.*)$ /index.php?s=$1 last;
    break;
   }
   error_page 404 /var/www/html/404.html;
  }
  location ~ \.php(.*)$ {
    fastcgi_pass 127.0.0.1:9000;
    fastcgi_index index.php;
    fastcgi_split_path_info ^((?u).+\.php)(/?.+)$;
    fastcgi_param script_filename $document_root$fastcgi_script_name;
    fastcgi_param path_info $fastcgi_path_info;
    fastcgi_param path_translated $document_root$fastcgi_path_info;
    include  fastcgi_params;
  }
}以上是Linux伺服器下Nginx與Apache共存如何實現的詳細內容。更多資訊請關注PHP中文網其他相關文章!

熱AI工具

Undresser.AI Undress
人工智慧驅動的應用程序,用於創建逼真的裸體照片

AI Clothes Remover
用於從照片中去除衣服的線上人工智慧工具。

Undress AI Tool
免費脫衣圖片

Clothoff.io
AI脫衣器

AI Hentai Generator
免費產生 AI 無盡。

熱門文章
熱工具

記事本++7.3.1
好用且免費的程式碼編輯器

SublimeText3漢化版
中文版,非常好用

禪工作室 13.0.1
強大的PHP整合開發環境

Dreamweaver CS6
視覺化網頁開發工具

SublimeText3 Mac版
神級程式碼編輯軟體(SublimeText3)
熱門話題


 apache怎麼啟動
Apr 13, 2025 pm 01:06 PM
apache怎麼啟動
Apr 13, 2025 pm 01:06 PM
啟動 Apache 的步驟如下:安裝 Apache(命令:sudo apt-get install apache2 或從官網下載)啟動 Apache(Linux:sudo systemctl start apache2;Windows:右鍵“Apache2.4”服務並選擇“啟動”)檢查是否已啟動(Linux:sudo systemctl status apache2;Windows:查看服務管理器中“Apache2.4”服務的狀態)啟用開機自動啟動(可選,Linux:sudo systemctl
 apache80端口被佔用怎麼辦
Apr 13, 2025 pm 01:24 PM
apache80端口被佔用怎麼辦
Apr 13, 2025 pm 01:24 PM
當 Apache 80 端口被佔用時,解決方法如下:找出佔用該端口的進程並關閉它。檢查防火牆設置以確保 Apache 未被阻止。如果以上方法無效,請重新配置 Apache 使用不同的端口。重啟 Apache 服務。
 apache中cgi目錄怎麼設置
Apr 13, 2025 pm 01:18 PM
apache中cgi目錄怎麼設置
Apr 13, 2025 pm 01:18 PM
要在 Apache 中設置 CGI 目錄,需要執行以下步驟:創建 CGI 目錄,如 "cgi-bin",並授予 Apache 寫入權限。在 Apache 配置文件中添加 "ScriptAlias" 指令塊,將 CGI 目錄映射到 "/cgi-bin" URL。重啟 Apache。
 apache怎麼刪除多於的服務器名
Apr 13, 2025 pm 01:09 PM
apache怎麼刪除多於的服務器名
Apr 13, 2025 pm 01:09 PM
要從 Apache 中刪除多餘的 ServerName 指令,可以採取以下步驟:識別並刪除多餘的 ServerName 指令。重新啟動 Apache 使更改生效。檢查配置文件驗證更改。測試服務器確保問題已解決。
 apache怎麼連接數據庫
Apr 13, 2025 pm 01:03 PM
apache怎麼連接數據庫
Apr 13, 2025 pm 01:03 PM
Apache 連接數據庫需要以下步驟:安裝數據庫驅動程序。配置 web.xml 文件以創建連接池。創建 JDBC 數據源,指定連接設置。從 Java 代碼中使用 JDBC API 訪問數據庫,包括獲取連接、創建語句、綁定參數、執行查詢或更新以及處理結果。
 怎麼查看apache版本
Apr 13, 2025 pm 01:00 PM
怎麼查看apache版本
Apr 13, 2025 pm 01:00 PM
如何查看 Apache 版本?啟動 Apache 服務器:使用 sudo service apache2 start 啟動服務器。查看版本號:使用以下方法之一查看版本:命令行:運行 apache2 -v 命令。服務器狀態頁面:在 Web 瀏覽器中訪問 Apache 服務器的默認端口(通常為 80),版本信息顯示在頁面底部。
 怎麼查看自己的apache版本
Apr 13, 2025 pm 01:15 PM
怎麼查看自己的apache版本
Apr 13, 2025 pm 01:15 PM
有 3 種方法可在 Apache 服務器上查看版本:通過命令行(apachectl -v 或 apache2ctl -v)、檢查服務器狀態頁(http://<服務器IP或域名>/server-status)或查看 Apache 配置文件(ServerVersion: Apache/<版本號>)。
 apache怎麼配置zend
Apr 13, 2025 pm 12:57 PM
apache怎麼配置zend
Apr 13, 2025 pm 12:57 PM
如何在 Apache 中配置 Zend?在 Apache Web 服務器中配置 Zend Framework 的步驟如下:安裝 Zend Framework 並解壓到 Web 服務器目錄中。創建 .htaccess 文件。創建 Zend 應用程序目錄並添加 index.php 文件。配置 Zend 應用程序(application.ini)。重新啟動 Apache Web 服務器。
