

MySQL基於SSL安全連線的主從複製怎麼實現

在生產環境中一台mysql主機存在單點故障,所以我們要確保mysql的高可用性,也就是兩台MySQL伺服器如果其中有一台MySQL伺服器掛掉後,另外一台能立刻接替其進行工作。
主從複製的原理
master記錄二進位日誌,在每個交易更新資料完成之前,master在二日誌記錄這些變更。儲存引擎在二進位日誌完成後收到主伺服器的通知,提交MySQL交易。接下來,slave需要將master的二進位日誌複製到自己的中繼日誌。首先,slave開始一個工作線程——I/O線程,I/O線程在master上打開一個普通的連接,然後開啟binlog dump process。 Binlog dump process從master的二進位日誌中讀取事件,如果已經同步了master,它會睡眠並等待master產生新的事件,I/O線程將這些事件寫入中繼日誌。 The final step of this process is handled by the SQL slave thread.。 SQL執行緒會讀取中繼日誌中的事件,並重現這些事件以更新從庫的數據,以保持與主庫中的數據一致。由於中繼日誌通常儲存在作業系統的快取中,因此只要該執行緒與 I/O 執行緒保持一致,中繼日誌的開銷很少。
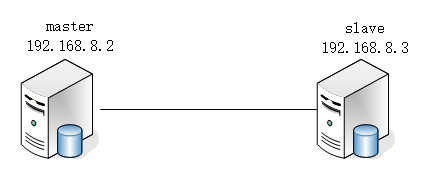
環境準備:開啟兩台MySQL伺服器,部署網路環境。
部署master
1. 主機建立 SSL/RSA 檔案
[root@master ~]# cd /usr/local/mysql/bin/
[root@master bin]# mysql_ssl_rsa_setup --user=mysql --basedir=/usr/llocal/mysql --datadir=/usr/local/mysql/data
2. 賦予權限並重新啟動。
[root@master bin]# chmod +r /usr/local/mysql/data/server-key.pem
[root@master bin]# service mysqld restart
Shutting down MySQL..                                      [  确定  ]
Starting MySQL.                                            [  确定  ]
3. 登入mysql查看ssl是否開啟,並建立一個複製使用者。
註:啟用mysql 支援ssl 安全連線主要用於mysql 主從複製(區域網路可以非ssh 連線即明文複製,但internet 複製建議採用ssl 連線)
mysql> grant replication slave on *.* to rep@'192.168.8.3' identified by '123';
Query OK, 0 rows affected, 1 warning (0.07 sec)
4. master開啟二進位日誌,重新啟動後查看二進位日誌檔。
要注意的是server_id必須唯一。
[root@master ~]# vim /etc/my.cnf
#添加下面内容
log-bin=mysql-bin
service_id=1
[root@master ~]# service mysqld restart
Shutting down MySQL..                                      [  确定  ]
Starting MySQL.                                            [  确定  ]
[root@master ~]# mysql -uroot -p123 -e "show master status"
mysql: [Warning] Using a password on the command line interface can be insecure.
+------------------+----------+--------------+------------------+-------------------+
| File             | Position | Binlog_Do_DB | Binlog_Ignore_DB | Executed_Gtid_Set |
+------------------+----------+--------------+------------------+-------------------+
| mysql-bin.000001 |      154 |              |                  |                   |
+------------------+----------+--------------+------------------+-------------------+
5. 防火牆配置,實驗環境中可以關閉防火牆,生產環境中需要配置防火牆規則,允許3306連接埠。
[root@master ~]# firewall-cmd --permanent --add-port=3306/tcp
success
[root@master ~]# firewall-cmd --reload
success
6. 把ssl檔案複製到slave
[root@master data]# scp ca.pem client-cert.pem client-key.pem root@192.168.8.3:/usr/local/mysql/data
The authenticity of host '192.168.8.3 (192.168.8.3)' can't be established.
ECDSA key fingerprint is SHA256:LFby9KMDz/kkPfOESbeJ7Qh+3hmQaX2W5gkDDMwSGHA.
ECDSA key fingerprint is MD5:03:32:64:b4:c2:5b:6c:a4:e2:f0:7f:df:7a:35:19:80.
Are you sure you want to continue connecting (yes/no)? yes
Warning: Permanently added '192.168.8.3' (ECDSA) to the list of known hosts.
root@192.168.8.3's password:
ca.pem                             100% 1112   232.5KB/s   00:00
client-cert.pem                    100% 1112   240.4KB/s   00:00
client-key.pem                     100% 1676   205.0KB/s   00:00
部署slave
1. 開啟ssl、中繼日誌,賦予ssl檔案讀取的權限並重啟mysql。
[root@slave ~]# vim /etc/my.cnf
#添加下面内容
server_id=2
relay-log=relay-log
ssl_ca=ca.pem
ssl_cert=client-cert.pem
ssl_key=client-key.pem

[root@slave ~]# cd /usr/local/mysql/data
[root@slave data]# ll ca.pem client-cert.pem client-key.pem
-rw-r--r--. 1 mysql mysql 1112 3月  31 14:31 ca.pem
-rw-r--r--. 1 mysql mysql 1112 3月  31 14:31 client-cert.pem
-rw-------. 1 mysql mysql 1676 3月  31 14:31 client-key.pem
[root@slave data]# chmod +r client-key.pem
[root@slave ~]# service mysqld restart
Shutting down MySQL..                                      [  确定  ]
Starting MySQL.                                            [  确定  ]
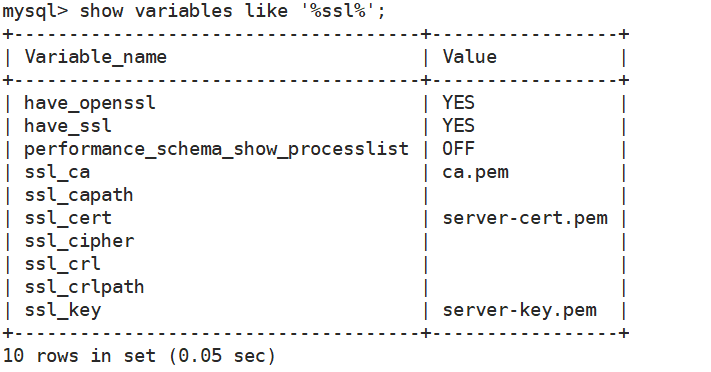
2. 確認ssl開啟成功
[root@slave ~]# mysql -uroot -p123 -e "show variables like '%ssl%'"
mysql: [Warning] Using a password on the command line interface can be insecure.
+-------------------------------------+-----------------+
| Variable_name                       | Value           |
+-------------------------------------+-----------------+
| have_openssl                        | YES             |
| have_ssl                            | YES             |
| performance_schema_show_processlist | OFF             |
| ssl_ca                              | ca.pem          |
| ssl_capath                          |                 |
| ssl_cert                            | client-cert.pem |
| ssl_cipher                          |                 |
| ssl_crl                             |                 |
| ssl_crlpath                         |                 |
| ssl_key                             | client-key.pem  |
+-------------------------------------+-----------------+
3. 在設定主從複製之前可以在從 mysql 上用 SSL 連線主伺服器試試。
注意已分割IP,8.2是master的IP,可以看到ssl協定Cipher in use is ECDHE-RSA-AES128-GCM-SHA256
[root@slave ~]# cd /usr/local/mysql/data
[root@slave data]# mysql --ssl-ca=ca.pem --ssl-cert=client-cert.pem --ssl-key=client-key.pem -u rep -p123 -h 192.168.8.2
mysql: [Warning] Using a password on the command line interface can be insecure.
Welcome to the MySQL monitor.  Commands end with ; or \g.
Your MySQL connection id is 3
Server version: 5.7.40-log MySQL Community Server (GPL)

Copyright (c) 2000, 2022, Oracle and/or its affiliates.

Oracle is a registered trademark of Oracle Corporation and/or its
affiliates. Other names may be trademarks of their respective
owners.

Type 'help;' or '\h' for help. Type '\c' to clear the current input statement.

mysql>
mysql> \s
--------------
mysql  Ver 14.14 Distrib 5.7.40, for linux-glibc2.12 (x86_64) using  EditLine wrapper

Connection id:		3
Current database:
Current user:		rep@192.168.8.3
SSL:			Cipher in use is ECDHE-RSA-AES128-GCM-SHA256
Current pager:		stdout
Using outfile:		''
Using delimiter:	;
Server version:		5.7.40-log MySQL Community Server (GPL)
Protocol version:	10
Connection:		192.168.8.2 via TCP/IP
Server characterset:	latin1
Db     characterset:	latin1
Client characterset:	utf8
Conn.  characterset:	utf8
TCP port:		3306
Uptime:			22 min 19 sec

Threads: 1  Questions: 8  Slow queries: 0  Opens: 109  Flush tables: 1  Open tables: 102  Queries per second avg: 0.005
--------------
1.登入slave,設定主從伺服器到伺服器replicate
記得先退出連接,登入slave的mysql服務。
mysql> exit
Bye
[root@slave data]# mysql -uroot -p123
#省略部分登录信息
mysql> change master to
-> master_host='192.168.8.2', #masterIP
-> master_user='rep', #master用户
-> master_password='123', #master密码
-> master_log_file='mysql-bin.000001', #master二进制日志文件
-> master_log_pos=154, #master位置
-> master_ssl=1, #masterssl
-> master_ssl_cert='client-cert.pem',
-> master_ssl_key='client-key.pem',
-> master_ssl_ca='ca.pem';
Query OK, 0 rows affected, 2 warnings (0.07 sec)
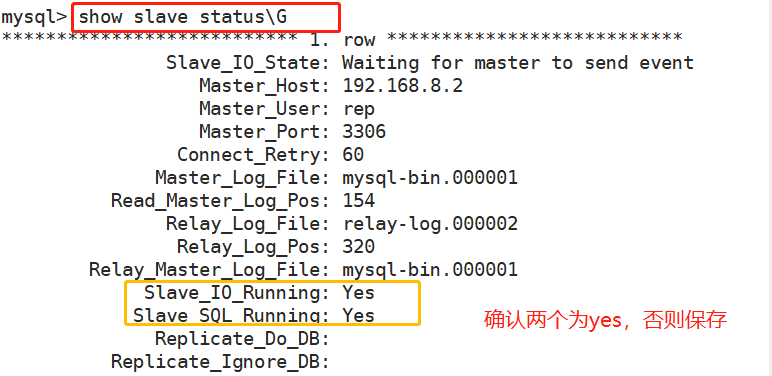
mysql> start slave; #启用从
Query OK, 0 rows affected (0.02 sec)確認啟用成功。
測試SSL主從複製
1. 登入master,寫入一些資料
[root@master ~]# mysql -uroot -p123
#省略部分内容
mysql> create database bbs;
Query OK, 1 row affected (0.01 sec)

mysql> use bbs;
Database changed
mysql> create table tb1(id int,
    -> name varchar(20));
Query OK, 0 rows affected (0.02 sec)

mysql> insert into tb1 values(1,'z3');
Query OK, 1 row affected (0.02 sec)2. 登入slave,查看資料
[root@slave ~]# mysql -uroot -p123
#省略部分内容
mysql> select * from bbs.tb1;
+------+------+
| id   | name |
+------+------+
|    1 | z3   |
+------+------+
1 row in set (0.01 sec)
最後可以查看到z3,主從成功。
以上是MySQL基於SSL安全連線的主從複製怎麼實現的詳細內容。更多資訊請關注PHP中文網其他相關文章!

熱AI工具

Undresser.AI Undress
人工智慧驅動的應用程序,用於創建逼真的裸體照片

AI Clothes Remover
用於從照片中去除衣服的線上人工智慧工具。

Undress AI Tool
免費脫衣圖片

Clothoff.io
AI脫衣器

Video Face Swap
使用我們完全免費的人工智慧換臉工具,輕鬆在任何影片中換臉!

熱門文章
熱工具

記事本++7.3.1
好用且免費的程式碼編輯器

SublimeText3漢化版
中文版,非常好用

禪工作室 13.0.1
強大的PHP整合開發環境

Dreamweaver CS6
視覺化網頁開發工具

SublimeText3 Mac版
神級程式碼編輯軟體(SublimeText3)


 MySQL的角色:Web應用程序中的數據庫
Apr 17, 2025 am 12:23 AM
MySQL的角色:Web應用程序中的數據庫
Apr 17, 2025 am 12:23 AM
MySQL在Web應用中的主要作用是存儲和管理數據。 1.MySQL高效處理用戶信息、產品目錄和交易記錄等數據。 2.通過SQL查詢,開發者能從數據庫提取信息生成動態內容。 3.MySQL基於客戶端-服務器模型工作,確保查詢速度可接受。
 docker怎麼啟動mysql
Apr 15, 2025 pm 12:09 PM
docker怎麼啟動mysql
Apr 15, 2025 pm 12:09 PM
在 Docker 中啟動 MySQL 的過程包含以下步驟:拉取 MySQL 鏡像創建並啟動容器,設置根用戶密碼並映射端口驗證連接創建數據庫和用戶授予對數據庫的所有權限
 laravel入門實例
Apr 18, 2025 pm 12:45 PM
laravel入門實例
Apr 18, 2025 pm 12:45 PM
Laravel 是一款 PHP 框架,用於輕鬆構建 Web 應用程序。它提供一系列強大的功能,包括:安裝: 使用 Composer 全局安裝 Laravel CLI,並在項目目錄中創建應用程序。路由: 在 routes/web.php 中定義 URL 和處理函數之間的關係。視圖: 在 resources/views 中創建視圖以呈現應用程序的界面。數據庫集成: 提供與 MySQL 等數據庫的開箱即用集成,並使用遷移來創建和修改表。模型和控制器: 模型表示數據庫實體,控制器處理 HTTP 請求。
 解決數據庫連接問題:使用minii/db庫的實際案例
Apr 18, 2025 am 07:09 AM
解決數據庫連接問題:使用minii/db庫的實際案例
Apr 18, 2025 am 07:09 AM
在開發一個小型應用時,我遇到了一個棘手的問題:需要快速集成一個輕量級的數據庫操作庫。嘗試了多個庫後,我發現它們要么功能過多,要么兼容性不佳。最終,我找到了minii/db,這是一個基於Yii2的簡化版本,完美地解決了我的問題。
 centos7如何安裝mysql
Apr 14, 2025 pm 08:30 PM
centos7如何安裝mysql
Apr 14, 2025 pm 08:30 PM
優雅安裝 MySQL 的關鍵在於添加 MySQL 官方倉庫。具體步驟如下:下載 MySQL 官方 GPG 密鑰,防止釣魚攻擊。添加 MySQL 倉庫文件:rpm -Uvh https://dev.mysql.com/get/mysql80-community-release-el7-3.noarch.rpm更新 yum 倉庫緩存:yum update安裝 MySQL:yum install mysql-server啟動 MySQL 服務:systemctl start mysqld設置開機自啟動
 centos安裝mysql
Apr 14, 2025 pm 08:09 PM
centos安裝mysql
Apr 14, 2025 pm 08:09 PM
在 CentOS 上安裝 MySQL 涉及以下步驟:添加合適的 MySQL yum 源。執行 yum install mysql-server 命令以安裝 MySQL 服務器。使用 mysql_secure_installation 命令進行安全設置,例如設置 root 用戶密碼。根據需要自定義 MySQL 配置文件。調整 MySQL 參數和優化數據庫以提升性能。
 laravel框架安裝方法
Apr 18, 2025 pm 12:54 PM
laravel框架安裝方法
Apr 18, 2025 pm 12:54 PM
文章摘要:本文提供了詳細分步說明,指導讀者如何輕鬆安裝 Laravel 框架。 Laravel 是一個功能強大的 PHP 框架,它 упростил 和加快了 web 應用程序的開發過程。本教程涵蓋了從系統要求到配置數據庫和設置路由等各個方面的安裝過程。通過遵循這些步驟,讀者可以快速高效地為他們的 Laravel 項目打下堅實的基礎。
 MySQL與其他編程語言:一種比較
Apr 19, 2025 am 12:22 AM
MySQL與其他編程語言:一種比較
Apr 19, 2025 am 12:22 AM
MySQL与其他编程语言相比,主要用于存储和管理数据,而其他语言如Python、Java、C 则用于逻辑处理和应用开发。MySQL以其高性能、可扩展性和跨平台支持著称,适合数据管理需求,而其他语言在各自领域如数据分析、企业应用和系统编程中各有优势。
