nginx怎麼配置二級域名
我的vps掛了三個服務, 分別是:
#wordpress搭建的博客服務, 運行於8000端口, 訪問方式http ://fangyuanxiaozhan.com:8000
gogs搭建的git服務, 運行於10080埠, 訪問方式http://fangyuanxiaozhan.com:10080
nextcloud搭建的網站服務, 運行於8080埠, 訪問方式http://fangyuanxiaozhan.com:10080
我的需求:
1.造訪部落格服務時, 直接輸入http://fangyuanxiaozhan.com
造訪git服務時,直接輸入http://git.fangyuanxiaozhan.com
造訪網盤服務時, 直接輸入http://cloud.fangyuanxiaozhan.com
#實現的方法
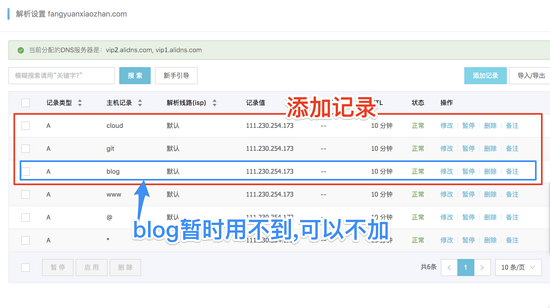
1、到託管網域的網站, 添加dns解析, 我的網域fangyuanxiaozhan.com 託管在阿里雲, 我的做法是登入https://dns.console.aliyun.com /#/dns/domainlist , 新增二級記錄

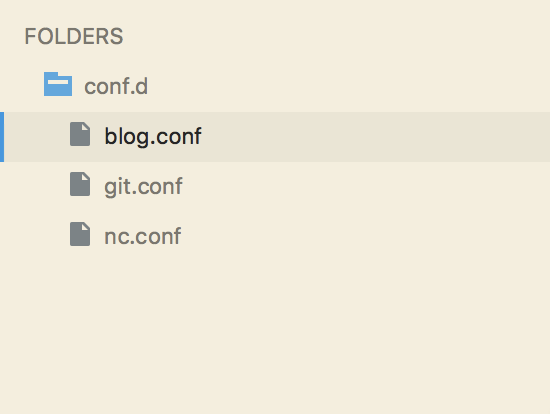
2、我使用的是centos7, nginx設定檔的預設位置為 /etc/nginx/nginx .conf , 有趣的是, /etc/nginx/nginx.conf 內引入了配置文件夾 /etc/nginx/conf.d , 也就是我們可以把 /etc/nginx/nginx.conf 中的一些預設設定註解掉, 直接在資料夾 /etc/nginx/conf.d 中設定多個獨立的設定檔.

/etc/nginx/nginx.conf 的設定
# for more information on configuration, see:
#  * official english documentation: http://nginx.org/en/docs/
#  * official russian documentation: http://nginx.org/ru/docs/

user nginx;
worker_processes auto;
error_log /var/log/nginx/error.log;
pid /run/nginx.pid;

# load dynamic modules. see /usr/share/nginx/readme.dynamic.
include /usr/share/nginx/modules/*.conf;

events {
  worker_connections 1024;
}

http {
  log_format main '$remote_addr - $remote_user [$time_local] "$request" '
           '$status $body_bytes_sent "$http_referer" '
           '"$http_user_agent" "$http_x_forwarded_for"';

  access_log /var/log/nginx/access.log main;

  sendfile      on;
  tcp_nopush     on;
  tcp_nodelay     on;
  keepalive_timeout  65;
  types_hash_max_size 2048;

  include       /etc/nginx/mime.types;
  default_type    application/octet-stream;

  include /etc/nginx/conf.d/*.conf;

}注意上述設定檔的最後一行, include /etc/ nginx/conf.d/*.conf; 保證了 /etc/nginx/conf.d/ 下,所有以.conf結尾的設定檔, 都會被主設定檔 nginx .conf 引入並生效
在 /etc/nginx/conf.d/ 下方需要新建三個檔案

blog.conf (實作8000埠映射到80埠, 不使用二級網域)
server {
  listen 80;
  server_name fangyuanxiaozhan.com;

  location / {
    proxy_set_header  x-real-ip $remote_addr;
    proxy_set_header  host   $http_host;
    proxy_pass     http://0.0.0.0:8000;
  }
}blog.conf實作了fangyuanxiaozhan.com:8000對應到fangyuanxiaozhan.com
#git.conf (實現10080埠映射到80埠, 使用二級網域 git )
server {
  listen 80;
  server_name git.fangyuanxiaozhan.com;

  location / {
    proxy_set_header  x-real-ip $remote_addr;
    proxy_set_header  host   $http_host;
    proxy_pass     http://0.0.0.0:10080;
  }
}git.conf實作了fangyuanxiaozhan.com:10080對應到git.fangyuanxiaozhan.com
# #nc.conf (實作10080埠對應到80埠, 使用二級網域 cloud )
server {
  listen 80;
  server_name cloud.fangyuanxiaozhan.com;

  location / {
    proxy_set_header  x-real-ip $remote_addr;
    proxy_set_header  host   $http_host;
    proxy_pass     http://0.0.0.0:8080;
  }
}git.conf實作了fangyuanxiaozhan.com:8080對應到cloud.fangyuanxiaozhan.com
重啟nginx讓設定生效
#關閉nginx
sudo $(which nginx) -s stop
開啟nginx
sudo $(which nginx)
效果顯示
 #
#


以上是nginx怎麼配置二級域名的詳細內容。更多資訊請關注PHP中文網其他相關文章!

熱AI工具

Undresser.AI Undress
人工智慧驅動的應用程序,用於創建逼真的裸體照片

AI Clothes Remover
用於從照片中去除衣服的線上人工智慧工具。

Undress AI Tool
免費脫衣圖片

Clothoff.io
AI脫衣器

Video Face Swap
使用我們完全免費的人工智慧換臉工具,輕鬆在任何影片中換臉!

熱門文章

熱工具

記事本++7.3.1
好用且免費的程式碼編輯器

SublimeText3漢化版
中文版,非常好用

禪工作室 13.0.1
強大的PHP整合開發環境

Dreamweaver CS6
視覺化網頁開發工具

SublimeText3 Mac版
神級程式碼編輯軟體(SublimeText3)
 nginx在windows中怎麼配置
Apr 14, 2025 pm 12:57 PM
如何在 Windows 中配置 Nginx?安裝 Nginx 並創建虛擬主機配置。修改主配置文件並包含虛擬主機配置。啟動或重新加載 Nginx。測試配置並查看網站。選擇性啟用 SSL 並配置 SSL 證書。選擇性設置防火牆允許 80 和 443 端口流量。
 docker容器名稱怎麼查
Apr 15, 2025 pm 12:21 PM
可以通過以下步驟查詢 Docker 容器名稱:列出所有容器(docker ps)。篩選容器列表(使用 grep 命令)。獲取容器名稱(位於 "NAMES" 列中)。
 docker怎麼啟動容器
Apr 15, 2025 pm 12:27 PM
Docker 容器啟動步驟:拉取容器鏡像:運行 "docker pull [鏡像名稱]"。創建容器:使用 "docker create [選項] [鏡像名稱] [命令和參數]"。啟動容器:執行 "docker start [容器名稱或 ID]"。檢查容器狀態:通過 "docker ps" 驗證容器是否正在運行。
 怎麼查看nginx是否啟動
Apr 14, 2025 pm 01:03 PM
確認 Nginx 是否啟動的方法:1. 使用命令行:systemctl status nginx(Linux/Unix)、netstat -ano | findstr 80(Windows);2. 檢查端口 80 是否開放;3. 查看系統日誌中 Nginx 啟動消息;4. 使用第三方工具,如 Nagios、Zabbix、Icinga。
 docker怎麼創建容器
Apr 15, 2025 pm 12:18 PM
在 Docker 中創建容器: 1. 拉取鏡像: docker pull [鏡像名] 2. 創建容器: docker run [選項] [鏡像名] [命令] 3. 啟動容器: docker start [容器名]
 nginx怎麼查版本
Apr 14, 2025 am 11:57 AM
可以查詢 Nginx 版本的方法有:使用 nginx -v 命令;查看 nginx.conf 文件中的 version 指令;打開 Nginx 錯誤頁,查看頁面的標題。
 nginx怎麼配置雲服務器域名
Apr 14, 2025 pm 12:18 PM
在雲服務器上配置 Nginx 域名的方法:創建 A 記錄,指向雲服務器的公共 IP 地址。在 Nginx 配置文件中添加虛擬主機塊,指定偵聽端口、域名和網站根目錄。重啟 Nginx 以應用更改。訪問域名測試配置。其他注意事項:安裝 SSL 證書啟用 HTTPS、確保防火牆允許 80 端口流量、等待 DNS 解析生效。
 nginx服務器掛了怎麼辦
Apr 14, 2025 am 11:42 AM
當 Nginx 服務器宕機時,可執行以下故障排除步驟:檢查 nginx 進程是否正在運行。查看錯誤日誌以獲取錯誤消息。檢查 nginx 配置語法正確性。確保 nginx 具有訪問文件所需的權限。檢查文件描述符打開限制。確認 nginx 正在偵聽正確的端口。添加防火牆規則以允許nginx流量。檢查反向代理設置,包括後端服務器可用性。如需進一步幫助,請聯繫技術支持。


