

Python+OpenCV之形態學的操作方法是什麼

一、腐蝕與膨脹
1.1 腐蝕操作
import cv2
import numpy as np

img = cv2.imread('DataPreprocessing/img/dige.png')

cv2.imshow("img", img)
cv2.waitKey(0)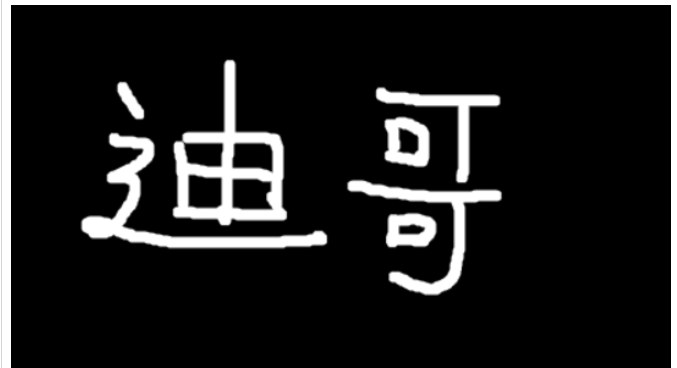
cv2.destroyAllWindows()dige.png原圖1展示(註: 沒有原圖的可以截圖下來保存本地。

#腐蝕1輪次之後~ (iterations = 1)
kernel = np.ones((3, 3), np.uint8)
erosion = cv2.erode(img, kernel, iterations=1)

cv2.imshow('erosion', erosion)
cv2.waitKey(0)
cv2.destroyAllWindows()
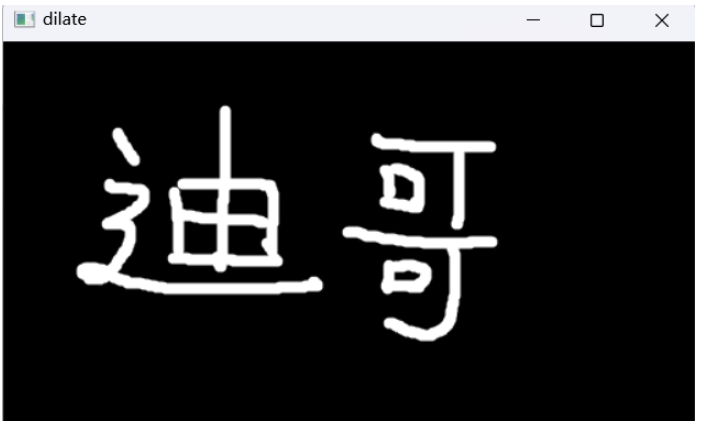
腐蝕結果展示圖2:

腐蝕圓多次的效果,以及腐蝕原理
pie = cv2.imread('DataPreprocessing/img/pie.png')

cv2.imshow('pie', pie)
cv2.waitKey(0)
cv2.destroyAllWindows()
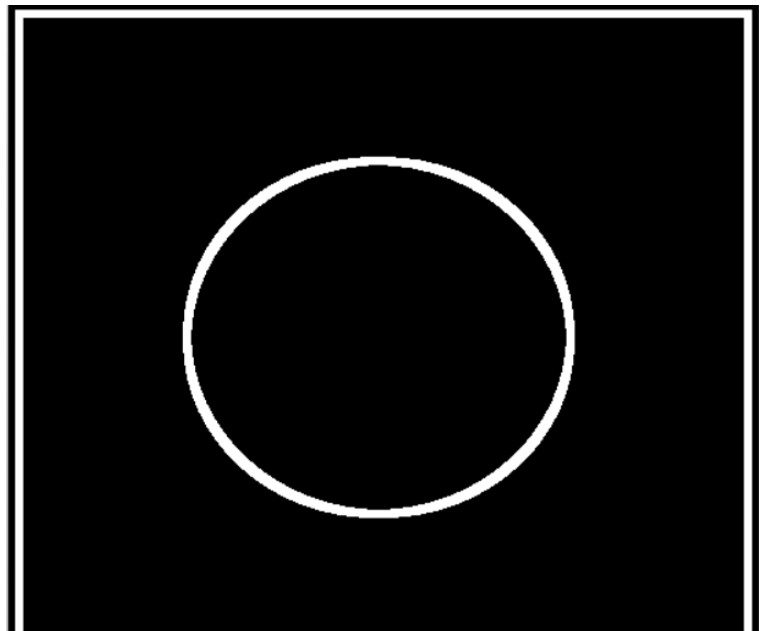
pie.png原圖3:

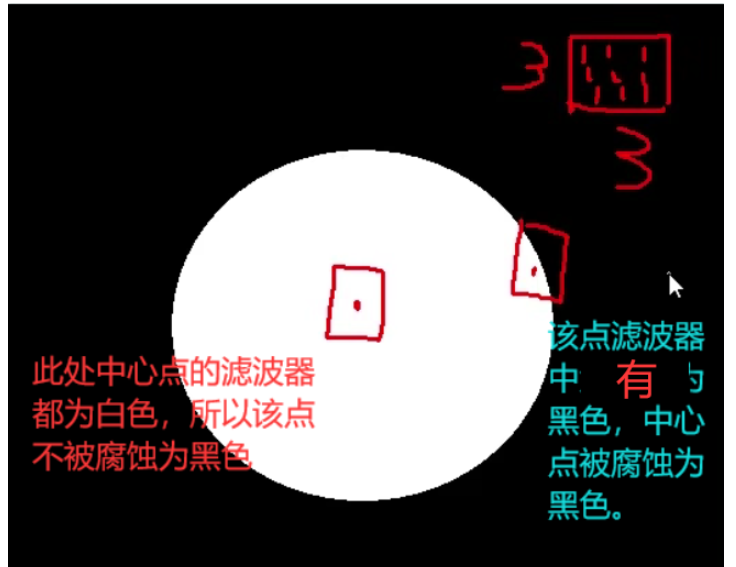
腐蝕原理, 其中濾波器的大小越大腐蝕的程度越大圖4:
kernel = np.ones((30, 30), np.uint8)
erosion_1 = cv2.erode(pie, kernel, iterations=1)
erosion_2 = cv2.erode(pie, kernel, iterations=2)
erosion_3 = cv2.erode(pie, kernel, iterations=3)
res = np.hstack((erosion_1, erosion_2, erosion_3))
cv2.imshow('res', res)
cv2.waitKey(0)
cv2.destroyAllWindows()
圓腐蝕三次結果展示圖5:

1.2 膨脹操作
kernel = np.ones((3, 3), np.uint8)
dige_dilate = erosion
dige_dilate = cv2.dilate(erosion, kernel, iterations=1)

cv2.imshow('dilate', dige_dilate)
cv2.waitKey(0)
cv2.destroyAllWindows()
膨脹之前圖2,發現線條變粗,跟原圖對比的線條相差無幾,但是沒了那些長須裝的噪音,圖6:
膨脹圓多次的效果,以及膨脹原理與腐蝕相反,有白點的濾波器則濾波器內資料全變為白色。
pie = cv2.imread('DataPreprocessing/img/pie.png')

kernel = np.ones((30, 30), np.uint8)
dilate_1 = cv2.dilate(pie, kernel, iterations=1)
dilate_2 = cv2.dilate(pie, kernel, iterations=2)
dilate_3 = cv2.dilate(pie, kernel, iterations=3)
res = np.hstack((dilate_1, dilate_2, dilate_3))
cv2.imshow('res', res)
cv2.waitKey(0)
cv2.destroyAllWindows()
膨脹圓3次的結果展示,圖7:

# 开:先腐蚀,再膨胀
img = cv2.imread('DataPreprocessing/img/dige.png')

kernel = np.ones((5, 5), np.uint8)
opening = cv2.morphologyEx(img, cv2.MORPH_OPEN, kernel)

cv2.imshow('opening', opening)
cv2.waitKey(0)
cv2.destroyAllWindows()
登入後複製
將原圖1,先腐蝕,再膨脹,得到開運算結果# 开:先腐蚀,再膨胀 img = cv2.imread('DataPreprocessing/img/dige.png') kernel = np.ones((5, 5), np.uint8) opening = cv2.morphologyEx(img, cv2.MORPH_OPEN, kernel) cv2.imshow('opening', opening) cv2.waitKey(0) cv2.destroyAllWindows()
圖8:
# 闭:先膨胀,再腐蚀
img = cv2.imread('DataPreprocessing/img/dige.png')

kernel = np.ones((5, 5), np.uint8)
closing = cv2.morphologyEx(img, cv2.MORPH_CLOSE, kernel)

cv2.imshow('closing', closing)
cv2.waitKey(0)
cv2.destroyAllWindows()
登入後複製
將原圖1,先膨脹,再腐蝕,得到開運算結果# 闭:先膨胀,再腐蚀 img = cv2.imread('DataPreprocessing/img/dige.png') kernel = np.ones((5, 5), np.uint8) closing = cv2.morphologyEx(img, cv2.MORPH_CLOSE, kernel) cv2.imshow('closing', closing) cv2.waitKey(0) cv2.destroyAllWindows()
圖9:

# 梯度=膨胀-腐蚀
pie = cv2.imread('DataPreprocessing/img/pie.png')
kernel = np.ones((7, 7), np.uint8)
dilate = cv2.dilate(pie, kernel, iterations=5)
erosion = cv2.erode(pie, kernel, iterations=5)

res = np.hstack((dilate, erosion))

cv2.imshow('res', res)
cv2.waitKey(0)
cv2.destroyAllWindows()

gradient = cv2.morphologyEx(pie, cv2.MORPH_GRADIENT, kernel)

cv2.imshow('gradient', gradient)
cv2.waitKey(0)
cv2.destroyAllWindows()
圖10:

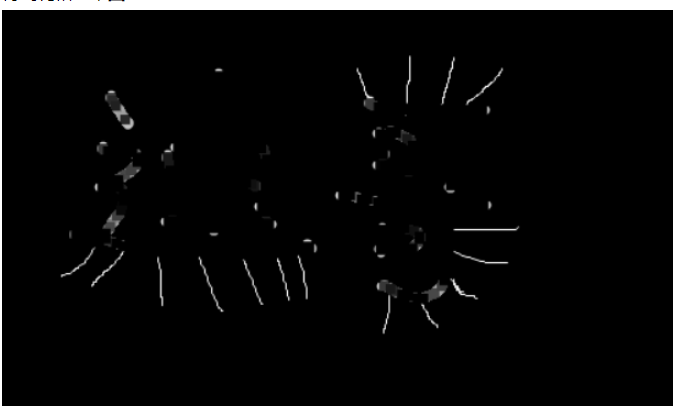
禮帽= 原始輸入-開運算結果
# 礼帽
img = cv2.imread('DataPreprocessing/img/dige.png')
tophat = cv2.morphologyEx(img, cv2.MORPH_TOPHAT, kernel)
cv2.imshow('tophat', tophat)
cv2.waitKey(0)
cv2.destroyAllWindows()
圖11:
#4.2 黑帽
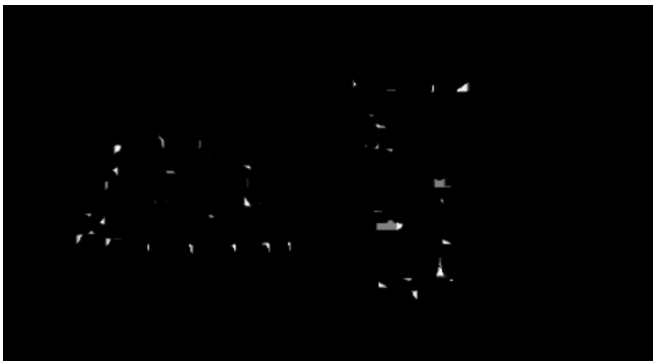
# 黑帽
img = cv2.imread('DataPreprocessing/img/dige.png')
blackhat = cv2.morphologyEx(img, cv2.MORPH_BLACKHAT, kernel)
cv2.imshow('blackhat ', blackhat)
cv2.waitKey(0)
cv2.destroyAllWindows()
以上是Python+OpenCV之形態學的操作方法是什麼的詳細內容。更多資訊請關注PHP中文網其他相關文章!

熱AI工具

Undresser.AI Undress
人工智慧驅動的應用程序,用於創建逼真的裸體照片

AI Clothes Remover
用於從照片中去除衣服的線上人工智慧工具。

Undress AI Tool
免費脫衣圖片

Clothoff.io
AI脫衣器

Video Face Swap
使用我們完全免費的人工智慧換臉工具,輕鬆在任何影片中換臉!

熱門文章
熱工具

記事本++7.3.1
好用且免費的程式碼編輯器

SublimeText3漢化版
中文版,非常好用

禪工作室 13.0.1
強大的PHP整合開發環境

Dreamweaver CS6
視覺化網頁開發工具

SublimeText3 Mac版
神級程式碼編輯軟體(SublimeText3)


 PHP和Python:解釋了不同的範例
Apr 18, 2025 am 12:26 AM
PHP和Python:解釋了不同的範例
Apr 18, 2025 am 12:26 AM
PHP主要是過程式編程,但也支持面向對象編程(OOP);Python支持多種範式,包括OOP、函數式和過程式編程。 PHP適合web開發,Python適用於多種應用,如數據分析和機器學習。
 在PHP和Python之間進行選擇:指南
Apr 18, 2025 am 12:24 AM
在PHP和Python之間進行選擇:指南
Apr 18, 2025 am 12:24 AM
PHP適合網頁開發和快速原型開發,Python適用於數據科學和機器學習。 1.PHP用於動態網頁開發,語法簡單,適合快速開發。 2.Python語法簡潔,適用於多領域,庫生態系統強大。
 PHP和Python:深入了解他們的歷史
Apr 18, 2025 am 12:25 AM
PHP和Python:深入了解他們的歷史
Apr 18, 2025 am 12:25 AM
PHP起源於1994年,由RasmusLerdorf開發,最初用於跟踪網站訪問者,逐漸演變為服務器端腳本語言,廣泛應用於網頁開發。 Python由GuidovanRossum於1980年代末開發,1991年首次發布,強調代碼可讀性和簡潔性,適用於科學計算、數據分析等領域。
 Python vs. JavaScript:學習曲線和易用性
Apr 16, 2025 am 12:12 AM
Python vs. JavaScript:學習曲線和易用性
Apr 16, 2025 am 12:12 AM
Python更適合初學者,學習曲線平緩,語法簡潔;JavaScript適合前端開發,學習曲線較陡,語法靈活。 1.Python語法直觀,適用於數據科學和後端開發。 2.JavaScript靈活,廣泛用於前端和服務器端編程。
 sublime怎麼運行代碼python
Apr 16, 2025 am 08:48 AM
sublime怎麼運行代碼python
Apr 16, 2025 am 08:48 AM
在 Sublime Text 中運行 Python 代碼,需先安裝 Python 插件,再創建 .py 文件並編寫代碼,最後按 Ctrl B 運行代碼,輸出會在控制台中顯示。
 vs code 可以在 Windows 8 中運行嗎
Apr 15, 2025 pm 07:24 PM
vs code 可以在 Windows 8 中運行嗎
Apr 15, 2025 pm 07:24 PM
VS Code可以在Windows 8上運行,但體驗可能不佳。首先確保系統已更新到最新補丁,然後下載與系統架構匹配的VS Code安裝包,按照提示安裝。安裝後,注意某些擴展程序可能與Windows 8不兼容,需要尋找替代擴展或在虛擬機中使用更新的Windows系統。安裝必要的擴展,檢查是否正常工作。儘管VS Code在Windows 8上可行,但建議升級到更新的Windows系統以獲得更好的開發體驗和安全保障。
 visual studio code 可以用於 python 嗎
Apr 15, 2025 pm 08:18 PM
visual studio code 可以用於 python 嗎
Apr 15, 2025 pm 08:18 PM
VS Code 可用於編寫 Python,並提供許多功能,使其成為開發 Python 應用程序的理想工具。它允許用戶:安裝 Python 擴展,以獲得代碼補全、語法高亮和調試等功能。使用調試器逐步跟踪代碼,查找和修復錯誤。集成 Git,進行版本控制。使用代碼格式化工具,保持代碼一致性。使用 Linting 工具,提前發現潛在問題。
 vscode在哪寫代碼
Apr 15, 2025 pm 09:54 PM
vscode在哪寫代碼
Apr 15, 2025 pm 09:54 PM
在 Visual Studio Code(VSCode)中編寫代碼簡單易行,只需安裝 VSCode、創建項目、選擇語言、創建文件、編寫代碼、保存並運行即可。 VSCode 的優點包括跨平台、免費開源、強大功能、擴展豐富,以及輕量快速。
