SpringBoot怎麼整合Redis實作序列化儲存Java對象
一、背景
1、思考
透過我們前面的學習,我們已經可以往Redis 存入字串,那麼我們要到Redis 存入Java 物件該怎麼辦呢?
2、方案
我們可以將Java 物件轉換為JSON 對象,然後轉為JSON 字串,存入Redis,那麼我們從Redis 中取出該資料的時候,我們也只能取出字串,並轉為Java 對象,這一系列的操作是不是顯得有些麻煩呢?
二、原始碼分析

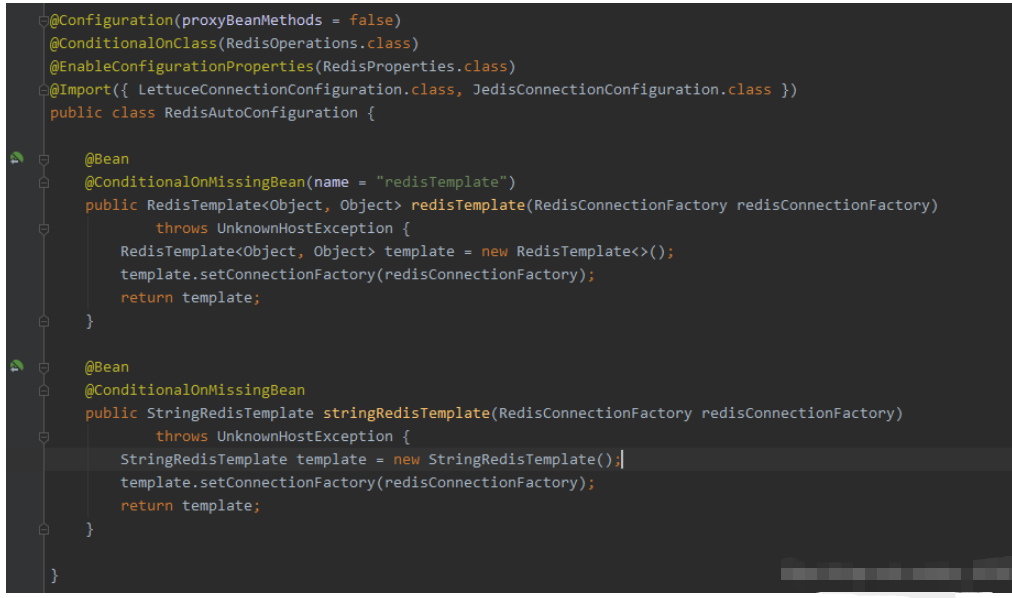
#以上是RedisAutoConfiguration 類別中的原始碼片段,可以看出SpringBoot 對Redis 做自動化配置的時候,容器中註入了redisTemplate 和stringRedisTemplate
#其中,RedisTemplate
看到這個@ConditionalOnMissingBean註解後,就知道如果Spring容器中有了RedisTemplate物件了,這個自動設定的RedisTemplate不會實例化。因此,我們有能力編寫自訂的配置類別來為RedisTemplate進行配置。
三、注入RedisTemplate
1、引入依賴
<!-- redis -->
<dependency>
    <groupId>org.springframework.boot</groupId>
    <artifactId>spring-boot-starter-data-redis</artifactId>
</dependency>以上引入了redis 的依賴,其餘依賴請自行添加
#2、Redis 連線資訊
spring:
  # Redis配置
  redis:
    host: 127.0.0.1
    port: 6379
    database: 10
    jedis:
      pool:
        # 连接池最大连接数(使用负值表示没有限制)
        max-active: 50
        # 连接池最大阻塞等待时间(使用负值表示没有限制)
        max-wait: 3000ms
        # 连接池中的最大空闲连接数
        max-idle: 20
        # 连接池中的最小空闲连接数
        min-idle: 5
    # 连接超时时间(毫秒)
timeout: 5000ms3、Redis 核心組態類別
Redis 的核心設定我們放在RedisConfig.java 檔案中
package com.zyxx.redistest.common;

import com.fasterxml.jackson.annotation.JsonAutoDetect;
import com.fasterxml.jackson.annotation.PropertyAccessor;
import com.fasterxml.jackson.databind.ObjectMapper;
import org.springframework.context.annotation.Bean;
import org.springframework.context.annotation.Configuration;
import org.springframework.data.redis.core.RedisTemplate;
import org.springframework.data.redis.serializer.Jackson2JsonRedisSerializer;
import org.springframework.data.redis.serializer.RedisSerializer;
import org.springframework.data.redis.serializer.StringRedisSerializer;

/**
 * @ClassName RedisConfig
 * @Description
 * @Author Lizhou
 * @Date 2020-10-22 9:48:48
 **/

@Configuration
public class RedisConfig {

    /**
     * RedisTemplate配置
     */
    @Bean
    public RedisTemplate<Object, Object> redisTemplate(RedisConnectionFactory redisConnectionFactory) {
		// 配置redisTemplate
        RedisTemplate<Object, Object> redisTemplate = new RedisTemplate<>();
        redisTemplate.setConnectionFactory(redisConnectionFactory);
        // 设置序列化
        Jackson2JsonRedisSerializer<Object> jackson2JsonRedisSerializer = new Jackson2JsonRedisSerializer<>(Object.class);
        ObjectMapper om = new ObjectMapper();
        om.setVisibility(PropertyAccessor.ALL, JsonAutoDetect.Visibility.ANY);
        om.activateDefaultTyping(LaissezFaireSubTypeValidator.instance, ObjectMapper.DefaultTyping.NON_FINAL, JsonTypeInfo.As.PROPERTY);
        jackson2JsonRedisSerializer.setObjectMapper(om);
        // key序列化
        redisTemplate.setKeySerializer(new StringRedisSerializer());
        // value序列化
        redisTemplate.setValueSerializer(jackson2JsonRedisSerializer);
        // Hash key序列化
        redisTemplate.setHashKeySerializer(new StringRedisSerializer());
        // Hash value序列化
        redisTemplate.setHashValueSerializer(jackson2JsonRedisSerializer);
        redisTemplate.afterPropertiesSet();
        return redisTemplate;
    }
}我們注入了一個名稱為redisTemplate,型別為RedisTemplate
4、Redis工具類別
#我們將對Redis 進行的一系列操作放在RedisUtils.java 檔案中
package com.zyxx.redistest.common;

import lombok.extern.slf4j.Slf4j;
import org.apache.commons.lang3.StringUtils;
import org.springframework.beans.factory.annotation.Autowired;
import org.springframework.data.redis.core.RedisTemplate;
import org.springframework.stereotype.Component;

/**
 * @ClassName RedisUtils
 * @Description
 * @Author Lizhou
 * @Date 2020-10-22 10:10:10
 **/
@Slf4j
@Component
public class RedisUtils {

    @Autowired
    private RedisTemplate<String, Object> redisTemplate;

    /**
     * 根据key读取数据
     */
    public Object get(final String key) {
        if (StringUtils.isBlank(key)) {
            return null;
        }
        try {
            return redisTemplate.opsForValue().get(key);
        } catch (Exception e) {
            e.printStackTrace();
        }
        return null;
    }

    /**
     * 写入数据
     */
    public boolean set(final String key, Object value) {
        if (StringUtils.isBlank(key)) {
            return false;
        }
        try {
            redisTemplate.opsForValue().set(key, value);
            log.info("存入redis成功,key:{},value:{}", key, value);
            return true;
        } catch (Exception e) {
            log.error("存入redis失败,key:{},value:{}", key, value);
            e.printStackTrace();
        }
        return false;
    }
}我們寫入了get,set 兩個方法用於測試
四、測試
1、建立Java 實體類UserInfo
package com.zyxx.redistest.common;

import lombok.Data;

import java.io.Serializable;
import java.util.Date;

/**
 * @ClassName UserInfo
 * @Description
 * @Author Lizhou
 * @Date 2020-10-22 10:12:12
 **/
@Data
public class UserInfo implements Serializable {
    /**
     * id
     */
    private Integer id;
    /**
     * 姓名
     */
    private String name;
    /**
     * 创建时间
     */
    private Date createTime;
}2、測試用例
package com.zyxx.redistest;

import com.zyxx.redistest.common.RedisUtils;
import com.zyxx.redistest.common.UserInfo;
import org.junit.jupiter.api.Test;
import org.springframework.beans.factory.annotation.Autowired;
import org.springframework.boot.test.context.SpringBootTest;

import java.util.Date;

@SpringBootTest
class RedisTestApplicationTests {

    @Autowired
    private RedisUtils redisUtil;

    @Test
    void contextLoads() {
        UserInfo userInfo = new UserInfo();
        userInfo.setId(1);
        userInfo.setName("jack");
        userInfo.setCreateTime(new Date());
        // 放入redis
        redisUtil.set("user", userInfo);
        // 从redis中获取
		System.out.println("获取到数据:" + redisUtil.get("user"));
    }
}我們向Redis 中存入了一個key 為」user“,value 為UserInfo 物件的數據,然後再根據key 取得該資料
3、測試結果

可以看出,我們在Redis 中成功存入Java 物件數據,並成功取得了這個物件。
以上是SpringBoot怎麼整合Redis實作序列化儲存Java對象的詳細內容。更多資訊請關注PHP中文網其他相關文章!

熱AI工具

Undresser.AI Undress
人工智慧驅動的應用程序,用於創建逼真的裸體照片

AI Clothes Remover
用於從照片中去除衣服的線上人工智慧工具。

Undress AI Tool
免費脫衣圖片

Clothoff.io
AI脫衣器

Video Face Swap
使用我們完全免費的人工智慧換臉工具,輕鬆在任何影片中換臉!

熱門文章

熱工具

記事本++7.3.1
好用且免費的程式碼編輯器

SublimeText3漢化版
中文版,非常好用

禪工作室 13.0.1
強大的PHP整合開發環境

Dreamweaver CS6
視覺化網頁開發工具

SublimeText3 Mac版
神級程式碼編輯軟體(SublimeText3)
 PHP:網絡開發的關鍵語言
Apr 13, 2025 am 12:08 AM
PHP是一種廣泛應用於服務器端的腳本語言,特別適合web開發。 1.PHP可以嵌入HTML,處理HTTP請求和響應,支持多種數據庫。 2.PHP用於生成動態網頁內容,處理表單數據,訪問數據庫等,具有強大的社區支持和開源資源。 3.PHP是解釋型語言,執行過程包括詞法分析、語法分析、編譯和執行。 4.PHP可以與MySQL結合用於用戶註冊系統等高級應用。 5.調試PHP時,可使用error_reporting()和var_dump()等函數。 6.優化PHP代碼可通過緩存機制、優化數據庫查詢和使用內置函數。 7
 PHP與Python:了解差異
Apr 11, 2025 am 12:15 AM
PHP和Python各有優勢,選擇應基於項目需求。 1.PHP適合web開發,語法簡單,執行效率高。 2.Python適用於數據科學和機器學習,語法簡潔,庫豐富。
 PHP與其他語言:比較
Apr 13, 2025 am 12:19 AM
PHP適合web開發,特別是在快速開發和處理動態內容方面表現出色,但不擅長數據科學和企業級應用。與Python相比,PHP在web開發中更具優勢,但在數據科學領域不如Python;與Java相比,PHP在企業級應用中表現較差,但在web開發中更靈活;與JavaScript相比,PHP在後端開發中更簡潔,但在前端開發中不如JavaScript。
 PHP與Python:核心功能
Apr 13, 2025 am 12:16 AM
PHP和Python各有優勢,適合不同場景。 1.PHP適用於web開發,提供內置web服務器和豐富函數庫。 2.Python適合數據科學和機器學習,語法簡潔且有強大標準庫。選擇時應根據項目需求決定。
 PHP:許多網站的基礎
Apr 13, 2025 am 12:07 AM
PHP成為許多網站首選技術棧的原因包括其易用性、強大社區支持和廣泛應用。 1)易於學習和使用,適合初學者。 2)擁有龐大的開發者社區,資源豐富。 3)廣泛應用於WordPress、Drupal等平台。 4)與Web服務器緊密集成,簡化開發部署。
 centos redis如何配置Lua腳本執行時間
Apr 14, 2025 pm 02:12 PM
在CentOS系統上,您可以通過修改Redis配置文件或使用Redis命令來限制Lua腳本的執行時間,從而防止惡意腳本佔用過多資源。方法一:修改Redis配置文件定位Redis配置文件:Redis配置文件通常位於/etc/redis/redis.conf。編輯配置文件:使用文本編輯器(例如vi或nano)打開配置文件:sudovi/etc/redis/redis.conf設置Lua腳本執行時間限制:在配置文件中添加或修改以下行,設置Lua腳本的最大執行時間(單位:毫秒)
 PHP與Python:用例和應用程序
Apr 17, 2025 am 12:23 AM
PHP適用於Web開發和內容管理系統,Python適合數據科學、機器學習和自動化腳本。 1.PHP在構建快速、可擴展的網站和應用程序方面表現出色,常用於WordPress等CMS。 2.Python在數據科學和機器學習領域表現卓越,擁有豐富的庫如NumPy和TensorFlow。
 PHP的影響:網絡開發及以後
Apr 18, 2025 am 12:10 AM
PHPhassignificantlyimpactedwebdevelopmentandextendsbeyondit.1)ItpowersmajorplatformslikeWordPressandexcelsindatabaseinteractions.2)PHP'sadaptabilityallowsittoscaleforlargeapplicationsusingframeworkslikeLaravel.3)Beyondweb,PHPisusedincommand-linescrip


