

怎麼使用Python+PyQt5自製監控小工具

利用opencv的影像處理功能可以輕鬆對電腦攝影機的呼叫實現即時影像的擷取效果。
最終將圖片進行儲存後產生監控的歷史影片記錄。
pip install PyQt5

pip install python-opencv
若是沒有安裝相關的模組,可以選擇上述pip的方式來安裝。
接下來我們將需要的python模組匯入到程式碼區塊中。
# It's just an alias for the cv2 module.
import cv2 as cv_

# It's importing all the classes from the QtGui module.
from PyQt5.QtGui import *

# It's importing all the classes from the QtCore module.
from PyQt5.QtCore import *

# It's importing all the classes from the QtWidgets module.
from PyQt5.QtWidgets import *

# It's importing the sys module.
import sys

# It's importing the os module.
import os

# It's importing the time module.
import time

# It's importing the traceback module.
import traceback
建立名稱為CameraUI的python類,開發監控工具相關的頁面元件及佈局。
將控制項按鈕等對應的槽函數也放到該類別中。
class CameraUI(QWidget):
def __init__(self):
super(CameraUI, self).__init__()
self.init_ui()
def init_ui(self):
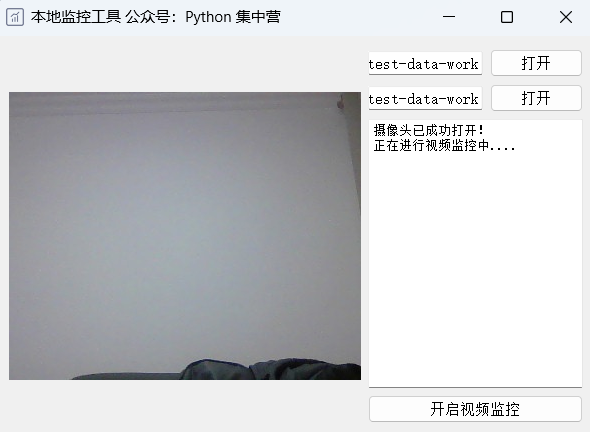
self.setWindowTitle('本地监控工具 公众号:Python 集中营')
self.setWindowIcon(QIcon('ico.png'))
self.resize(600, 400)
self.label_view = QLabel()
self.image_path = QLineEdit()
self.image_path.setReadOnly(True)
self.image_path.setPlaceholderText('视频流图片保存地址')
self.image_path_btn = QPushButton()
self.image_path_btn.setText('打开')
self.image_path_btn.clicked.connect(self.image_path_btn_clk)
self.video_path = QLineEdit()
self.video_path.setReadOnly(True)
self.video_path.setPlaceholderText('监控视频保存地址')
self.video_path_btn = QPushButton()
self.video_path_btn.setText('打开')
self.video_path_btn.clicked.connect(self.video_path_btn_clk)
self.start_listen_btn = QPushButton()
self.start_listen_btn.setText('开启监控')
self.start_listen_btn.clicked.connect(self.start_listen_btn_clk)
self.brower = QTextBrowser()
self.brower.setReadOnly(True)
self.brower.setFont(QFont('宋体', 8))
self.brower.setPlaceholderText('日志处理过程区域...')
self.brower.ensureCursorVisible()
hbox = QHBoxLayout()
vbox_left = QVBoxLayout()
vbox_right = QVBoxLayout()
vbox_left.addWidget(self.label_view)
vbox_right_grid1 = QGridLayout()
vbox_right_grid1.addWidget(self.image_path, 0, 0, 1, 2)
vbox_right_grid1.addWidget(self.image_path_btn, 0, 2, 1, 1)
vbox_right_grid1.addWidget(self.video_path, 1, 0, 1, 2)
vbox_right_grid1.addWidget(self.video_path_btn, 1, 2, 1, 1)
vbox_right_grid2 = QGridLayout()
vbox_right_grid2.addWidget(self.brower, 0, 0, 1, 3)
vbox_right_grid2.addWidget(self.start_listen_btn, 1, 0, 1, 3)
vbox_right.addLayout(vbox_right_grid1)
vbox_right.addLayout(vbox_right_grid2)
hbox.addLayout(vbox_left)
hbox.addLayout(vbox_right)
self.listen_thread = ListenWorkThread(self)
self.listen_thread.message.connect(self.show_message)
self.listen_thread.finished.connect(lambda: self.start_listen_btn.setEnabled(True))
self.setLayout(hbox)
def show_message(self, text):
cursor = self.brower.textCursor()
cursor.movePosition(QTextCursor.End)
self.brower.append(text)
self.brower.setTextCursor(cursor)
self.brower.ensureCursorVisible()
def image_path_btn_clk(self):
dir = QFileDialog.getExistingDirectory(self, "选择文件夹", os.getcwd())
self.image_path.setText(dir)
def video_path_btn_clk(self):
dir = QFileDialog.getExistingDirectory(self, "选择文件夹", os.getcwd())
self.video_path.setText(dir)
def start_listen_btn_clk(self):
self.listen_thread.start()
開發一個ListenWorkThread類別並且繼承自QThread的子執行緒。
將該執行緒作為業務類別實作呼叫本機攝影機完成監控的效果。
class ListenWorkThread(QThread):
    message = pyqtSignal(str)
    finished = pyqtSignal(bool)

    def __init__(self, parent=None):
        super(ListenWorkThread, self).__init__(parent)
        self.parent = parent
        self.working = True

    def __del__(self):
        self.working = False

    def run(self):
        try:
            image_path = self.parent.image_path.text()
            video_path = self.parent.video_path.text()
            if image_path.strip() == '' or video_path.strip() == '':
                self.message.emit('相关路径设置不能为空,请检查设置!')
                return
            self.cap = cv_.VideoCapture(0)
            self.cap.set(3, 300)
            self.cap.set(4, 400)
            if self.cap.isOpened():
                self.message.emit('摄像头已成功打开!')
                n = 0
                self.message.emit('正在进行视频 监控中....')
                start_time = time.clock()
                while True:
                    ret, img = self.cap.read()
                    if os.path.exists(os.path.join(image_path, str(n) + '.jpg')):
                        os.remove(os.path.join(image_path, str(n) + '.jpg'))
                    self.save_image(img, str(n), image_path)
                    time.sleep(0.1)
                    pixmap_ = QPixmap(os.path.join(image_path, str(n) + '.jpg'))
                    self.parent.label_view.setPixmap(pixmap_)
                    n = n + 1

            self.finished.emit(True)
        except Exception as e:
            traceback.print_exc()
            self.message.emit('程序运行错误,请检查参数是否设置正确!')
            self.finished.emit(True)

    def save_image(self, image=None, file_name=None, image_path=None):
        if image is not None:
cv_.imwrite(os.path.join(image_path, file_name + '.jpg'), image)以上整個業務子執行緒的邏輯就開發完成了,然後使用python模組的main函數呼叫。
將整個程式的運行加入主體循環當中。
if __name__ == '__main__':
    app = QApplication(sys.argv)
    main = CameraUI()
    main.show()
sys.exit(app.exec_())以上是怎麼使用Python+PyQt5自製監控小工具的詳細內容。更多資訊請關注PHP中文網其他相關文章!

熱AI工具

Undresser.AI Undress
人工智慧驅動的應用程序,用於創建逼真的裸體照片

AI Clothes Remover
用於從照片中去除衣服的線上人工智慧工具。

Undress AI Tool
免費脫衣圖片

Clothoff.io
AI脫衣器

Video Face Swap
使用我們完全免費的人工智慧換臉工具,輕鬆在任何影片中換臉!

熱門文章
熱工具

記事本++7.3.1
好用且免費的程式碼編輯器

SublimeText3漢化版
中文版,非常好用

禪工作室 13.0.1
強大的PHP整合開發環境

Dreamweaver CS6
視覺化網頁開發工具

SublimeText3 Mac版
神級程式碼編輯軟體(SublimeText3)


 PHP和Python:解釋了不同的範例
Apr 18, 2025 am 12:26 AM
PHP和Python:解釋了不同的範例
Apr 18, 2025 am 12:26 AM
PHP主要是過程式編程,但也支持面向對象編程(OOP);Python支持多種範式,包括OOP、函數式和過程式編程。 PHP適合web開發,Python適用於多種應用,如數據分析和機器學習。
 在PHP和Python之間進行選擇:指南
Apr 18, 2025 am 12:24 AM
在PHP和Python之間進行選擇:指南
Apr 18, 2025 am 12:24 AM
PHP適合網頁開發和快速原型開發,Python適用於數據科學和機器學習。 1.PHP用於動態網頁開發,語法簡單,適合快速開發。 2.Python語法簡潔,適用於多領域,庫生態系統強大。
 sublime怎麼運行代碼python
Apr 16, 2025 am 08:48 AM
sublime怎麼運行代碼python
Apr 16, 2025 am 08:48 AM
在 Sublime Text 中運行 Python 代碼,需先安裝 Python 插件,再創建 .py 文件並編寫代碼,最後按 Ctrl B 運行代碼,輸出會在控制台中顯示。
 PHP和Python:深入了解他們的歷史
Apr 18, 2025 am 12:25 AM
PHP和Python:深入了解他們的歷史
Apr 18, 2025 am 12:25 AM
PHP起源於1994年,由RasmusLerdorf開發,最初用於跟踪網站訪問者,逐漸演變為服務器端腳本語言,廣泛應用於網頁開發。 Python由GuidovanRossum於1980年代末開發,1991年首次發布,強調代碼可讀性和簡潔性,適用於科學計算、數據分析等領域。
 Python vs. JavaScript:學習曲線和易用性
Apr 16, 2025 am 12:12 AM
Python vs. JavaScript:學習曲線和易用性
Apr 16, 2025 am 12:12 AM
Python更適合初學者,學習曲線平緩,語法簡潔;JavaScript適合前端開發,學習曲線較陡,語法靈活。 1.Python語法直觀,適用於數據科學和後端開發。 2.JavaScript靈活,廣泛用於前端和服務器端編程。
 Golang vs. Python:性能和可伸縮性
Apr 19, 2025 am 12:18 AM
Golang vs. Python:性能和可伸縮性
Apr 19, 2025 am 12:18 AM
Golang在性能和可擴展性方面優於Python。 1)Golang的編譯型特性和高效並發模型使其在高並發場景下表現出色。 2)Python作為解釋型語言,執行速度較慢,但通過工具如Cython可優化性能。
 vscode在哪寫代碼
Apr 15, 2025 pm 09:54 PM
vscode在哪寫代碼
Apr 15, 2025 pm 09:54 PM
在 Visual Studio Code(VSCode)中編寫代碼簡單易行,只需安裝 VSCode、創建項目、選擇語言、創建文件、編寫代碼、保存並運行即可。 VSCode 的優點包括跨平台、免費開源、強大功能、擴展豐富,以及輕量快速。
 notepad 怎麼運行python
Apr 16, 2025 pm 07:33 PM
notepad 怎麼運行python
Apr 16, 2025 pm 07:33 PM
在 Notepad 中運行 Python 代碼需要安裝 Python 可執行文件和 NppExec 插件。安裝 Python 並為其添加 PATH 後,在 NppExec 插件中配置命令為“python”、參數為“{CURRENT_DIRECTORY}{FILE_NAME}”,即可在 Notepad 中通過快捷鍵“F6”運行 Python 代碼。
