

Springboot如何實現認證與動態權限管理

知識點補充
Shiro快取
流程分析
在原來的專案當中,由於沒有配置快取,因此每次需要驗證目前主體有沒有存取權限時,都會去查詢資料庫。由於權限資料是典型的讀多寫少的數據,因此,我們應該要對其加入快取的支援。
當我們加入快取後,shiro在做鑑權時先去緩存裡查詢相關數據,緩存裡沒有,則查詢資料庫並將查到的數據寫入緩存,下次再查時就能從緩存當中獲取數據,而不是從資料庫中獲取。這樣就能改善我們的應用的效能。
接下來,我們去實作shiro的快取管理部分。
Shiro會話機制
Shiro 提供了完整的企業級會話管理功能,不依賴底層容器(如web 容器tomcat),不管JavaSE 還是JavaEE 環境都可以使用,提供了會話管理、會話事件監聽、會話儲存/ 持久化、容器無關的叢集、失效/ 過期支援、對Web 的透明支援、SSO 單一登入的支援等特性。
我們將使用 Shiro 的會話管理來接管我們應用的web會話,並透過Redis來儲存會話資訊。
整合步驟
新增快取
CacheManager
在Shiro當中,它提供了CacheManager這個類別來做快取管理。
使用Shiro預設的EhCache實作
在shiro當中,預設使用的是EhCache快取框架。 EhCache 是純Java的進程內快取框架,具有快速、精幹等特性。
引入shiro-EhCache依賴
<dependency>
    <groupId>org.apache.shiro</groupId>
    <artifactId>shiro-ehcache</artifactId>
    <version>1.4.0</version>
</dependency>在SpringBoot整合Redis的過程中,也要注意版本匹配的問題,不然有可能報方法未找到的異常。
在ShiroConfig中加入快取配置
private void enableCache(MySQLRealm realm){
    //开启全局缓存配置
    realm.setCachingEnabled(true);
    //开启认证缓存配置
    realm.setAuthenticationCachingEnabled(true);
    //开启授权缓存配置
    realm.setAuthorizationCachingEnabled(true);

    //为了方便操作,我们给缓存起个名字
    realm.setAuthenticationCacheName("authcCache");
    realm.setAuthorizationCacheName("authzCache");
    //注入缓存实现
    realm.setCacheManager(new EhCacheManager());
}然後再在getRealm中呼叫這個方法即可。
提示:在這個實作當中,只是實作了本機的快取。也就是說快取的資料同應用程式一樣共用一台機器的記憶體。如果伺服器發生宕機或意外停電,那麼快取資料也將不復存在。當然你也可以透過cacheManager.setCacheManagerConfigFile()方法給予快取更多的設定。
接下來我們將透過Redis快取我們的權限資料
使用Redis實現
#新增依賴
<!--shiro-redis相关依赖-->
        <dependency>
            <groupId>org.crazycake</groupId>
            <artifactId>shiro-redis</artifactId>
            <version>3.1.0</version>
            <!--    里面这个shiro-core版本较低,会引发一个异常
					ClassNotFoundException: org.apache.shiro.event.EventBus
                    需要排除,直接使用上面的shiro
                    shiro1.3 加入了时间总线。-->
            <exclusions>
                <exclusion>
                    <groupId>org.apache.shiro</groupId>
                    <artifactId>shiro-core</artifactId>
                </exclusion>
            </exclusions>
</dependency>配置redis
在application.yml中新增redis的相關設定
spring:
   redis:
     host: 127.0.0.1
     port: 6379
     password: hewenping
     timeout: 3000
     jedis:
       pool:
         min-idle: 5
         max-active: 20
max-idle: 15修改ShiroConfig設定類,新增shiro-redis外掛程式設定
/**shiro配置类
 * @author 赖柄沣 bingfengdev@aliyun.com
 * @version 1.0
 * @date 2020/10/6 9:11
 */
@Configuration
public class ShiroConfig {

    private static final String CACHE_KEY = "shiro:cache:";
    private static final String SESSION_KEY = "shiro:session:";
    private static final int EXPIRE = 18000;
    @Value("${spring.redis.host}")
    private String host;
    @Value("${spring.redis.port}")
    private int port;
    @Value("${spring.redis.timeout}")
    private int timeout;
    @Value("${spring.redis.password}")
    private String password;

    @Value("${spring.redis.jedis.pool.min-idle}")
    private int minIdle;
    @Value("${spring.redis.jedis.pool.max-idle}")
    private int maxIdle;
    @Value("${spring.redis.jedis.pool.max-active}")
    private int maxActive;

    @Bean
    public AuthorizationAttributeSourceAdvisor authorizationAttributeSourceAdvisor(org.apache.shiro.mgt.SecurityManager securityManager) {
        AuthorizationAttributeSourceAdvisor authorizationAttributeSourceAdvisor = new AuthorizationAttributeSourceAdvisor();
        authorizationAttributeSourceAdvisor.setSecurityManager(securityManager);
        return authorizationAttributeSourceAdvisor;
    }


    /**
     * 创建ShiroFilter拦截器
     * @return ShiroFilterFactoryBean
     */
    @Bean(name = "shiroFilterFactoryBean")
    public ShiroFilterFactoryBean getShiroFilterFactoryBean(DefaultWebSecurityManager securityManager){
        ShiroFilterFactoryBean shiroFilterFactoryBean = new ShiroFilterFactoryBean();
        shiroFilterFactoryBean.setSecurityManager(securityManager);

        //配置不拦截路径和拦截路径,顺序不能反
        HashMap<String, String> map = new HashMap<>(5);

        map.put("/authc/**","anon");
        map.put("/login.html","anon");
        map.put("/js/**","anon");
        map.put("/css/**","anon");

        map.put("/**","authc");
        shiroFilterFactoryBean.setFilterChainDefinitionMap(map);

        //覆盖默认的登录url
        shiroFilterFactoryBean.setLoginUrl("/authc/unauthc");
        return shiroFilterFactoryBean;
    }

    @Bean
    public Realm getRealm(){
        //设置凭证匹配器,修改为hash凭证匹配器
        HashedCredentialsMatcher myCredentialsMatcher = new HashedCredentialsMatcher();
        //设置算法
        myCredentialsMatcher.setHashAlgorithmName("md5");
        //散列次数
        myCredentialsMatcher.setHashIterations(1024);
        MySQLRealm realm = new MySQLRealm();
        realm.setCredentialsMatcher(myCredentialsMatcher);
        //开启缓存
        realm.setCachingEnabled(true);
        realm.setAuthenticationCachingEnabled(true);
        realm.setAuthorizationCachingEnabled(true);
        return realm;
    }

    /**
     * 创建shiro web应用下的安全管理器
     * @return DefaultWebSecurityManager
     */
    @Bean
    public DefaultWebSecurityManager getSecurityManager( Realm realm){
        DefaultWebSecurityManager securityManager = new DefaultWebSecurityManager();
        securityManager.setRealm(realm);

        securityManager.setCacheManager(cacheManager());
        SecurityUtils.setSecurityManager(securityManager);
        return securityManager;
    }


    /**
     * 配置Redis管理器
     * @Attention 使用的是shiro-redis开源插件
     * @return
     */
    @Bean
    public RedisManager redisManager() {
        RedisManager redisManager = new RedisManager();
        redisManager.setHost(host);
        redisManager.setPort(port);
        redisManager.setTimeout(timeout);
        redisManager.setPassword(password);
        JedisPoolConfig jedisPoolConfig = new JedisPoolConfig();
        jedisPoolConfig.setMaxTotal(maxIdle+maxActive);
        jedisPoolConfig.setMaxIdle(maxIdle);
        jedisPoolConfig.setMinIdle(minIdle);
        redisManager.setJedisPoolConfig(jedisPoolConfig);
        return redisManager;
    }


    @Bean
    public RedisCacheManager cacheManager() {
        RedisCacheManager redisCacheManager = new RedisCacheManager();
        redisCacheManager.setRedisManager(redisManager());
        redisCacheManager.setKeyPrefix(CACHE_KEY);
        // shiro-redis要求放在session里面的实体类必须有个id标识
        //这是组成redis中所存储数据的key的一部分
        redisCacheManager.setPrincipalIdFieldName("username");
        return redisCacheManager;
    }

}修改MySQLRealm中的doGetAuthenticationInfo #方法,將User物件整體作為SimpleAuthenticationInfo的第一個參數。 shiro-redis將根據RedisCacheManager的principalIdFieldName屬性值從第一個參數中取得id值作為redis中資料的key的一部份。
/**
 * 认证
 * @param token
 * @return
 * @throws AuthenticationException
 */
@Override
protected AuthenticationInfo doGetAuthenticationInfo(AuthenticationToken token) throws AuthenticationException {

    if(token==null){
        return null;
    }
    String principal = (String) token.getPrincipal();
    User user = userService.findByUsername(principal);
    SimpleAuthenticationInfo simpleAuthenticationInfo = new MyAuthcInfo(
            //由于shiro-redis插件需要从这个属性中获取id作为redis的key
            //所有这里传的是user而不是username
            user,
            //凭证信息
            user.getPassword(),
            //加密盐值
            new CurrentSalt(user.getSalt()),
            getName());

    return simpleAuthenticationInfo;
}並修改MySQLRealm中的doGetAuthorizationInfo方法,從User物件中取得主識別資訊。
/**
 * 授权
 * @param principals
 * @return
 */
@Override
protected AuthorizationInfo doGetAuthorizationInfo(PrincipalCollection principals) {
   User user = (User) principals.getPrimaryPrincipal();
    String username = user.getUsername();
    List<Role> roleList = roleService.findByUsername(username);
    SimpleAuthorizationInfo authorizationInfo = new SimpleAuthorizationInfo();
    for (Role role : roleList) {
        authorizationInfo.addRole(role.getRoleName());
    }
    List<Long> roleIdList  = new ArrayList<>();
    for (Role role : roleList) {
        roleIdList.add(role.getRoleId());
    }

    List<Resource> resourceList = resourceService.findByRoleIds(roleIdList);
    for (Resource resource : resourceList) {
        authorizationInfo.addStringPermission(resource.getResourcePermissionTag());
    }
    return authorizationInfo;
}自訂Salt
由於Shiro裡面預設的SimpleByteSource沒有實現序列化接口,導致ByteSource.Util.bytes()產生的salt在序列化時出錯,因此需要自訂Salt類別並實作序列化介面。並在自訂的Realm的認證方法使用new CurrentSalt(user.getSalt())傳入鹽值。
/**由于shiro当中的ByteSource没有实现序列化接口,缓存时会发生错误
 * 因此,我们需要通过自定义ByteSource的方式实现这个接口
 * @author 赖柄沣 bingfengdev@aliyun.com
 * @version 1.0
 * @date 2020/10/8 16:17
 */
public class CurrentSalt extends SimpleByteSource implements Serializable {
    public CurrentSalt(String string) {
        super(string);
    }

    public CurrentSalt(byte[] bytes) {
        super(bytes);
    }

    public CurrentSalt(char[] chars) {
        super(chars);
    }

    public CurrentSalt(ByteSource source) {
        super(source);
    }

    public CurrentSalt(File file) {
        super(file);
    }

    public CurrentSalt(InputStream stream) {
        super(stream);
    }
}新增Shiro自訂會話
新增自訂會話ID產生器
/**SessionId生成器
 * <p>@author 赖柄沣 laibingf_dev@outlook.com</p>
 * <p>@date 2020/8/15 15:19</p>
 */
public class ShiroSessionIdGenerator implements SessionIdGenerator {

    /**
     *实现SessionId生成
     * @param session
     * @return
     */
    @Override
    public Serializable generateId(Session session) {
        Serializable sessionId = new JavaUuidSessionIdGenerator().generateId(session);
        return String.format("login_token_%s", sessionId);
    }
}新增自訂會話管理器
/**
 * <p>@author 赖柄沣 laibingf_dev@outlook.com</p>
 * <p>@date 2020/8/15 15:40</p>
 */
public class ShiroSessionManager extends DefaultWebSessionManager {

    //定义常量
    private static final String AUTHORIZATION = "Authorization";
    private static final String REFERENCED_SESSION_ID_SOURCE = "Stateless request";
    //重写构造器
    public ShiroSessionManager() {
        super();
        this.setDeleteInvalidSessions(true);
    }

    /**
     * 重写方法实现从请求头获取Token便于接口统一
     *      * 每次请求进来,
     *      Shiro会去从请求头找Authorization这个key对应的Value(Token)
     * @param request
     * @param response
     * @return
     */
    @Override
    public Serializable getSessionId(ServletRequest request, ServletResponse response) {
        String token = WebUtils.toHttp(request).getHeader(AUTHORIZATION);
        //如果请求头中存在token 则从请求头中获取token
        if (!StringUtils.isEmpty(token)) {
            request.setAttribute(ShiroHttpServletRequest.REFERENCED_SESSION_ID_SOURCE, REFERENCED_SESSION_ID_SOURCE);
            request.setAttribute(ShiroHttpServletRequest.REFERENCED_SESSION_ID, token);
            request.setAttribute(ShiroHttpServletRequest.REFERENCED_SESSION_ID_IS_VALID, Boolean.TRUE);
            return token;
        } else {
            // 这里禁用掉Cookie获取方式
            return null;
        }
    }
}設定自訂會話管理器
在ShiroConfig中新增對會話管理器的配置
/**
 * SessionID生成器
 *
 */
@Bean
public ShiroSessionIdGenerator sessionIdGenerator(){
    return new ShiroSessionIdGenerator();
}

/**
 * 配置RedisSessionDAO
 */
@Bean
public RedisSessionDAO redisSessionDAO() {
    RedisSessionDAO redisSessionDAO = new RedisSessionDAO();
    redisSessionDAO.setRedisManager(redisManager());
    redisSessionDAO.setSessionIdGenerator(sessionIdGenerator());
    redisSessionDAO.setKeyPrefix(SESSION_KEY);
    redisSessionDAO.setExpire(EXPIRE);
    return redisSessionDAO;
}

/**
 * 配置Session管理器
 * @Author Sans
 *
 */
@Bean
public SessionManager sessionManager() {
    ShiroSessionManager shiroSessionManager = new ShiroSessionManager();
    shiroSessionManager.setSessionDAO(redisSessionDAO());
    //禁用cookie
    shiroSessionManager.setSessionIdCookieEnabled(false);
    //禁用会话id重写
    shiroSessionManager.setSessionIdUrlRewritingEnabled(false);
    return shiroSessionManager;
}目前最新版本(1.6.0)中,session管理器的setSessionIdUrlRewritingEnabled(false)配置沒有生效,導致沒有認證直接存取受保護資源出現多次重新導向的錯誤。將shiro版本切換為1.5.0後就解決了這個bug。
本來這篇文章應該是昨晚發的,因為這個原因搞了好久,今天才發。 。 。
修改自訂Realm的doGetAuthenticationInfo認證方法
在認證資訊回傳前,我們需要做一個判斷:如果目前使用者已在舊裝置上登錄,則需要將舊裝置上的會話id刪掉,使其下線。
/**
 * 认证
 * @param token
 * @return
 * @throws AuthenticationException
 */
@Override
protected AuthenticationInfo doGetAuthenticationInfo(AuthenticationToken token) throws AuthenticationException {

    if(token==null){
        return null;
    }
    String principal = (String) token.getPrincipal();
    User user = userService.findByUsername(principal);
    SimpleAuthenticationInfo simpleAuthenticationInfo = new MyAuthcInfo(
            //由于shiro-redis插件需要从这个属性中获取id作为redis的key
            //所有这里传的是user而不是username
            user,
            //凭证信息
            user.getPassword(),
            //加密盐值
            new CurrentSalt(user.getSalt()),
            getName());

    //清除当前主体旧的会话,相当于你在新电脑上登录系统,把你之前在旧电脑上登录的会话挤下去
    ShiroUtils.deleteCache(user.getUsername(),true);
    return simpleAuthenticationInfo;
}修改login介面
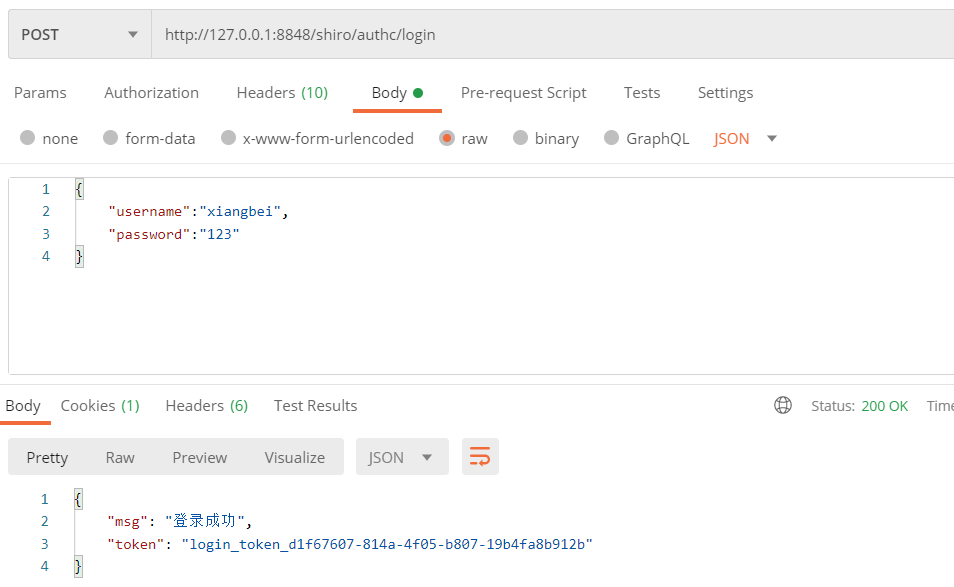
我們將會話資訊儲存在redis中,並在使用者認證通過後將會話Id以token的形式傳回給使用者。使用者請求受保護資源時帶上這個token,我們根據token資訊去redis中獲取使用者的權限信息,從而做訪問控制。
@PostMapping("/login")
public HashMap<Object, Object> login(@RequestBody LoginVO loginVO) throws AuthenticationException {
    boolean flags = authcService.login(loginVO);
    HashMap<Object, Object> map = new HashMap<>(3);
    if (flags){
        Serializable id = SecurityUtils.getSubject().getSession().getId();
        map.put("msg","登录成功");
        map.put("token",id);
        return map;
    }else {
        return null;
    }
}新增全域異常處理
/**shiro异常处理
 * @author 赖柄沣 bingfengdev@aliyun.com
 * @version 1.0
 * @date 2020/10/7 18:01
 */
@ControllerAdvice(basePackages = "pers.lbf.springbootshiro")
public class AuthExceptionHandler {

    //==================认证异常====================//

    @ExceptionHandler(ExpiredCredentialsException.class)
    @ResponseBody
    public String expiredCredentialsExceptionHandlerMethod(ExpiredCredentialsException e) {
        return "凭证已过期";
    }

    @ExceptionHandler(IncorrectCredentialsException.class)
    @ResponseBody
    public String incorrectCredentialsExceptionHandlerMethod(IncorrectCredentialsException e) {
        return "用户名或密码错误";
    }

    @ExceptionHandler(UnknownAccountException.class)
    @ResponseBody
    public String unknownAccountExceptionHandlerMethod(IncorrectCredentialsException e) {
        return "用户名或密码错误";
    }


    @ExceptionHandler(LockedAccountException.class)
    @ResponseBody
    public String lockedAccountExceptionHandlerMethod(IncorrectCredentialsException e) {
        return "账户被锁定";
    }

    //=================授权异常=====================//

    @ExceptionHandler(UnauthorizedException.class)
    @ResponseBody
    public String unauthorizedExceptionHandlerMethod(UnauthorizedException e){
        return "未授权!请联系管理员授权";
    }
}實際開發中,應該對回傳結果統一化,並給出業務錯誤碼。這已經超出了本文的範疇,如有需要,請根據自身系統特徵考慮。
進行測試
認證
登入成功的狀況
使用者名稱或密碼錯誤的情況

為了安全起見,不要暴露具體是使用者名稱錯誤還是密碼錯誤。
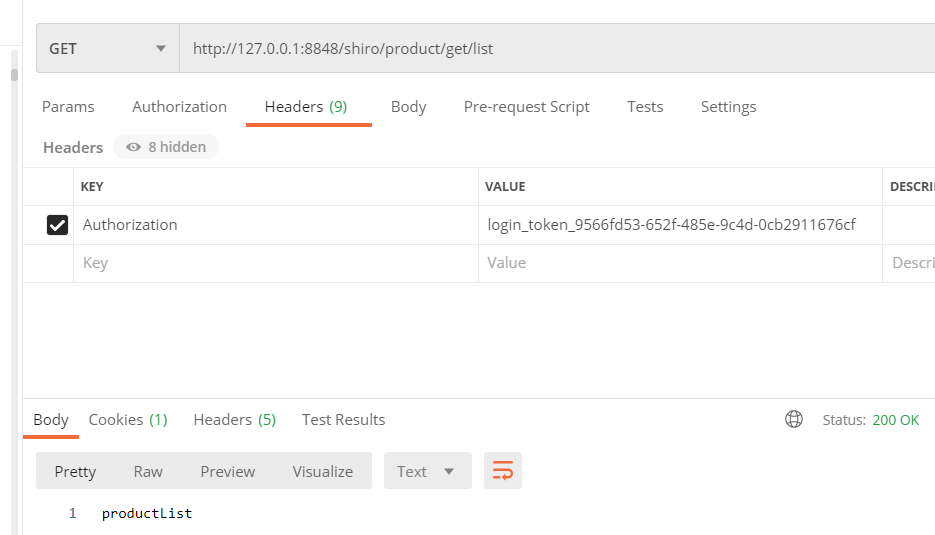
存取受保護資源
認證後存取有權限的資源
認證後訪問無權限的資源

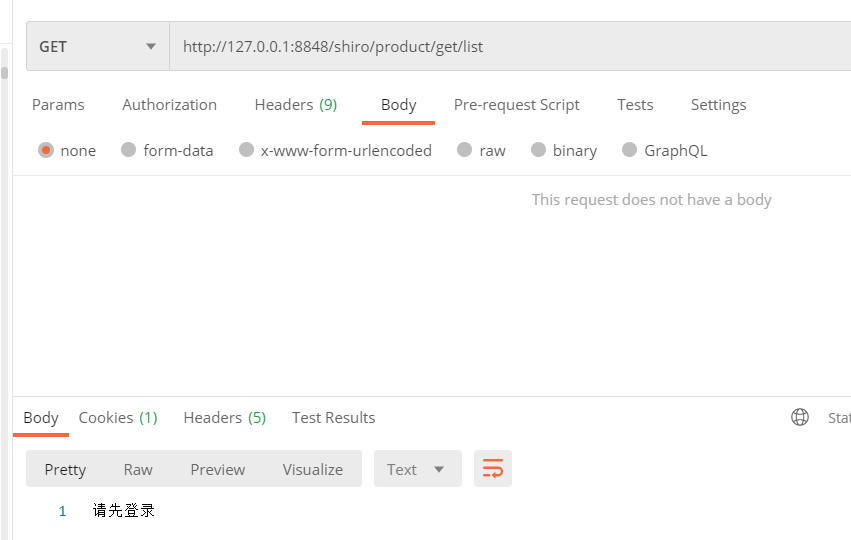
未認證直接存取的情況

以上是Springboot如何實現認證與動態權限管理的詳細內容。更多資訊請關注PHP中文網其他相關文章!

熱AI工具

Undresser.AI Undress
人工智慧驅動的應用程序,用於創建逼真的裸體照片

AI Clothes Remover
用於從照片中去除衣服的線上人工智慧工具。

Undress AI Tool
免費脫衣圖片

Clothoff.io
AI脫衣器

AI Hentai Generator
免費產生 AI 無盡。

熱門文章
熱工具

記事本++7.3.1
好用且免費的程式碼編輯器

SublimeText3漢化版
中文版,非常好用

禪工作室 13.0.1
強大的PHP整合開發環境

Dreamweaver CS6
視覺化網頁開發工具

SublimeText3 Mac版
神級程式碼編輯軟體(SublimeText3)
熱門話題


 Springboot怎麼整合Jasypt實現設定檔加密
Jun 01, 2023 am 08:55 AM
Springboot怎麼整合Jasypt實現設定檔加密
Jun 01, 2023 am 08:55 AM
Jasypt介紹Jasypt是一個java庫,它允許開發員以最少的努力為他/她的專案添加基本的加密功能,並且不需要對加密工作原理有深入的了解用於單向和雙向加密的高安全性、基於標準的加密技術。加密密碼,文本,數字,二進位檔案...適合整合到基於Spring的應用程式中,開放API,用於任何JCE提供者...添加如下依賴:com.github.ulisesbocchiojasypt-spring-boot-starter2. 1.1Jasypt好處保護我們的系統安全,即使程式碼洩露,也可以保證資料來源的
 SpringBoot怎麼整合Redisson實現延遲隊列
May 30, 2023 pm 02:40 PM
SpringBoot怎麼整合Redisson實現延遲隊列
May 30, 2023 pm 02:40 PM
使用場景1、下單成功,30分鐘未支付。支付超時,自動取消訂單2、訂單簽收,簽收後7天未進行評估。訂單超時未評價,系統預設好評3、下單成功,商家5分鐘未接單,訂單取消4、配送超時,推播簡訊提醒…對於延時比較長的場景、即時性不高的場景,我們可以採用任務調度的方式定時輪詢處理。如:xxl-job今天我們採
 怎麼在SpringBoot中使用Redis實現分散式鎖
Jun 03, 2023 am 08:16 AM
怎麼在SpringBoot中使用Redis實現分散式鎖
Jun 03, 2023 am 08:16 AM
一、Redis實現分散式鎖原理為什麼需要分散式鎖在聊分散式鎖之前,有必要先解釋一下,為什麼需要分散式鎖。與分散式鎖相對就的是單機鎖,我們在寫多執行緒程式時,避免同時操作一個共享變數產生資料問題,通常會使用一把鎖來互斥以保證共享變數的正確性,其使用範圍是在同一個進程中。如果換做是多個進程,需要同時操作一個共享資源,如何互斥?現在的業務應用通常是微服務架構,這也意味著一個應用會部署多個進程,多個進程如果需要修改MySQL中的同一行記錄,為了避免操作亂序導致髒數據,此時就需要引入分佈式鎖了。想要實現分
 springboot讀取檔案打成jar包後存取不到怎麼解決
Jun 03, 2023 pm 04:38 PM
springboot讀取檔案打成jar包後存取不到怎麼解決
Jun 03, 2023 pm 04:38 PM
springboot讀取文件,打成jar包後訪問不到最新開發出現一種情況,springboot打成jar包後讀取不到文件,原因是打包之後,文件的虛擬路徑是無效的,只能通過流去讀取。文件在resources下publicvoidtest(){Listnames=newArrayList();InputStreamReaderread=null;try{ClassPathResourceresource=newClassPathResource("name.txt");Input
 Springboot+Mybatis-plus不使用SQL語句進行多表新增怎麼實現
Jun 02, 2023 am 11:07 AM
Springboot+Mybatis-plus不使用SQL語句進行多表新增怎麼實現
Jun 02, 2023 am 11:07 AM
在Springboot+Mybatis-plus不使用SQL語句進行多表添加操作我所遇到的問題準備工作在測試環境下模擬思維分解一下:創建出一個帶有參數的BrandDTO對像模擬對後台傳遞參數我所遇到的問題我們都知道,在我們使用Mybatis-plus中進行多表操作是極其困難的,如果你不使用Mybatis-plus-join這一類的工具,你只能去配置對應的Mapper.xml文件,配置又臭又長的ResultMap,然後再寫對應的sql語句,這種方法雖然看上去很麻煩,但具有很高的靈活性,可以讓我們
 SpringBoot與SpringMVC的比較及差別分析
Dec 29, 2023 am 11:02 AM
SpringBoot與SpringMVC的比較及差別分析
Dec 29, 2023 am 11:02 AM
SpringBoot和SpringMVC都是Java開發中常用的框架,但它們之間有一些明顯的差異。本文將探究這兩個框架的特點和用途,並對它們的差異進行比較。首先,我們來了解一下SpringBoot。 SpringBoot是由Pivotal團隊開發的,它旨在簡化基於Spring框架的應用程式的建立和部署。它提供了一種快速、輕量級的方式來建立獨立的、可執行
 SpringBoot怎麼自訂Redis實作快取序列化
Jun 03, 2023 am 11:32 AM
SpringBoot怎麼自訂Redis實作快取序列化
Jun 03, 2023 am 11:32 AM
1.自訂RedisTemplate1.1、RedisAPI預設序列化機制基於API的Redis快取實作是使用RedisTemplate範本進行資料快取操作的,這裡開啟RedisTemplate類,查看該類別的源碼資訊publicclassRedisTemplateextendsRedisAccessorimplementsRedisOperations,BeanClassLoaderAware{//聲明了value的各種序列化方式,初始值為空@NullableprivateRedisSe
 springboot怎麼取得application.yml裡值
Jun 03, 2023 pm 06:43 PM
springboot怎麼取得application.yml裡值
Jun 03, 2023 pm 06:43 PM
在專案中,很多時候需要用到一些配置信息,這些信息在測試環境和生產環境下可能會有不同的配置,後面根據實際業務情況有可能還需要再做修改。我們不能將這些設定在程式碼中寫死,最好是寫到設定檔中,例如可以把這些資訊寫到application.yml檔案中。那麼,怎麼在程式碼裡取得或使用這個位址呢?有2個方法。方法一:我們可以透過@Value註解的${key}即可取得設定檔(application.yml)中和key對應的value值,這個方法適用於微服務比較少的情形方法二:在實際專案中,遇到業務繁瑣,邏
