

Java API 開發中使用 Spring Security OAuth 進行安全授權

Java API 開發中的一個常見需求就是實作使用者的身份驗證和授權功能。為了提供更安全可靠的API服務,授權功能變得特別重要。 Spring Security OAuth 是一個優秀的開源框架,可以幫助我們在 Java API 中實現授權功能。本文將介紹如何使用 Spring Security OAuth 進行安全授權。
- 什麼是 Spring Security OAuth?
Spring Security OAuth 是 Spring Security 框架的一個擴展,它可以幫助我們實現 OAuth 認證和授權功能。
OAuth 是一個開放標準,用於授權第三方應用程式存取資源。它可以幫助我們實現業務邏輯解耦和安全性強的應用程式。 OAuth 授權流程通常包含以下角色:
- 使用者:資源的擁有者;
- 用戶端:申請存取使用者資源的應用程式;
- 授權伺服器:處理使用者授權的伺服器;
- 資源伺服器:儲存使用者資源的伺服器;
- #授權流程
Spring Security OAuth 實作了OAuth授權流程中的四個端點:
- /oauth/authorize:授權伺服器的授權端點;
- /oauth/token:授權伺服器的令牌端點;
- /oauth/confirm_access:用戶端確認授權的端點;
- /oauth/error:授權伺服器錯誤訊息的端點;
Spring Security OAuth 實作了OAuth 2.0 的四大授權模式:
- 授權碼模式:使用場景為應用程式啟動時需要使用者授權;
- 密碼模式:使用場景為用戶端自主管理使用者憑證;
- 簡化模式:使用場景為客戶端跑在瀏覽器中,不需要客戶端保護使用者憑證;
- 客戶端模式:使用場景為客戶端不需要使用者授權,請求的存取權令牌只代表了客戶端本身;
- 新增Spring Security OAuth 依賴
在專案中加入Spring Security OAuth 依賴。在 pom.xml 中進行以下配置:
<dependency>
    <groupId>org.springframework.security.oauth</groupId>
    <artifactId>spring-security-oauth2</artifactId>
    <version>2.3.4.RELEASE</version>
</dependency>- 配置授權伺服器
我們需要定義授權伺服器以便進行授權。在 Spring Security OAuth 中,可以透過啟用 OAuth2 認證伺服器和實作 AuthorizationServerConfigurer 介面來定義授權伺服器。
@Configuration
@EnableAuthorizationServer
public class AuthorizationServerConfig extends AuthorizationServerConfigurerAdapter {

    @Autowired
    TokenStore tokenStore;

    @Autowired
    AuthenticationManager authenticationManager;

    @Override
    public void configure(ClientDetailsServiceConfigurer clients) throws Exception {
        clients.inMemory()
            .withClient("client")
            .secret("{noop}secret")
            .authorizedGrantTypes("client_credentials", "password")
            .scopes("read", "write")
            .accessTokenValiditySeconds(3600)
            .refreshTokenValiditySeconds(7200);
    }

    @Override
    public void configure(AuthorizationServerEndpointsConfigurer endpoints) throws Exception {
        endpoints.tokenStore(tokenStore)
            .authenticationManager(authenticationManager);
    }
}在上面的程式碼中,我們定義了一個基於記憶體的客戶端細節服務,並配置了授權類型為 client_credentials 和 password,也指定了存取令牌的有效期和刷新令牌的有效期。另外,我們也定義了 endpoints 以及他們所需的 tokenStore 和 authenticationManager。
- 設定資源伺服器
要使用 Spring Security OAuth 安全授權,我們還需要設定資源伺服器。在 Spring Security OAuth 中,我們可以透過實作 ResourceServerConfigurer 介面來定義資源伺服器。
@Configuration
@EnableResourceServer
public class ResourceServerConfig extends ResourceServerConfigurerAdapter {

    @Override
    public void configure(HttpSecurity http) throws Exception {
        http.authorizeRequests()
            .antMatchers("/api/**").authenticated()
            .anyRequest().permitAll();
    }

    @Override
    public void configure(ResourceServerSecurityConfigurer config) throws Exception {
        config.resourceId("my_resource_id");
    }
}在上面的程式碼中,我們定義了 /api/** 給予身份驗證,而其他請求允許匿名存取。我們也配置了資源 ID "my_resource_id" 以便在後續的授權流程中使用。
- 設定 Web 安全性
為了使用 Spring Security OAuth 安全性授權,我們也需要設定 Web 安全性。在 Spring Security OAuth 中,可以透過實作 SecurityConfigurer 介面來定義安全性。
@Configuration
public class WebSecurityConfig extends WebSecurityConfigurerAdapter {

    @Override
    protected void configure(AuthenticationManagerBuilder auth) throws Exception {
        auth.inMemoryAuthentication()
            .withUser("user")
            .password("{noop}password")
            .roles("USER");
    }

    @Override
    @Bean
    public AuthenticationManager authenticationManagerBean() throws Exception {
        return super.authenticationManagerBean();
    }

    @Override
    protected void configure(HttpSecurity http) throws Exception {
        http.authorizeRequests()
            .antMatchers("/oauth/**")
            .permitAll()
            .anyRequest()
            .authenticated()
            .and()
            .formLogin()
            .permitAll();
    }
}在上面的程式碼中,我們定義了一個基於記憶體的使用者詳細資訊服務,並聲明了需要身份驗證的請求(也就是/oauth/** 後面的路徑都需要身份驗證,其他的路徑都可以匿名存取)。我們還配置了一個簡單的表單登入以便使用者登入應用程式。
- 實作 UserDetailsService
我們需要實作 UserDetailsService 介面以便在安全授權中使用。這裡我們直接使用記憶體來保存使用者帳號和密碼,並不涉及資料庫操作。
@Service
public class UserDetailsServiceImpl implements UserDetailsService {

    @Override
    public UserDetails loadUserByUsername(String username) throws UsernameNotFoundException {
        if ("user".equals(username)) {
            return new User("user", "{noop}password",
                    AuthorityUtils.createAuthorityList("ROLE_USER"));
        } else {
            throw new UsernameNotFoundException("username not found");
        }
    }
}- 實作 API
接下來我們需要實作一個簡單的 API。我們在 /api/** 路徑下新增了一個 getGreeting() API,用於向客戶端傳回一條問候語。
@RestController
@RequestMapping("/api")
public class ApiController {

    @GetMapping("/greeting")
    public String getGreeting() {
        return "Hello, World!";
    }
}- 測試授權流程
最後,我們需要測試授權流程是否如預期運作。首先,我們使用授權碼模式來取得授權碼:
http://localhost:8080/oauth/authorize?response_type=code&client_id=client&redirect_uri=http://localhost:8080&scope=read
在你的瀏覽器中存取上面的 URL,你將會被要求輸入使用者名稱和密碼以便授權。輸入使用者名稱 user 和密碼 password 然後點擊授權,你將被重定向到 http://localhost:8080/?code=xxx,其中 xxx 是授權碼。
接下來,我們使用密碼模式來取得存取權杖:
curl -X POST
  http://localhost:8080/oauth/token
  -H 'content-type: application/x-www-form-urlencoded'
  -d 'grant_type=password&username=user&password=password&client_id=client&client_secret=secret'
你將會收到一個JSON 回應,其中包含存取權杖和刷新令牌:
{
    "access_token":"...",
    "token_type":"bearer",
    "refresh_token":"...",
    "expires_in":3600,
    "scope":"read"
}現在你可以使用這個存取權令牌來存取API 服務:
curl -X GET
  http://localhost:8080/api/greeting
  -H 'authorization: Bearer xxx'
其中xxx 是你的存取權杖。你將會收到一條 JSON 回應,其中包含問候語 "Hello, World!"。
在這篇文章中,我們介紹如何使用 Spring Security OAuth 進行安全授權。 Spring Security OAuth 是一個非常強大的框架,可以幫助我們實現 OAuth 授權流程中的所有角色。在實際應用中,我們可以根據不同的安全需求選擇不同的授權模式和服務配置。
以上是Java API 開發中使用 Spring Security OAuth 進行安全授權的詳細內容。更多資訊請關注PHP中文網其他相關文章!

熱AI工具

Undresser.AI Undress
人工智慧驅動的應用程序,用於創建逼真的裸體照片

AI Clothes Remover
用於從照片中去除衣服的線上人工智慧工具。

Undress AI Tool
免費脫衣圖片

Clothoff.io
AI脫衣器

AI Hentai Generator
免費產生 AI 無盡。

熱門文章
熱工具

記事本++7.3.1
好用且免費的程式碼編輯器

SublimeText3漢化版
中文版,非常好用

禪工作室 13.0.1
強大的PHP整合開發環境

Dreamweaver CS6
視覺化網頁開發工具

SublimeText3 Mac版
神級程式碼編輯軟體(SublimeText3)
熱門話題


 突破或從Java 8流返回?
Feb 07, 2025 pm 12:09 PM
突破或從Java 8流返回?
Feb 07, 2025 pm 12:09 PM
Java 8引入了Stream API,提供了一種強大且表達力豐富的處理數據集合的方式。然而,使用Stream時,一個常見問題是:如何從forEach操作中中斷或返回? 傳統循環允許提前中斷或返回,但Stream的forEach方法並不直接支持這種方式。本文將解釋原因,並探討在Stream處理系統中實現提前終止的替代方法。 延伸閱讀: Java Stream API改進 理解Stream forEach forEach方法是一個終端操作,它對Stream中的每個元素執行一個操作。它的設計意圖是處

 Java程序查找膠囊的體積
Feb 07, 2025 am 11:37 AM
Java程序查找膠囊的體積
Feb 07, 2025 am 11:37 AM
膠囊是一種三維幾何圖形,由一個圓柱體和兩端各一個半球體組成。膠囊的體積可以通過將圓柱體的體積和兩端半球體的體積相加來計算。本教程將討論如何使用不同的方法在Java中計算給定膠囊的體積。 膠囊體積公式 膠囊體積的公式如下: 膠囊體積 = 圓柱體體積 兩個半球體體積 其中, r: 半球體的半徑。 h: 圓柱體的高度(不包括半球體)。 例子 1 輸入 半徑 = 5 單位 高度 = 10 單位 輸出 體積 = 1570.8 立方單位 解釋 使用公式計算體積: 體積 = π × r2 × h (4
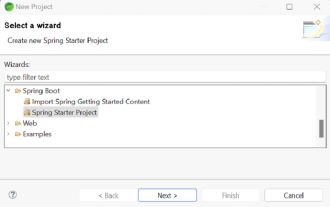 如何在Spring Tool Suite中運行第一個春季啟動應用程序?
Feb 07, 2025 pm 12:11 PM
如何在Spring Tool Suite中運行第一個春季啟動應用程序?
Feb 07, 2025 pm 12:11 PM
Spring Boot簡化了可靠,可擴展和生產就緒的Java應用的創建,從而徹底改變了Java開發。 它的“慣例慣例”方法(春季生態系統固有的慣例),最小化手動設置
