學canvas學了有一個多禮拜了,覺得canvas真心好玩。學canvas的人想法估計都跟我差不多,抱著寫遊戲的態度去學canvas的。所以運動學啊、碰撞偵測啊、一些簡單的演算法神馬的是基礎啊。以前沒做過遊戲的我學起來還真心吃力。今天就來說下用canvas寫個最簡單的彈力球遊戲,就運用了最簡單的重力作用以及碰撞檢測。
先上DEMO:彈力球DEMO (老鼠點擊canvas裡的空白區域會給與小球新速度)
【創建小球物件】
第一步就是先創建一個小球對象,寫好小球的構造函數:
小球屬性很簡單,xy是小球的座標,vx和vy是小球的初始水平速度和初始垂直速度。 radius是小球的半徑,color是小球顏色(為了區分不同球),oldx和oldy是記錄小球的上一幀的位置,後期球與球之間碰撞後用於位置修正(後面其實沒用上,位置修正直接計算了,如果用oldx來設定很不嚴謹,不過記錄一下,難免會用得到)。
小球屬性寫好後,就在小球原型中寫小球的動作了:
if(Math.abs(this.vx) this.vx = 0;
}
else this.vx = this.vx>0? -mocali* t : mocali*t;
this.vy = this.vy g * t;
this.x = t * this.vx * pxpm;
this.y = t * this.vy * pxpm;
if(this.y > canvas.height - ballRadius || this.y this.y = this.y thisRadius : (canvas.height - ballRadius);
thisRadius > this .vy = -this.vy*collarg
}
if(this.x > canvas.width - ballRadius || this.x this.x = this.x this.derectionX = !this.derectionX;
this.vx = -this.vx*collarg;
}
this.paint(); }
this.paint(); }
this.paint(); > },
}
小球的動作方法也很簡單,就兩個,第一個方法是把自己畫出來,第二個方法就是控制小球的運動。 t是目前幀與上一幀的時間差。用於計算小球的速度的增量從而得出小球的位移增量,從而計算出小球的新位置並且將小球重繪。得出新位置的同時判斷小球的新位置有無超出牆壁,如果超出則進行速度修正讓小球反彈。
第二個方法裡的一些常數ballRadius =30, g = 9.8 , mocali = 0.5,balls = [],collarg = 0.8,pxpm = canvas.width/20; 意思很明顯:ballradius是球半徑,g是重力加速度,mocali是空氣阻力造成的水平方向的減速度,balls是用來存放小球物件的數組,collarg是彈性係數。 pxpm是像素與米之間的映射,把畫布當成20公尺寬的區域。
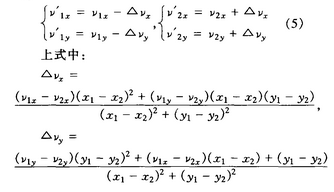
//得到碰撞後速度的增量
var ax = ((b1.vx - b2.vx)*Math.pow((b1.x - b2.x) , 2) (b1.vy - b2.vy)*(b1.x - b2.x)*(b1.y - b2.y))/Math.pow(rc , 2)
var ay = ((b1.vy - b2.vy) *Math.pow((b1.y - b2.y) , 2) (b1.vx - b2.vx)*(b1.x - b2.x) (b1.y - b2.y))/Math.pow (rc , 2)
//給予與小球新的速度
b1.vx = (b1.vx-ax)*collarg;
b1.vy = (b1.vy-ay)*collarg;
b2 .vx = (b2.vx ax)*collarg;
b2.vy = (b2.vy ay)*collarg;
//取得兩球斜切位置並且強制扭轉 var clength = ((b1.radius b2.radius)-rc)/2;
var cx = clength * (b1.x-b2. x)/rc;
var cy = clength * (b1.y-b2.y)/rc;
b1.x = b1.x cx;
b1.y = b1.y cy;
b2.x = b2.x-cx;
b2.y = b2.y-cy;
}
}
}
}
}
 具體原理我就不說了,想了解原理就直接戳
小球碰撞的演算法設計 。 下面那段就是防止小球重複碰撞偵測導致無法正常反彈,所以計算兩小球的球心距離,然後算出兩個小球的斜切位置,並且將兩個小球的位置進行更正。
【運動動畫】最後一步:
canvas.onclick = function(event){
balls.forEach(function(){
this.vx = (x - this.x)/20; //初始速度m/s
this.vy = (y - this.y)/ 20;
});
}
function animate(){
ctx.save();
ctx.fillStyle = "rgba(255,255,255,0.2)";
ctx.fillRect(0,0,canvas.width,canvas.width. height)
ctx.restore();
// ctx.clearRect(0,0,canvas.width,canvas.height)
var t1 = new Date();
var t = (t1 - t0)/1000;
collision();
balls.forEach(function(){
this.run( t);
});
t0 = t1;
if("requestAnimationFrame" in window){
requestAnimationFrame(animate);
}
else if("webkitRequestAnimationFrame" in window){
webkitRequestRequest(ani); 🎜> else if("msRequestAnimationFrame" in window){
msRequestAnimationFrame(animate);
}
else if("mozRequestAnimationFrame" in window){
else if("mozRequestAnimationFrame" in window){ 🎜> }
}
透過點擊畫布的位置給於小球初速度,然後animate就是動畫的每一幀運行的方法。上面的ctx.fillStyle = "rgba(255,255,255,0.2)"; ctx.fillRect(0,0,canvas.width,canvas.height)是給小球添加虛影,我覺得這樣會更好看,如果覺得不喜歡,就直接用clearRect清除就行了。然後就是計算每一幀的時間差,然後對小球數組裡小球數組進行遍歷重繪。然後再加入碰撞偵測的collision方法。動畫也就做完了。
至此,就已經寫完了,原始碼位址:
https://github.com/whxaxes/canvas-test/blob/gh-pages/src/Other-demo/shotBall.html


