

手把手教你使用Flask搭建ES搜尋引擎(實戰篇)
開始使用 Flask 建立 ES 搜尋。

#coding:utf-8
import os
DB_USERNAME = 'root'
DB_PASSWORD = None # 如果没有密码的话
DB_HOST = '127.0.0.1'
DB_PORT = '3306'
DB_NAME = 'flask_es'

class Config:
    SECRET_KEY ="随机字符" # 随机 SECRET_KEY
    SQLALCHEMY_COMMIT_ON_TEARDOWN = True # 自动提交
    SQLALCHEMY_TRACK_MODIFICATIONS = True # 自动sql
    DEBUG = True # debug模式
    SQLALCHEMY_DATABASE_URI = 'mysql+pymysql://%s:%s@%s:%s/%s' % (DB_USERNAME, DB_PASSWORD,DB_HOST, DB_PORT, DB_NAME) #数据库URL

    MAIL_SERVER = 'smtp.qq.com'
    MAIL_POST = 465
    MAIL_USERNAME = '3417947630@qq.com'
    MAIL_PASSWORD = '邮箱授权码'
    FLASK_MAIL_SUBJECT_PREFIX='M_KEPLER'
    FLASK_MAIL_SENDER=MAIL_USERNAME # 默认发送人
    # MAIL_USE_SSL = True
    MAIL_USE_TLS = False
    MAIL_DEBUG = False
ENABLE_THREADS=True 文件,當然對於當前專案來說資料庫的連接不是必要的,我只是用# coding=utf-8
import os
import logging
import logging.config as log_conf
import datetime
import coloredlogs
coloredlogs.DEFAULT_FIELD_STYLES = {'asctime': {'color': 'green'}, 'hostname': {'color': 'magenta'}, 'levelname': {'color': 'magenta', 'bold': False}, 'name': {'color': 'green'}}
log_dir = os.path.dirname(os.path.dirname(__file__)) + '/logs'
if not os.path.exists(log_dir):
os.mkdir(log_dir)
today = datetime.datetime.now().strftime("%Y-%m-%d")
log_path = os.path.join(log_dir, today + ".log")
log_config = {
'version': 1.0,
# 格式输出
'formatters': {
'colored_console': {
'format': "%(asctime)s - %(name)s - %(levelname)s - %(message)s",
'datefmt': '%H:%M:%S'
},
'detail': {
'format': '%(asctime)s - %(name)s - %(levelname)s - %(message)s',
'datefmt': "%Y-%m-%d %H:%M:%S" #时间格式
},
},
'handlers': {
'console': {
'class': 'logging.StreamHandler',
'level': 'DEBUG',
'formatter': 'colored_console'
},
'file': {
'class': 'logging.handlers.RotatingFileHandler',
'maxBytes': 1024 * 1024 * 1024,
'backupCount': 1,
'filename': log_path,
'level': 'INFO',
'formatter': 'detail', #
'encoding': 'utf-8', # utf8 编码 防止出现编码错误
},
},
'loggers': {
'logger': {
'handlers': ['console'],
'level': 'DEBUG',
},
}
}
log_conf.dictConfig(log_config)
log_v = logging.getLogger('log')
coloredlogs.install(level='DEBUG', logger=log_v)
# # Some examples.
# logger.debug("this is a debugging message")
# logger.info("this is an informational message")
# logger.warning("this is a warning message")
# logger.error("this is an error message")
# logger.critical("this is a critical message")路由
对于 Flask 项目而言, 蓝图和路由会让整个项目更具观赏性(当然指的是代码的阅读)。
这里我采用两个分支来作为数据支撑,一个是 Math 入口,另一个是 Baike 入口,数据的来源是基于上一篇的百度百科爬虫所得,根据 深度优先 的爬取方式抓取后放入 ES 中。
# coding:utf8
from flask import Flask
from flask_sqlalchemy import SQLAlchemy
from app.config.config import Config
from flask_mail import Mail
from flask_wtf.csrf import CSRFProtect

app = Flask(__name__,template_folder='templates',static_folder='static')
app.config.from_object(Config)

db = SQLAlchemy(app)
db.init_app(app)

csrf = CSRFProtect(app)
mail = Mail(app)
# 不要在生成db之前导入注册蓝图。
from app.home.baike import baike as baike_blueprint
from app.home.math import math as math_blueprint
from app.home.home import home as home_blueprint

app.register_blueprint(home_blueprint)
app.register_blueprint(math_blueprint,url_prefix="/math")
app.register_blueprint(baike_blueprint,url_prefix="/baike")
# -*- coding:utf-8 -*-
from flask import Blueprint
baike = Blueprint("baike", __name__)

from app.home.baike import views# -*- coding:utf-8 -*-
from flask import Blueprint
math = Blueprint("math", __name__)
from app.home.math import views声明路由并在 __init__ 文件中初始化
下面来看看路由的实现(以Baike为例)
# -*- coding:utf-8 -*-
import os
from flask_paginate import Pagination, get_page_parameter
from app.Logger.logger import log_v
from app.elasticsearchClass import elasticSearch
from app.home.forms import SearchForm
from app.home.baike import baike
from flask import request, jsonify, render_template, redirect
baike_es = elasticSearch(index_type="baike_data",index_name="baike")
@baike.route("/")
def index():
searchForm = SearchForm()
return render_template('baike/index.html', searchForm=searchForm)
@baike.route("/search", methods=['GET', 'POST'])
def baikeSearch():
search_key = request.args.get("b", default=None)
if search_key:
searchForm = SearchForm()
log_v.error("[+] Search Keyword: " + search_key)
match_data = baike_es.search(search_key,count=30)
# 翻页
PER_PAGE = 10
page = request.args.get(get_page_parameter(), type=int, default=1)
start = (page - 1) * PER_PAGE
end = start + PER_PAGE
total = 30
print("最大数据总量:", total)
pagination = Pagination(page=page, start=start, end=end, total=total)
context = {
'match_data': match_data["hits"]["hits"][start:end],
'pagination': pagination,
'uid_link': "/baike/"
}
return render_template('data.html', q=search_key, searchForm=searchForm, **context)
return redirect('home.index')
@baike.route('/<uid>')
def baikeSd(uid):
base_path = os.path.abspath('app/templates/s_d/')
old_file = os.listdir(base_path)[0]
old_path = os.path.join(base_path, old_file)
file_path = os.path.abspath('app/templates/s_d/{}.html'.format(uid))
if not os.path.exists(file_path):
log_v.debug("[-] File does not exist, renaming !!!")
os.rename(old_path, file_path)
match_data = baike_es.id_get_doc(uid=uid)
return render_template('s_d/{}.html'.format(uid), match_data=match_data)可以看到我们成功的将 elasticSearch 类初始化并且进行了数据搜索。
我们使用了 Flask 的分页插件进行分页并进行了单页数量的限制,根据 Uid 来跳转到详情页中。
细心的小伙伴会发现我这里用了个小技巧
@baike.route('/<uid>')
def baikeSd(uid):
base_path = os.path.abspath('app/templates/s_d/')
old_file = os.listdir(base_path)[0]
old_path = os.path.join(base_path, old_file)
file_path = os.path.abspath('app/templates/s_d/{}.html'.format(uid))
if not os.path.exists(file_path):
log_v.debug("[-] File does not exist, renaming !!!")
os.rename(old_path, file_path)
match_data = baike_es.id_get_doc(uid=uid)
return render_template('s_d/{}.html'.format(uid), match_data=match_data)以此来保证存放详情页面的模板中始终只保留一个 html 文件。
项目启动
一如既往的采用 flask_script 作为项目的启动方案,确实方便。
# coding:utf8
from app import app
from flask_script import Manager, Server

manage = Manager(app)

# 启动命令
manage.add_command("runserver", Server(use_debugger=True))


if __name__ == "__main__":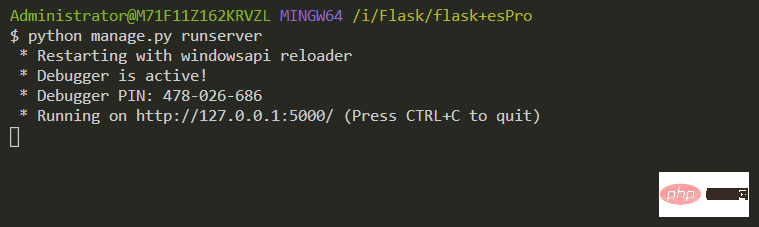
manage.run()黑窗口键入
python manage.py runserver
就可以启动项目,默认端口 5000,访问 http://127.0.0.1:5000
使用gunicorn启动
pip install gunicorn
#encoding:utf-8
import multiprocessing

from gevent import monkey
monkey.patch_all()

# 并行工作进程数
workers = multiprocessing.cpu_count() * 2 + 1

debug = True

reload = True # 自动重新加载

loglevel = 'debug'

# 指定每个工作者的线程数
threads = 2

# 转发为监听端口8000
bind = '0.0.0.0:5001'

# 设置守护进程,将进程交给supervisor管理
daemon = 'false'

# 工作模式协程
worker_class = 'gevent'

# 设置最大并发量
worker_connections = 2000

# 设置进程文件目录
pidfile = 'log/gunicorn.pid'
logfile = 'log/debug.log'

# 设置访问日志和错误信息日志路径
accesslog = 'log/gunicorn_acess.log'
errorlog = 'log/gunicorn_error.log'
利用配置文件来启动 gunicorn 服务器
gunicorn -c gconfig.py manage:app
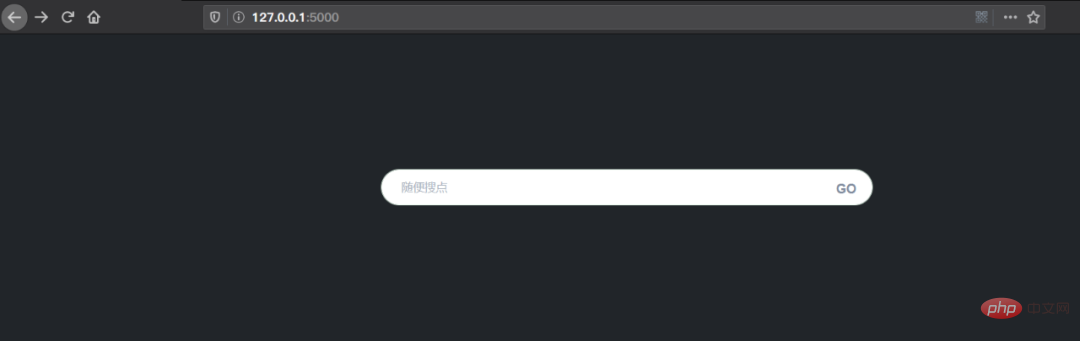
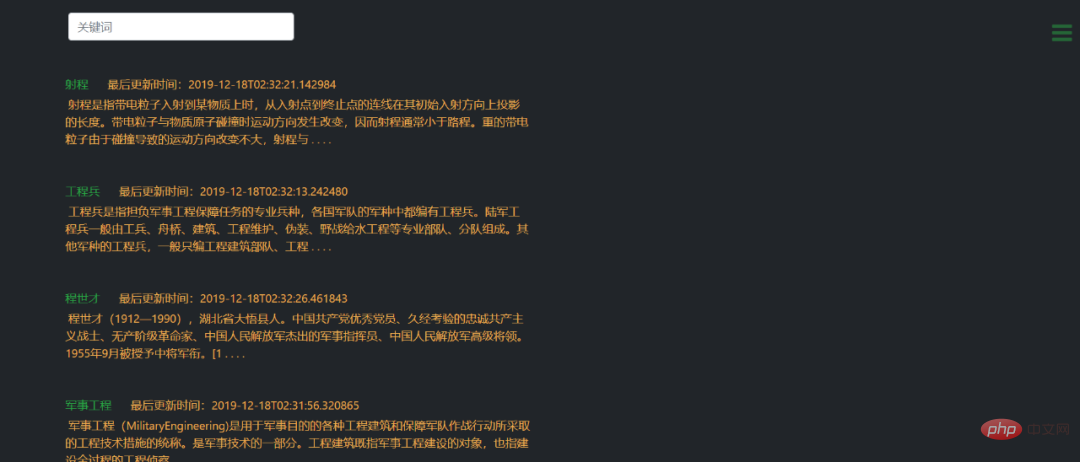
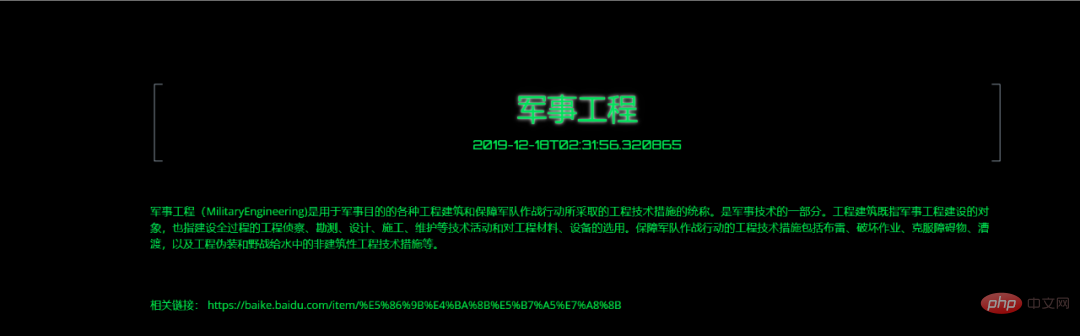
项目截图
以上是手把手教你使用Flask搭建ES搜尋引擎(實戰篇)的詳細內容。更多資訊請關注PHP中文網其他相關文章!

熱AI工具

Undresser.AI Undress
人工智慧驅動的應用程序,用於創建逼真的裸體照片

AI Clothes Remover
用於從照片中去除衣服的線上人工智慧工具。

Undress AI Tool
免費脫衣圖片

Clothoff.io
AI脫衣器

Video Face Swap
使用我們完全免費的人工智慧換臉工具,輕鬆在任何影片中換臉!

熱門文章
熱工具

記事本++7.3.1
好用且免費的程式碼編輯器

SublimeText3漢化版
中文版,非常好用

禪工作室 13.0.1
強大的PHP整合開發環境

Dreamweaver CS6
視覺化網頁開發工具

SublimeText3 Mac版
神級程式碼編輯軟體(SublimeText3)


 如何利用React和Flask建構簡單易用的網路應用
Sep 27, 2023 am 11:09 AM
如何利用React和Flask建構簡單易用的網路應用
Sep 27, 2023 am 11:09 AM
如何利用React和Flask建構簡單易用的網路應用引言:隨著網路的發展,網路應用的需求也越來越多樣化和複雜化。為了滿足使用者對於易用性和效能的要求,使用現代化的技術堆疊來建立網路應用變得越來越重要。 React和Flask是兩個在前端和後端開發中非常受歡迎的框架,它們可以很好的結合在一起,用來建立簡單易用的網路應用。本文將詳細介紹如何利用React和Flask
 Django vs. Flask:Python Web框架的比較分析
Jan 19, 2024 am 08:36 AM
Django vs. Flask:Python Web框架的比較分析
Jan 19, 2024 am 08:36 AM
Django和Flask都是PythonWeb框架中的佼佼者,它們都有著自己的優點和適用場景。本文將對這兩個框架進行比較分析,並提供具體的程式碼範例。開發簡介Django是一個全功能的Web框架,它的主要目的是為了快速開發複雜的Web應用。 Django提供了許多內建的功能,例如ORM(物件關聯映射)、表單、認證、管理後台等。這些功能使得Django在處理大型
 從頭開始,逐步引導您安裝Flask,快速建立個人博客
Feb 19, 2024 pm 04:01 PM
從頭開始,逐步引導您安裝Flask,快速建立個人博客
Feb 19, 2024 pm 04:01 PM
從零開始,手把手教你安裝Flask和快速建立個人部落格作為一個喜歡寫作的人來說,擁有個人部落格是非常重要的。而Flask作為一個輕量級的PythonWeb框架,可以幫助我們快速建立一個簡潔而功能完善的個人部落格。在本文中,我將從零開始,手把手教你如何安裝Flask並快速建立個人部落格。第一步:安裝Python和pip在開始之前,我們需要先安裝Python和pi
 安裝Flask框架指南:詳細步驟可協助您正確安裝Flask
Feb 18, 2024 pm 10:51 PM
安裝Flask框架指南:詳細步驟可協助您正確安裝Flask
Feb 18, 2024 pm 10:51 PM
Flask框架安裝教學:一步步教你如何正確安裝Flask框架,需要具體程式碼範例引言:Flask是一款簡潔且靈活的PythonWeb開發框架。它易於學習、易於使用,並且具有強大的功能。本文將帶領您一步步正確地安裝Flask框架,並提供詳細的程式碼範例供參考。第一步:安裝Python在安裝Flask框架之前,首先需要確保您的電腦上安裝了Python。您可以從P
 Flask和Intellij IDEA整合: Python web應用程式開發技巧(第二部分)
Jun 17, 2023 pm 01:58 PM
Flask和Intellij IDEA整合: Python web應用程式開發技巧(第二部分)
Jun 17, 2023 pm 01:58 PM
在第一部分介紹了基本的Flask和IntellijIDEA整合、專案和虛擬環境的設定、依賴安裝等方面的內容。接下來我們將繼續探討更多的Pythonweb應用程式開發技巧,建立更有效率的工作環境:使用FlaskBlueprintsFlaskBlueprints可讓您組織應用程式程式碼以便於管理和維護。 Blueprint是一個Python模組,能夠包
 比較Flask應用部署的Gunicorn和uWSGI效能對比
Jan 17, 2024 am 08:52 AM
比較Flask應用部署的Gunicorn和uWSGI效能對比
Jan 17, 2024 am 08:52 AM
Flask應用部署:GunicornvsuWSGI的比較引言:Flask作為一種輕量級的PythonWeb框架,受到了許多開發者的喜愛。在將Flask應用程式部署到生產環境時,選擇適合的伺服器閘道介面(ServerGatewayInterface,簡稱SGI)是至關重要的決策。 Gunicorn和uWSGI是兩種常見的SGI伺服器,本文將對它們進行詳細的
 Flask vs FastAPI: 高效開發Web API的最佳選擇
Sep 27, 2023 pm 09:01 PM
Flask vs FastAPI: 高效開發Web API的最佳選擇
Sep 27, 2023 pm 09:01 PM
FlaskvsFastAPI:高效開發WebAPI的最佳選擇引言:在現代的軟體開發中,WebAPI已經成為了不可或缺的一部分。它們能夠提供數據和服務,使得不同的應用程式之間能夠進行通訊和互通。而在選擇開發WebAPI的框架時,Flask和FastAPI是兩個備受關注的選擇。這兩個框架都非常流行,而且各有優勢。在本文中,我們將對Fl
 Flask-RESTful和Swagger: Python web應用程式中建立RESTful API的最佳實務(第二部分)
Jun 17, 2023 am 10:39 AM
Flask-RESTful和Swagger: Python web應用程式中建立RESTful API的最佳實務(第二部分)
Jun 17, 2023 am 10:39 AM
Flask-RESTful和Swagger:Pythonweb應用程式中建立RESTfulAPI的最佳實務(第二部分)在上一篇文章中,我們探討如何使用Flask-RESTful和Swagger來建立RESTfulAPI的最佳實務。我們介紹了Flask-RESTful框架的基礎知識,並展示如何使用Swagger來建立RESTfulAPI的文件。本
