4000字詳細說明,推薦20個好用到爆的Pandas函數方法
#今天分享幾個不為人知的 pandas函數,大家可能平常看到的不多,但是使用起來倒是非常的方便,也能夠幫助我們數據分析人員大幅度地提高工作效率,同時也希望大家看完之後能夠有所收穫
items()方法#iterrows()方法-
insert()方法 assign()方法eval()方法pop()方法##truncate() 方法count() 方法add_prefix() 方法/add_suffix ()方法clip() 方法filter() 方法first()方法isin()方法df.plot.area()方法#df.plot.bar()方法df.plot.box()方法#df.plot.pie()方法
items()方法
items()方法可以用來遍歷數據集當中的每一列,同時傳回列名以及每一列當中的內容,透過以元組的形式,範例如下df = pd.DataFrame({'species': ['bear', 'bear', 'marsupial'],
'population': [1864, 22000, 80000]},
index=['panda', 'polar', 'koala'])
dfoutput
         species  population
panda       bear        1864
polar       bear       22000
koala  marsupial       80000
然後我們使用items() 方法
for label, content in df.items():
    print(f'label: {label}')
    print(f'content: {content}', sep='\n')
print("=" * 50)output
label: species
content: panda         bear
polar         bear
koala    marsupial
Name: species, dtype: object
==================================================
label: population
content: panda     1864
polar    22000
koala    80000
Name: population, dtype: int64
==================================================
相繼的列印出了'species'和'population'這兩列的列名和對應的內容
#iterrows()方法
iterrows()方法而言,其功能則是遍歷資料集當中的每一行,傳回每一行的索引以及帶有列名的每一行的內容,範例如下for label, content in df.iterrows():
print(f'label: {label}')
print(f'content: {content}', sep='\n')
print("=" * 50)output
#label: panda content: species bear population 1864 Name: panda, dtype: object ================================================== label: polar content: species bear population 22000 Name: polar, dtype: object ================================================== label: koala content: species marsupial population 80000 Name: koala, dtype: object ==================================================
insert()方法
insert()方法主要是用于在数据集当中的特定位置处插入数据,示例如下
df.insert(1, "size", [2000, 3000, 4000])
output
         species  size  population
panda       bear  2000        1864
polar       bear  3000       22000
koala  marsupial  4000       80000
可见在DataFrame数据集当中,列的索引也是从0开始的
assign()方法
assign()方法可以用来在数据集当中添加新的列,示例如下
df.assign(size_1=lambda x: x.population * 9 / 5 + 32)
output
         species  population    size_1
panda       bear        1864    3387.2
polar       bear       22000   39632.0
koala  marsupial       80000  144032.0
lambda匿名函数,在数据集当中添加一个新的列,命名为‘size_1’,当然我们也可以通过assign()方法来创建不止一个列df.assign(size_1 = lambda x: x.population * 9 / 5 + 32,
size_2 = lambda x: x.population * 8 / 5 + 10)output
         species  population    size_1    size_2
panda       bear        1864    3387.2    2992.4
polar       bear       22000   39632.0   35210.0
koala  marsupial       80000  144032.0  128010.0
eval()方法
eval()方法主要是用来执行用字符串来表示的运算过程的,例如
df.eval("size_3 = size_1 + size_2")output
         species  population    size_1    size_2    size_3
panda       bear        1864    3387.2    2992.4    6379.6
polar       bear       22000   39632.0   35210.0   74842.0
koala  marsupial       80000  144032.0  128010.0  272042.0
当然我们也可以同时对执行多个运算过程
df = df.eval('''
size_3 = size_1 + size_2
size_4 = size_1 - size_2
''')
output
         species  population    size_1    size_2    size_3   size_4
panda       bear        1864    3387.2    2992.4    6379.6    394.8
polar       bear       22000   39632.0   35210.0   74842.0   4422.0
koala  marsupial       80000  144032.0  128010.0  272042.0  16022.0
pop()方法
pop()方法主要是用来删除掉数据集中特定的某一列数据
df.pop("size_3")output
panda      6379.6
polar     74842.0
koala    272042.0
Name: size_3, dtype: float64
而原先的数据集当中就没有这个‘size_3’这一例的数据了
truncate()方法
truncate()方法主要是根据行索引来筛选指定行的数据的,示例如下
df = pd.DataFrame({'A': ['a', 'b', 'c', 'd', 'e'],
                   'B': ['f', 'g', 'h', 'i', 'j'],
                   'C': ['k', 'l', 'm', 'n', 'o']},
index=[1, 2, 3, 4, 5])output
   A  B  C
1  a  f  k
2  b  g  l
3  c  h  m
4  d  i  n
5  e  j  o
我们使用truncate()方法来做一下尝试
df.truncate(before=2, after=4)
output
   A  B  C
2  b  g  l
3  c  h  m
4  d  i  n
before和after存在于truncate()方法中,目的就是把行索引2之前和行索引4之后的数据排除在外,筛选出剩余的数据count()方法
count()方法主要是用来计算某一列当中非空值的个数,示例如下
df = pd.DataFrame({"Name": ["John", "Myla", "Lewis", "John", "John"],
                   "Age": [24., np.nan, 25, 33, 26],
"Single": [True, True, np.nan, True, False]})output
    Name   Age Single
0   John  24.0   True
1   Myla   NaN   True
2  Lewis  25.0    NaN
3   John  33.0   True
4   John  26.0  False
我们使用count()方法来计算一下数据集当中非空值的个数
df.count()
output
Name      5
Age       4
Single    4
dtype: int64
add_prefix()方法/add_suffix()方法
add_prefix()方法和add_suffix()方法分别会给列名以及行索引添加后缀和前缀,对于Series()数据集而言,前缀与后缀是添加在行索引处,而对于DataFrame()数据集而言,前缀与后缀是添加在列索引处,示例如下s = pd.Series([1, 2, 3, 4])
output
0    1
1    2
2    3
3    4
dtype: int64
我们使用add_prefix()方法与add_suffix()方法在Series()数据集上
s.add_prefix('row_')
output
row_0    1
row_1    2
row_2    3
row_3    4
dtype: int64
又例如
s.add_suffix('_row')
output
0_row    1
1_row    2
2_row    3
3_row    4
dtype: int64
DataFrame()形式数据集而言,add_prefix()方法以及add_suffix()方法是将前缀与后缀添加在列索引处的df = pd.DataFrame({'A': [1, 2, 3, 4], 'B': [3, 4, 5, 6]})output
   A  B
0  1  3
1  2  4
2  3  5
3  4  6
示例如下
df.add_prefix("column_")output
   column_A  column_B
0         1         3
1         2         4
2         3         5
3         4         6
又例如
df.add_suffix("_column")output
   A_column  B_column
0         1         3
1         2         4
2         3         5
3         4         6
clip()方法
clip()方法主要是通过设置阈值来改变数据集当中的数值,当数值超过阈值的时候,就做出相应的调整data = {'col_0': [9, -3, 0, -1, 5], 'col_1': [-2, -7, 6, 8, -5]}
df = pd.DataFrame(data)output
df.clip(lower = -4, upper = 4)
output
   col_0  col_1
0      4     -2
1     -3     -4
2      0      4
3     -1      4
4      4     -4
lower和upper分别代表阈值的上限与下限,数据集当中超过上限与下限的值会被替代。filter()方法
pandas当中的filter()方法是用来筛选出特定范围的数据的,示例如下
df = pd.DataFrame(np.array(([1, 2, 3], [4, 5, 6], [7, 8, 9], [10, 11, 12])),
                  index=['A', 'B', 'C', 'D'],
columns=['one', 'two', 'three'])output
   one  two  three
A    1    2      3
B    4    5      6
C    7    8      9
D   10   11     12
我们使用filter()方法来筛选数据
df.filter(items=['one', 'three'])
output
   one  three
A    1      3
B    4      6
C    7      9
D   10     12
我们还可以使用正则表达式来筛选数据
df.filter(regex='e$', axis=1)
output
   one  three
A    1      3
B    4      6
C    7      9
D   10     12
当然通过参数axis来调整筛选行方向或者是列方向的数据
df.filter(like='B', axis=0)
output
   one  two  three
B    4    5      6
first()方法
当数据集当中的行索引是日期的时候,可以通过该方法来筛选前面几行的数据
index_1 = pd.date_range('2021-11-11', periods=5, freq='2D')
ts = pd.DataFrame({'A': [1, 2, 3, 4, 5]}, index=index_1)
tsoutput
            A
2021-11-11  1
2021-11-13  2
2021-11-15  3
2021-11-17  4
2021-11-19  5
我们使用first()方法来进行一些操作,例如筛选出前面3天的数据
ts.first('3D')
output
            A
2021-11-11  1
2021-11-13  2
isin()方法
isin()方法主要是用来确认数据集当中的数值是否被包含在给定的列表当中
df = pd.DataFrame(np.array(([1, 2, 3], [4, 5, 6], [7, 8, 9], [10, 11, 12])),
                  index=['A', 'B', 'C', 'D'],
                  columns=['one', 'two', 'three'])
df.isin([3, 5, 12])output
     one    two  three
A  False  False   True
B  False   True  False
C  False  False  False
D  False  False   True
True,否则就返回Falsedf.plot.area()方法
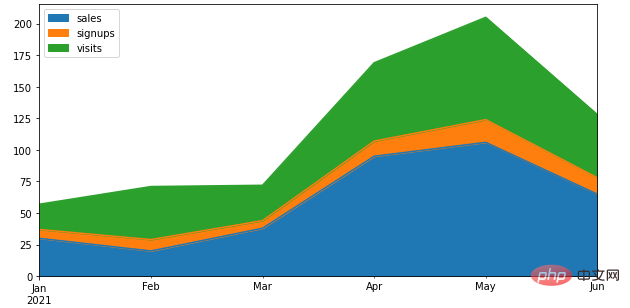
Pandas当中通过一行代码来绘制图表,将所有的列都通过面积图的方式来绘制df = pd.DataFrame({
'sales': [30, 20, 38, 95, 106, 65],
'signups': [7, 9, 6, 12, 18, 13],
'visits': [20, 42, 28, 62, 81, 50],
}, index=pd.date_range(start='2021/01/01', end='2021/07/01', freq='M'))
ax = df.plot.area(figsize = (10, 5))output
df.plot.bar()方法
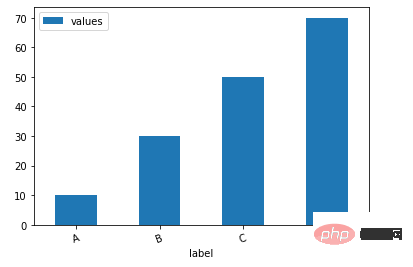
下面我们看一下如何通过一行代码来绘制柱状图
df = pd.DataFrame({'label':['A', 'B', 'C', 'D'], 'values':[10, 30, 50, 70]})
ax = df.plot.bar(x='label', y='values', rot=20)output
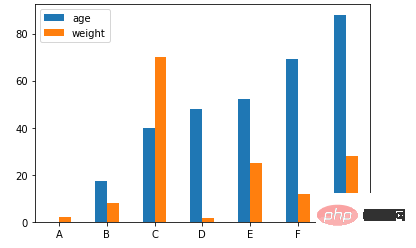
当然我们也可以根据不同的类别来绘制柱状图
age = [0.1, 17.5, 40, 48, 52, 69, 88]
weight = [2, 8, 70, 1.5, 25, 12, 28]
index = ['A', 'B', 'C', 'D', 'E', 'F', 'G']
df = pd.DataFrame({'age': age, 'weight': weight}, index=index)
ax = df.plot.bar(rot=0)output
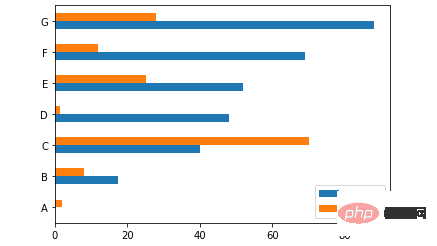
当然我们也可以横向来绘制图表
ax = df.plot.barh(rot=0)
output
df.plot.box()方法
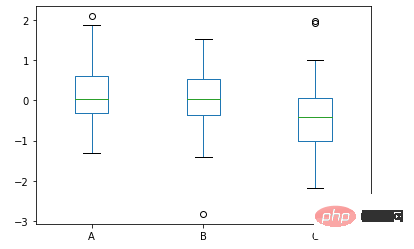
我们来看一下箱型图的具体的绘制,通过pandas一行代码来实现
data = np.random.randn(25, 3)
df = pd.DataFrame(data, columns=list('ABC'))
ax = df.plot.box()
output
df.plot.pie()方法
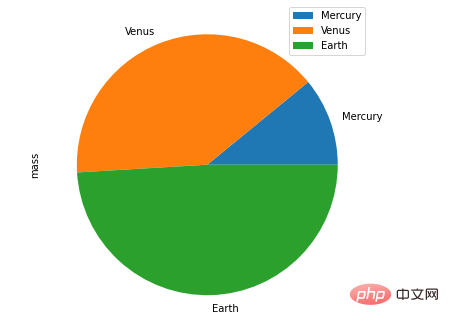
接下来是饼图的绘制
df = pd.DataFrame({'mass': [1.33, 4.87 , 5.97],
                   'radius': [2439.7, 6051.8, 6378.1]},
                  index=['Mercury', 'Venus', 'Earth'])
plot = df.plot.pie(y='mass', figsize=(8, 8))output
除此之外,还有折线图、直方图、散点图等等,步骤与方式都与上述的技巧有异曲同工之妙,大家感兴趣的可以自己另外去尝试。
以上是4000字詳細說明,推薦20個好用到爆的Pandas函數方法的詳細內容。更多資訊請關注PHP中文網其他相關文章!

熱AI工具

Undresser.AI Undress
人工智慧驅動的應用程序,用於創建逼真的裸體照片

AI Clothes Remover
用於從照片中去除衣服的線上人工智慧工具。

Undress AI Tool
免費脫衣圖片

Clothoff.io
AI脫衣器

AI Hentai Generator
免費產生 AI 無盡。

熱門文章

熱工具

記事本++7.3.1
好用且免費的程式碼編輯器

SublimeText3漢化版
中文版,非常好用

禪工作室 13.0.1
強大的PHP整合開發環境

Dreamweaver CS6
視覺化網頁開發工具

SublimeText3 Mac版
神級程式碼編輯軟體(SublimeText3)

熱門話題
 HadiDB:Python 中的輕量級、可水平擴展的數據庫
Apr 08, 2025 pm 06:12 PM
HadiDB:輕量級、高水平可擴展的Python數據庫HadiDB(hadidb)是一個用Python編寫的輕量級數據庫,具備高度水平的可擴展性。安裝HadiDB使用pip安裝:pipinstallhadidb用戶管理創建用戶:createuser()方法創建一個新用戶。 authentication()方法驗證用戶身份。 fromhadidb.operationimportuseruser_obj=user("admin","admin")user_obj.
 2小時的Python計劃:一種現實的方法
Apr 11, 2025 am 12:04 AM
2小時內可以學會Python的基本編程概念和技能。 1.學習變量和數據類型,2.掌握控制流(條件語句和循環),3.理解函數的定義和使用,4.通過簡單示例和代碼片段快速上手Python編程。
 Navicat查看MongoDB數據庫密碼的方法
Apr 08, 2025 pm 09:39 PM
直接通過 Navicat 查看 MongoDB 密碼是不可能的,因為它以哈希值形式存儲。取回丟失密碼的方法:1. 重置密碼;2. 檢查配置文件(可能包含哈希值);3. 檢查代碼(可能硬編碼密碼)。
 Python:探索其主要應用程序
Apr 10, 2025 am 09:41 AM
Python在web開發、數據科學、機器學習、自動化和腳本編寫等領域有廣泛應用。 1)在web開發中,Django和Flask框架簡化了開發過程。 2)數據科學和機器學習領域,NumPy、Pandas、Scikit-learn和TensorFlow庫提供了強大支持。 3)自動化和腳本編寫方面,Python適用於自動化測試和系統管理等任務。
 如何針對高負載應用程序優化 MySQL 性能?
Apr 08, 2025 pm 06:03 PM
MySQL數據庫性能優化指南在資源密集型應用中,MySQL數據庫扮演著至關重要的角色,負責管理海量事務。然而,隨著應用規模的擴大,數據庫性能瓶頸往往成為製約因素。本文將探討一系列行之有效的MySQL性能優化策略,確保您的應用在高負載下依然保持高效響應。我們將結合實際案例,深入講解索引、查詢優化、數據庫設計以及緩存等關鍵技術。 1.數據庫架構設計優化合理的數據庫架構是MySQL性能優化的基石。以下是一些核心原則:選擇合適的數據類型選擇最小的、符合需求的數據類型,既能節省存儲空間,又能提升數據處理速度
 如何將 AWS Glue 爬網程序與 Amazon Athena 結合使用
Apr 09, 2025 pm 03:09 PM
作為數據專業人員,您需要處理來自各種來源的大量數據。這可能會給數據管理和分析帶來挑戰。幸運的是,兩項 AWS 服務可以提供幫助:AWS Glue 和 Amazon Athena。
 redis怎麼啟動服務器
Apr 10, 2025 pm 08:12 PM
啟動 Redis 服務器的步驟包括:根據操作系統安裝 Redis。通過 redis-server(Linux/macOS)或 redis-server.exe(Windows)啟動 Redis 服務。使用 redis-cli ping(Linux/macOS)或 redis-cli.exe ping(Windows)命令檢查服務狀態。使用 Redis 客戶端,如 redis-cli、Python 或 Node.js,訪問服務器。
 redis怎麼讀取隊列
Apr 10, 2025 pm 10:12 PM
要從 Redis 讀取隊列,需要獲取隊列名稱、使用 LPOP 命令讀取元素,並處理空隊列。具體步驟如下:獲取隊列名稱:以 "queue:" 前綴命名,如 "queue:my-queue"。使用 LPOP 命令:從隊列頭部彈出元素並返回其值,如 LPOP queue:my-queue。處理空隊列:如果隊列為空,LPOP 返回 nil,可先檢查隊列是否存在再讀取元素。


