無論您是要建立一個簡單的部落格、建立一個公司網站還是使用WordPress 建立一個創意作品集,「聯絡(我們)」頁面(幾乎)總是必要的,而且擁有聯絡表單(幾乎)總是更好而不是公開分享您的電子郵件地址(儘管垃圾郵件機器人喜歡它們)。當然,WordPress 有很多很棒的聯絡表單插件,但是當我們可以使用一個可愛、簡單的自訂短代碼插件來代替時,為什麼要使用帶有大量資料庫查詢的繁重插件來使網站膨脹呢?
外掛程式很棒,但是太多的外掛程式具有您不需要的功能,可能會透過使用資料庫連接、運行額外的PHP 程式碼、向標頭添加CSS 樣式表和JS 檔案來使您的網站變得臃腫……所以,在某些時候,您只是想遠離現有的插件,無論您想要使用的插件有多棒。
如果你不知道如何編碼,我必須承認你的手(有點)被束縛,並且你必須使用插件。但是,如果您熟悉任何級別的 WordPress 開發(我假設您很熟悉,因為您仍然和我在一起),那麼您應該考慮破解自己的主題或編寫自己的外掛程式的好處。以下是我認為的優點:
好了,閒聊就夠了-讓我們開始寫程式吧!我們不會在這裡處理大量的程式碼或任何類型的艱苦工作,因此即使您是 PHP 和/或 WordPress 的初學者,您也可以透過跟隨我的指導並研究其中的任何部分來理解程式碼。您不認識的程式碼。
可以將此程式碼直接放入主題的 functions.php 檔案中,但更好的方法是將其用作插件。這樣,當您切換主題時,您不會失去功能並最終在內容中列印短代碼。讓我們從標準插件資訊開始:
<?php
/*
Plugin Name: Simple Contact Form Shortcode
Plugin URI: https://tutsplus.com/authors/Bar%C4%B1%C5%9F%20%C3%9Cnver
Description: A simple contact form for simple needs. Usage: <code>[contact email="your@email.address"]</code>
Version: 1.0
Author: Barış Ünver
Author URI: http://beyn.org/
*/

// This line of comment holds the place of the amazingly simple code we're going to write. So you don't really need to read this.

?>
get_the_ip()
正如您從函數名稱中可以猜到的那樣,即使用戶透過代理伺服器進行連接,我們也會取得使用者的真實 IP 位址。當然,它並不是萬無一失的,但我們無論如何都會將其用作用戶的額外資訊。
基本上,我們將嘗試取得不同的 $_SERVER 變數:分別為 HTTP_X_FORWARDED_FOR、HTTP_CLIENT_IP 和 REMOTE_ADDR。程式碼如下:
function wptuts_get_the_ip() {
	if (isset($_SERVER["HTTP_X_FORWARDED_FOR"])) {
		return $_SERVER["HTTP_X_FORWARDED_FOR"];
	}
	elseif (isset($_SERVER["HTTP_CLIENT_IP"])) {
		return $_SERVER["HTTP_CLIENT_IP"];
	}
	else {
		return $_SERVER["REMOTE_ADDR"];
	}
}
如果您在 Wptuts 上關注我的帖子,您就會知道我絕對喜歡 WordPress 的 Shortcode API。
我將把短代碼分成 3 個部分,以便更好地解釋它,但我們不要忘記先打開和關閉短代碼功能:
function wptuts_contact_form_sc( $atts ) {

	// This line of comment, too, holds the place of the brilliant yet simple shortcode that creates our contact form. And yet you're still wasting your time to read this comment. Bravo.

}
add_shortcode( 'contact', 'wptuts_contact_form_sc' );
我們需要設定一些屬性,以便在保持輕量級的同時保持靈活性。這是十個:
extract( shortcode_atts( array(
	// if you don't provide an e-mail address, the shortcode will pick the e-mail address of the admin:
	"email" => get_bloginfo( 'admin_email' ),
	"subject" => "",
	"label_name" => "Your Name",
	"label_email" => "Your E-mail Address",
	"label_subject" => "Subject",
	"label_message" => "Your Message",
	"label_submit" => "Submit",
	// the error message when at least one of the required fields are empty:
	"error_empty" => "Please fill in all the required fields.",
	// the error message when the e-mail address is not valid:
	"error_noemail" => "Please enter a valid e-mail address.",
	// and the success message when the e-mail is sent:
	"success" => "Thanks for your e-mail! We'll get back to you as soon as we can."
), $atts ) );
請記住,我們將在程式碼中將它們作為帶有屬性名稱的變數進行引用(例如 $label_submit)。
這是該函數中最重要的部分,因此我將繼續解釋程式碼中的程式碼,並帶有註解行:
// if the <form> element is POSTed, run the following code
if ( $_SERVER['REQUEST_METHOD'] == 'POST' ) {
	$error = false;
	// set the "required fields" to check
	$required_fields = array( "your_name", "email", "message", "subject" );

	// this part fetches everything that has been POSTed, sanitizes them and lets us use them as $form_data['subject']
	foreach ( $_POST as $field => $value ) {
		if ( get_magic_quotes_gpc() ) {
			$value = stripslashes( $value );
		}
		$form_data[$field] = strip_tags( $value );
	}

	// if the required fields are empty, switch $error to TRUE and set the result text to the shortcode attribute named 'error_empty'
	foreach ( $required_fields as $required_field ) {
		$value = trim( $form_data[$required_field] );
		if ( empty( $value ) ) {
			$error = true;
			$result = $error_empty;
		}
	}

	// and if the e-mail is not valid, switch $error to TRUE and set the result text to the shortcode attribute named 'error_noemail'
	if ( ! is_email( $form_data['email'] ) ) {
		$error = true;
		$result = $error_noemail;
	}

	if ( $error == false ) {
		$email_subject = "[" . get_bloginfo( 'name' ) . "] " . $form_data['subject'];
		$email_message = $form_data['message'] . "\n\nIP: " . wptuts_get_the_ip();
		$headers  = "From: " . $form_data['name'] . " <" . $form_data['email'] . ">\n";
		$headers .= "Content-Type: text/plain; charset=UTF-8\n";
		$headers .= "Content-Transfer-Encoding: 8bit\n";
		wp_mail( $email, $email_subject, $email_message, $headers );
		$result = $success;
		$sent = true;
	}
	// but if $error is still FALSE, put together the POSTed variables and send the e-mail!
	if ( $error == false ) {
		// get the website's name and puts it in front of the subject
		$email_subject = "[" . get_bloginfo( 'name' ) . "] " . $form_data['subject'];
		// get the message from the form and add the IP address of the user below it
		$email_message = $form_data['message'] . "\n\nIP: " . wptuts_get_the_ip();
		// set the e-mail headers with the user's name, e-mail address and character encoding
		$headers  = "From: " . $form_data['your_name'] . " <" . $form_data['email'] . ">\n";
		$headers .= "Content-Type: text/plain; charset=UTF-8\n";
		$headers .= "Content-Transfer-Encoding: 8bit\n";
		// send the e-mail with the shortcode attribute named 'email' and the POSTed data
		wp_mail( $email, $email_subject, $email_message, $headers );
		// and set the result text to the shortcode attribute named 'success'
		$result = $success;
		// ...and switch the $sent variable to TRUE
		$sent = true;
	}
}
這部分當然和前一部分一樣重要。畢竟,如果沒有聯絡表單,前面的程式碼該如何發送電子郵件呢? :)
// if there's no $result text (meaning there's no error or success, meaning the user just opened the page and did nothing) there's no need to show the $info variable
if ( $result != "" ) {
	$info = '<div class="info">' . $result . '</div>';
}
// anyways, let's build the form! (remember that we're using shortcode attributes as variables with their names)
$email_form = '<form class="contact-form" method="post" action="' . get_permalink() . '">
	<div>
		<label for="cf_name">' . $label_name . ':</label>
		<input type="text" name="your_name" id="cf_name" size="50" maxlength="50" value="' . $form_data['your_name'] . '" />
	</div>
	<div>
		<label for="cf_email">' . $label_email . ':</label>
		<input type="text" name="email" id="cf_email" size="50" maxlength="50" value="' . $form_data['email'] . '" />
	</div>
	<div>
		<label for="cf_subject">' . $label_subject . ':</label>
		<input type="text" name="subject" id="cf_subject" size="50" maxlength="50" value="' . $subject . $form_data['subject'] . '" />
	</div>
	<div>
		<label for="cf_message">' . $label_message . ':</label>
		<textarea name="message" id="cf_message" cols="50" rows="15">' . $form_data['message'] . '</textarea>
	</div>
	<div>
		<input type="submit" value="' . $label_submit . '" name="send" id="cf_send" />
	</div>
</form>';
提示:如果您仔細查看聯絡表單的 HTML 程式碼,您可能會看到額外的 $subject 變數。還記得沒有預設值的簡碼屬性「subject」嗎?這表示如果您想要設定預設主題,您可以使用這樣的短程式碼: [contact subject="Job application"]
返回简码的最后一点非常简单:如果电子邮件已发送,则显示成功消息,或者显示电子邮件表单和错误消息(如果有)。代码如下:
if ( $sent == true ) {
	return $info;
} else {
	return $info . $email_form;
}
如果电子邮件已发送,我们不会再次显示该表单,但如果您仍想显示该表单,可以使用以下简单的行:
return $info . $email_form;
当然,代码本身看起来不太好。通过一些化妆、CSS,我们可以使我们的表单更漂亮。将这些 CSS 代码行添加到主题的 style.css 文件中:
.contact-form label, .contact-form input, .contact-form textarea { display: block; margin: 10px 0; }
.contact-form label { font-size: larger; }
.contact-form input { padding: 5px; }
#cf_message { width: 90%; padding: 10px; }
#cf_send { padding: 5px 10px; }
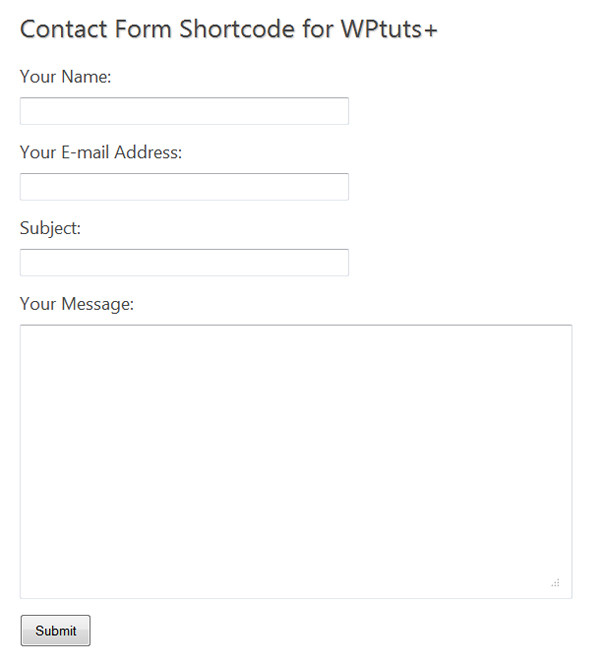
如果一切正确,您将看到类似于下图的内容:

恭喜,您刚刚构建了自己的联系表单短代码!
这个简单的联系表单对于大多数网站来说已经足够了,但是如果您想向其中添加更多字段,您只需编辑表单并将 $form_data['name_of_the_new_field'] 变量添加到 $email_message 中变量(并且可能将字段名称添加到 $required_fields 数组中。
如果您对如何改进此代码或显示您使用该代码的网站页面有任何想法,请在下面与我们分享您的评论!
以上是簡化基本要求的聯絡表單創建的詳細內容。更多資訊請關注PHP中文網其他相關文章!


