
NativeScript 是一個使用 XML、CSS 和 JavaScript 建立跨平臺本機行動應用程式的框架。在本系列中,我們將嘗試使用 NativeScript 應用程式可以完成的一些很酷的事情:地理位置和 Google 地圖整合、SQLite 資料庫、Firebase 整合和推播通知。在此過程中,我們正在建立一個具有即時功能的健身應用程序,該應用程式將使用這些功能。
在本教學中,您將了解使用 Firebase 雲端訊息服務為 NativeScript 應用程式新增推播通知是多麼輕鬆。
#繼續上一教學,您將向應用程式新增推播通知。當用戶打破當前記錄或其中一個朋友取代他們獲得第一名時,將會觸發通知。
如果您已遵循先前的 Firebase 教程,則只需使用相同專案並建立我們將在本教程中添加的功能即可。否則,您可以建立一個新專案並將起始檔案複製到專案的應用程式資料夾中。
tns create fitApp --appid "com.yourname.fitApp"
之後,您還需要安裝地理位置、Google 地圖、SQLite 和 Firebase 外掛程式:
tns plugin add nativescript-geolocation
tns plugin add nativescript-google-maps-sdk
tns plugin add nativescript-sqlite
tns plugin add nativescript-plugin-firebase
安裝後,您需要設定 Google 地圖外掛程式。您可以閱讀先前教程中的安裝 Google 地圖外掛程式部分,以了解有關如何執行此操作的完整說明。
接下來,安裝用於格式化日期的 fecha 函式庫:
npm install --save fecha
之後,您還需要設定 Firebase 外掛程式。請務必閱讀上一教學中的以下部分,以便您可以執行應用程式:
由於我們已經在上一篇文章中設定了 Firebase 插件,因此只需完成少量工作即可設定推播通知。
首先,您必須進入 node_modules/nativescript-plugin-firebase 目錄並執行 npm run config 來重新設定外掛程式。這次,選擇 Facebook 身份驗證和訊息傳遞。
完成後,開啟專案根目錄中的 firebase.nativescript.json 文件,並確保 messaging 設定為 true:
{
    "using_ios": false,
    "using_android": true,
    "remote_config": false,
    "messaging": true,
    "crash_reporting": false,
    "storage": false,
    "facebook_auth": true,
    "google_auth": false,
    "admob": false,
    "invites": false
}
接下來,開啟app/App_Resources/Android/AndroidManifest.xml並在 <application> 中新增以下服務。這將為應用程式啟用 Firebase 訊息傳遞服務:
<application ...>

<service android:name="org.nativescript.plugins.firebase.MyFirebaseInstanceIDService">
    <intent-filter>
        <action android:name="com.google.firebase.INSTANCE_ID_EVENT"/>
    </intent-filter>
</service>
<service android:name="org.nativescript.plugins.firebase.MyFirebaseMessagingService">
    <intent-filter>
        <action android:name="com.google.firebase.MESSAGING_EVENT"/>
    </intent-filter>
</service>

</application>
可以透過執行 tns run android 來運行專案。但由於此應用程式將建立在地理定位功能的基礎上,我建議您使用 GPS 模擬器來快速設定和更改您的位置。您可以在先前的教程中的運行應用程式部分了解如何執行此操作。
如果遇到任何建置錯誤,您可以刪除平台並重新執行應用程式:
tns platform remove android
tns run android
您將使用 Firebase Cloud Functions 建立一個用於發送推播通知的伺服器。此 Firebase 功能用於在您正在使用的 Firebase 功能中發生特定事件時運行後端程式碼 - 例如,如果實時資料庫中保存了新數據,或者透過Firebase 驗證服務。對於此應用程式,您將使用 HTTP 觸發器在行動應用程式向特定端點發出請求時發送推播通知。
要使用 Firebase Cloud Functions,您首先需要全域安裝 firebase-tools 軟體包:
npm install -g firebase-tools
接下來,建立一個新資料夾來存放伺服器程式碼。這應該位於您的應用程式資料夾之外。在該資料夾中,安裝 firebase-functions 軟體包:
npm install firebase-functions@latest --save
安裝完成後,透過執行 firebase login 登入 Firebase。這將開啟一個新的瀏覽器選項卡,讓您可以使用 Google 帳戶登入。完成整個過程並同意所要求的所有權限。
登入後,現在可以初始化特定 Firebase 專案的 Firebase 函數:
firebase init functions
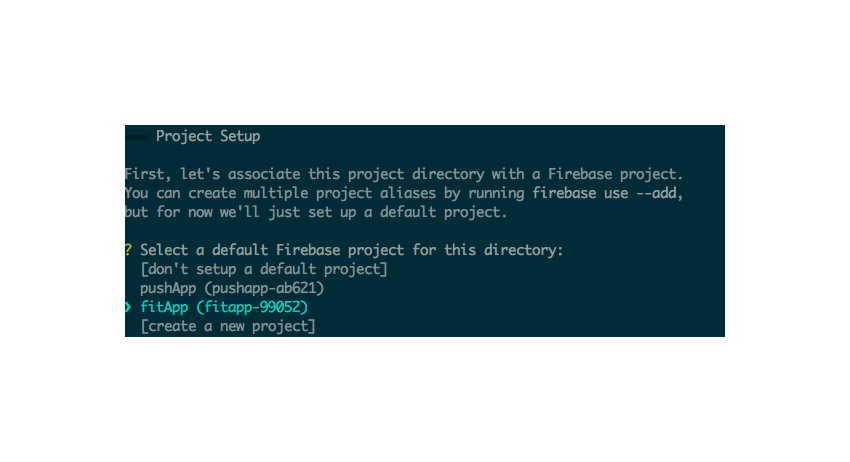
這將詢問您是否要設定預設項目。選擇您在上一教學中建立的 Firebase 專案:
接下來,系統會詢問您是否要安裝相依性。說是。
安裝完所有依賴項後,您應該會在目錄中看到一個 firebase.json 檔案和一個 functions 資料夾。您要處理的檔案是 functions/index.js 檔案。打開該文件,您將看到以下內容:
const functions = require('firebase-functions');

// // Create and Deploy Your First Cloud Functions
// // https://firebase.google.com/docs/functions/write-firebase-functions
//
// exports.helloWorld = functions.https.onRequest((request, response) => {
//  response.send("Hello from Firebase!");
// });
取消註解 helloWorld 函數,您將看到正在執行的 HTTP 觸發器。
exports.helloWorld = functions.https.onRequest((request, response) => {
    response.send("Hello from Firebase!");
});
執行以下命令將函數部署到雲端:
firebase deploy --only functions
部署完成後,它應該會顯示已部署該函數的 URL:
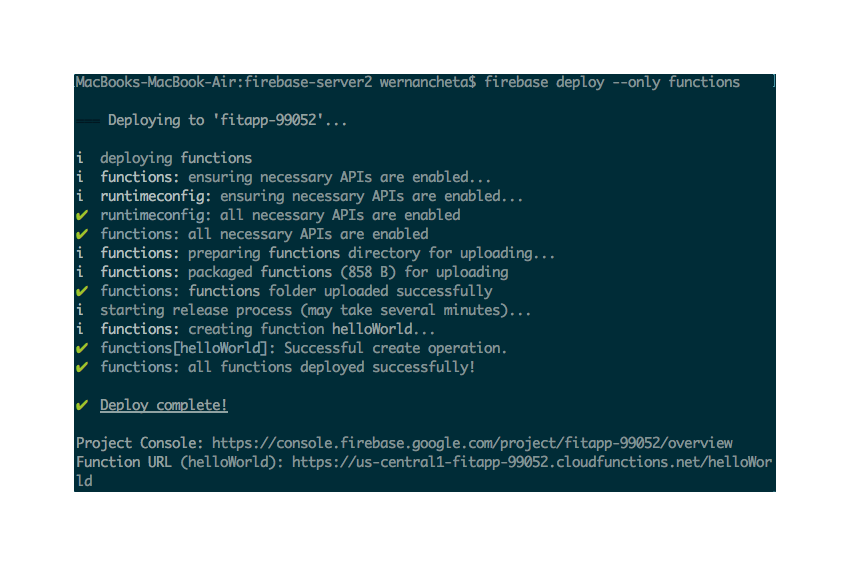
从浏览器访问该网址即可查看输出“Hello from Firebase!”
现在您已准备好添加用于实现推送通知的代码。首先,您将添加服务器组件的代码,然后添加应用程序的代码。
打开functions/index.js文件并清空其内容。
导入您需要的 Firebase 软件包:
const functions = require('firebase-functions'); // for listening to http triggers
const admin = require('firebase-admin'); // for accessing the realtime database
admin.initializeApp(functions.config().firebase); // initialize the Firebase Admin SDK
创建 init_push 函数。请注意,任何请求方法都会调用 HTTP 触发器,因此您必须筛选要处理的请求方法。在本例中,我们只想处理 POST 请求。我们希望应用提交 id、steps 和 friend_ids 作为请求数据。
exports.init_push = functions.https.onRequest((request, response) => {

    if(request.method == 'POST'){

        var id = request.body.id; // ID of the user who made the request (Firebase Auth ID)
        var steps = parseInt(request.body.steps); // latest steps, not recorded yet
        var friend_ids = request.body.friend_ids.split(',');

        friend_ids.push(id); // also include the ID of the current user

        // next: add code for getting the user and friends data
    }

});
接下来,查询 Firebase 数据库以检查用户 ID 是否存在。这是保护端点的一种方式,因此并非任何人都可以触发推送通知。 (当然,真正的应用程序应该具有更好的后端安全性,以便用户无法欺骗自己的数据或其他人的数据。)
如果用户确实存在,则再次查询数据库,以便返回所有用户。请注意,Firebase 目前不提供基于 ID 数组返回记录的方法,因此我们必须自己过滤相关数据:
admin.database().ref('/users')
    .orderByChild('id')
    .limitToFirst(1)
    .equalTo(id)
    .once('value').then(snapshot => {

    var user_data = snapshot.val();

    if(user_data){
        // get all users from the database
        admin.database().ref('/users')
            .once('value').then(snapshot => {
            // next: add code for getting the current user's data and their friends data
        });
    }
});
接下来,循环遍历从 Firebase 返回的结果并创建一个新数组来容纳 friends_data。完成此操作后,根据每个用户的步数对数组进行排序。步骤数最多的索引为第一个索引。
var friends_data = [];
var current_user_data = null;
var notification_data = {};
var has_notification = false;

var users = snapshot.val();
for(var key in users){
    var user_id = users[key].id;

    if(friend_ids.indexOf(user_id) != -1 && id != user_id){ // the current user's friends
        friends_data.push(users[key]);
    }else if(id == user_id){ // the current user
        current_user_data = users[key];
    }
}

// sort in descending order by the number of steps
var sorted_friends_data = friends_data.sort(function(a, b) {
    return b.steps - a.steps;
});

// next: add code for constructing the notification payload
现在我们准备好确定谁将接收通知并构建通知负载。谁是第一名?是当前用户还是用户的朋友之一?由于当前用户在打破第一名的总记录时也打破了自己的记录,因此我们只需要检查该记录是否已被打破。
if(steps > sorted_friends_data[0].steps){
    // notify friend who was overtaken
    var diff_steps = steps - sorted_friends_data[0].steps;
    notification_data = {
        payload: {
            title: 'One of your friends beat your record',
            body: 'Too bad, your friend ' + current_user_data.user_name + ' just overtook you by ' + diff_steps + ' steps'
        },
        device_token: sorted_friends_data[0].device_token
    };
    has_notification = true;

}else if(steps > current_user_data.steps){
    // notify current user
    var diff_steps = steps - current_user_data.steps;
    notification_data = {
        payload: {
            title: 'You beat your record!',
            body: 'Congrats! You beat your current record by ' + diff_steps + ' steps!'
        },
        device_token: current_user_data.device_token
    };
    has_notification = true;
}

// next: add code for sending push notification
最后发出通知:
if(has_notification){

    var payload = {
      notification: notification_data.payload
    };

    // send push notification
    admin.messaging().sendToDevice(notification_data.device_token, payload).then(function(res) {

        response.send(JSON.stringify({'has_notification': true})); // inform the app that a notification was sent
    })
    .catch(function(error) {
        response.send(JSON.stringify(error)); // send the push notification error to the app
    });

}else{
    response.send(JSON.stringify({'has_notification': false})); // inform the app that a notification was not sent
}
之前,您设置了应用程序,以便它能够接收推送通知。这次,您将添加代码,以便您的应用程序可以处理这些推送通知并将其显示给用户。
为了接收推送通知,您需要做的第一件事是更新 firebase.init() 函数以包含用于接收设备令牌的侦听器:
onPushTokenReceivedCallback: function(token) {
    // temporarily save it to application settings until such time that
    // the user logs in for the first time
    applicationSettings.setString('device_token', token);
},
此函数仅执行一次,因此您必须使用应用程序设置在本地保存令牌。稍后,这将使我们能够在用户首次登录时获取设备令牌。如果您还记得上一教程,我们会在用户首次登录时将其数据保存到 Firebase。
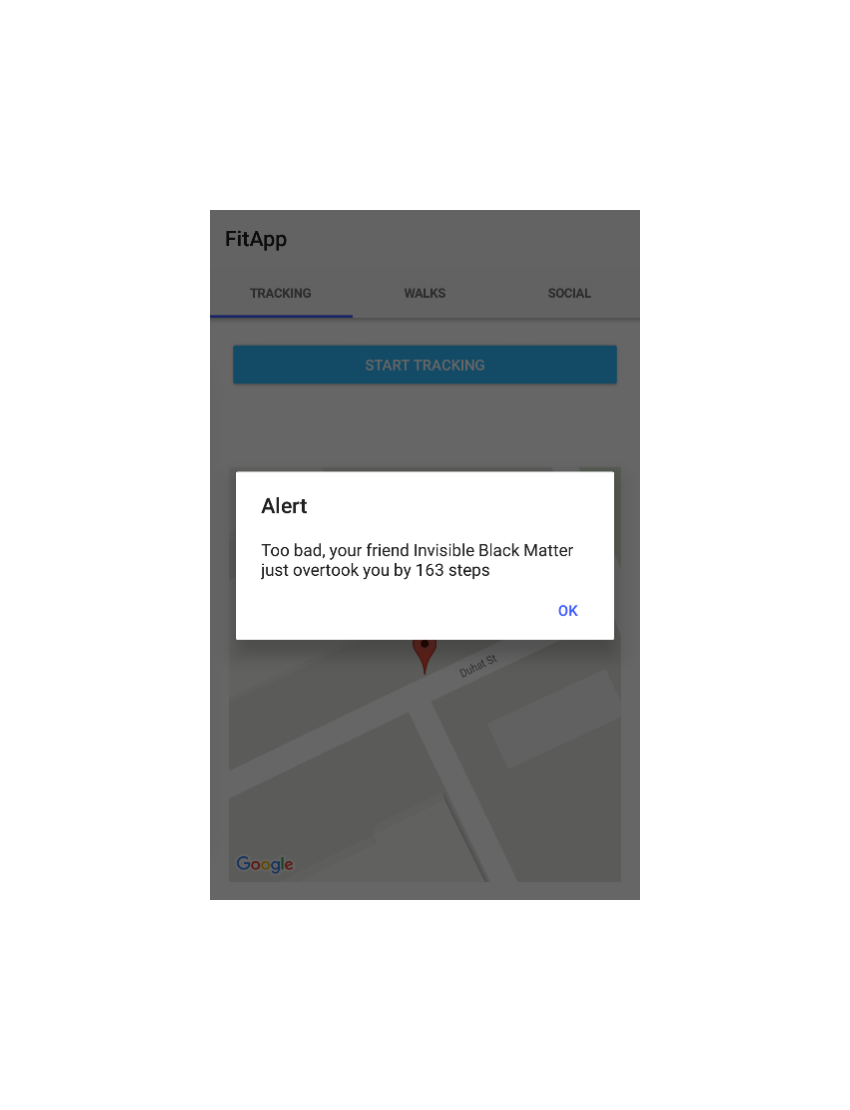
接下来,您可以添加接收通知时的侦听器。这将显示一个警告框,其中使用消息的标题和正文作为内容:
onMessageReceivedCallback: function(message) {
    dialogs.alert({
        title: message.title,
        message: message.body,
        okButtonText: "ok"
    });
},
Firebase Cloud Messaging 在向特定设备发送推送通知时需要设备令牌。由于我们已经在使用 Firebase,因此我们只需将设备令牌与用户数据一起保存。为此,您需要编辑用于保存用户数据的代码以包含我们之前获得的设备令牌:
if(firebase_result.value == null){

    var device_token = applicationSettings.getString('device_token');

    var user_data = {
        'uid': fb_result.uid,
        'user_name': fb_result.name,
        'profile_photo': fb_result.profileImageURL,
        'device_token': device_token
    };

}
当发生以下两种情况之一时,将触发推送通知:
第一个很简单,因此实际上不需要额外的设置。但对于第二个,你需要做一些工作。首先,您必须编辑身份验证状态更改时的代码。从 Facebook 结果中提取好友 ID 后,您必须使用应用程序设置保存好友 ID。
// extracting the friend IDs from the Facebook result
var friends_ids = r.data.map(function(obj){
    return obj.id;
});

// save the friend IDs
applicationSettings.setString('friends_ids', JSON.stringify(friends_ids));

friends_ids.push(user[user_key].id);
接下来,更新用户何时停止跟踪其步行的代码。在构建更新用户的用户数据的代码之后,从应用程序设置中获取好友 ID,并将其包含在包含触发推送通知的请求数据的对象中。
// construct the user data for updating the user's distance and steps
var user_key = applicationSettings.getString('user_key');
var user = applicationSettings.getString('user');
var user_data = JSON.parse(user);
user_data[user_key].distance = total_distance;
user_data[user_key].steps = total_steps;

// get friend IDs
var friends_ids = JSON.parse(applicationSettings.getString('friends_ids'));

var request_data = {
    'id': user_data[user_key].id,
    'friend_ids': friends_ids.join(','),
    'steps': total_steps
};
向您之前创建的 Firebase Cloud Functions 端点发出请求。一旦返回成功响应,用户的数据才会在 Firebase 数据库上更新。
http.request({
    url: "https://us-central1-pushapp-ab621.cloudfunctions.net/init_push",
    method: "POST",
    headers: { "Content-Type": "application/json" },
    content: JSON.stringify(request_data)
}).then(function (response) {

    var statusCode = response.statusCode;
    if(statusCode == 200){
        // update the user's data on Firebase
        firebase.update(
            '/users',
            user_data
        );

    }

}, function (e) {
    console.log('Error occurred while initiating push: ', e);
});
您可以通过首先从模拟器或设备中卸载应用程序来测试推送通知的发送。这使得我们能够正确触发获取设备令牌的函数。请务必添加 console.log 以输出设备令牌:
onPushTokenReceivedCallback: function(token) {
    applicationSettings.setString('device_token', token);
    console.log('device token: ', device_token); // <-- add this
}
当设备令牌在 NativeScript 控制台中输出时,将其复制,点击 Firebase 应用信息中心上的数据库菜单,并将其作为设备令牌添加给应用的所有用户。使用 device_token 作为属性名称。
要触发推送通知,您可以使用 curl 向 Firebase 函数端点发出 POST 请求:
curl -X POST -H "Content-Type:application/json" YOUR_FIREBASE_FUNCTION_ENDPOINT -d '{"id":"ID OF A FIREBASE USER", "steps":NUMBER_OF_STEPS, "friend_ids":"COMMA,SEPARATED,FIREBASE,USER_IDs"}'
如果您没有安装curl,您可以使用Postman应用发送请求。对请求使用以下设置:
POST
内容类型
application/json
{"id":"ID OF A FIREBASE USER", "steps":NUMBER_OF_STEPS, "friend_ids":"COMMA,SEPARATED,FIREBASE,USER_IDs"}
触发后,您将看到类似于以下内容的输出:
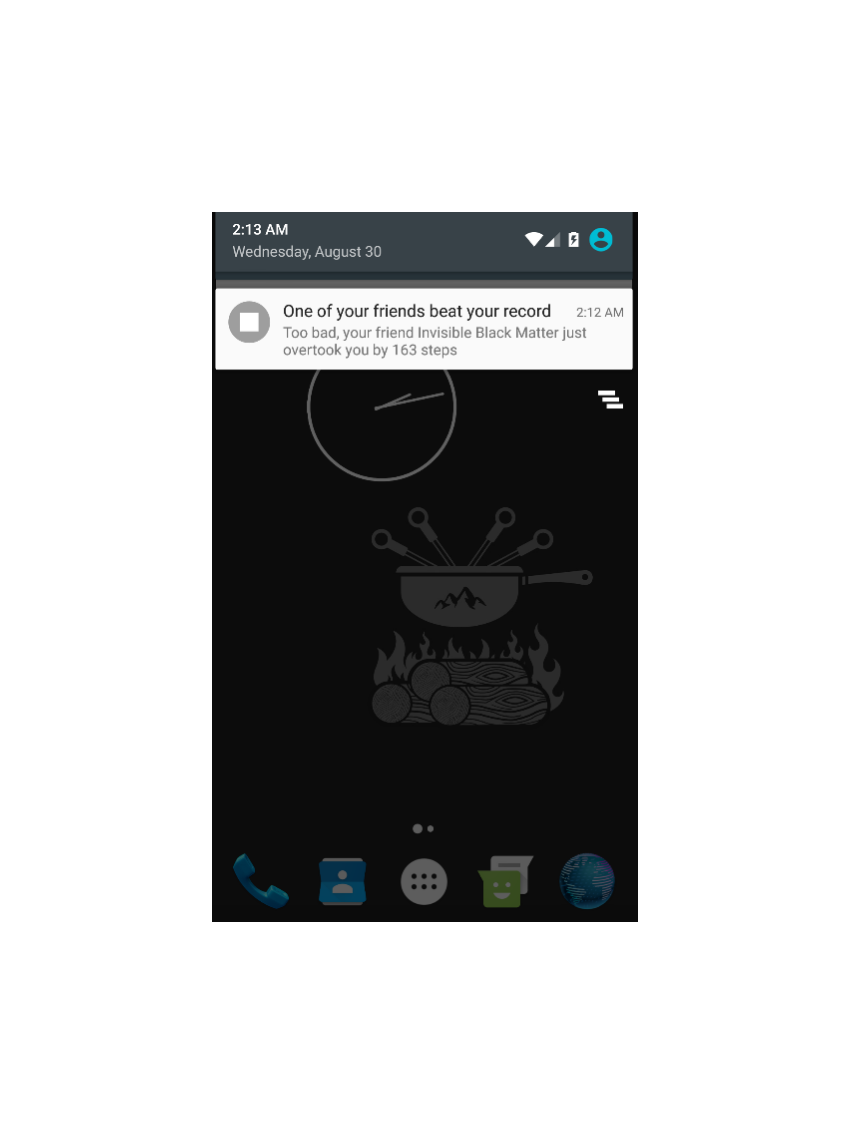
如果应用当前未打开,您将在通知区域中看到通知:
恭喜!您终于完成了健身应用程序。在四个教程的过程中,您已经构建了一个使用 Google 地图、SQLite、Firebase 实时数据库和 Firebase 云消息传递的 NativeScript 应用。现在您已经为构建使用这些技术的 NativeScript 应用程序奠定了良好的基础。
要了解有关 NativeScript 或其他跨平台移动技术的更多信息,请务必查看我们在 Envato Tuts+ 上的其他一些课程和教程!
以上是使用 NativeScript 開發即時應用程式:實現推播通知的詳細內容。更多資訊請關注PHP中文網其他相關文章!


