

在 OpenCart 中設計個人化支付選項:第 3 部分

如果您一直在關注本系列,您應該熟悉我們在後端為自訂付款方式設定的文件結構類型。如果您還沒有閱讀過本系列的前面部分,我強烈建議您在繼續閱讀本系列之前先閱讀它們。
我們也將為前端部分使用類似的檔案設定。
控制器設定
繼續並在 catalog/controller/ payment/custom.php 建立控制器檔案。將以下內容貼到新建立的控制器檔案 custom.php 中。
<?php
class ControllerPaymentCustom extends Controller {
  protected function index() {
    $this->language->load('payment/custom');
    $this->data['button_confirm'] = $this->language->get('button_confirm');
    $this->data['action'] = 'https://yourpaymentgatewayurl';

    $this->load->model('checkout/order');
    $order_info = $this->model_checkout_order->getOrder($this->session->data['order_id']);

    if ($order_info) {
      $this->data['text_config_one'] = trim($this->config->get('text_config_one'));
      $this->data['text_config_two'] = trim($this->config->get('text_config_two'));
      $this->data['orderid'] = date('His') . $this->session->data['order_id'];
      $this->data['callbackurl'] = $this->url->link('payment/custom/callback');
      $this->data['orderdate'] = date('YmdHis');
      $this->data['currency'] = $order_info['currency_code'];
      $this->data['orderamount'] = $this->currency->format($order_info['total'], $this->data['currency'] , false, false);
      $this->data['billemail'] = $order_info['email'];
      $this->data['billphone'] = html_entity_decode($order_info['telephone'], ENT_QUOTES, 'UTF-8');
      $this->data['billaddress'] = html_entity_decode($order_info['payment_address_1'], ENT_QUOTES, 'UTF-8');
      $this->data['billcountry'] = html_entity_decode($order_info['payment_iso_code_2'], ENT_QUOTES, 'UTF-8');
      $this->data['billprovince'] = html_entity_decode($order_info['payment_zone'], ENT_QUOTES, 'UTF-8');;
      $this->data['billcity'] = html_entity_decode($order_info['payment_city'], ENT_QUOTES, 'UTF-8');
      $this->data['billpost'] = html_entity_decode($order_info['payment_postcode'], ENT_QUOTES, 'UTF-8');
      $this->data['deliveryname'] = html_entity_decode($order_info['shipping_firstname'] . $order_info['shipping_lastname'], ENT_QUOTES, 'UTF-8');
      $this->data['deliveryaddress'] = html_entity_decode($order_info['shipping_address_1'], ENT_QUOTES, 'UTF-8');
      $this->data['deliverycity'] = html_entity_decode($order_info['shipping_city'], ENT_QUOTES, 'UTF-8');
      $this->data['deliverycountry'] = html_entity_decode($order_info['shipping_iso_code_2'], ENT_QUOTES, 'UTF-8');
      $this->data['deliveryprovince'] = html_entity_decode($order_info['shipping_zone'], ENT_QUOTES, 'UTF-8');
      $this->data['deliveryemail'] = $order_info['email'];
      $this->data['deliveryphone'] = html_entity_decode($order_info['telephone'], ENT_QUOTES, 'UTF-8');
      $this->data['deliverypost'] = html_entity_decode($order_info['shipping_postcode'], ENT_QUOTES, 'UTF-8');

      if (file_exists(DIR_TEMPLATE . $this->config->get('config_template') . '/template/payment/custom.tpl')){
        $this->template = $this->config->get('config_template') . '/template/payment/custom.tpl';
      } else {
        $this->template = 'default/template/payment/custom.tpl';
      }

      $this->render();
    }
  }

  public function callback() {
    if (isset($this->request->post['orderid'])) {
      $order_id = trim(substr(($this->request->post['orderid']), 6));
    } else {
      die('Illegal Access');
    }

    $this->load->model('checkout/order');
    $order_info = $this->model_checkout_order->getOrder($order_id);

    if ($order_info) {
      $data = array_merge($this->request->post,$this->request->get);

      //payment was made successfully
      if ($data['status'] == 'Y' || $data['status'] == 'y') {
        // update the order status accordingly
      }
    }
  }
}
?>
如您所見,有兩種不同的方法。 index 方法將負責在表單提交到第三方支付網關時設定數據,而 callback 方法用於處理來自第三方支付網關的回應資料支付網關。話雖如此,如果您的支付網關需要,您可以定義更多方法。在此範例中,我們使流程盡可能簡單。
讓我們詳細了解每個部分。我們將從 index 方法開始。
首先,我們載入了語言檔案並設定了確認按鈕的值。我們也設定了 action 屬性,該屬性將由付款提交表單使用。您應該根據您的支付網關更改此設定。
$this->language->load('payment/custom');
$this->data['button_confirm'] = $this->language->get('button_confirm');
$this->data['action'] = 'https://yourpaymentgatewayurl';
接下來,我們從使用者的活動會話中載入訂單資訊。
$this->load->model('checkout/order');
$order_info = $this->model_checkout_order->getOrder($this->session->data['order_id']);
如果訂單資訊可用,我們將繼續設定隱藏變數的數據,這些數據將用於將表單提交到支付網關 URL。如果您密切注意程式碼,您會發現我們也使用了自訂參數 text_config_one 和 text_config_two,我們在管理設定表單中設定了這些參數本系列的前一部分。
這裡需要注意的另一個重要變數是 callbackurl,它保存支付網關在付款過程後將使用者重新導向回我們商店所使用的 URL。是的,查看 URL payment/custom/callback 應表明它將呼叫 callback 方法,正如我們將在此刻看到的那樣。
$this->data['text_config_one'] = trim($this->config->get('text_config_one'));
$this->data['text_config_two'] = trim($this->config->get('text_config_two'));
$this->data['orderid'] = date('His') . $this->session->data['order_id'];
$this->data['callbackurl'] = $this->url->link('payment/custom/callback');
$this->data['orderdate'] = date('YmdHis');
$this->data['currency'] = $order_info['currency_code'];
$this->data['orderamount'] = $this->currency->format($order_info['total'], $this->data['currency'] , false, false);
$this->data['billemail'] = $order_info['email'];
$this->data['billphone'] = html_entity_decode($order_info['telephone'], ENT_QUOTES, 'UTF-8');
$this->data['billaddress'] = html_entity_decode($order_info['payment_address_1'], ENT_QUOTES, 'UTF-8');
$this->data['billcountry'] = html_entity_decode($order_info['payment_iso_code_2'], ENT_QUOTES, 'UTF-8');
$this->data['billprovince'] = html_entity_decode($order_info['payment_zone'], ENT_QUOTES, 'UTF-8');;
$this->data['billcity'] = html_entity_decode($order_info['payment_city'], ENT_QUOTES, 'UTF-8');
$this->data['billpost'] = html_entity_decode($order_info['payment_postcode'], ENT_QUOTES, 'UTF-8');
$this->data['deliveryname'] = html_entity_decode($order_info['shipping_firstname'] . $order_info['shipping_lastname'], ENT_QUOTES, 'UTF-8');
$this->data['deliveryaddress'] = html_entity_decode($order_info['shipping_address_1'], ENT_QUOTES, 'UTF-8');
$this->data['deliverycity'] = html_entity_decode($order_info['shipping_city'], ENT_QUOTES, 'UTF-8');
$this->data['deliverycountry'] = html_entity_decode($order_info['shipping_iso_code_2'], ENT_QUOTES, 'UTF-8');
$this->data['deliveryprovince'] = html_entity_decode($order_info['shipping_zone'], ENT_QUOTES, 'UTF-8');
$this->data['deliveryemail'] = $order_info['email'];
$this->data['deliveryphone'] = html_entity_decode($order_info['telephone'], ENT_QUOTES, 'UTF-8');
$this->data['deliverypost'] = html_entity_decode($order_info['shipping_postcode'], ENT_QUOTES, 'UTF-8');
最後,我們指派自訂範本檔案 custom.tpl 並渲染視圖。
if (file_exists(DIR_TEMPLATE . $this->config->get('config_template') . '/template/payment/custom.tpl')){
  $this->template = $this->config->get('config_template') . '/template/payment/custom.tpl';
} else {
  $this->template = 'default/template/payment/custom.tpl';
}

$this->render();
讓我們回顧一下 callback 方法的程式碼。當使用者從支付網關網站返回商店時,將呼叫此方法。
首先,我們在繼續操作之前檢查 orderid 變數是否可用。如果不可用,我們將停止進一步處理。
if (isset($this->request->post['orderid'])) {
  $order_id = trim(substr(($this->request->post['orderid']), 6));
} else {
  die('Illegal Access');
}
接下來,我們從資料庫載入訂單資訊。最後,我們將檢查支付網關回應中是否有 success 指示器。如果是這樣,我們將繼續相應地更新訂單狀態資訊。
$this->load->model('checkout/order');
$order_info = $this->model_checkout_order->getOrder($order_id);

if ($order_info) {
  $data = array_merge($this->request->post,$this->request->get);

  //payment was made succ
  if ($data['status'] == 'Y' || $data['status'] == 'y') {
    // update the order status accordingly
  }
}
這就是控制器設定。很簡單,不是嗎?
傳統模型
您可能知道,OpenCart 有自己的一套處理商店內部運作的慣例和標準。支付方式偵測的模型設定就是這種情況。您只需按照約定進行設置,它就會自動拾取。
繼續並在 catalog/model/ payment/custom.php 建立模型檔案。將以下內容貼到新建立的模型檔案 custom.php 中。
<?php
class ModelPaymentCustom extends Model {
  public function getMethod($address, $total) {
    $this->load->language('payment/custom');

    $method_data = array(
      'code'     => 'custom',
      'title'    => $this->language->get('text_title'),
      'sort_order' => $this->config->get('custom_sort_order')
    );

    return $method_data;
  }
}
OpenCart 在結帳過程中列出有效付款方式時將使用此類。在此過程中,OpenCart 從後端收集有效支付方法的列表,並且對於每種方法,它將檢查適當的模型類別是否可用。僅當關聯模型類別可用時才會列出付款方式。
此設定中最重要的是 code 變數的值。在我們的例子中,我們將其定義為custom,這表示當您選擇付款方式並按繼續時,它將呼叫 payment/custom內部URL,最終為我們的支付網關設定表單。
簡而言之,我們可以說它是前端支付方式檢測和正常工作的強製文件。
語言和模板檔案
現在,我們只需要建立語言並查看檔案。繼續並在 catalog/language/english/ payment/custom.php 建立語言檔案。將以下內容貼到新建立的語言檔案 custom.php 中。
<?php
$_['text_title'] = 'Custom Payment Method';
$_['button_confirm'] = 'Confirm Order';
?>
相當容易理解:我們剛剛設定了結帳時將在前端使用的標籤。
繼續並在 catalog/view/theme/default/template/ payment/custom.tpl 建立範本檔案。將以下內容貼到新建立的範本檔案 custom.tpl 中。
<form action="<?php echo $action; ?>" method="post">
  <input type="hidden" name="text_config_one" value="<?php echo $text_config_one; ?>" />
  <input type="hidden" name="text_config_two" value="<?php echo $text_config_two; ?>" />
  <input type="hidden" name="orderid" value="<?php echo $orderid; ?>" />
  <input type="hidden" name="callbackurl" value="<?php echo $callbackurl; ?>" />
  <input type="hidden" name="orderdate" value="<?php echo $orderdate; ?>" />
  <input type="hidden" name="currency" value="<?php echo $currency; ?>" />
  <input type="hidden" name="orderamount" value="<?php echo $orderamount; ?>" />
  <input type="hidden" name="billemail" value="<?php echo $billemail; ?>" />
  <input type="hidden" name="billphone" value="<?php echo $billphone; ?>" />
  <input type="hidden" name="billaddress" value="<?php echo $billaddress; ?>" />
  <input type="hidden" name="billcountry" value="<?php echo $billcountry; ?>" />
  <input type="hidden" name="billprovince" value="<?php echo $billprovince; ?>" />
  <input type="hidden" name="billcity" value="<?php echo $billcity; ?>" />
  <input type="hidden" name="billpost" value="<?php echo $billpost; ?>" />
  <input type="hidden" name="deliveryname" value="<?php echo $deliveryname; ?>" />
  <input type="hidden" name="deliveryaddress" value="<?php echo $deliveryaddress; ?>" />
  <input type="hidden" name="deliverycity" value="<?php echo $deliverycity; ?>" />
  <input type="hidden" name="deliverycountry" value="<?php echo $deliverycountry; ?>" />
  <input type="hidden" name="deliveryprovince" value="<?php echo $deliveryprovince; ?>" />
  <input type="hidden" name="deliveryemail" value="<?php echo $deliveryemail; ?>" />
  <input type="hidden" name="deliveryphone" value="<?php echo $deliveryphone; ?>" />
  <input type="hidden" name="deliverypost" value="<?php echo $deliverypost; ?>" />

  <div class="buttons">
    <div class="right">
      <input type="submit" value="<?php echo $button_confirm; ?>" class="button" />
    </div>
  </div>
</form>
正如您可能已經猜到的,這是當使用者點擊確認訂單按鈕時將提交的表單。我們剛剛設定了隱藏變數及其值,這些變數先前在控制器的 index 方法中定義。
讓我們看看前端的狀況:
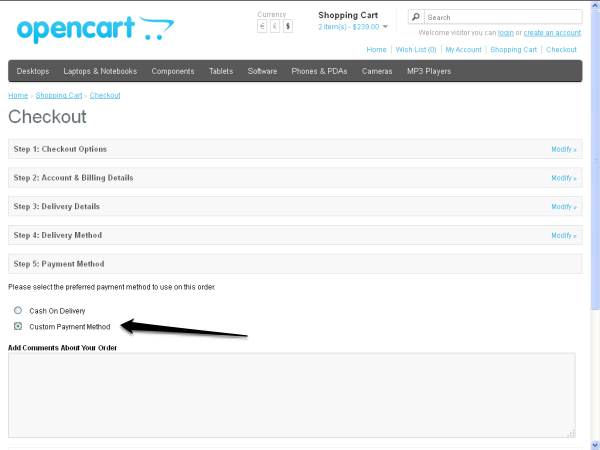
讓我們快速瀏覽整個流程:
- 首先,您必須為付款方式設定模型文件,以便可以在第 5 步:付款方式標籤中列出該模型文件。
- 接下來,當使用者在第五個選項卡中選擇自訂付款方式並點擊繼續按鈕時,OpenCart 會在內部呼叫
payment /customURL,最終呼叫index方法並在第六個選項卡中呈現custom.tpl檔案。
- 最後,當使用者點擊確認訂單按鈕時,表單將被提交,使用者將被帶到付款網關網站,付款流程將由此開始。付款過程完成後,由於
callbackurl隱藏變量,用戶將被重定向回我們的網站。當然,如果一切按預期運行,訂單狀態將作為callback方法的一部分進行更新。
結論
在本系列中,我解釋瞭如何透過建立自己的付款方式模組來設定幾乎所有付款方式。我希望您喜歡這個系列並學到一些有用的東西。
為任何框架創建自訂內容總是很有趣,不是嗎?請記住,您隨時可以使用下面的評論表提出評論和問題。
以上是在 OpenCart 中設計個人化支付選項:第 3 部分的詳細內容。更多資訊請關注PHP中文網其他相關文章!

熱AI工具

Undresser.AI Undress
人工智慧驅動的應用程序,用於創建逼真的裸體照片

AI Clothes Remover
用於從照片中去除衣服的線上人工智慧工具。

Undress AI Tool
免費脫衣圖片

Clothoff.io
AI脫衣器

Video Face Swap
使用我們完全免費的人工智慧換臉工具,輕鬆在任何影片中換臉!

熱門文章
熱工具

記事本++7.3.1
好用且免費的程式碼編輯器

SublimeText3漢化版
中文版,非常好用

禪工作室 13.0.1
強大的PHP整合開發環境

Dreamweaver CS6
視覺化網頁開發工具

SublimeText3 Mac版
神級程式碼編輯軟體(SublimeText3)


 PHP和Python:比較兩種流行的編程語言
Apr 14, 2025 am 12:13 AM
PHP和Python:比較兩種流行的編程語言
Apr 14, 2025 am 12:13 AM
PHP和Python各有優勢,選擇依據項目需求。 1.PHP適合web開發,尤其快速開發和維護網站。 2.Python適用於數據科學、機器學習和人工智能,語法簡潔,適合初學者。
 PHP行動:現實世界中的示例和應用程序
Apr 14, 2025 am 12:19 AM
PHP行動:現實世界中的示例和應用程序
Apr 14, 2025 am 12:19 AM
PHP在電子商務、內容管理系統和API開發中廣泛應用。 1)電子商務:用於購物車功能和支付處理。 2)內容管理系統:用於動態內容生成和用戶管理。 3)API開發:用於RESTfulAPI開發和API安全性。通過性能優化和最佳實踐,PHP應用的效率和可維護性得以提升。
 說明PHP中的安全密碼散列(例如,password_hash,password_verify)。為什麼不使用MD5或SHA1?
Apr 17, 2025 am 12:06 AM
說明PHP中的安全密碼散列(例如,password_hash,password_verify)。為什麼不使用MD5或SHA1?
Apr 17, 2025 am 12:06 AM
在PHP中,應使用password_hash和password_verify函數實現安全的密碼哈希處理,不應使用MD5或SHA1。1)password_hash生成包含鹽值的哈希,增強安全性。 2)password_verify驗證密碼,通過比較哈希值確保安全。 3)MD5和SHA1易受攻擊且缺乏鹽值,不適合現代密碼安全。
 PHP:網絡開發的關鍵語言
Apr 13, 2025 am 12:08 AM
PHP:網絡開發的關鍵語言
Apr 13, 2025 am 12:08 AM
PHP是一種廣泛應用於服務器端的腳本語言,特別適合web開發。 1.PHP可以嵌入HTML,處理HTTP請求和響應,支持多種數據庫。 2.PHP用於生成動態網頁內容,處理表單數據,訪問數據庫等,具有強大的社區支持和開源資源。 3.PHP是解釋型語言,執行過程包括詞法分析、語法分析、編譯和執行。 4.PHP可以與MySQL結合用於用戶註冊系統等高級應用。 5.調試PHP時,可使用error_reporting()和var_dump()等函數。 6.優化PHP代碼可通過緩存機制、優化數據庫查詢和使用內置函數。 7
 PHP如何安全地上載文件?
Apr 10, 2025 am 09:37 AM
PHP如何安全地上載文件?
Apr 10, 2025 am 09:37 AM
PHP通過$\_FILES變量處理文件上傳,確保安全性的方法包括:1.檢查上傳錯誤,2.驗證文件類型和大小,3.防止文件覆蓋,4.移動文件到永久存儲位置。
 PHP的持久相關性:它還活著嗎?
Apr 14, 2025 am 12:12 AM
PHP的持久相關性:它還活著嗎?
Apr 14, 2025 am 12:12 AM
PHP仍然具有活力,其在現代編程領域中依然佔據重要地位。 1)PHP的簡單易學和強大社區支持使其在Web開發中廣泛應用;2)其靈活性和穩定性使其在處理Web表單、數據庫操作和文件處理等方面表現出色;3)PHP不斷進化和優化,適用於初學者和經驗豐富的開發者。
 PHP類型提示如何起作用,包括標量類型,返回類型,聯合類型和無效類型?
Apr 17, 2025 am 12:25 AM
PHP類型提示如何起作用,包括標量類型,返回類型,聯合類型和無效類型?
Apr 17, 2025 am 12:25 AM
PHP類型提示提升代碼質量和可讀性。 1)標量類型提示:自PHP7.0起,允許在函數參數中指定基本數據類型,如int、float等。 2)返回類型提示:確保函數返回值類型的一致性。 3)聯合類型提示:自PHP8.0起,允許在函數參數或返回值中指定多個類型。 4)可空類型提示:允許包含null值,處理可能返回空值的函數。
 PHP與Python:了解差異
Apr 11, 2025 am 12:15 AM
PHP與Python:了解差異
Apr 11, 2025 am 12:15 AM
PHP和Python各有優勢,選擇應基於項目需求。 1.PHP適合web開發,語法簡單,執行效率高。 2.Python適用於數據科學和機器學習,語法簡潔,庫豐富。
