在基於 React 的部落格應用程式中更新和刪除帖子:第 4 部分
在本教學系列的前一部分中,您了解如何實現新增和顯示貼文功能。在有關在 React 中建立部落格應用程式的教學系列的這一部分中,您將實現更新和刪除部落格文章的功能。
開始使用
讓我們開始複製本系列最後一部分的原始碼。
https://github.com/royagasthyan/ReactBlogApp-AddPost
克隆目錄後,導覽至專案目錄並安裝所需的依賴項。
cd ReactBlogApp-AddPost
npm install
啟動 Node.js 伺服器,應用程式將在 http://localhost:7777/index.html#/ 上運行。
建立更新和刪除視圖
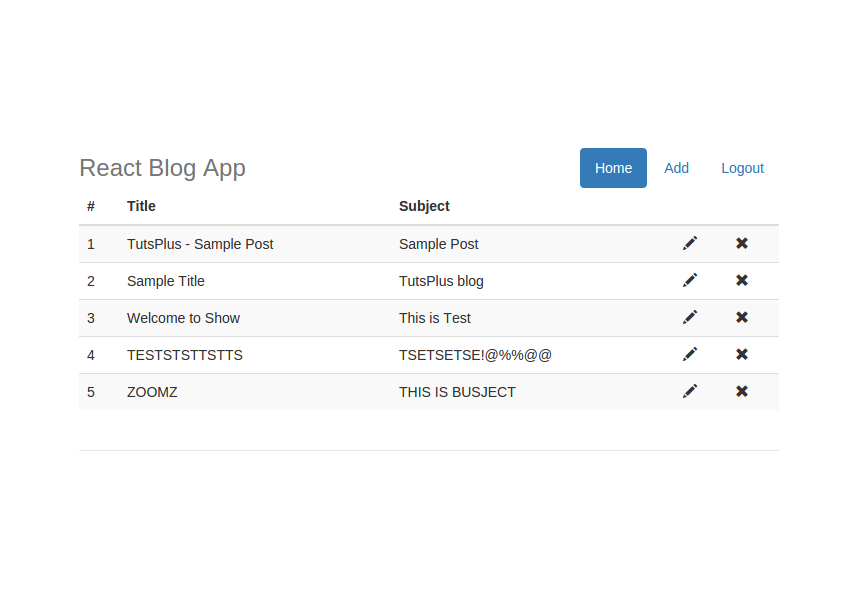
讓我們修改部落格文章列表,以帶有更新和刪除圖示的表格形式顯示資料。在 ShowPost 元件的 render 方法中,將現有的 div 替換為表格,如程式碼所示:
<table className="table table-striped">
            <thead>
              <tr>
                <th>#</th>
                <th>Title</th>
                <th>Subject</th>
                <th></th>
                <th></th>
              </tr>
            </thead>
            <tbody>
              {
                this.state.posts.map(function(post,index) {
                   return <tr key={index} >
                            <td>{index+1}</td>
                            <td>{post.title}</td>
                            <td>{post.subject}</td>
                            <td>
                              <span className="glyphicon glyphicon-pencil"></span>
                            </td>
                            <td>
                              <span className="glyphicon glyphicon-remove"></span>
                            </td>
                          </tr>
                }.bind(this))
              }
            </tbody>
</table>
如上面的程式碼所示,您已修改現有程式碼以以表格形式顯示貼文。您已對應 posts 變數以迭代 posts 集合並動態建立所需的 tr 和 td。
儲存以上變更並重新啟動伺服器。將瀏覽器指向 http://localhost:7777/home#/,您應該可以以表格格式查看部落格文章清單。

實作更新發布功能
要實現更新發布功能,您需要將點擊事件附加到編輯圖示。修改編輯圖示span如圖:
<span onClick={this.updatePost.bind(this,post._id)} className="glyphicon glyphicon-pencil"></span>
如上面的程式碼所示,您已將貼文 ID 作為參數傳遞給 updatePost 方法。
在 ShowPost 元件內建立一個方法 updatePost 。
updatePost(id){
  hashHistory.push('/addPost/' + id);
}
如上面的程式碼所示,您已使用已編輯項目的 ID 觸發了到新增貼文頁面的重定向。在新增貼文頁面中,您將獲得帶有傳遞的 ID 的部落格文章的詳細資訊並填入詳細資訊。
修改路由器以在新增貼文頁面中包含可選的 id 參數。
<Route component={AddPost} path="/addPost(/:id)"></Route>
在 AddPost 元件內,建立一個名為 getPostWithId 的方法,以使用 id 取得部落格文章的詳細資訊。在 getPostWithId 方法內,對 app.js 內的 getPostWithId API 進行 AJAX 呼叫。
getPostWithId(){
  var id = this.props.params.id;
  var self = this;
  axios.post('/getPostWithId', {
    id: id
  })
  .then(function (response) {
    if(response){
      self.setState({title:response.data.title});
      self.setState({subject:response.data.subject});
    }
  })
  .catch(function (error) {
    console.log('error is ',error);
  });
}
透過從 getPostWithId API 方法收到的回應,您已更新狀態變數 title 和 subject。
修改 title 和 subject 文字方塊以顯示狀態變數的值。
<div className="form-group">
    <input value={this.state.title} type="text" onChange={this.handleTitleChange} className="form-control" id="title" name="title" placeholder="Title" required />
</div>

<div className="form-group">
    <textarea value={this.state.subject} className="form-control" onChange={this.handleSubjectChange} type="textarea" id="subject" placeholder="Subject" maxlength="140" rows="7"></textarea>
</div>
現在,讓我們在 app.js 中創建 getPostWithId API,以對 MongoDB 資料庫進行資料庫調用,以獲取具有特定 ID 的帖子詳細資訊。這是 getPostWithId API 方法:
app.post('/getPostWithId', function(req,res){
  var id = req.body.id;
  post.getPostWithId(id, function(result){
    res.send(result)
  })
})
在 post.js 檔案中,建立一個方法 getPostWithId 來查詢資料庫以取得詳細資訊。其外觀如下:
getPostWithId: function(id, callback){
	MongoClient.connect(url, function(err, db){
		 db.collection('post').findOne({
		 	_id: new mongodb.ObjectID(id)
		 },
		 function(err, result){
			assert.equal(err, null);
	    	if(err == null){
	    		callback(result)
	    	}
	    	else{
	    		callback(false)
	    	}
		});
	})
}
如上面的程式碼所示,您使用了 findOne API 來取得具有特定 ID 的部落格文章的詳細資訊。
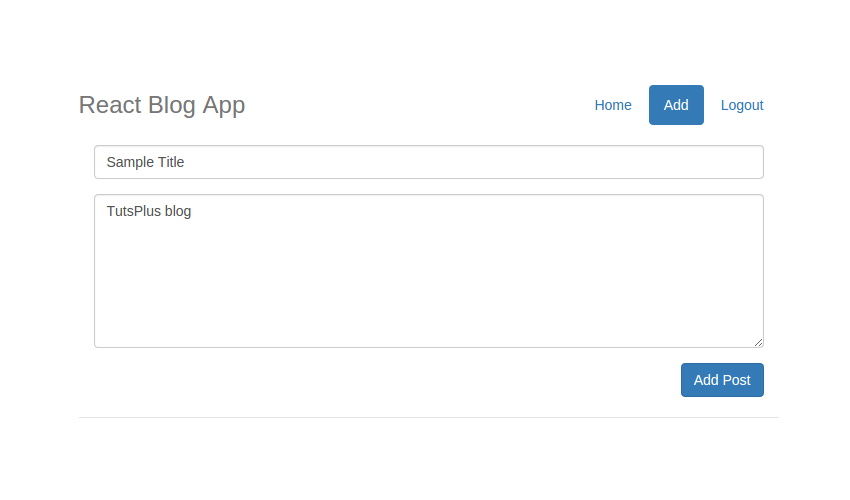
儲存以上變更並嘗試執行程式。點擊主頁上的編輯圖標,它將重定向到添加帖子頁面並填充標題和主題。

現在,要更新部落格文章詳細信息,您需要檢查id在app.js 中的addPost API 方法內。如果是新帖子,則 id 將為 undefined。
修改 AddPost 元件中的 AddPost 方法以包含 id 狀態變數。
axios.post('/addPost', {
    title: this.state.title,
    subject: this.state.subject,
    id: this.state.id
})
在 addPost API 方法中,您需要檢查 id 參數是否為 undefined 。如果undefined,則表示這是一個新帖子,否則需要呼叫update方法。 addPost API 方法如下所示:
app.post('/addpost', function (req, res) {
  var title = req.body.title;
  var subject = req.body.subject;
  var id = req.body.id;
  if(id == '' || id == undefined)
    post.addPost(title, subject ,function(result){
      res.send(result);
    });
  }
  else{
    post.updatePost(id, title, subject ,function(result){
      res.send(result);
    });
  }
})
在 post.js 檔案中,建立一個名為 updatePost 的方法來更新部落格文章詳細資訊。您將利用 updateOne API 來更新具有特定 id 的部落格文章的詳細資訊。以下是 updatePost 方法的外觀:
updatePost: function(id, title, subject, callback){
	MongoClient.connect(url, function(err, db) {
	  	db.collection('post').updateOne(
	  		{ "_id": new mongodb.ObjectID(id) },
	  		{ $set:
	  			{ "title" : title,
	  			  "subject" : subject
	  			}
	  		},function(err, result){
			assert.equal(err, null);
	    	if(err == null){
	    		callback(true)
	    	}
	    	else{
	    		callback(false)
	    	}
		});
	});
}
保存以上更改并重新启动服务器。登录应用程序并点击编辑图标。修改现有值并单击按钮更新详细信息。
实现删除帖子功能
要实现删除帖子功能,您需要将点击事件附加到删除图标。修改删除图标跨度如图:
<span onClick={this.deletePost.bind(this,post._id)} className="glyphicon glyphicon-remove"></span>
如上面的代码所示,您已将帖子 ID 作为参数传递给 deletePost 方法。
在 ShowPost 组件中创建一个名为 deletePost 的方法。
deletePost(id){

}
在ShowPost组件构造函数中绑定该方法。
this.deletePost = this.deletePost.bind(this);
要在 map 函数回调中使用 this,您需要将 this 绑定到 map 函数。修改map函数回调如图:
      {
        this.state.posts.map(function(post,index) {
           return
                    {index+1}
                    {post.title}
                    {post.subject}

                      <span onClick={this.updatePost.bind(this,post._id)} className="glyphicon glyphicon-pencil"></span>


                      <span onClick={this.deletePost.bind(this,post._id)} className="glyphicon glyphicon-remove"></span>


        }.bind(this))
      }
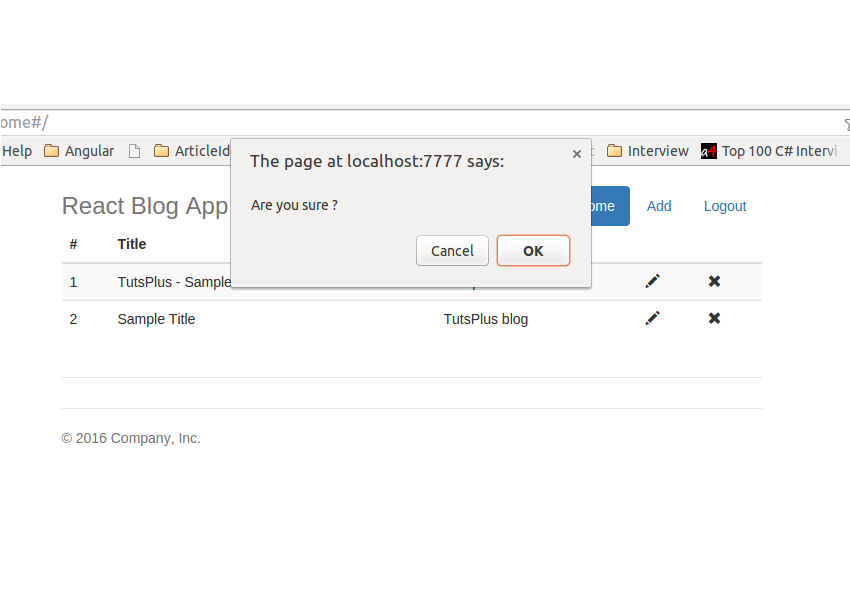
在 deletePost 方法中,在调用删除 API 之前添加确认提示。
deletePost(id){
  if(confirm('Are you sure ?')){
    // Delete Post API call will be here !!
  }
}
现在让我们在 app.js 文件中添加 deletePost API。 API 将从 AJAX 调用中读取帖子 ID 并从 MongoDB 中删除该条目。以下是 deletePost API 的外观:
app.post('/deletePost', function(req,res){
  var id = req.body.id;
  post.deletePost(id, function(result){
    res.send(result)
  })
})
如上面的代码所示,您将调用 post.js 文件中的 deletePost 方法并返回结果。让我们在 post.js 文件中创建 deletePost 方法。
deletePost: function(id, callback){

	MongoClient.connect(url, function(err, db){
		 db.collection('post').deleteOne({
		 	_id: new mongodb.ObjectID(id)
		 },
		 function(err, result){
			assert.equal(err, null);
	    	console.log("Deleted the post.");
	    	if(err == null){
	    		callback(true)
	    	}
	    	else{
	    		callback(false)
	    	}
		});
	})
}
如上面的代码所示,post.js 文件中的 deletePost 方法将使用 MongoClient 连接到MongoDB 中的博客数据库。使用从 AJAX 调用传递的 Id ,它将从数据库中删除该帖子。
更新 home.jsx 文件中 deletePost 方法内的代码,以包含对 deletePost API 的 AJAX 调用 app.js 文件。
deletePost(id){
  if(confirm('Are you sure ?')){
    var self = this;
    axios.post('/deletePost', {
      id: id
    })
    .then(function (response) {

    })
    .catch(function (error) {

    });
  }
}
删除博客文章后,您需要刷新博客文章列表以反映这一点。因此,创建一个名为 getPost 的新方法,并将 componentDidMount 代码移到该函数内。这是 getPost 方法:
getPost(){
  var self = this;
  axios.post('/getPost', {
  })
  .then(function (response) {
    console.log('res is ',response);
    self.setState({posts:response.data})
  })
  .catch(function (error) {
    console.log('error is ',error);
  });
}
修改componentDidMount代码,如图:
componentDidMount(){
  this.getPost();

  document.getElementById('homeHyperlink').className = "active";
  document.getElementById('addHyperLink').className = "";
}
在 deletePost AJAX 调用成功回调内,调用 getPost 方法来更新博客文章列表。
deletePost(id){
  if(confirm('Are you sure ?')){
    var self = this;
    axios.post('/deletePost', {
      id: id
    })
    .then(function (response) {
      self.getPost();
    })
    .catch(function (error) {
      console.log('Error is ',error);
    });
  }
}
保存以上更改并重新启动服务器。尝试添加新的博客文章,然后从网格列表中单击“删除”。系统将提示您一条删除确认消息。单击确定按钮后,该条目将被删除,并且博客文章列表将被更新。

总结
在本教程中,您了解了如何在 React 博客应用程序中实现删除和更新博客文章功能。在本教程系列的下一部分中,您将了解如何为登录用户实现个人资料页面。
请在下面的评论中告诉我们您的想法和建议。本教程的源代码可在 GitHub 上获取。
以上是在基於 React 的部落格應用程式中更新和刪除帖子:第 4 部分的詳細內容。更多資訊請關注PHP中文網其他相關文章!

熱AI工具

Undresser.AI Undress
人工智慧驅動的應用程序,用於創建逼真的裸體照片

AI Clothes Remover
用於從照片中去除衣服的線上人工智慧工具。

Undress AI Tool
免費脫衣圖片

Clothoff.io
AI脫衣器

Video Face Swap
使用我們完全免費的人工智慧換臉工具,輕鬆在任何影片中換臉!

熱門文章

熱工具

記事本++7.3.1
好用且免費的程式碼編輯器

SublimeText3漢化版
中文版,非常好用

禪工作室 13.0.1
強大的PHP整合開發環境

Dreamweaver CS6
視覺化網頁開發工具

SublimeText3 Mac版
神級程式碼編輯軟體(SublimeText3)
 如何開始WordPress博客:初學者的分步指南
Apr 17, 2025 am 08:25 AM
博客是人們在網上表達觀點、意見和見解的理想平台。許多新手渴望建立自己的網站,卻因擔心技術障礙或成本問題而猶豫不決。然而,隨著平台不斷發展以滿足初學者的能力和需求,現在開始變得比以往任何時候都更容易。 本文將逐步指導您如何建立一個WordPress博客,從主題選擇到使用插件提升安全性和性能,助您輕鬆創建自己的網站。 選擇博客主題和方向 在購買域名或註冊主機之前,最好先確定您計劃涵蓋的主題。個人網站可以圍繞旅行、烹飪、產品評論、音樂或任何激發您興趣的愛好展開。專注於您真正感興趣的領域可以鼓勵持續寫作
 wordpress文章列表怎麼調
Apr 20, 2025 am 10:48 AM
有四種方法可以調整 WordPress 文章列表:使用主題選項、使用插件(如 Post Types Order、WP Post List、Boxy Stuff)、使用代碼(在 functions.php 文件中添加設置)或直接修改 WordPress 數據庫。
 如何在父分類的存檔頁面上顯示子分類
Apr 19, 2025 pm 11:54 PM
您想了解如何在父分類存檔頁面上顯示子分類嗎?在自定義分類存檔頁面時,您可能需要執行此操作,以使其對訪問者更有用。在本文中,我們將向您展示如何在父分類存檔頁面上輕鬆顯示子分類。為什麼在父分類存檔頁面上顯示子分類?通過在父分類存檔頁面上顯示所有子分類,您可以使其不那麼通用,對訪問者更有用。例如,如果您運行一個關於書籍的WordPress博客,並且有一個名為“主題”的分類法,那麼您可以添加“小說”、“非小說”等子分類法,以便您的讀者可以
 如何在 WordPress 中獲取登錄用戶信息以獲得個性化結果
Apr 19, 2025 pm 11:57 PM
最近,我們向您展示瞭如何通過允許用戶將自己喜歡的帖子保存在個性化庫中來為用戶創建個性化體驗。您可以通過在某些地方(即歡迎屏幕)使用他們的名字,將個性化結果提升到另一個水平。幸運的是,WordPress使獲取登錄用戶的信息變得非常容易。在本文中,我們將向您展示如何檢索與當前登錄用戶相關的信息。我們將利用get_currentuserinfo(); 功能。這可以在主題中的任何地方使用(頁眉、頁腳、側邊欄、頁面模板等)。為了使其工作,用戶必須登錄。因此我們需要使用
 對於初學者來說,WordPress容易嗎?
Apr 03, 2025 am 12:02 AM
WordPress對初學者來說容易上手。 1.登錄後台後,用戶界面直觀,簡潔的儀表板提供所有必要功能鏈接。 2.基本操作包括創建和編輯內容,所見即所得的編輯器簡化了內容創建。 3.初學者可以通過插件和主題擴展網站功能,學習曲線存在但可以通過實踐掌握。
 如何在 WordPress 中按帖子過期日期對帖子進行排序
Apr 19, 2025 pm 11:48 PM
過去,我們分享過如何使用PostExpirator插件使WordPress中的帖子過期。好吧,在創建活動列表網站時,我們發現這個插件非常有用。我們可以輕鬆刪除過期的活動列表。其次,多虧了這個插件,按帖子過期日期對帖子進行排序也非常容易。在本文中,我們將向您展示如何在WordPress中按帖子過期日期對帖子進行排序。更新了代碼以反映插件中更改自定義字段名稱的更改。感謝Tajim在評論中讓我們知道。在我們的特定項目中,我們將事件作為自定義帖子類型。現在
 如何在 WordPress 中顯示查詢數量和頁面加載時間
Apr 19, 2025 pm 11:51 PM
我們的一位用戶詢問其他網站如何在頁腳中顯示查詢數量和頁面加載時間。您經常會在網站的頁腳中看到這一點,它可能會顯示類似以下內容:“1.248秒內64個查詢”。在本文中,我們將向您展示如何在WordPress中顯示查詢數量和頁面加載時間。只需將以下代碼粘貼到主題文件中您喜歡的任何位置(例如footer.php)。 queriesin
 如何使用 IFTTT 自動化 WordPress 和社交媒體(及更多)
Apr 18, 2025 am 11:27 AM
您是否正在尋找自動化 WordPress 網站和社交媒體帳戶的方法? 通過自動化,您將能夠在 Facebook、Twitter、LinkedIn、Instagram 等平台上自動分享您的 WordPress 博客文章或更新。 在本文中,我們將向您展示如何使用 IFTTT、Zapier 和 Uncanny Automator 輕鬆實現 WordPress 和社交媒體的自動化。 為什麼要自動化 WordPress 和社交媒體? 自動化您的WordPre


