

percona XTRADB Cluster 5.6在ubuntu安装_MySQL

Ubuntu
installing-perconaXTRADB Cluster 5.6
in-ubuntu-13-10-wheezy
First of all, I would recommend login as root so that you don’t have tosudo every time you hit the command and give the root password.
1. $ su -
$ su -
Now you should be logged in as root. Mine now is
1. root@rajug:~#
root@rajug:~#
Step 1:
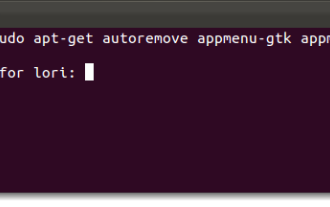
First of all lets remove everything that is related to MySQL from the machine.
1. apt-get remove mysql*
2. apt-get purge mysql*
3. apt-get autoremove
apt-get remove mysql*
apt-get purge mysql*
apt-get autoremeve
Step 2: Adding the key
Now lets add the key that is provided by Percona, we have to add this to beallowed to install from Percona server.
1. apt-key adv --keyserver keys.gnupg.net --recv-keys 1C4CBDCDCD2EFD2A
apt-key adv --keyserverkeys.gnupg.net --recv-keys 1C4CBDCDCD2EFD2A
Step 3: Adding the repository
Lets add the Percona repository in the sources list in the machine/Ubuntu.
1. vim /etc/apt/sources.list
vim /etc/apt/sources.list
Add the following two lines in the source list:
http://repo.percona.com/apt/dists/
1. deb http://repo.percona.com/apt wheezy main
2. deb-src http://repo.percona.com/apt wheezy main
deb http://repo.percona.com/aptsaucy main
deb-srchttp://repo.percona.com/apt saucy main
Step 4: Apt-Pinning the packages
In some cases you might need to “pin” the selected packages to avoid theupgrades from the distribution repositories. You’ll need to make a new file/etc/apt/preferences.d/00percona.pref and add the following lines in it:
1. vim /etc/apt/preferences.d/00percona.pref
vim/etc/apt/preferences.d/00percona.pref
Add the following line:
1. Package: *
2. Pin: release o=Percona Development Team
3. Pin-Priority: 1001
Package: *
Pin: release o=PerconaDevelopment Team
Pin-Priority: 1001
Step 5: Update
1. $apt-get update
$apt-get update
Step 6: Install Percona Server and Client
1. $ sudo apt-get installpercona-xtradb-cluster-56
$ apt-get installpercona-server-server-5.6 percona-server-client-5.6
Step 7: Install dependencies
If there are any dependencies left, then lets install them
1. $ apt-get install -f
$ apt-get install -f
Step 8: Testing
To make sure if Percona Server is installed in your machine with MySQL simplytry:
1. $ mysql -u root -p
$ mysql -u root -p
And it showed me :
root@rajug:~# mysql -u root -p
1. Enter password:
2. Welcome to the MySQL monitor. Commands end with ; or /g.
3. Your MySQL connection id is 11
4. Server version: 5.6.15-63.0 Percona Server (GPL), Release 63.0
5.
6. Copyright (c) 2009-2013 Percona LLC and/or its affiliates
7. Copyright (c) 2000, 2013, Oracle and/or its affiliates. All rights reserved.
8.
9. Oracle is a registered trademark of Oracle Corporation and/or its
10.affiliates. Other names may be trademarks of their respective
11.owners.
12.
13.Type 'help;' or '/h' for help. Type '/c' to clear the current input statement.
14.
mysql>
熱AI工具

Undresser.AI Undress
人工智慧驅動的應用程序,用於創建逼真的裸體照片

AI Clothes Remover
用於從照片中去除衣服的線上人工智慧工具。

Undress AI Tool
免費脫衣圖片

Clothoff.io
AI脫衣器

Video Face Swap
使用我們完全免費的人工智慧換臉工具,輕鬆在任何影片中換臉!

熱門文章
熱工具

記事本++7.3.1
好用且免費的程式碼編輯器

SublimeText3漢化版
中文版,非常好用

禪工作室 13.0.1
強大的PHP整合開發環境

Dreamweaver CS6
視覺化網頁開發工具

SublimeText3 Mac版
神級程式碼編輯軟體(SublimeText3)


 如何取消Ubuntu 18.04資料夾右下角的鎖定圖示?
Jan 12, 2024 pm 11:18 PM
如何取消Ubuntu 18.04資料夾右下角的鎖定圖示?
Jan 12, 2024 pm 11:18 PM
ubuntu系統常常遇到有的資料夾頂面有個鎖的形狀,這個檔案常常是無法進行編輯或移動,這是因為對這個檔案沒有可以編輯等的權限,所以我們要修改它的權限,就能去掉右下角的鎖,該怎麼操作呢?下面我們就來看看詳細的教學。 1.在上鎖的資料夾上右鍵--屬性。 2、選擇視窗中的權限選項。 3.把裡面都選擇為建立和刪除檔案。 4.接著選擇底部的更改包含文件的權限,裡面同樣都設定為創建和刪除文件,最後記得點擊右上角的更改。 5.如果還是沒有去掉上面的鎖,或是當面的選項出現灰色無法操作,可以在裡面右鍵--開啟終端。 6、使
 ubuntu終端機打不開怎麼辦? 修復Ubuntu無法開啟終端機問題的方法
Feb 29, 2024 pm 05:30 PM
ubuntu終端機打不開怎麼辦? 修復Ubuntu無法開啟終端機問題的方法
Feb 29, 2024 pm 05:30 PM
如今,Ubuntu不允許其用戶打開終端機是一個非常普遍的問題。如果您收到類似的問題並且不知道下一步該怎麼做,請了解有關如何在Linux裝置上解決此「Ubuntu無法開啟終端」問題的五個修復程式。事不宜遲,讓我們深入探討導致它的原因及其可用的解決方案。為什麼Ubuntu打不開它上面的終端機?這主要發生在您安裝一些有缺陷的軟體或修改終端配置時。除此之外,與語言環境互動並破壞它們的新應用程式或遊戲也可能導致類似的問題。一些用戶在Ubuntu的活動選單中搜尋終端時報告修復了這個問題。這表明這個
 如何在Ubuntu開始功能表中移除圖示?
Jan 13, 2024 am 10:45 AM
如何在Ubuntu開始功能表中移除圖示?
Jan 13, 2024 am 10:45 AM
ubuntu系統開始選單裡面列出了很多的軟體圖標,有很多不常用的圖標,想要刪除,該怎麼刪除呢?下面我們就來看看詳細的教學。 1.先進入ubuntu桌面,點選左邊面板下面的開始選單。 2、裡面可以找到一個文字編輯器圖標,我們要把它刪除了。 3.現在我們回到桌面直接滑鼠右鍵開啟終端。 4、使用指令開啟應用程式列表目錄。 sudonautilus/usr/share/applicationssudonautilus~/.local/share/applications5、在裡面找到對應的文字編輯器圖示。 6、接著直
 以超級使用者登入Ubuntu
Mar 20, 2024 am 10:55 AM
以超級使用者登入Ubuntu
Mar 20, 2024 am 10:55 AM
在Ubuntu系統中,root使用者通常是停用狀態的。要啟動root用戶,可以使用passwd指令設定密碼,然後使用su-指令以root身分登入。根用戶是具有系統管理權限且不受限制的使用者。他擁有存取和修改檔案、使用者管理、軟體安裝和刪除,以及系統配置變更等權限。根用戶與一般用戶有著明顯的區別,根用戶擁有系統中最高的權限和更廣泛的控制權。根用戶可以執行重要的系統命令和編輯系統文件,而普通用戶則無法做到這一點。在本指南中,我將探討Ubuntu根用戶,如何以根用戶身份登錄,以及它與一般用戶的不同之處。注意
 Ubuntu 24.04 LTS 七大亮點搶先看
Feb 27, 2024 am 11:22 AM
Ubuntu 24.04 LTS 七大亮點搶先看
Feb 27, 2024 am 11:22 AM
Ubuntu24.04LTS,代號「NobleNumbat」即將發布!如果你正在使用的是Ubuntu23.10這類非LTS版本,遲早需要考慮升級。對於那些使用Ubuntu20.04LTS或Ubuntu22.04LTS的用戶,是否升級值得深思。 Canonical已經宣布,Ubuntu24.04LTS將提供長達12年的更新支持,細分如下:作為LTS版本,它將有5年的常規維護和安全更新。如果訂閱UbuntuPro,還能享有額外5年的支援。目前,這個額外的支援期限已經延長至7年,這意味著你將獲得長達12
 ubuntu 20.04錄影軟體OBS安裝與解除安裝圖文教學課程
Feb 29, 2024 pm 04:01 PM
ubuntu 20.04錄影軟體OBS安裝與解除安裝圖文教學課程
Feb 29, 2024 pm 04:01 PM
OBS是由世界各地的志願貢獻者在空閒時間開發的開源軟體。一款視訊直播錄製軟體,主要用於視訊的錄製、直播的創流。 Ubuntu/Mint的安裝請注意,OBSStudio在ChromeOS上無法完全運作,螢幕和視窗捕捉等功能不能使用。建議使用xserver-xorg1.18.4或更新的版本,以避免OBS中某些功能的潛在效能問題,如全螢幕投影機。 FFmpeg是必要的如果你沒有安裝FFmpeg(如果你不確定,那麼你可能沒有),你可以用以下命令得到它:sudoaptinstallffmpeg我這裡已經安裝有了
 如何在Ubuntu系統中停用全域選單?
Jan 11, 2024 pm 04:33 PM
如何在Ubuntu系統中停用全域選單?
Jan 11, 2024 pm 04:33 PM
Ubuntu11.04起,新增了一個新功能,稱為全域選單,它是所有應用程式共享的常用功能表列(如上所示)。我們大多數人已被使用到具有自己的功能表列的每個應用程式視窗。 Unity桌面頂部面板上提供全域選單,無論應用程式視窗在哪裡。如果您的螢幕的右下角的應用程式視窗大小調整為小,則該應用程式的選單列仍在頂部面板上。如果不習慣,這可能會令人困惑和不舒服。本經驗主要參考《Linux就該這麼學》,如果您不喜歡新的全域選單,並希望將選單列移回各個應用程式窗口,我們將向您展示如何停用全域選單。 1、按Ctrl+Al
 ubuntu系統怎麼將鍵盤佈局改成美式鍵盤?
Jan 12, 2024 pm 12:39 PM
ubuntu系統怎麼將鍵盤佈局改成美式鍵盤?
Jan 12, 2024 pm 12:39 PM
要把系統的鍵盤佈局改為美式鍵盤,ubuntu系統該怎麼修改呢?下面我們就來看看詳細的設定方法。 1.在桌面上右鍵,開啟openterminal,輸入指令。 2、只要輸入管理員密碼,依照類型選擇你的電腦。 3、選擇國家English(us),按tab選OK。 4.鍵盤佈局選擇English(us)代表是美國,圖二設定一個修飾按鍵。 5.再選擇一個按鍵組合起來以便啟動它的【altgr】功能,選no,則不用組合鍵,然後選yes,那麼即可把鍵盤佈局設定為English(us),就是美式鍵盤。
