如何在 Linux 中使用 SCP 安全地傳輸文件
在網路上檔案傳輸可以透過各種不同的方式和協定來完成。遠端複製檔案最常用的協定是 Rsync、SCP 和 SFTP。在本文中,我們將了解什麼是 SCP 以及如何在 Linux 和類 Unix 作業系統中使用 SCP 在本機和遠端電腦之間安全地傳輸檔案。
什麼是 SCP?
SCP,代表安全複製(Secure Copy),它是一個命令列程序,在Linux 和類Unix 作業系統中以安全的方式在本地和遠端系統之間,或在兩個遠端系統之間複製文件和目錄。
使用 scp 指令,你可以安全地複製檔案或目錄:
◈ 從本地到遠端系統
◈ 從遠端系統到本機
◈ 在兩個遠端系統之間
使用 scp 指令傳輸資料時,檔案和目錄都是加密的。因此,即使網路被破壞,作惡者也無法獲得任何有意義的資料。
SCP 是 openSSH 程式的一個元件,它使用 SSH 協定安全地傳輸檔案。幾乎所有現代 Linux 和 Unix 發行版都預先安裝了 OpenSSH,所以不必費心安裝它。
提醒一句:
根據 openSSH 開發人員的官方公告:
「
#scp 協定已經過時了,它不靈活且不易修復。我們建議使用更現代的協議,如
sftp和rsync來代替。參考 – https://lists.mindrot.org/pipermail/openssh-unix-dev/2019-March/037672.html
」
#但是,大多數用戶仍然更喜歡 SCP 協定。因為,SCP 處理遠端檔案傳輸比同儕 SFTP 和 Rsync 更快。
另外,SCP 的工作原理與 cp 指令完全相同,而 rsync 則會判斷來源目錄是否有結尾斜線而出現不同的行為。看一看下面的指令:
◈ rsync source destination/ – 將 source 目錄複製到 destination 資料夾內。
◈ rsync source/ destination/ – 將 source 目錄的內容複製到 destination 資料夾中。
所以,你必須反覆檢查是否在路徑中添加了斜線。
我個人使用 Rsync🔗 ostechnix.com 在兩台主機之間複製大文件,使用 SCP 在網路上複製單一文件。
SCP 指令語法
SCP 的通用語法如下:
scp [-346ABCpqrTv] [-c cipher] [-F ssh_config] [-i identity_file] [-J destination] [-l limit] [-o ssh_option] [-P port] [-S program] source ... target
根據檔案傳輸路徑的不同,語法也會有所不同。這裡我羅列了一些語法格式範例。
從本機複製一個檔案到遠端系統:
scp SourceFile User@RemoteHost:RemotePath
类似的,从本地系统复制一个目录到远程系统,使用 -r 参数:
scp -r SourceDirectory User@RemoteHost:RemotePath
复制多个文件到远程系统:
scp SourceFile1 SourceFile2 User@RemoteHost:RemotePath
远程系统复制文件到本地:
scp User@RemoteHost:RemoteFilePath DestinationFile
远程系统复制目录到本地:
scp -r User@RemoteHost:RemoteDirectoryPath DestinationDirectory
在本地将文件在两个远程系统之间复制:
scp User@RemoteHost1:RemoteFile1 User@RemoteHost2:RemotePath
注意,当你在两个远程系统之间复制文件时,流量不会通过本地系统。操作直接在两个远程系统之间进行。但是,你可以使用 -3 参数让流量经过你运行 scp 命令的系统。
从你的本地系统将一个远程系统的目录复制到另一个远程系统:
scp -r User@RemoteHost1:RemoteDirectory User@RemoteHost2:DestinationPath
SCP 命令参数
SCP 命令最常用的参数有:
◈ -C:启用压缩。C 代表 压缩(Compression)。使用此参数时,数据传输速度会更快,因为数据是压缩的。SCP 将自动在源系统上压缩,并在目标系统上解压缩。
◈ -c <cipher></cipher>:c 代表 加密(Cipher)。默认情况下,SCP 使用 AES-128 加密方法对数据进行加密。你可以使用 -c 参数更改加密方法。
◈ -i <identity_file></identity_file>:i 代表 身份(Identity) 文件或私钥。如你所知,SSH 中使用基于密码或密钥的身份验证。如果希望在传输文件时使用基于密钥的身份验证,可以使用 -i 参数指定身份文件或私钥。
◈ -l limit:l 代表 限制(Limit) 带宽。通过此参数,可以设置传输数据的最大带宽。它的单位是 Kbit/s。
◈ -F <ssh_config></ssh_config>:有时你可能需要使用不同的网络来连接到 Linux 系统,或你有一个代理服务器,这种情况下,你可以使用 -F 参数使用不同的 ssh_config 文件(File)。
◈ -P port:P represents port. Note that this is capitalized P. By default, SSH uses port 22. But for security reasons, you may have changed the port number in the target host. In this case, you should explicitly specify the new port number using the -P parameter.
◈ -p: If you want to preserve the modification time, access time and mode of the original file, you need to use the -p parameter. Note that it is lowercase p.
◈ -r: Recursively copy the entire directory.
◈ -B:B represents Batch mode. It is used to select batch mode when transferring files. Can prevent asking for password.
◈ -S program: Program name used for encrypted connections.
◈ -v:v represents Verbose. When using the -v parameter, the command will print progress on the terminal screen. You'll see what exactly happens when the file is transferred. It's useful when debugging connection, authentication, and configuration issues.
SCP has many parameters, you can check its man page for other parameters. Let’s look at some examples of useful scp commands.
Important things to remember before you begin
◈ scp The command relies on ssh for secure file transfer. Therefore, you must have an ssh key or password to authenticate to the remote system.
◈ In order to transfer files, you must have read permission to the source file and write permission to the destination location.
◈ scp The command does not check the target location before writing. Any files with the same name in the destination location will be overwritten without being notified.
◈ To be able to distinguish between local and remote locations, use colon (:).
◈ When transferring large files, it is recommended to start the task within a Screen🔗 ostechnix.com or Tmux🔗 ostechnix.com session.
Using SCP to transfer files in Linux
正如我所说,我们可以使用 scp 命令将文件或目录从本地复制到远程系统,反之亦然,或者在两台远程系统之间复制文件或目录。
\1. 使用 SCP 从本地系统复制文件到远程系统
使用 scp 命令将文件从本地复制到远程系统,运行:
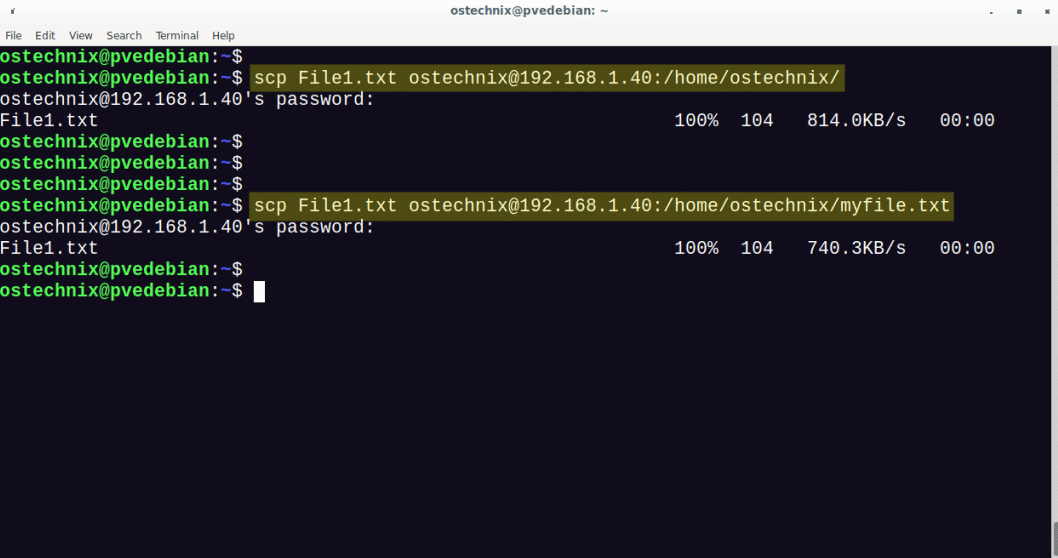
$ scp File1.txt ostechnix@192.168.1.40:/home/ostechnix/
示例输出:
ostechnix@192.168.1.40's password:File1.txt 100% 104 814.0KB/s 00:00
让我们分析一下上面的命令,看看每个参数都做了什么。
◈ File1.txt – 源文件
◈ ostechnix – 远程系统的用户名
◈ 192.168.1.40 – 远程系统的 IP 地址
◈ /home/ostechnix/ – 远程系统中的目标目录。这是我们想要传输源文件的绝对路径,如 File.txt。
你还可以修改目标文件的名称。下面的命令将 File1.txt 传输到目的地,保存为 myfile.txt。
$ scp File1.txt ostechnix@192.168.1.40:/home/ostechnix/myfile.txt

将文件从本地复制到远程系统
\2. 使用 SCP 从本地系统复制多个文件到远程系统
使用 scp 命令将多个文件从本地系统传输到远程系统,运行:
$ scp File1.txt File2.txt ostechnix@192.168.1.40:/home/ostechnix/
示例输出:
ostechnix@192.168.1.40's password:File1.txt 100% 104 689.4KB/s 00:00File2.txt 100% 496 6.3MB/s 00:00
从本地复制多个文件到远程系统
这里:
◈ File1.txt 和 File2.txt – 源文件名
◈ ostechnix@192.168.1.40 – 远程系统的用户名和 IP 地址
◈ /home/ostechnix – 目标文件的路径
如果文件具有相同的扩展名,你可以使用以下替代命令来实现相同的目标。
$ scp {File1,File2}.txt ostechnix@192.168.1.40:/home/ostechnix/
或者,
$ scp *.txt ostechnix@192.168.1.40:/home/ostechnix/
\3. 使用 SCP 从本地到远程系统递归复制目录
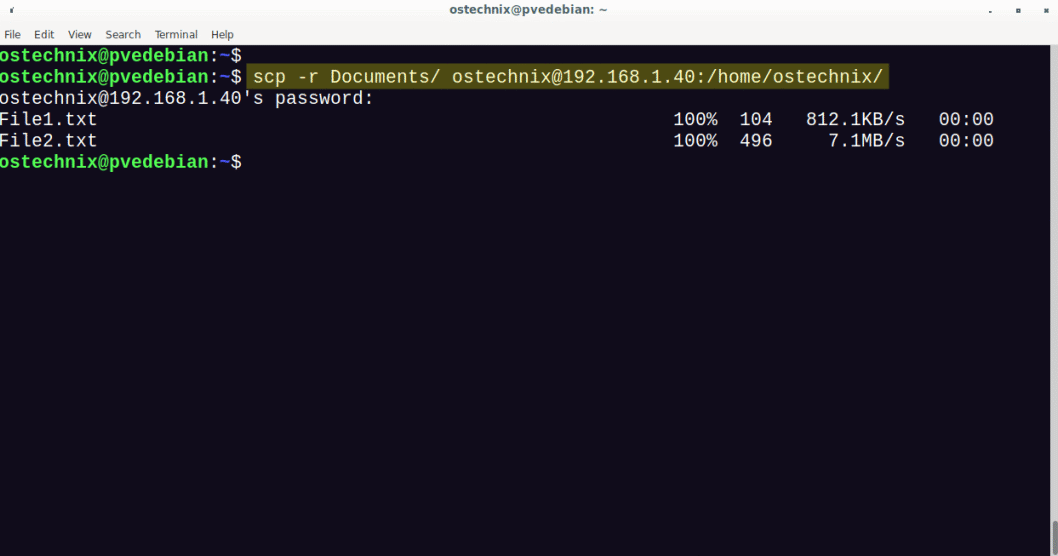
递归地将整个目录(包括子目录及其内容)从本地复制到远程系统,使用 -r 参数。
$ scp -r Documents/ ostechnix@192.168.1.40:/home/ostechnix/

从本地复制目录到远程系统
上述命令将整个 Documents 目录包括其内容复制到目标系统。
其中,
◈ -r – 递归复制文件和目录,包括子目录及其内容
◈ Documents – 源目录名称
◈ ostechnix@192.168.1.40 – 远程系统的用户名和 IP 地址
◈ /home/ostechnix – 目标目录的路径
\4. 用 SCP 将文件从远程系统传输到本地
还记得我们从本地系统复制了 File1.txt 到远程系统,让我们把它复制回本地。
使用 scp 命令从远程系统复制文件到本地,运行:
$ scp ostechnix@192.168.1.40:/home/ostechnix/File1.txt Downloads/
其中
◈ ostechnix@192.168.1.40 – 远程系统的用户名和 IP 地址
◈ /home/ostechnix/File.txt – 远程系统文件的绝对路径
◈ Downloads – 本地保存复制文件的位置
从远程系统传输文件到本地
\5. 使用 SCP 将多个文件从远程系统传输到本地
将多个文件从远程系统复制到本地,在花括号内注明文件的绝对路径,如下所示:
$ scp ostechnix@192.168.1.40:/home/ostechnix/\{File1.txt,File2.txt\} Downloads/
将多个文件从远程系统传输到本地
上述命令将从远程系统的 /home/ostechnix/ 目录中复制 File1.txt 和 File2.txt 到本地的 Downloads 目录中。
注意,花括号内的逗号后面没有空格。
\6. 从远程系统递归复制目录到本地
使用 scp 从远程系统递归复制整个目录(包括子目录及其内容)到本地系统,使用 -r 参数。
$ scp -r ostechnix@192.168.1.40:/home/ostechnix/Documents Downloads/
上述命令将从远程系统将整个 Documents 目录复制到本地的 Downloads 目录。
\7. 使用 SCP 在两台远程计算机之间复制文件
使用 scp 命令将文件从一个远程系统直接复制到另一个远程系统,运行:
$ scp senthil@192.168.1.40:/home/senthil/File1.txt kumar@192.168.1.20:/home/kumar/
它会要求你输入两个远程系统的密码:
其中,
◈ senthil@192.168.1.40 – 文件源端远程系统的用户名和 IP 地址
◈ /home/senthil/File1.txt – 复制的文件名及其位置
◈ kumar@192.168.1.20 – 复制文件到目标端的用户名和 IP 地址
◈ /home/kumar – 在目标端上保存复制文件的位置
上述命令将从远程主机 192.168.1.40 复制 /home/senthil/File1.txt 到 192.168.1.20 上的 /home/kumar/ 目录。
在这种方法中,数据将直接从一个远程系统传输到另一个远程系统。如果你想通过本地机器路由流量,使用 -3 参数,如下所示:
$ scp -3 senthil@192.168.1.40:/home/senthil/File1.txt kumar@192.168.1.20:/home/kumar/
\8. 使用 SCP 复制文件时启用压缩
到目前为止,我们在没有压缩的情况下传输了文件。现在我们将使用 -C 参数在传输文件时启用压缩。
$ scp -C File1.txt ostechnix@192.168.1.40:/home/ostechnix/
-C 参数将在源端启用压缩,并在目标端自动解压数据。
通过启用压缩,可以显著提高文件复制或传输速度。
\9. 使用 SCP 传输文件时限制带宽
我们可以使用 -l 参数限制带宽。注意,最大带宽单位为 Kbits/s。1 Byte = 8 bit。因此,如果你想将带宽限制在 200KB/s,-l 的值将是 1600(200*8)。
$ scp -l 1600 File1.txt ostechnix@192.168.1.40:/home/ostechnix/
这在传输大文件时非常有用,可以防止 SCP 限制带宽。
\10. 使用 SCP 复制文件时使用不同端口
作为系统管理员,出于安全原因,你可能在远程服务器上 更改了 SSH 协议的默认端口🔗 ostechnix.com。这种情况下,你可以在传输文件时使用 -P 参数指定端口号。注意:大写的 P。
$ scp -P 2022 File1.txt ostechnix@192.168.1.40:/home/ostechnix/
\11. 使用 SCP 复制文件时使用不同的加密方法
默认情况下,SCP 使用 AES-128 对文件进行加密。如果你想使用不同的加密方法,使用 c 参数。
例如,如果你想使用 3des-cbc 加密方法,命令如下所示:
$ scp -c 3des-cbc File1.txt ostechnix@192.168.1.40:/home/ostechnix/
要查看支持的密码列表,执行:
$ ssh -Q cipher localhost | paste -d, -s -
示例输出:
3des-cbc,aes128-cbc,aes192-cbc,aes256-cbc,rijndael-cbc@lysator.liu.se,aes128-ctr,aes192-ctr,aes256-ctr,aes128-gcm@openssh.com,aes256-gcm@openssh.com,chacha20-poly1305@openssh.com
\12. 在详细模式下使用 SCP 复制文件
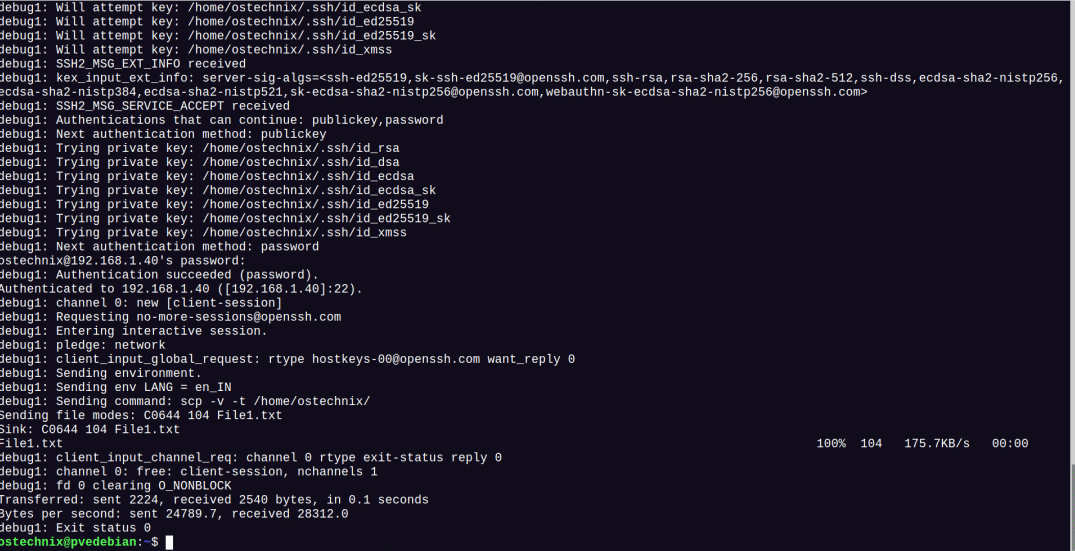
如果你想知道使用 scp 复制文件时幕后发生了什么,你可以使用 -v 参数。使用详细模式传输文件时,终端上会显示执行 scp 命令执行的每一步过程。这在故障排除时很方便。
$ scp -v File1.txt ostechnix@192.168.1.40:/home/ostechnix/
在详细模式下发送文件时,你将看到大量输出,如下所示:

在详细模式下使用 SCP 复制文件
\13. 在安静模式下使用 SCP 传输文件
我们可以使用 -q 参数在安静模式下传输文件。在安静模式下共享文件时,不会在输出中显示进度、警告或诊断信息。
$ scp -q File1.txt ostechnix@192.168.1.40:/home/ostechnix/
\14. 使用 SCP 传输文件时保留文件属性
使用 -p 参数可以保留文件修改时间、访问时间和模式等文件属性。注意,这是小写的 p。
$ scp -p File1.txt ostechnix@192.168.1.40:/home/ostechnix/
\15. 使用 SCP 复制文件时使用身份文件
SSH 同时支持基于密码和密钥的身份验证。密钥是 Linux 环境中使用最广泛的身份验证方法。
如果你想在传输文件时使用基于密钥的身份验证,使用 -i 参数指定身份文件或私钥。
$ scp -i my_private_key.pem File1.txt ostechnix@192.168.1.40:/home/ostechnix/
\16. 使用不同的 ssh 配置文件
在某些情况下,你需要使用不同的网络来连接到 Linux 系统,或你有一个代理服务器。这在情况下,你可以配合 -F 参数使用不同的 ssh_config 文件。
$ scp -F /home/ostechnix/my_ssh_config File1.txt ostechnix@192.168.1.40:/home/ostechnix/
\17. 使用 IPv4 或 IPv6 复制文件
在复制文件时,我们可以强制 SCP 只使用 IPv4 或 IPv6 地址。IPv4 网络添加 -4 参数,IPv6 网络添加 -6 参数可以实现这一点。
$ scp -6 File1.txt ostechnix@192.168.1.40:/home/ostechnix/
常见问题
问题 1:什么是 SCP?
SCP 是一个命令行程序,旨在将文件和目录从本地系统安全地传输到远程系统,反之亦然,或者直接在两个远程系统之间传输。
问题 2: 如何使用 SCP 将文件从本地复制到远程计算机?
将文件从本地复制到远程系统,命令如下:
scp SourceFile.txt User@RemoteHost:/some/remote/directory
问题 3:如何递归复制文件和目录?
递归复制包含子目录的目录,使用 -r 参数:
scp -r /some/local/directory User@RemoteHost:/some/remote/directory
问题 4:使用 SCP 可以传输多个文件吗?
当然,只要用空格分隔源文件名即可。
从本地复制多个文件到远程:
scp file1.txt file2.txt file3.txt User@RemoteHost:/some/remote/directoryscp {file1,file2,file3}.txt User@RemoteHost:/some/remote/directoryscp *.txt User@RemoteHost:/some/remote/directory
从远程复制多个文件到本地:
scp User@RemoteHost:/some/remote/directory/\{file1.txt,file2.txt,file3.txt\} /some/local/directory
从一个远程系统复制多个文件到另一个远程系统:
$ scp User@RemoteHost1:/some/remote/directory/\{file1.txt,file2.txt,file3.txt\} User@RemoteHost2:/some/remote/directory/
问题 5:如何传输目录下的所有文件?
传输整个目录,首先进入该目录:
cd dir_name
然后,
scp *.txt User@RemoteHost:/some/remote/directory
问题 6:可以压缩文件吗?
当然。使用 -C 压缩文件。文件会在源端压缩,在目标端自动解压缩。
scp -C /some/large/file User@RemoteHost:/some/remote/directory
问题 7:可以保留文件属性吗?
保留原始文件的修改时间、访问时间和模式等文件属性,使用 -p 参数。
scp -p file.txt User@RemoteHost:/some/remote/directory
问题 8: 可以使用其他端口吗?
当然。SCP 配合 -P 参数允许你使用其他端口。
scp -P 2022 file.txt User@RemoteHost:/some/remote/directory
问题 9: 可以使用不同的加密方法吗?
当然。使用 -c 参数。
scp -c 3des-cbc User@RemoteHost:/some/remote/directory
问题 10: 如何列出 SSH 支持的加密方法?
使用以下命令查看 SSH 和 SCP 支持的加密方法列表:
ssh -Q cipher localhost | paste -d, -s -
问题 11:SCP 真的安全吗?
当然,它用起来是完全安全的。SCP 和 openSSH 使用相同的 SSH 机制。传输的数据在源端加密,目标端解密。
问题 12:可以从 Windows 系统传输文件到 Linux 吗?
当然。使用 PSCP 程序将文件从 windows 传输到 Linux 平台,你也可以使用 WinSCP。
总结
在这篇全面指南中,我们了解了什么是 SCP,以及如何在 Linux 中使用 SCP 安全地传输文件,其中包括 17 个 SCP 命令示例,另外还回答了关于 SCP 的常见问题。
无论你是 Linux 管理人员、开发人员还是普通用户,你都会面临某个时候将文件复制到远程系统或从远程系统复制文件的情况,知道如何使用 SCP 安全地复制文件将是非常有用的。
以上是如何在 Linux 中使用 SCP 安全地傳輸文件的詳細內容。更多資訊請關注PHP中文網其他相關文章!

熱AI工具

Undresser.AI Undress
人工智慧驅動的應用程序,用於創建逼真的裸體照片

AI Clothes Remover
用於從照片中去除衣服的線上人工智慧工具。

Undress AI Tool
免費脫衣圖片

Clothoff.io
AI脫衣器

AI Hentai Generator
免費產生 AI 無盡。

熱門文章

熱工具

記事本++7.3.1
好用且免費的程式碼編輯器

SublimeText3漢化版
中文版,非常好用

禪工作室 13.0.1
強大的PHP整合開發環境

Dreamweaver CS6
視覺化網頁開發工具

SublimeText3 Mac版
神級程式碼編輯軟體(SublimeText3)

熱門話題
 centos和ubuntu的區別
Apr 14, 2025 pm 09:09 PM
CentOS 和 Ubuntu 的關鍵差異在於:起源(CentOS 源自 Red Hat,面向企業;Ubuntu 源自 Debian,面向個人)、包管理(CentOS 使用 yum,注重穩定;Ubuntu 使用 apt,更新頻率高)、支持週期(CentOS 提供 10 年支持,Ubuntu 提供 5 年 LTS 支持)、社區支持(CentOS 側重穩定,Ubuntu 提供廣泛教程和文檔)、用途(CentOS 偏向服務器,Ubuntu 適用於服務器和桌面),其他差異包括安裝精簡度(CentOS 精
 centos如何安裝
Apr 14, 2025 pm 09:03 PM
CentOS 安裝步驟:下載 ISO 映像並刻錄可引導媒體;啟動並選擇安裝源;選擇語言和鍵盤佈局;配置網絡;分區硬盤;設置系統時鐘;創建 root 用戶;選擇軟件包;開始安裝;安裝完成後重啟並從硬盤啟動。
 Centos停止維護2024
Apr 14, 2025 pm 08:39 PM
CentOS將於2024年停止維護,原因是其上游發行版RHEL 8已停止維護。該停更將影響CentOS 8系統,使其無法繼續接收更新。用戶應規劃遷移,建議選項包括CentOS Stream、AlmaLinux和Rocky Linux,以保持系統安全和穩定。
 docker原理詳解
Apr 14, 2025 pm 11:57 PM
Docker利用Linux內核特性,提供高效、隔離的應用運行環境。其工作原理如下:1. 鏡像作為只讀模板,包含運行應用所需的一切;2. 聯合文件系統(UnionFS)層疊多個文件系統,只存儲差異部分,節省空間並加快速度;3. 守護進程管理鏡像和容器,客戶端用於交互;4. Namespaces和cgroups實現容器隔離和資源限制;5. 多種網絡模式支持容器互聯。理解這些核心概念,才能更好地利用Docker。
 Centos停止維護後的選擇
Apr 14, 2025 pm 08:51 PM
CentOS 已停止維護,替代選擇包括:1. Rocky Linux(兼容性最佳);2. AlmaLinux(與 CentOS 兼容);3. Ubuntu Server(需要配置);4. Red Hat Enterprise Linux(商業版,付費許可);5. Oracle Linux(與 CentOS 和 RHEL 兼容)。在遷移時,考慮因素有:兼容性、可用性、支持、成本和社區支持。
 docker desktop怎麼用
Apr 15, 2025 am 11:45 AM
如何使用 Docker Desktop? Docker Desktop 是一款工具,用於在本地機器上運行 Docker 容器。其使用步驟包括:1. 安裝 Docker Desktop;2. 啟動 Docker Desktop;3. 創建 Docker 鏡像(使用 Dockerfile);4. 構建 Docker 鏡像(使用 docker build);5. 運行 Docker 容器(使用 docker run)。
 centos怎麼掛載硬盤
Apr 14, 2025 pm 08:15 PM
CentOS硬盤掛載分為以下步驟:確定硬盤設備名(/dev/sdX);創建掛載點(建議使用/mnt/newdisk);執行mount命令(mount /dev/sdX1 /mnt/newdisk);編輯/etc/fstab文件添加永久掛載配置;卸載設備使用umount命令,確保沒有進程使用設備。
 centos停止維護後怎麼辦
Apr 14, 2025 pm 08:48 PM
CentOS 停止維護後,用戶可以採取以下措施應對:選擇兼容髮行版:如 AlmaLinux、Rocky Linux、CentOS Stream。遷移到商業發行版:如 Red Hat Enterprise Linux、Oracle Linux。升級到 CentOS 9 Stream:滾動發行版,提供最新技術。選擇其他 Linux 發行版:如 Ubuntu、Debian。評估容器、虛擬機或云平台等其他選項。


