原生js實作模擬滾動條_javascript技巧
當頁面中有很多滾動條,它們相互嵌套,很不好看,這時就會模擬滾動條,並給這個滾動條好看的樣式,使得頁面美觀。
模擬捲軸很多時候是去用jquery插件,然後寫幾行程式碼就搞定了。不過隨著mvvm的快速發展,很多時候都懶得用jquery了,這就是本文的動機,本屌力求用簡單的不依賴jquery只依賴mvvm(avalon) api的程式碼,完成一個簡易的滾動條。
要求:
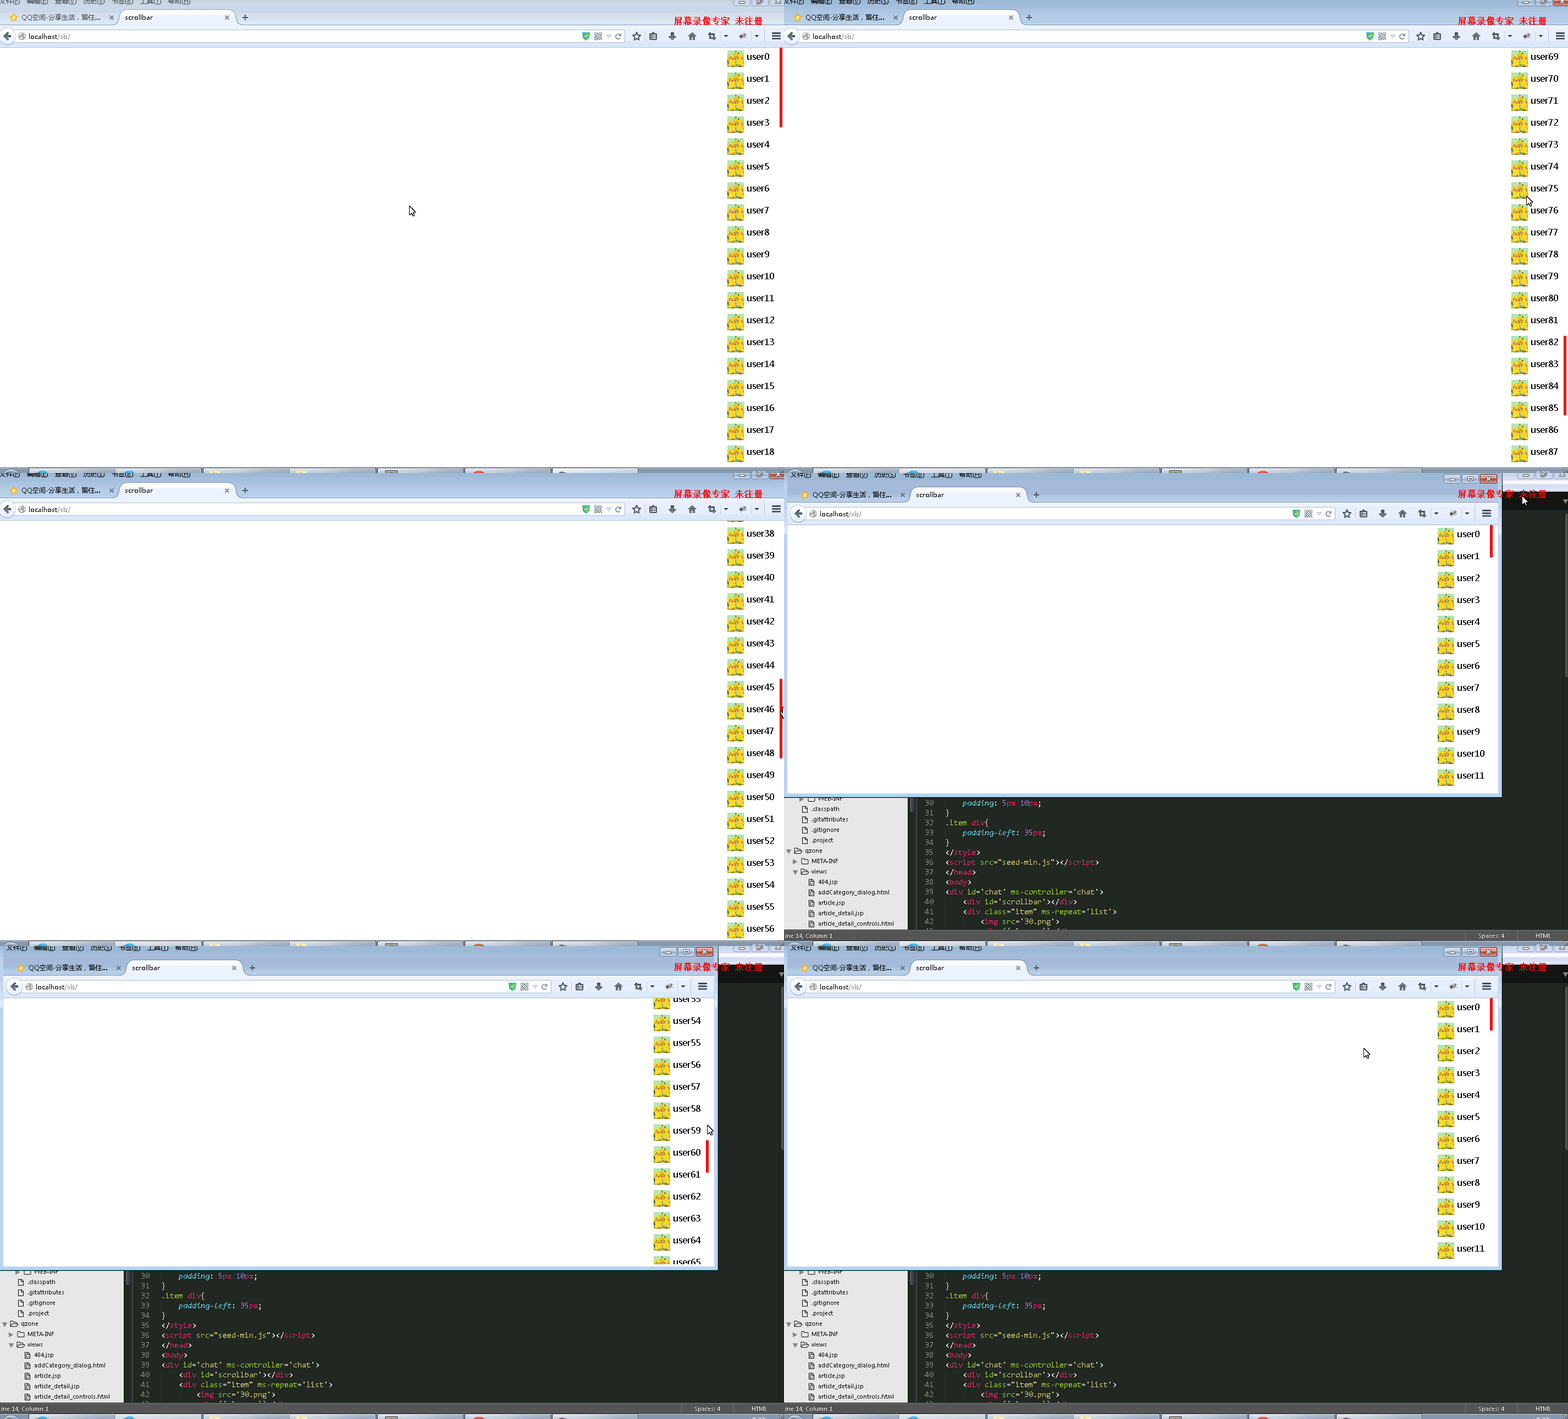
1.滑鼠滾輪可以讓捲軸工作,介面滾動
2.滑鼠可以拖曳捲軸並讓介面捲動
3.頁面resize時,捲軸根據頁面尺寸變化,仍然可以工作
效果:

很顯然,這個元件是基於拖曳drag的,本屌又不想重新寫,就只有改下ui框架的drag了,這裡改的是easy js ui的drag元件。用easy js是因為註解比較多,程式碼簡潔。
本屌把easy js ui的drag組件裡的對應方法換成avalon api裡的方法,刪除prototype裡的方法及冗餘程式碼
define('drag',['avalon-min'],function(avalon){
function getBoundary(container, target) {
var borderTopWidth = 0, borderRightWidth = 0, borderBottomWidth = 0, borderLeftWidth = 0, cOffset = avalon(container)
.offset(), cOffsetTop = cOffset.top, cOffsetLeft = cOffset.left, tOffset = avalon(target)
.offset();
borderTopWidth = parseFloat(avalon.css(container,'borderTopWidth'));
borderRightWidth = parseFloat(avalon.css(container,'borderRightWidth'));
borderBottomWidth = parseFloat(avalon.css(container,'borderBottomWidth'));
borderLeftWidth = parseFloat(avalon.css(container,'borderLeftWidth'));
cOffsetTop = cOffsetTop - tOffset.top + parseFloat(avalon(target).css('top'));
cOffsetLeft = cOffsetLeft - tOffset.left + parseFloat(avalon(target).css('left'));
return {
top : cOffsetTop + borderTopWidth,
right : cOffsetLeft + avalon(container).outerWidth() - avalon(target).outerWidth()
- borderRightWidth,
left : cOffsetLeft + borderLeftWidth,
bottom : cOffsetTop + avalon(container).outerHeight() - avalon(target).outerHeight()
- borderBottomWidth
};
}
var drag = function(target, options) {
var defaults = {
axis:null,
container:null,
handle:null,
ondragmove:null
};
var o =avalon.mix(defaults,options),
doc = target.ownerDocument,
win = doc.defaultView || doc.parentWindow,
originHandle=target,
isIE =!-[1,],
handle = isIE ? target :doc,
container = o.container ?o.container: null,
count = 0,
drag = this,
axis = o.axis,
isMove = false,
boundary, zIndex, originalX, originalY,
clearSelect = 'getSelection' in win ? function(){
win.getSelection().removeAllRanges();
} : function(){
try{
doc.selection.empty();
}
catch( e ){};
},
down = function( e ){
o.isDown = true;
var newTarget = target,
left, top, offset;
o.width = avalon(target).outerWidth();
o.height = avalon(target).outerHeight();
o.handle = handle;
left = avalon(newTarget).css( 'left' );
top = avalon(newTarget).css( 'top' );
offset = avalon(newTarget).offset();
drag.left = left = parseInt( left );
drag.top = top = parseInt( top );
drag.offsetLeft = offset.left;
drag.offsetTop = offset.top;
originalX = e.pageX - left;
originalY = e.pageY - top;
if( (!boundary && container)){
boundary = getBoundary(container, newTarget );
}
if( axis ){
if( axis === 'x' ){
originalY = false;
}
else if( axis === 'y' ){
originalX = false;
}
}
if( isIE ){
handle.setCapture();
}
avalon.bind(handle,'mousemove',move);
avalon.bind(handle,'mouseup',up);
if( isIE ){
avalon.bind(handle,'losecapture',up);
}
e.stopPropagation();
e.preventDefault();
},
move = function( e ){
if( !o.isDown ){
return;
}
count++;
if( count % 2 === 0 ){
return;
}
var currentX = e.pageX,
currentY = e.pageY,
style = target.style,
x, y, left, right, top, bottom;
clearSelect();
isMove = true;
if( originalX ){
x = currentX - originalX;
if( boundary ){
left = boundary.left;
right = boundary.right;
x = x < left ? left :
x > right ? right :
x;
}
drag.left = x;
drag.offsetLeft = currentX - e.offsetX;
style.left = x + 'px';
}
if( originalY ){
y = currentY - originalY;
if( boundary ){
top = boundary.top;
bottom = boundary.bottom;
y = y < top ? top :
y > bottom ? bottom :
y;
}
drag.top = y;
drag.offsetTop = currentY - e.offsetY;
style.top = y + 'px';
}
o.ondragmove.call(this,drag);
e.stopPropagation();
},
up = function( e ){
o.isDown = false;
if( isIE ){
avalon.unbind(handle,'losecapture' );
}
avalon.unbind( handle,'mousemove');
avalon.unbind( handle,'mouseup');
if( isIE ){
handle.releaseCapture();
}
e.stopPropagation();
};
avalon(originHandle).css( 'cursor', 'pointer' );
avalon.bind( originHandle,'mousedown', down );
    drag.refresh=function(){
      boundary=getBoundary(container,target);
    };
};
return drag;
});
另外在最後暴露的drag上加了一個refresh()方法,作用是在resize時,需要更新滾動條可以拖曳的範圍。這個方法在scrollbar的更新視圖中會用到。
drag.refresh=function(){
boundary=getBoundary(container,target);
};
還有在捲軸拖曳過程move中,新增一個鉤子,允許從外面新增一個監聽函數,拖曳時會觸發監聽函數,並傳入drag參數。
o.ondragmove.call(this,drag);
然後是scrollbar.js
define('scrollbar',['avalon-min','drag'],function(avalon,drag){
  function scrollbar(wrap,scrollbar,height_per_scroll){//容器,滚动条,每次滚轮移动的距离
    this.scroll_height=0;//滚动条高度
    this.dragger=null;//drag组件实例
    wrap.scrollTop=0;
    //容器的位置要减去浏览器最外面的默认滚动条垂直方向位置
    var self=this,wrap_top=avalon(wrap).offset().top-avalon(document).scrollTop();
    function ondragmove(drag){//drag组件拖动时的监听函数,更新容器视图
      wrap.scrollTop=(parseFloat(scrollbar.style.top)-wrap_top)*
      (wrap.scrollHeight -wrap.clientHeight)/(wrap.clientHeight-self.scroll_height);
    };
    function setScrollPosition(o) {//更新滚动条位置
      scrollbar.style.top =o.scrollTop*wrap.clientHeight/wrap.scrollHeight+wrap_top+ 'px';
    }
    function inti_events(){
      avalon.bind(wrap,'mousewheel',function(e){
        if(e.wheelDelta < 0)
          wrap.scrollTop+=height_per_scroll;
        else
          wrap.scrollTop-=height_per_scroll;
        setScrollPosition(wrap);
        e.preventDefault();
      });
      self.dragger=new drag(scrollbar,{container:wrap,axis:'y',ondragmove:ondragmove});
      window.onresize=function(){
        self.refresh_views();
        self.dragger.refresh();
      };
    }
    this.refresh_views=function(){//更新组件所有部分视图,并暴露供外部调用
      //容器高度这里设置成浏览器可视部分-容器垂直方向位置,没有考虑容器有border,padding,margin.可根据相应场景修改
      wrap.style.height=document.documentElement.clientHeight-wrap_top+'px';
      self.scroll_height=wrap.clientHeight*wrap.clientHeight/wrap.scrollHeight;
      //容器高度等于滚动条高度,隐藏滚动条
      if(self.scroll_height==wrap.clientHeight)
        scrollbar.style.display='none';
      else
        scrollbar.style.display='block';
      scrollbar.style.height=self.scroll_height+'px';
      setScrollPosition(wrap);
    }
    function init(){
      self.refresh_views();
      inti_events();
    }
    init();
  }
  return scrollbar;
});
可以看到,在resize時,呼叫了drag元件的refresh方法,更新捲軸可以拖曳的範圍。這裡暴露了refresh_views()方法,以應對外部需要手動更新視圖的情況。例如,聊天分組的折疊和展開。

這樣就完成了簡易捲軸。程式碼很簡單,如果有問題需要fix bug或客製化的話,也很容易。
以上所述上就是本文的全部內容了,希望大家能夠喜歡。

熱AI工具

Undresser.AI Undress
人工智慧驅動的應用程序,用於創建逼真的裸體照片

AI Clothes Remover
用於從照片中去除衣服的線上人工智慧工具。

Undress AI Tool
免費脫衣圖片

Clothoff.io
AI脫衣器

Video Face Swap
使用我們完全免費的人工智慧換臉工具,輕鬆在任何影片中換臉!

熱門文章

熱工具

記事本++7.3.1
好用且免費的程式碼編輯器

SublimeText3漢化版
中文版,非常好用

禪工作室 13.0.1
強大的PHP整合開發環境

Dreamweaver CS6
視覺化網頁開發工具

SublimeText3 Mac版
神級程式碼編輯軟體(SublimeText3)
 建議:優秀JS開源人臉偵測辨識項目
Apr 03, 2024 am 11:55 AM
人臉偵測辨識技術已經是一個比較成熟且應用廣泛的技術。而目前最廣泛的網路應用語言非JS莫屬,在Web前端實現人臉偵測辨識相比後端的人臉辨識有優勢也有弱勢。優點包括減少網路互動、即時識別,大大縮短了使用者等待時間,提高了使用者體驗;弱勢是:受到模型大小限制,其中準確率也有限。如何在web端使用js實現人臉偵測呢?為了實現Web端人臉識別,需要熟悉相關的程式語言和技術,如JavaScript、HTML、CSS、WebRTC等。同時也需要掌握相關的電腦視覺和人工智慧技術。值得注意的是,由於Web端的計
 如何使用PHP和JS創建股票蠟燭圖
Dec 17, 2023 am 08:08 AM
如何使用PHP和JS創建股票蠟燭圖股票蠟燭圖是股票市場中常見的技術分析圖形,透過繪製股票的開盤價、收盤價、最高價和最低價等數據,幫助投資者更直觀地了解股票的價格波動情形。本文將教你如何使用PHP和JS創建股票蠟燭圖,並附上具體的程式碼範例。一、準備工作在開始之前,我們需要準備以下環境:1.一台運行PHP的伺服器2.一個支援HTML5和Canvas的瀏覽器3
 股票分析必備工具:學習PHP和JS繪製蠟燭圖的步驟
Dec 17, 2023 pm 06:55 PM
股票分析必備工具:學習PHP和JS繪製蠟燭圖的步驟,需要具體程式碼範例隨著網路和科技的快速發展,股票交易已成為許多投資者的重要途徑之一。而股票分析是投資人決策的重要一環,其中蠟燭圖被廣泛應用於技術分析。學習如何使用PHP和JS繪製蠟燭圖將為投資者提供更多直觀的信息,幫助他們更好地做出決策。蠟燭圖是一種以蠟燭形狀來展示股票價格的技術圖表。它展示了股票價格的
 如何使用JS和百度地圖實現地圖平移功能
Nov 21, 2023 am 10:00 AM
如何使用JS和百度地圖實現地圖平移功能百度地圖是一款廣泛使用的地圖服務平台,在Web開發中經常用於展示地理資訊、定位等功能。本文將介紹如何使用JS和百度地圖API實作地圖平移功能,並提供具體的程式碼範例。一、準備工作使用百度地圖API前,首先需要在百度地圖開放平台(http://lbsyun.baidu.com/)上申請一個開發者帳號,並建立一個應用程式。創建完成
 如何使用JS和百度地圖實現地圖點擊事件處理功能
Nov 21, 2023 am 11:11 AM
如何使用JS和百度地圖實現地圖點擊事件處理功能概述:在網路開發中,經常需要使用地圖功能來展示地理位置和地理資訊。而地圖上的點擊事件處理是地圖功能中常用且重要的一環。本文將介紹如何使用JS和百度地圖API來實現地圖的點擊事件處理功能,並給出具體的程式碼範例。步驟:匯入百度地圖的API檔案首先,要在HTML檔案中匯入百度地圖API的文件,可以透過以下程式碼實現:
 如何使用JS和百度地圖實現地圖熱力圖功能
Nov 21, 2023 am 09:33 AM
如何使用JS和百度地圖實現地圖熱力圖功能簡介:隨著互聯網和行動裝置的快速發展,地圖成為了普遍的應用場景。而熱力圖作為一種視覺化的展示方式,能夠幫助我們更直觀地了解數據的分佈。本文將介紹如何使用JS和百度地圖API來實現地圖熱力圖的功能,並提供具體的程式碼範例。準備工作:在開始之前,你需要準備以下事項:一個百度開發者帳號,並建立一個應用,取得到對應的AP
 PHP與JS開發技巧:掌握繪製股票蠟燭圖的方法
Dec 18, 2023 pm 03:39 PM
隨著網路金融的快速發展,股票投資已經成為了越來越多人的選擇。而在股票交易中,蠟燭圖是常用的技術分析方法,它能夠顯示股票價格的變動趨勢,幫助投資人做出更精準的決策。本文將透過介紹PHP和JS的開發技巧,帶領讀者了解如何繪製股票蠟燭圖,並提供具體的程式碼範例。一、了解股票蠟燭圖在介紹如何繪製股票蠟燭圖之前,我們首先需要先了解什麼是蠟燭圖。蠟燭圖是由日本人
 js和vue的關係
Mar 11, 2024 pm 05:21 PM
js和vue的關係:1、JS作為Web開發基石;2、Vue.js作為前端框架的崛起;3、JS與Vue的互補關係;4、JS與Vue的實踐應用。


