ViewPager的简单使用
本节引言:
本节带来的是Android 3.0后引入的一个UI控件——ViewPager(视图滑动切换工具),实在想不到 如何来称呼这个控件,他的大概功能:通过手势滑动可以完成View的切换,一般是用来做APP 的引导页或者实现图片轮播,因为是3.0后引入的,如果想在低版本下使用,就需要引入v4 兼容包哦~,我们也可以看到,ViewPager在:android.support.v4.view.ViewPager目录下~ 下面我们就来学习一下这个控件的基本用法~ 官方API文档:ViewPager
1.ViewPager的简单介绍
ViewPager就是一个简单的页面切换组件,我们可以往里面填充多个View,然后我们可以左 右滑动,从而切换不同的View,我们可以通过setPageTransformer()方法为我们的ViewPager 设置切换时的动画效果,当然,动画我们还没学到,所以我们把为ViewPager设置动画 放到下一章绘图与动画来讲解!和前面学的ListView,GridView一样,我们也需要一个Adapter (适配器)将我们的View和ViewPager进行绑定,而ViewPager则有一个特定的Adapter——PagerAdapter!另外,Google官方是建议我们使用Fragment来填充ViewPager的,这样 可以更加方便的生成每个Page,以及管理每个Page的生命周期!给我们提供了两个Fragment 专用的Adapter:FragmentPageAdapter和FragmentStatePagerAdapter我们简要的来分析下这两个Adapter的区别:
- FragmentPageAdapter:和PagerAdapter一样,只会缓存当前的Fragment以及左边一个,右边 一个,即总共会缓存3个Fragment而已,假如有1,2,3,4四个页面:
处于1页面:缓存1,2
处于2页面:缓存1,2,3
处于3页面:销毁1页面,缓存2,3,4
处于4页面:销毁2页面,缓存3,4
更多页面的情况,依次类推~- FragmentStatePagerAdapter:当Fragment对用户不 见得时,整个Fragment会被销毁, 只会保存Fragment的状态!而在页面需要重新显示的时候,会生成新的页面!
综上,FragmentPageAdapter适合固定的页面较少的场合;而FragmentStatePagerAdapter则适合 于页面较多或者页面内容非常复杂(需占用大量内存)的情况!
2.PagerAdapter的使用
我们先来介绍最普通的PagerAdapter,如果想使用这个PagerAdapter需要重写下面的四个方法: 当然,这只是官方建议,实际上我们只需重写getCount()和isViewFromObject()就可以了~
- getCount():获得viewpager中有多少个view
- destroyItem():移除一个给定位置的页面。适配器有责任从容器中删除这个视图。 这是为了确保在finishUpdate(viewGroup)返回时视图能够被移除。
而另外两个方法则是涉及到一个key的东东:
- instantiateItem(): ①将给定位置的view添加到ViewGroup(容器)中,创建并显示出来 ②返回一个代表新增页面的Object(key),通常都是直接返回view本身就可以了,当然你也可以 自定义自己的key,但是key和每个view要一一对应的关系
- isViewFromObject(): 判断instantiateItem(ViewGroup, int)函数所返回来的Key与一个页面视图是否是 代表的同一个视图(即它俩是否是对应的,对应的表示同一个View),通常我们直接写 return view == object!
使用示例1:最简单用法
运行效果图:

关键部分代码:
好的,代码写起来也是非常简单的:首先是每个View的布局,一式三份,另外两个View一样:
view_one.xml:
<LinearLayout xmlns:android="http://schemas.android.com/apk/res/android"
android:layout_width="match_parent"
android:layout_height="match_parent"
android:background="../style/images/android-tutorial-viewpager.html"
android:gravity="center"
android:orientation="vertical">
<TextView
android:layout_width="wrap_content"
android:layout_height="wrap_content"
android:text="第一个Page"
android:textColor="#000000"
android:textSize="18sp"
android:textStyle="bold" />
</LinearLayout>
然后编写一个自定义个的PagerAdapter:
MyPagerAdapter.java:
private ArrayList<View> viewLists;
public MyPagerAdapter() {
}
public MyPagerAdapter(ArrayList<View> viewLists) {
super();
this.viewLists = viewLists;
}
@Override
public int getCount() {
return viewLists.size();
}
@Override
public boolean isViewFromObject(View view, Object object) {
return view == object;
}
@Override
public Object instantiateItem(ViewGroup container, int position) {
container.addView(viewLists.get(position));
return viewLists.get(position);
}
@Override
public void destroyItem(ViewGroup container, int position, Object object) {
container.removeView(viewLists.get(position));
}
}
接着到Activity了,和以前学的ListView非常类似:
OneActivity.java:
private ViewPager vpager_one;
private ArrayList<View> aList;
private MyPagerAdapter mAdapter;
@Override
protected void onCreate(Bundle savedInstanceState) {
super.onCreate(savedInstanceState);
setContentView(R.layout.activity_one);
vpager_one = (ViewPager) findViewById(R.id.vpager_one);
aList = new ArrayList<View>();
LayoutInflater li = getLayoutInflater();
aList.add(li.inflate(R.layout.view_one,null,false));
aList.add(li.inflate(R.layout.view_two,null,false));
aList.add(li.inflate(R.layout.view_three,null,false));
mAdapter = new MyPagerAdapter(aList);
vpager_one.setAdapter(mAdapter);
}
}
好的,关键代码就上述部分,非常容易理解~
使用示例2:标题栏——PagerTitleStrip与PagerTabStrip
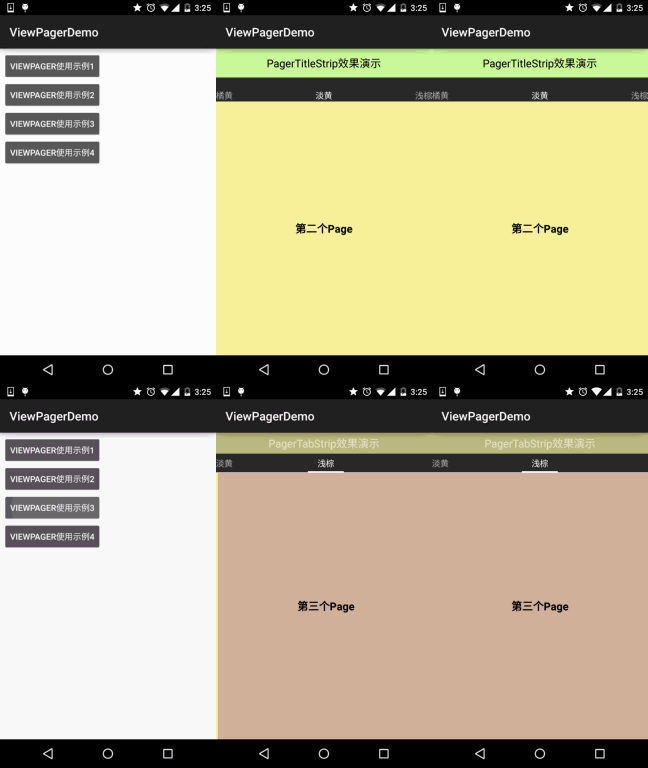
就是跟随着ViewPager滑动而滑动的标题咯,这两个是官方提供的,一个是普通文字, 一个是带有下划线,以及可以点击文字可切换页面,下面我们来写个简单的例子~
运行效果图:

关键代码实现:
这里两者的区别仅仅是布局不一样而已,其他的都一样:
PagerTitleStrip所在Activtiy的布局:activity_two.xml:
android:layout_width="match_parent"
android:layout_height="match_parent"
android:orientation="vertical">
<TextView
android:layout_width="match_parent"
android:layout_height="48dp"
android:background="../style/images/android-tutorial-viewpager.html"
android:gravity="center"
android:text="PagerTitleStrip效果演示"
android:textColor="#000000"
android:textSize="18sp" />
<android.support.v4.view.ViewPager
android:id="@+id/vpager_two"
android:layout_width="wrap_content"
android:layout_height="wrap_content"
android:layout_gravity="center">
<android.support.v4.view.PagerTitleStrip
android:id="@+id/pagertitle"
android:layout_width="wrap_content"
android:layout_height="40dp"
android:layout_gravity="top"
android:textColor="../style/images/android-tutorial-viewpager.html" />
</android.support.v4.view.ViewPager>
</LinearLayout>
而PagerTabStrip所在的布局:
activity_three.xml:
android:layout_width="match_parent"
android:layout_height="match_parent"
android:orientation="vertical">
<TextView
android:layout_width="match_parent"
android:layout_height="35dp"
android:background="../style/images/android-tutorial-viewpager.html"
android:gravity="center"
android:text="PagerTabStrip效果演示"
android:textSize="18sp" />
<android.support.v4.view.ViewPager
android:id="@+id/vpager_three"
android:layout_width="wrap_content"
android:layout_height="wrap_content"
android:layout_gravity="center">
<android.support.v4.view.PagerTabStrip
android:id="@+id/pagertitle"
android:layout_width="wrap_content"
android:layout_height="wrap_content"
android:layout_gravity="top" />
</android.support.v4.view.ViewPager>
</LinearLayout>
接下来的两者都一样了,我们先来编写一个自定义的PagerAdapter,除了前面重写的 四个方法外,我们需要另外重写一个方法:getPageTitle(),这个设置标题的~ 代码如下:
MyPagerAdapter2.java:
* Created by Jay on 2015/10/8 0008.
*/
public class MyPagerAdapter2 extends PagerAdapter {
private ArrayList<View> viewLists;
private ArrayList<String> titleLists;
public MyPagerAdapter2() {}
public MyPagerAdapter2(ArrayList<View> viewLists,ArrayList<String> titleLists)
{
this.viewLists = viewLists;
this.titleLists = titleLists;
}
@Override
public int getCount() {
return viewLists.size();
}
@Override
public boolean isViewFromObject(View view, Object object) {
return view == object;
}
@Override
public Object instantiateItem(ViewGroup container, int position) {
container.addView(viewLists.get(position));
return viewLists.get(position);
}
@Override
public void destroyItem(ViewGroup container, int position, Object object) {
container.removeView(viewLists.get(position));
}
@Override
public CharSequence getPageTitle(int position) {
return titleLists.get(position);
}
}
最后是Activity部分,两个都是一样的:
TwoActivity.java:
* Created by Jay on 2015/10/8 0008.
*/
public class TwoActivity extends AppCompatActivity {
private ViewPager vpager_two;
private ArrayList<View> aList;
private ArrayList<String> sList;
private MyPagerAdapter2 mAdapter;
@Override
public void onCreate(Bundle savedInstanceState) {
super.onCreate(savedInstanceState);
setContentView(R.layout.activity_two);
vpager_two = (ViewPager) findViewById(R.id.vpager_two);
aList = new ArrayList<View>();
LayoutInflater li = getLayoutInflater();
aList.add(li.inflate(R.layout.view_one,null,false));
aList.add(li.inflate(R.layout.view_two,null,false));
aList.add(li.inflate(R.layout.view_three, null, false));
sList = new ArrayList<String>();
sList.add("橘黄");
sList.add("淡黄");
sList.add("浅棕");
mAdapter = new MyPagerAdapter2(aList,sList);
vpager_two.setAdapter(mAdapter);
}
}
好了,非常简单,有疑问的话,自己下demo看看就懂了~
使用示例3:ViewPager实现TabHost的效果:
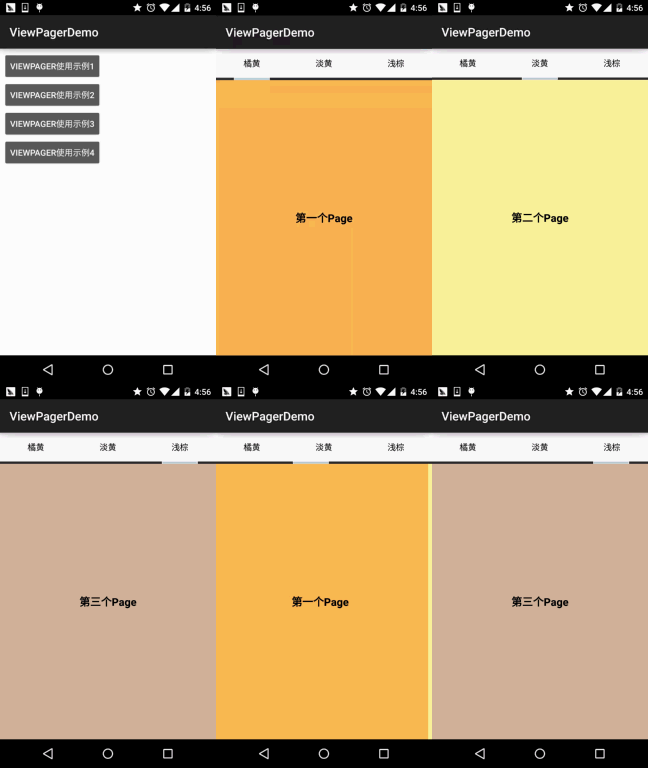
当然,示例2很多时候,只是中看不中用,实际开发中我们可能需要自行定制这个标题栏, 下面我们就来写个简单的例子来实现TabHost的效果,如果你不知道TabHost是什么鬼的 话,那么,请看效果图!
运行效果图:

实现逻辑解析:
下面我们来讲解下实现上述效果的逻辑,然后贴代码:
首先是布局:顶部一个LinearLayout,包着三个TextView,weight属性都为1,然后下面跟着 一个滑块的ImageView,我们设置宽度为match_parent;最底下是我们的ViewPager,这里可能 有两个属性你并不认识,一个是:flipInterval:这个是指定View动画间的时间间隔的!
而persistentDrawingCache:则是设置控件的绘制缓存策略,可选值有四个:可以同时用2个,animation|scrolling这样~
- none:不在内存中保存绘图缓存;
- animation:只保存动画绘图缓存;
- scrolling:只保存滚动效果绘图缓存;
- all:所有的绘图缓存都应该保存在内存中;
布局代码:activity_four.xml:
xmlns:tools="http://schemas.android.com/tools"
android:id="@+id/LinearLayout1"
android:layout_width="match_parent"
android:layout_height="match_parent"
android:orientation="vertical"
tools:context=".MainActivity">
<LinearLayout
android:layout_width="fill_parent"
android:layout_height="48dp"
android:background="../style/images/android-tutorial-viewpager.html">
<TextView
android:id="@+id/tv_one"
android:layout_width="fill_parent"
android:layout_height="fill_parent"
android:layout_weight="1.0"
android:gravity="center"
android:text="橘黄"
android:textColor="#000000" />
<TextView
android:id="@+id/tv_two"
android:layout_width="fill_parent"
android:layout_height="fill_parent"
android:layout_weight="1.0"
android:gravity="center"
android:text="淡黄"
android:textColor="#000000" />
<TextView
android:id="@+id/tv_three"
android:layout_width="fill_parent"
android:layout_height="fill_parent"
android:layout_weight="1.0"
android:gravity="center"
android:text="浅棕"
android:textColor="#000000" />
</LinearLayout>
<ImageView
android:id="@+id/img_cursor"
android:layout_width="fill_parent"
android:layout_height="wrap_content"
android:scaleType="matrix"
android:src="@mipmap/line" />
<android.support.v4.view.ViewPager
android:id="@+id/vpager_four"
android:layout_width="wrap_content"
android:layout_height="0dp"
android:layout_gravity="center"
android:layout_weight="1.0"
android:flipInterval="30"
android:persistentDrawingCache="animation" />
</LinearLayout>
接着到我们的Activity了,我们来捋下思路:
Step 1:我们需要让我们的移动块在第一个文字下居中,那这里就要算一下偏移量: 先获得图片宽度pw,然后获取屏幕宽度sw,计算方法很简单:
offset(偏移量) = ((sw / 3)-pw) / 2 //屏幕宽/3 - 图片宽度,然后再除以2,左右嘛!
然后我么你调用setImageMatrix设置滑块当前的位置:
同时我们也把切换一页和两页,滑块的移动距离也算出来,很简单:
one = offset * 2 + pw;
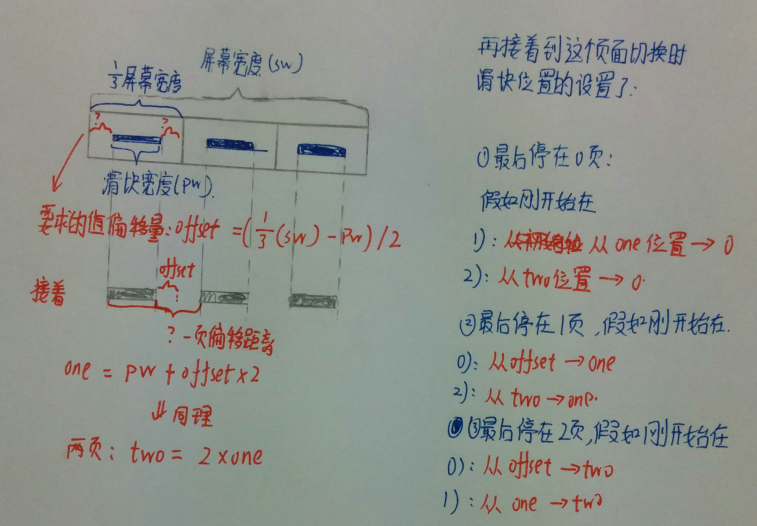
two = one * 2;Step 2:当我们滑动页面时,我们的滑块要进行移动,我们要为ViewPager添加一个 OnPageChangeListener事件,我们需要对滑动后的页面来做一个判断,同时记录滑动前处于 哪个页面,下面自己画了个图,可能更容易理解吧!
PS:太久没写字,字很丑,能看清就好,字丑人美,哈哈~

嗯,如果还是不能理解的话,自己动手画画图就知道了,下面上代码:
FourActvitiy.java:
* Created by Jay on 2015/10/8 0008.
*/
public class FourActivity extends AppCompatActivity implements View.OnClickListener,
ViewPager.OnPageChangeListener {
private ViewPager vpager_four;
private ImageView img_cursor;
private TextView tv_one;
private TextView tv_two;
private TextView tv_three;
private ArrayList<View> listViews;
private int offset = 0;//移动条图片的偏移量
private int currIndex = 0;//当前页面的编号
private int bmpWidth;// 移动条图片的长度
private int one = 0; //移动条滑动一页的距离
private int two = 0; //滑动条移动两页的距离
@Override
public void onCreate(Bundle savedInstanceState) {
super.onCreate(savedInstanceState);
setContentView(R.layout.activity_four);
initViews();
}
private void initViews() {
vpager_four = (ViewPager) findViewById(R.id.vpager_four);
tv_one = (TextView) findViewById(R.id.tv_one);
tv_two = (TextView) findViewById(R.id.tv_two);
tv_three = (TextView) findViewById(R.id.tv_three);
img_cursor = (ImageView) findViewById(R.id.img_cursor);
//下划线动画的相关设置:
bmpWidth = BitmapFactory.decodeResource(getResources(), R.mipmap.line).getWidth();// 获取图片宽度
DisplayMetrics dm = new DisplayMetrics();
getWindowManager().getDefaultDisplay().getMetrics(dm);
int screenW = dm.widthPixels;// 获取分辨率宽度
offset = (screenW / 3 - bmpWidth) / 2;// 计算偏移量
Matrix matrix = new Matrix();
matrix.postTranslate(offset, 0);
img_cursor.setImageMatrix(matrix);// 设置动画初始位置
//移动的距离
one = offset * 2 + bmpWidth;// 移动一页的偏移量,比如1->2,或者2->3
two = one * 2;// 移动两页的偏移量,比如1直接跳3
//往ViewPager填充View,同时设置点击事件与页面切换事件
listViews = new ArrayList<View>();
LayoutInflater mInflater = getLayoutInflater();
listViews.add(mInflater.inflate(R.layout.view_one, null, false));
listViews.add(mInflater.inflate(R.layout.view_two, null, false));
listViews.add(mInflater.inflate(R.layout.view_three, null, false));
vpager_four.setAdapter(new MyPagerAdapter(listViews));
vpager_four.setCurrentItem(0); //设置ViewPager当前页,从0开始算
tv_one.setOnClickListener(this);
tv_two.setOnClickListener(this);
tv_three.setOnClickListener(this);
vpager_four.addOnPageChangeListener(this);
}
@Override
public void onClick(View v) {
switch (v.getId()) {
case R.id.tv_one:
vpager_four.setCurrentItem(0);
break;
case R.id.tv_two:
vpager_four.setCurrentItem(1);
break;
case R.id.tv_three:
vpager_four.setCurrentItem(2);
break;
}
}
@Override
public void onPageSelected(int index) {
Animation animation = null;
switch (index) {
case 0:
if (currIndex == 1) {
animation = new TranslateAnimation(one, 0, 0, 0);
} else if (currIndex == 2) {
animation = new TranslateAnimation(two, 0, 0, 0);
}
break;
case 1:
if (currIndex == 0) {
animation = new TranslateAnimation(offset, one, 0, 0);
} else if (currIndex == 2) {
animation = new TranslateAnimation(two, one, 0, 0);
}
break;
case 2:
if (currIndex == 0) {
animation = new TranslateAnimation(offset, two, 0, 0);
} else if (currIndex == 1) {
animation = new TranslateAnimation(one, two, 0, 0);
}
break;
}
currIndex = index;
animation.setFillAfter(true);// true表示图片停在动画结束位置
animation.setDuration(300); //设置动画时间为300毫秒
img_cursor.startAnimation(animation);//开始动画
}
@Override
public void onPageScrollStateChanged(int i) {
}
@Override
public void onPageScrolled(int i, float v, int i1) {
}
}
嗯,关于动画可能你并不熟悉,没事,下一章我们带大家一起扣~
3.ViewPager结合Fragment示例
嗯,在前面讲解Fragment的时候我们就讲解了一个使用示例:Android基础入门教程——5.2.4 Fragment实例精讲——底部导航栏+ViewPager滑动切换页面这里就不再详述了,有兴趣的点下链接看看即可~
4.代码示例下载
ViewPagerDemo.zip
本节小结:
关于ViewPager,限于篇幅,有些地方并没有讲到,其他的大家需要自己查阅文档了~
另外,上面也说了,ViewPager的动画我们会在下一章讲解!好的,就说这么多~
嗯,国庆前曾说会在国庆假期里完成整个系列,结果一篇都没写,实在抱歉... 因为妹子过来玩了,So,你懂的~
,会加快进度~,争取早日进阶!


